Qt 学习之路 2(84):Repeater
前面的章节我 们介绍过模型视图。这是一种数据和显示相分离的技术,在 Qt 中有着非常重要的地位。在 QtQuick 中,数据和显示的分离同样也是利用这种“模型-视图”技术实现的。对于每一个视图,数据元素的可视化显示交给代理完成。与 Qt/C++ 类似,QtQuick 提供了一系列预定义的模型和视图。本章开始,我们着重介绍这部分内容。这部分内容主要来自http://qmlbook.org/ch06/index.html,在此表示感谢。
由于 QtQuick 中的模型视图的基本概念同前面的章节没有本质的区别,所以这里不再赘述这部分内容。
将数据从表现层分离的最基本方法是使用Repeater元素。Repeater元素可以用于显示一个数组的数据,并且可以很方便地在用户界面进行定位。Repeater的模型范围很广:从一个整型到网络数据,均可作为其数据模型。
Repeater最简单的用法是将一个整数作为其model属性的值。这个整型代表Repeater所使用的模型中的数据个数。例如下面的代码中,model: 10代表Repeater的模型有 10 个数据项。
import QtQuick 2.2
Column {
spacing: 2
Repeater {
model: 10
Rectangle {
width: 100
height: 20
radius: 3
color: "lightBlue"
Text {
anchors.centerIn: parent
text: index
}
}
}
}
| 1 2 3 4 5 6 7 8 9 10 11 12 13 14 15 16 17 18 | import QtQuick 2.2 Column { spacing: 2 Repeater { model: 10 Rectangle { width: 100 height: 20 radius: 3 color: "lightBlue" Text { anchors.centerIn: parent text: index } } } } |
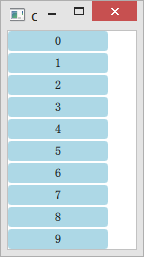
现在我们设置了 10 个数据项,然后定义一个Rectangle进行显示。每一个Rectangle的宽度和高度分别为 100px 和 20px,并且有圆角和浅蓝色背景。Rectangle中有一个Text元素为其子元素,Text文本值为当前项的索引。代码运行结果如下:
 中国学网 www.xue163.com
虽然指定模型项的个数很简单,但实际用处不大。Repeater还支持更复杂的方式,例如,把一个 JavaScript 数组作为模型。JavaScript 数组元素可以是任意类型:字符串、数字或对象。在下面的例子中,我们将一个字符串数组作为Repeater的模型。我们当然可以使用index获得当前索引,同时,我们也可以使用modelData访问到数组中的每一个元素的值:
import QtQuick 2.2
Column {
spacing: 2
Repeater {
model: ["Enterprise", "Colombia", "Challenger", "Discovery", "Endeavour", "Atlantis"]
Rectangle {
width: 100
height: 20
radius: 3
color: "lightBlue"
Text {
anchors.centerIn: parent
text: index +": "+modelData
}
}
}
}
| 1 2 3 4 5 6 7 8 9 10 11 12 13 14 15 16 17 18 | import QtQuick 2.2 Column { spacing: 2 Repeater { model: ["Enterprise", "Colombia", "Challenger", "Discovery", "Endeavour", "Atlantis"] Rectangle { width: 100 height: 20 radius: 3 color: "lightBlue" Text { anchors.centerIn: parent text: index +": "+modelData } } } } |
代码运行结果如下:
 中国学网 www.xue163.com
由于能够使用 JavaScript 数组作为Repeater的模型,而 JavaScript 数组能够以对象作为其元素类型,因而Repeater就可以处理复杂的数据项,比如带有属性的对象。这种情况其实更为常见。相比普通的 JavaScript 对象,更常用的是ListElement类型。类似普通 JavaScript 对象,每一个ListElement可以有任意属性。例如下面的代码示例中,每一个数据项都有一个名字和外观颜色。
import QtQuick 2.2
Column {
spacing: 2
Repeater {
model: ListModel {
ListElement { name: "Mercury"; surfaceColor: "gray" }
ListElement { name: "Venus"; surfaceColor: "yellow" }
ListElement { name: "Earth"; surfaceColor: "blue" }
ListElement { name: "Mars"; surfaceColor: "orange" }
ListElement { name: "Jupiter"; surfaceColor: "orange" }
ListElement { name: "Saturn"; surfaceColor: "yellow" }
ListElement { name: "Uranus"; surfaceColor: "lightBlue" }
ListElement { name: "Neptune"; surfaceColor: "lightBlue" }
}
Rectangle {
width: 100
height: 20
radius: 3
color: "lightBlue"
Text {
anchors.centerIn: parent
text: name
}
Rectangle {
anchors.left: parent.left
anchors.verticalCenter: parent.verticalCenter
anchors.leftMargin: 2
width: 16
height: 16
radius: 8
border.color: "black"
border.width: 1
color: surfaceColor
}
}
}
}
| 1 2 3 4 5 6 7 8 9 10 11 12 13 14 15 16 17 18 19 20 21 22 23 24 25 26 27 28 29 30 31 32 33 34 35 36 37 38 39 40 41 42 | import QtQuick 2.2 Column { spacing: 2 Repeater { model: ListModel { ListElement { name: "Mercury"; surfaceColor: "gray" } ListElement { name: "Venus"; surfaceColor: "yellow" } ListElement { name: "Earth"; surfaceColor: "blue" } ListElement { name: "Mars"; surfaceColor: "orange" } ListElement { name: "Jupiter"; surfaceColor: "orange" } ListElement { name: "Saturn"; surfaceColor: "yellow" } ListElement { name: "Uranus"; surfaceColor: "lightBlue" } ListElement { name: "Neptune"; surfaceColor: "lightBlue" } } Rectangle { width: 100 height: 20 radius: 3 color: "lightBlue" Text { anchors.centerIn: parent text: name } Rectangle { anchors.left: parent.left anchors.verticalCenter: parent.verticalCenter anchors.leftMargin: 2 width: 16 height: 16 radius: 8 border.color: "black" border.width: 1 color: surfaceColor } } } } |
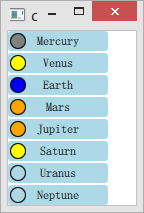
运行结果如下图所示:
 中国学网 www.xue163.com
ListElement的每个属性都被Repeater绑定到实例化的显示项。正如上面代码中显示的那样,这意味着每一个用于显示数据的Rectangle作用域内都可以访问到ListElement的name和surfaceColor属性。
像上面几段代码中,Repeater的每一个数据项都使用一个Rectangle渲染。事实上,这是由于Repeater具有一个delegate的默认属性,由于Rectangle没有显式赋值给任何一个属性,因此它直接成为默认属性delegate的值,所以才会使用Rectangle渲染。理解了这一点,我们就可以写出具有显式赋值的代码:
import QtQuick 2.2
Column {
spacing: 2
Repeater {
model: 10
delegate: Rectangle {
width: 100
height: 20
radius: 3
color: "lightBlue"
Text {
anchors.centerIn: parent
text: index
}
}
}
}
| 1 2 3 4 5 6 7 8 9 10 11 12 13 14 15 16 17 18 | import QtQuick 2.2 Column { spacing: 2 Repeater { model: 10 delegate: Rectangle { width: 100 height: 20 radius: 3 color: "lightBlue" Text { anchors.centerIn: parent text: index } } } } |
实际上,这段代码与前面提到的是等价的。
Qt 学习之路 2(84):Repeater的更多相关文章
- Qt 学习之路 2(51):布尔表达式树模型
Qt 学习之路 2(51):布尔表达式树模型 豆子 2013年5月15日 Qt 学习之路 2 17条评论 本章将会是自定义模型的最后一部分.原本打算结束这部分内容,不过实在不忍心放弃这个示例.来自于 ...
- 《Qt 学习之路 2》目录
<Qt 学习之路 2>目录 <Qt 学习之路 2>目录 豆子 2012年8月23日 Qt 学习之路 2 177条评论 <Qt 学习之路 2>目录 序 Qt ...
- QT学习之路--创建一个对话框
Q_OBJECT:这是一个宏,凡是定义信号槽的类都必须声明这个宏. 函数tr()全名是QObject::tr(),被他处理过的字符串可以使用工具提取出来翻译成其他语言,也就是做国际化使用. 对于QT学 ...
- 转载: Qt 学习之路 2归档
Qt 学习之路 2归档 http://www.devbean.net/2012/08/qt-study-road-2-catelog/
- Qt学习之路
Qt学习之路_14(简易音乐播放器) Qt学习之路_13(简易俄罗斯方块) Qt学习之路_12(简易数据管理系统) Qt学习之路_11(简易多文档编辑器) Qt学习之路_10(Qt ...
- Qt 学习之路 2
Qt 学习之路 2 | DevBean Tech World Qt 学习之路 2 Qt 学习之路 2 目录
- Qt 学习之路 2(76):QML 和 QtQuick 2
Home / Qt 学习之路 2 / Qt 学习之路 2(76):QML 和 QtQuick 2 Qt 学习之路 2(76):QML 和 QtQuick 2 豆子 2013年12月18日 Qt ...
- Qt 学习之路 2(74):线程和 QObject
Home / Qt 学习之路 2 / Qt 学习之路 2(74):线程和 QObject Qt 学习之路 2(74):线程和 QObject 豆子 2013年12月3日 Qt 学习之路 2 2 ...
- Qt 学习之路 2(73):Qt 线程相关类
Home / Qt 学习之路 2 / Qt 学习之路 2(73):Qt 线程相关类 Qt 学习之路 2(73):Qt 线程相关类 豆子 2013年11月26日 Qt 学习之路 2 7条评论 希 ...
- Qt 学习之路 2(72):线程和事件循环
Qt 学习之路 2(72):线程和事件循环 <理解不清晰,不透彻> -- 有需求的话还需要进行专题学习 豆子 2013年11月24日 Qt 学习之路 2 34条评论 前面一章我 ...
随机推荐
- j2ee tomcat 部署学习
J2EE基础实例demo http://www.cnblogs.com/javabin/p/3809954.html J2EE 数据库JDBC(Java Data Base Connectivity, ...
- Django 1.8 - “No migrations to apply” when run migrate after makemigrations 解决办法
解决办法 1 删除应用migrations目录 2 删除MySQL中django_migrations中对应的行(delete from django_migrations where app='ap ...
- Bounce 弹飞绵羊
Bounce 弹飞绵羊 题目链接:http://www.lydsy.com/JudgeOnline/problem.php?id=2002 分块 将整个大区间分成若干块,每个点维护到下一个块需要跳的次 ...
- Apache Kafka开发入门指南(2)
Apache Kafka目标是统一离线和在线处理,与Flume和Scribe相比较,Kafka在处理活动流数据方面更具优势.但是从架构的视野来看,Kafka与传统的消息系统(例如ActiveMQ或Ra ...
- flask部署 supervisor的使用
安装supervisor sudo apt-get install supervsor 配置 打开 /etc/supervisor/supervisor.conf 可以看到 同目录文件夹下的 co ...
- Infix to postfix 用stack模板,表达式没有括号
#include<stack> #include<iostream> #include<string> using namespace std; //优先级判断 c ...
- Excel教程(14) - 文本和数据函数
ASC 用途:将字符串中的全角(双字节)英文字母更改为半角 (单字节)字符. 语法:ASC(text) 参数:Text 为文本或包含文本的单元格引用.如果文本 中不包含任何全角英文字母,则文本不会 ...
- 找斐波那契数列中的第N个数——递归与函数自调用算法
题目描述 Description 用递归的方法求斐波那契数列中的第N个数 输入输出格式 Input/output 输入格式:一行,一个正整数n输出格式: 一行,一个数,表示斐波那契数列中的第N个数 ...
- 通过Maven配置测试环境和开发环境连接不同的数据库
通过Maven配置测试环境和开发环境连接不同的数据库 作者及来源: 通灵宝玉 - 博客园 收藏到→_→: 此文来自: 马开东博客 网址:http://www.makaidong.com ...
- 移动端touch事件影响click事件的相关解决方法
preventDefault()的方法,阻止事件的默认行为. 在移动端,手指点击一个元素,会经过:touchstart --> touchmove -> touchend -->cl ...