三天学会HTML5——SVG和Canvas的使用
在第一天学习了HTML5的一些非常重要的基本知识,今天将进行更深层学习
首先来回顾第一天学习的内容,第一天学习了新标签,新控件,验证功能,应用缓存等内容。
第2天将学习如何使用Canvas 和使用SVG 实现功能
Lab1—— 使用Canvas
Canvas 是指定了长度和宽度的矩形画布,我们将使用新的HTML5 JavaScript,可使用HTML5 JS API 来画出各种图形。
初始化
1. 创建HTML页面
<html>

<head></head>

<body></body>

</html>
2. 在Body标签内添加Canvas
<canvas id="MyCanvas" width="500px" height="500px" style="border:1px solid black;">

</canvas>
3. 在<head>标签内添加Script 标签
<head>

<script type="text/javascript">

</script>

</head>
4. 在Script 标签内创建JavaScript 函数 Draw ,Draw函数能够访问Canvas 对象
function Draw()

{

        var ctx = document.getElementById('MyCanvas').getContext("2d");

        //Canvas Code Comes Here

}
Lab 1.1 使用 Path
Path 由0个或多个Sub Path组成,每个Sub path 是是由一个或多个终点组成,每个终点是通过直线或曲线连接的。
Lab1.1.1 使用Single 创建Path;
脚本片段:
ctx.beginPath();

ctx.strokeStyle = "blue";

ctx.moveTo(75, 50);

ctx.lineTo(75, 100);

ctx.stroke();

ctx.strokeStyle = "red";

ctx.lineTo(25, 100);

ctx.stroke();
输出:
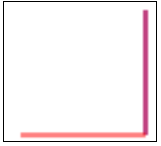
上述示例中Path 是由2个子路径组成的。
BeginPath—— 创建新路径
strokeStyle 用于设置样式
每次调用Stroke 方法,所有的子路径都会使用当前的Style 重新画。
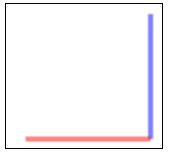
Lab 1.1.2 使用Multiple Begin Path创建Path
核心代码:
ctx.beginPath();

ctx.strokeStyle = "blue";

ctx.moveTo(75, 50);

ctx.lineTo(75, 100);

ctx.stroke();

ctx.beginPath();

ctx.moveTo(75, 100);

ctx.strokeStyle = "red";

ctx.lineTo(25, 100);

ctx.stroke();
输出:
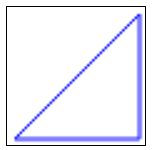
Lab1.1.3 理解ClosePath
核心代码:
ctx.beginPath();

ctx.strokeStyle = "blue";

ctx.moveTo(75, 50);

ctx.lineTo(75, 100);

ctx.lineTo(25, 100);

ctx.closePath();

ctx.stroke();
输出:
Lab1.1.4 理解Fill
核心代码
ctx.beginPath();

ctx.moveTo(75, 50);

ctx.lineTo(75, 100);

ctx.lineTo(25, 100);

ctx.fillStyle = "red";

ctx.fill();
输出:

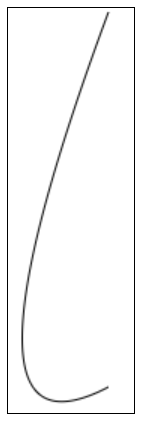
Lab1.1.5 画曲线
quadraticCurveTo 函数定义了四个参数,前两个点是控制点,用于曲率计算,后两个参数是终点的曲度核心代码:
ctx.beginPath();

ctx.moveTo(175, 50)

ctx.quadraticCurveTo(60, 360, 175, 300);

ctx.stroke()
输出:
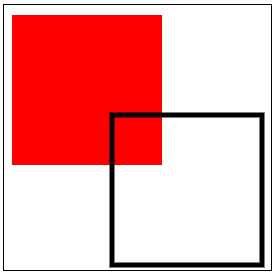
Lab 1.2 使用Rectangle
Lab1.2.1 画矩形
ctx.fillStyle="red";

ctx.fillRect(75, 75, 150, 150);

ctx.strokeStyle = "black";

ctx.lineWidth = 5;

ctx.strokeRect(175,175,150,150);
输出:
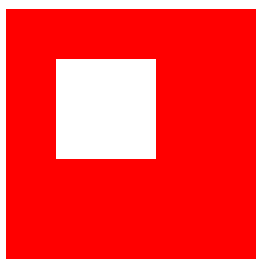
Lab1.2.2 清除矩形
代码:
ctx.fillStyle="red";

ctx.fillRect(75, 75, 250, 250);

ctx.clearRect(125, 125, 100, 100);
输出
Lab 1.3 使用渐变色
Lab1.3.1 使用线性渐变色
var grd = ctx.createLinearGradient(75, 75, 225, 75);

grd.addColorStop(0, "black");

grd.addColorStop(0.2, "magenta");

grd.addColorStop(0.4, "blue");

grd.addColorStop(0.6, "green");

grd.addColorStop(0.8, "yellow");

grd.addColorStop(1, "red");

ctx.fillStyle = grd

ctx.fillRect(75, 75, 150, 150);
输出
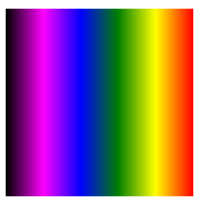
注意:
reateLinearGradient 包含四个参数x1,y1,x2,y2
1. 如果x1=x2 并且y1!=y2,渐变色改变的方向则是水平。
2. 如果y1=y2 并且x1!=x2, 渐变色方向是垂直的。
3. 如果x1!=x2且y1!=y2,渐变色方向则为对角。
AddColorStop 函数包含两个参数。
1. 0到1 之间的数字,用来表示渐变色起始和终点的位置。
2. Color;
Lab1.3.2 使用圆形渐变
代码:
var grd = ctx.createRadialGradient(150, 150, 5, 150, 150,85);

grd.addColorStop(0, "orange");

grd.addColorStop(0.2, "magenta");

grd.addColorStop(0.4, "blue");

grd.addColorStop(0.6, "green");

grd.addColorStop(0.8, "yellow");

grd.addColorStop(1, "red");

ctx.fillStyle = grd

ctx.fillRect(75, 75, 150, 150);
输出
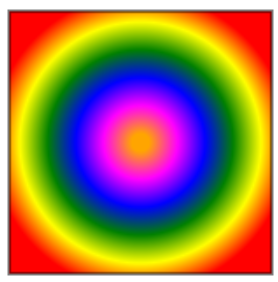
CreateRadialGradiant包含6个参数,x1,y1,r1,x2,y2,r2
1, x1,y1,r1代表开始圆形的圆心和半径
2. x2,y2,r2 表示结束圆的圆心和半径
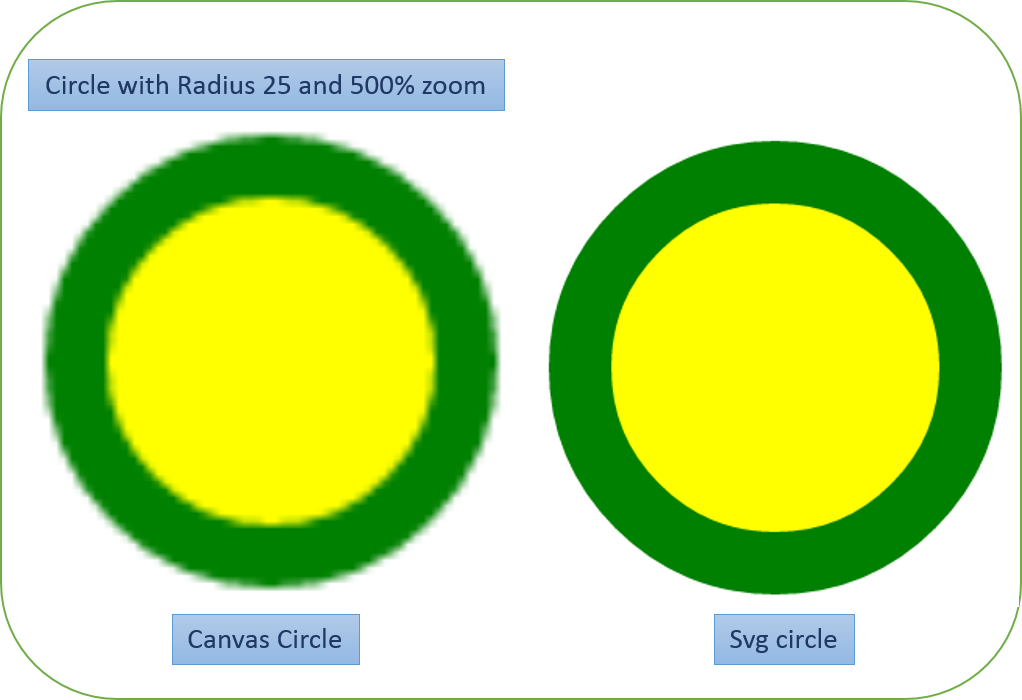
Lab 1.4 使用圆形
核心代码:
ctx.beginPath();

ctx.fillStyle="yellow";

ctx.strokeStyle="green";

ctx.lineWidth = "8";

ctx.arc(100, 175, 85, 0, 2*Math.PI);

ctx.fill();

ctx.stroke();

ctx.beginPath();

ctx.fillStyle = "green";

ctx.strokeStyle = "yellow";

ctx.lineWidth = "8";

ctx.arc(285, 175, 85, 0, 1 * Math.PI);

ctx.fill();

ctx.stroke();
输出:
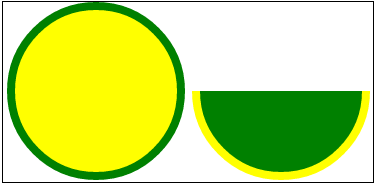
DrawArc 函数包含5个参数,x,y,r,sa,ea
x 和y 表示圆心
r表示半径
sa 和ea 是开始边缘和结束边缘
Lab1.5 使用Text
代码:
ctx.beginPath();

ctx.font = "30px Segoe UI";

ctx.fillText("www.StepByStepSchools.Net",0, 150);
输出:

fillText/stokeText具有三个参数
1. 实际输出的文本
2. x,y 是可选值。
Lab 1.6 Scale
ctx.strokeRect(75, 75, 75, 75);

ctx.scale(2,2);

ctx.strokeRect(75, 75, 75, 75);
输出:
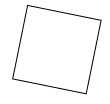
Lab 1.7 旋转
代码片段:
ctx.rotate(0.2);

ctx.strokeRect(75, 75, 75, 75);
输出:
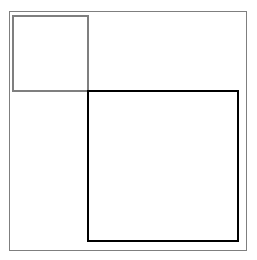
Lab 1.8 转换
代码:
ctx.strokeRect(0, 0, 150, 150);

ctx.translate(150, 150);

ctx.strokeRect(0, 0, 150, 150);
输出:

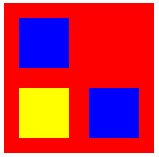
Lab 1.9 保存和重置Canvas 的状态
ctx.fillStyle="red";

ctx.fillRect(75, 75, 150, 150);

ctx.fillStyle = "blue";

ctx.fillRect(90, 90, 50, 50);

ctx.save();

ctx.fillStyle = "yellow";

ctx.fillRect(90, 160, 50, 50);

ctx.save();

ctx.fillStyle = "green";

ctx.restore();

ctx.restore();

ctx.fillRect(160, 160, 50, 50);
输出
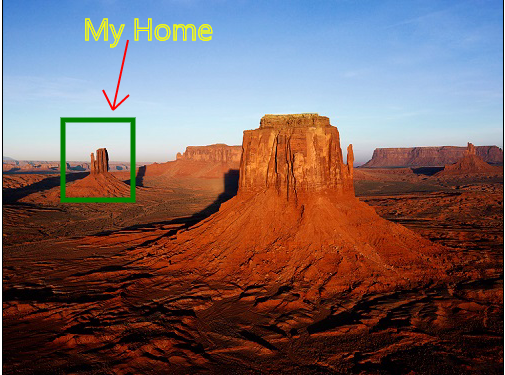
Lab 1.10 使用图像
vari = new Image();

i.src = "Desert.jpg";

i.onload = function () {

    //Draw Squqre

ctx.strokeStyle = "green";

ctx.lineWidth = 5;

ctx.drawImage(i, 0, 0);

ctx.strokeRect(60, 120, 70, 80);

    //draw Text

ctx.strokeStyle = "yellow";

ctx.font = "30px Segoe UI";

ctx.lineWidth = 1;

ctx.strokeText("My Home", 80, 40);

    //Draw Arrow

ctx.beginPath();

ctx.strokeStyle = "red";

ctx.lineWidth = 2;

ctx.moveTo(110, 110);

ctx.lineTo(125, 40);

ctx.moveTo(110, 110);

ctx.lineTo(100, 90);

ctx.moveTo(110, 110);

ctx.lineTo(126, 95);

ctx.stroke();

};
输出:
Lab1.11 使用Canvas 生成动画
一旦在Canvas 填充好东西就无法修改,可采用以下方法来修改:
1. 使用ClearRect 函数删除存在的元素
2. 添加新属性重画元素
当以上策略与传统的JS 函数结合,可使用TimeOut 或SetInterval 方法来实现,可产生动画。
代码:
var interval;

var x = 0, y = 0;

functiondrawInAnimation()

{

varctx = document.getElementById('MyCanvas').getContext("2d");

ctx.beginPath();

ctx.moveTo(x, y);

ctx.clearRect(x , y, 50, 50);

if (x >document.getElementById('MyCanvas').width) {

        x = 0;

        y += 50;

if (y + 50 >document.getElementById('MyCanvas').height)

        {

            x = 0; y = 0;

        }

    }

else {

        x += 15;

    }

ctx.fillStyle = getRndColor();

ctx.fillRect(x, y,50,50);

}

functiongetRndColor() {

var r = 255 * Math.random() | 0,

        g = 255 * Math.random() | 0,

        b = 255 * Math.random() | 0;

    return 'rgb(' + r + ',' + g + ',' + b + ')';

}

interval = setInterval("drawInAnimation()", 15);
输出:
Lab 2 使用SVG 工作
如Canvas,SVG 支持在矩形中画图像,接下来将了解到Canvas 与SVG 的区别。
初始化
1. 新建HTML页面
<html>

<head></head>

<body></body>

</html>
2. 在body 标签内新建Canvas :
<SVG id="MySVG" width="500px" height="500px" style="border:1px solid black;">

</SVG >
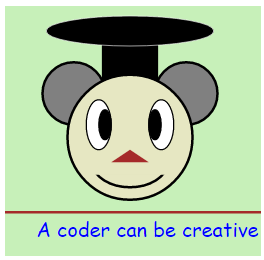
Lab2.1 画出多种形状
代码:
<svg width="205" height="200">

    <!--surrounding border-->

    <rect x="0" y="0" width="205" height="200" style="fill: rgb(199, 240, 185);"> </rect>

    <!--surrounding border-->

    <!--Hat Start-->

    <rect x="78" y="10" width="44" height="70" style="fill: black; stroke: black; "></rect>

    <ellipse cx="100" cy="20" rx="67" ry="12" stroke="white"

                stroke-width="0.5" fill="black"></ellipse>

    <!--Hat End-->

    <!--Left ear-->

    <ellipse cx="55" cy="70" rx="25" ry="25" stroke="black" stroke-width="2" fill="gray"></ellipse>

    <!--Right ear-->

    <ellipse cx="145" cy="70" rx="25" ry="25" stroke="black" stroke-width="2" fill="gray"></ellipse>

    <!--Face-->

    <circle cx="100" cy="105" r="50" stroke="black" stroke-width="2" fill="rgb(230, 231, 194)" />

    <!--Left Eye-->

    <ellipse cx="75" cy="95" rx="10" ry="20"

                style="fill:white;stroke:black;stroke-width:1" />

    <!--Left Eye ball-->

    <ellipse cx="80" cy="95" rx="5" ry="12"

                style="fill:black;stroke:black;stroke-width:1" />

    <!--Right Eye-->

    <ellipse cx="125" cy="95" rx="10" ry="20"

                style="fill:white;stroke:black;stroke-width:1" />

    <!--Right Eye ball-->

    <ellipse cx="120" cy="95" rx="5" ry="12"

                style="fill:black;stroke:black;stroke-width:1" />

    <!--Mouth start-->

    <clipPath id="cut-off-bottom">

        <rect x="70" y="135" width="60" height="30" />

    </clipPath>

    <ellipse cx="100" cy="125" rx="30" ry="20" clip-path="url(#cut-off-bottom)"

                style="fill:rgb(230, 231, 194);stroke:black;stroke-width:2" />

    <!--Mouth End-->

    <!--Nose-->

    <polygon points="100,115 85,125 115,125"

                style="fill: brown;

            stroke-width: 1" />

    <!--Divider-->

    <line x1="0" y1="165" x2="205" y2="165" style="stroke:brown;

stroke-width:2" />

    <text x="25" y="185" font-family="Comic Sans MS'" fill="Blue" >A coder can be creative</text>

</svg>
输出:
Lab 2.2SVG 动画
SVG 使得动画制作变得简单:
初始化设置:
<svg width="205" height="220">

        <rect x="0" y="0" width="205" height="220" style="fill: rgb(199, 240, 185);">

        </rect>

....

</svg>
眨眼动画:
<!--Left Eye-->

        <ellipse cx="75" cy="95" rx="15" ry="15"

                    style="fill:white;stroke:black;stroke-width:1" />

        <!--Left Eye ball-->

        <ellipse cx="75" cy="95" rx="5" ry="5"

                    style="fill:black;stroke:black;stroke-width:1">

            <animate attributeName="cx" attributeType="XML"

                        from="75" to="85" id="Left1" repeatCount="1"

                        begin="0s;Left5.end" dur="0.5s" />

            <set attributeName="cx" attributeType="XML"

                    to="85"

                    begin="Left1.end" />

            <animateTransform attributeName="transform"

                                type="rotate" id="Left2"

                                from="0 75 95" to="360 75 95"

                                begin="Left1.end" dur="1s"

                                repeatCount="3">

            </animateTransform>

            <animate attributeName="cx" attributeType="XML"

                        from="85" to="65" id="Left3"

                        begin="Left2.end" dur="0.5s" />

            <set attributeName="cx" attributeType="XML"

                    to="65"

                    begin="Left3.end" />

            <animateTransform attributeName="transform"

                                type="rotate" id="Left4"

                                from="360 75 95" to="0 75 95"

                                begin="Left3.end" dur="1s"

                                repeatCount="3">

            </animateTransform>

            <animate attributeName="cx" attributeType="XML"

                        from="65" to="75" id="Left5"

                        begin="Left4.end" dur="0.5s" />

            <set attributeName="cx" attributeType="XML"

                    to="75"

                    begin="Left4.end" >

            </set>

        </ellipse>
<!--Right Eye-->

        <ellipse cx="125" cy="95" rx="15" ry="15"

                    style="fill:white;stroke:black;stroke-width:1" />

        <!--Right Eye ball-->

        <ellipse cx="125" cy="95" rx="5" ry="5" style="fill:black;stroke:black;stroke-width:1">

            <animate attributeName="cx" attributeType="XML"

                        from="125" to="135" id="Right1" repeatCount="1"

                        begin="0s;Right5.end" dur="0.5s" />

            <set attributeName="cx" attributeType="XML" to="135" begin="Right1.end" />

            <animateTransform attributeName="transform"

                                type="rotate" id="Right2"

                                from="0 125 95" to="360 125 95"

                                begin="Right1.end" dur="1s"

                                repeatCount="3">

            </animateTransform>

            <animate attributeName="cx" attributeType="XML"

                        from="135" to="115" id="Right3"

                        begin="Right2.end" dur="0.5s" />

            <set attributeName="cx" attributeType="XML"

                    to="115"

                    begin="Right3.end" />

            <animateTransform attributeName="transform"

                                type="rotate" id="Right4"

                                from="360 125 95" to="0 125 95"

                                begin="Right3.end" dur="1s"

                                repeatCount="3">

            </animateTransform>

            <animate attributeName="cx" attributeType="XML"

                        from="115" to="125" id="Right5"

                        begin="Right4.end" dur="0.5s" />

            <set attributeName="cx" attributeType="XML" to="125" begin="Right4.end" />

        </ellipse>
张嘴动画:
<clipPath id="cut-off-bottom">

    <rect x="70" y="135" width="60" height="11">

        <animate attributeName="y" attributeType="XML"

                    from="135" to="125" id="MouthClipAnimation1"

                    begin="0;MouthClipAnimation3.end+3" dur="1s" />

        <animate attributeName="height" attributeType="XML"

                    from="11" to="22" id="MouthClipAnimation2"

                    begin="0;MouthClipAnimation4.end+3" dur="1s" />

        <set attributeName="y" attributeType="XML"

                to="125"

                begin="MouthClipAnimation1.end-0.1" />

        <set attributeName="height" attributeType="XML"

                to="22"

                begin="MouthClipAnimation2.end-0.1" />

        <animate attributeName="y" attributeType="XML"

                    from="125" to="135" id="MouthClipAnimation3"

                    begin="MouthClipAnimation1.end+3" dur="1s" />

        <animate attributeName="height" attributeType="XML"

                    from="22" to="11" id="MouthClipAnimation4"

                    begin="MouthClipAnimation2.end+3" dur="1s" />

        <set attributeName="y" attributeType="XML"

                to="135"

                begin="MouthClipAnimation3.end-0.1" />

        <set attributeName="height" attributeType="XML"

                to="11"

                begin="MouthClipAnimation4.end-0.1" />

    </rect>

</clipPath>

<ellipse cx="100" cy="125" rx="30" ry="20" clip-path="url(#cut-off-bottom)"

            style="fill:rgb(230, 231, 194);stroke:black;stroke-width:2">

    <animate attributeName="cy" attributeType="XML"

                from="125" to="135" id="MouthEllipseAnimation1"

                begin="0;MouthEllipseAnimation4.end+3" dur="1s" />

    <animate attributeName="rx" attributeType="XML"

                from="30" to="8" id="MouthEllipseAnimation2"

                begin="0;MouthEllipseAnimation5.end+3" dur="1s" />

    <animate attributeName="ry" attributeType="XML"

                from="20" to="8" id="MouthEllipseAnimation3"

                begin="0;MouthEllipseAnimation6.end+3" dur="1s" />

    <set attributeName="cy" attributeType="XML"

            to="135"

            begin="MouthEllipseAnimation1.end-0.1" />

    <set attributeName="rx" attributeType="XML"

            to="8"

            begin="MouthEllipseAnimation2.end-0.1" />

    <set attributeName="ry" attributeType="XML"

            to="8"

            begin="MouthEllipseAnimation3.end-0.1" />

    <animate attributeName="cy" attributeType="XML"

                from="135" to="125" id="MouthEllipseAnimation4"

                begin="MouthEllipseAnimation1.end+3" dur="1s" />

    <animate attributeName="rx" attributeType="XML"

                from="8" to="30" id="MouthEllipseAnimation5"

                begin="MouthEllipseAnimation2.end+3" dur="1s" />

    <animate attributeName="ry" attributeType="XML"

                from="8" to="20" id="MouthEllipseAnimation6"

                begin="MouthEllipseAnimation3.end+3" dur="1s" />

    <set attributeName="cy" attributeType="XML"

            to="125"

            begin="MouthEllipseAnimation4.end-0.1" />

    <set attributeName="rx" attributeType="XML"

            to="30"

            begin="MouthEllipseAnimation5.end-0.1" />

    <set attributeName="ry" attributeType="XML"

            to="20"

            begin="MouthEllipseAnimation6.end-0.1" />

</ellipse>
盒子动画效果:
<!--Box Anmation-->

        <rect x="0" y="165" width="14" height="14"

              stroke-width="2" fill="brown">

            <animate attributeName="width" attributeType="XML"

                     from="0" to="210" id="leftToRight"

                     begin="0;bottomToTop.end" dur="1s" />

            <set attributeName="width" attributeType="XML"

                 to="14"

                 begin="leftToRight.end-0.2" />

            <set attributeName="x" attributeType="XML"

                 to="191"

                 begin="leftToRight.end-0.2" />

            <animate attributeName="height" attributeType="XML"

                     from="14" to="55" id="topToBottom"

                     begin="leftToRight.end" dur="1s" />

            <set attributeName="height" attributeType="XML"

                 to="14"

                 begin="topToBottom.end-0.2" />

            <set attributeName="y" attributeType="XML"

                 to="206"

                 begin="topToBottom.end-0.2" />

            <animate attributeName="width" attributeType="XML"

                     from="0" to="210" id="rightToLeft"

                     begin="topToBottom.end" dur="1s" />

            <animate attributeName="x" attributeType="XML"

                     from="206" to="0" id="rightToLeft"

                     begin="topToBottom.end" dur="1s" />

            <set attributeName="width" attributeType="XML"

                 to="14"

                 begin="rightToLeft.end-0.2" />

            <set attributeName="x" attributeType="XML"

                 to="0"

                 begin="rightToLeft.end-0.2" />

            <animate attributeName="height" attributeType="XML"

                     from="14" to="55" id="bottomToTop"

                     begin="rightToLeft.end" dur="1s" />

            <animate attributeName="y" attributeType="XML"

                     from="206" to="165" id="bottomToTop"

                     begin="rightToLeft.end" dur="1s" />

            <set attributeName="height" attributeType="XML"

                 to="14"

                 begin="bottomToTop.end-0.2" />

            <set attributeName="y" attributeType="XML"

                 to="165"

                 begin="bottomToTop.end-0.2" />

        </rect>

        <line x1="0" y1="165" x2="205" y2="165" style="stroke:brown;

stroke-width:2" />

        <text x="14" y="200" font-family="Comic Sans MS'" fill="Blue">A coder can be creative</text>
输出

SVG VS Canvas
SVG 和Canvas 区别:
- Vector VS Pixel
Canvas 是基于Pixel 而SVG 是基于Vector
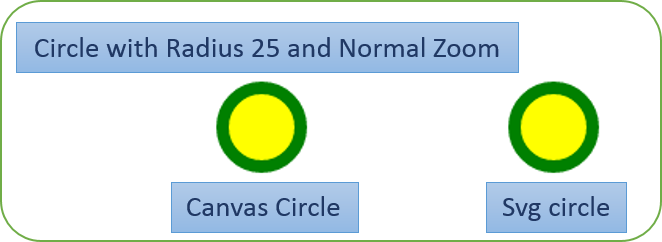
简单来说SVG图片是与屏幕分辨率无关的,而Canvas 不是。
- XML VS JavaScript
SVG使用语义标记可绘出图形,然而Canvas就只能使用JS脚本代码。
- 支持事件处理
Canvas 不支持事件处理,SVG 支持。
HTML
  <svg width="120" height="120">

        <circle cx="60" cy="60" r="25" stroke="green"  id="MyCircle"

            stroke-width="8" fill="yellow" onmouseover="IncreaseSize();" onmouseout="DecreaseSize();" />

    </svg>

<input type="button" value="+" onclick="ChangeSize();">
JavaScript
<script type="text/javascript">

    function IncreaseSize ()

    {

                    document.getElementById("MyCircle").r.baseVal.value=50;

    }

    function DecreaseSize()

    {

        document.getElementById("MyCircle").r.baseVal.value = 25;

    }

</script>
输出
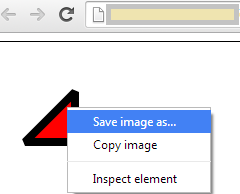
支持图片保存
Canvas 最后可输出为图像,可使用浏览器默认的选项将图像保存。而SVG 不支持。
下一章将要学习什么?
三天学会HTML5——SVG和Canvas的使用的更多相关文章
- 三天学会HTML5 ——多媒体元素的使用
目录 1. HTML5 Media-Video 2. HTML5 Media-Audio 3. 拖拽操作 4. 获取位置信息 5. 使用Google 地图获取位置信息 多媒体是互联网中的最重要的一部分 ...
- 三天学会HTML5 之第一天
引言 HTML5 一直是非常热门的话题,因此此系列文章主要从一些基本功能开始讲起,逐步深入了解HTML5的新概念. 首先了解一些基本的术语和概念. SGML, HTML,XML三者之间的区别 Doc类 ...
- HTML5(三)SVG vs. Canvas
HTML5 内联 SVG 什么是SVG? SVG 指可伸缩矢量图形 (Scalable Vector Graphics) SVG 用于定义用于网络的基于矢量的图形 SVG 使用 XML 格式定义图形 ...
- 9款基于HTML5/SVG/Canvas的折线图表应用
1.华丽的HTML5图表 可展示实时数据 HTML5在图表应用中也十分广泛,比起以前的网页图表,HTML5图表制作更便捷,功能更强大.这款HTML5图表插件外观十分华丽和专业,在数据展示方面也很有优势 ...
- HTML5学习(六)---------SVG 与Canvas
参考教程:http://www.w3school.com.cn/html5/html_5_canvas_vs_svg.asp Canvas 和 SVG 都允许您在浏览器中创建图形,但是它们在根本上是不 ...
- html5 中的SVG 和canvas
想到昨天看资料的时候,发现html5 中的SVG 和canvas 都可以表示图形,那它们到底有哪些区别呢?该如何正确的使用它们呢? 1.SVG:可缩放矢量图形,(Scalable Vector Gra ...
- HTML5 Canvas、内联 SVG、Canvas vs. SVG
canvas 元素用于在网页上绘制图形. 什么是 Canvas? HTML5 的 canvas 元素使用 JavaScript 在网页上绘制图像. 画布是一个矩形区域,您可以控制其每一像素. canv ...
- 基于html5的动画库,非svg和canvas
基于html5的动画库,非svg和canvas https://greensock.com/docs/#/HTML5/GSAP/TweenLite/
- HTML5学习总结——canvas绘制象棋(canvas绘图)
一.HTML5学习总结——canvas绘制象棋 1.第一次:canvas绘制象棋(笨方法)示例代码: <!DOCTYPE html> <html> <head> & ...
随机推荐
- freeCodeCamp:Caesars Cipher
让上帝的归上帝,凯撒的归凯撒. 下面我们来介绍风靡全球的凯撒密码Caesar cipher,又叫移位密码. 移位密码也就是密码中的字母会按照指定的数量来做移位. 一个常见的案例就是ROT13密码,字母 ...
- Maven入门示例(3):自动部署至外部Tomcat
Maven入门示例(3):自动部署至外部Tomcat 博客分类: maven 2012原创 Maven入门示例(3):自动部署至外部Tomcat 上一篇,介绍了如何创建Maven项目以及如何在内 ...
- yii使用createCommand()增删改查
查询单条数据$sql = "SELECT `name` FROM `table` WHERE id='7'";$users=Yii::$app->db->createC ...
- nodejs中标准包的制作,上传,安装及卸载方法
一:如何制作一个标准包? 为了规范化,基本遵循CommonJS规范,首先约定: 包的使用: 所有模块放在一个文件夹(包名) 包放在当前项目中的node_modules文件夹下 包中定义一个index. ...
- 亲测——pycharm下运行第一个scrapy项目 ©seven_clear
最近在学习scrapy,就想着用pycharm调试,但不知道怎么弄,从网上搜了很多方法,这里总结一个我试成功了的. 首先当然是安装scrapy,安装教程什么的网上一大堆,这里推荐一个详细的:http: ...
- 猿团YTFCloud生态系统,全面服务创业者
9月15日,YTFCloud已正式开启了内测. 创业者翘首以待的YTFCloud,虽然让部分创业者感受到了它的神奇,但对于更多暂时无法尝试的创业者来说,它依然有一层神秘的面纱. 今天小编就来带你近距离 ...
- Win7 64位qt-windows-x86-msvc2015-5.6.0 DLL依赖库打包
今天开始系统的学习QT,第一个测试的问题就是在纯净的系统中如何正常运行,也就是找出QT生成的exe的依赖库问题 网上搜了下可以简单粗暴的用 D:\Qt\Qt5.6.0\5.6\msvc2015\bin ...
- 微信小程序的两个BUG?
微信小程序的两个BUG,也许可能是我搞错了 1.wx.uploadFile 用循环上传图片的时候,电脑.苹果手机上都会正常,安卓机上面则会出现the same task is working的问题 2 ...
- C# XMAL与WPF
通过老师上课的解释和我下课后的网上查询,我了解到了一些关于这三者的关系.XAML是.NET体系开发程序或者网页时前台编程的一种布局方式或者说开发语言,可以比较自由的用标签的方式进行布局,借鉴了HTML ...
- Cordova for iOS[ PhoneGap]
安装这个费了点劲,和早前的PhoneGap有些不同. Cordova支持如下移动操作系统:iOS, Android,ubuntu phone os, Blackberry, Windows Phone ...