Topshelf + ServiceModelEx + Nlog 从头构建WCF
前言
Topshelf可以很方便的构建windows service,而且在本地开发时也可以构建Console宿主,因此很方便WCF的开发。
ServiceModelEx则提供了很多便利的方法来配置wcf的behavior。
Nlog是.NET中记录日志类库和log4net提供的功能一样。
构建solution
好了,现在开始从头构建解决方案:
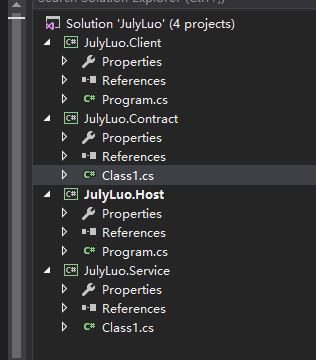
以上的Host和Client为Console,Contract和Service为class librariy。
构建Contract
Contract里面定义的是wcf对外提供之服务,这里将其分为一下三个部分:
- 请求Request
- 回复Response
- 行为Action
其中的Request和Response可以看作为Data Transfer Object也就是我们说的DTO,这里就将其放置与DTO的文件夹下面。
现在构建Request:
[DataContract]

public class JulyLuoRequest

{

    [DataMember]

    public string Greeting { get; set; }

    [DataMember]

    public string Name { get; set; }

}
构建Response:
[DataContract]

public class JulyLuoResponse

{

    [DataMember]

    public string Greeting { get; set; }

    [DataMember]

    public string ClientName { get; set; }

    [DataMember]

    public string ServiceName { get; set; }

}
最后构建我们的接口:
[ServiceContract]

public interface IJulyLuoIntroduce

{
    [OperationContract]

    JulyLuoResponse Introduce(JulyLuoRequest request);

}
整个的Contract工程如下:

构建Service
Service是最终实现接口的地方,因此其需要引用Contract project,这里就简单的实现:
public class JulyLuoIntroduce : IJulyLuoIntroduce

{

    public JulyLuoResponse Introduce(JulyLuoRequest request)

    {

        return new JulyLuoResponse()

        {

            Greeting = request.Greeting,

            ClientName = request.Name,

            ServiceName = "JulyLuo"

        };

    }

}
构建Host
Host需要引用以上的Contract和Service工程。
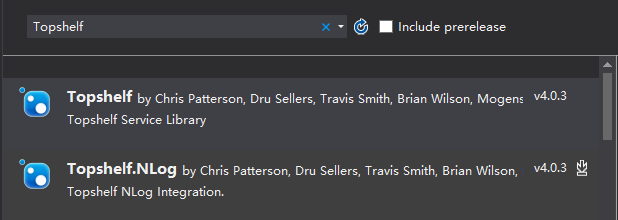
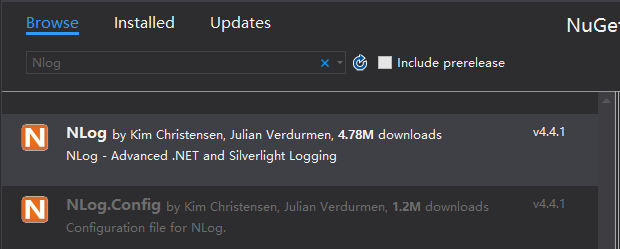
Host这里我们就需要TopShelf和Nlog的第三方类库,可以在NuGet上获取:
最后的引用如下:
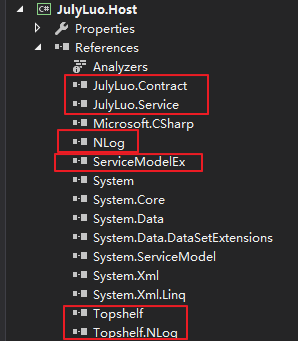
Topshelf的最新版本网上提到不支持.NET 4.0, .NET4.5,因此用Nuget的时候可能不成功,解决办法就是使用低版本的Topshelf,或者从Topshelf官网下载对应的dll直接引用。
ServiceModeEx的类库在Nuget上获取不到,大家可以在网上下载自己再添加引用。
现在构建一个WcfHost类封装wcf提供的服务:
public class WcfHost

{

    private ServiceHost<JulyLuoIntroduce> _service;

    internal WcfHost()

    {

        _service = new ServiceHost<JulyLuoIntroduce>(new Uri[] { });

    }

    public void Start()

    {

        _service.Open();

    }

    public void Stop()

    {

        try

        {

            if (_service != null)

            {

                if (_service.State == CommunicationState.Opened)

                {

                    _service.Close();

                }

            }

        }

        catch (Exception ex)

        {

            Console.WriteLine(ex.Message);

        }

    }

}
最后通过TopShelf 配置Nlog,并宿主刚刚定义的WcfHost:
class Program

{

    private static Logger logger = LogManager.GetLogger("JulyLuo.Host");

    public static readonly LogFactory Instance = new LogFactory(new XmlLoggingConfiguration(GetNLogConfigFilePath()));

    private static string GetNLogConfigFilePath()

    {

        return Path.Combine(AppDomain.CurrentDomain.BaseDirectory, "NLog.config");

    }

    static void Main(string[] args)

    {

        try

        {

            const string name = "JulyLuo-Service";

            const string description = "JulyLuo-Introduce";

            var host = HostFactory.New(configuration =>

            {

                configuration.UseNLog(Instance);

                configuration.Service<WcfHost>(callback =>

                {

                    callback.ConstructUsing(s => new WcfHost());

                    callback.WhenStarted(service => service.Start());

                    callback.WhenStopped(service => service.Stop());

                });

                configuration.SetDisplayName(name);

                configuration.SetServiceName(name);

                configuration.SetDescription(description);

                configuration.RunAsLocalService();

            });

            host.Run();

        }

        catch (Exception ex)

        {

            logger.Error("Pdf Generator Service fatal exception. " + ex.Message);

        }

    }

}
配置Config
现在要配置Nlog的配置文件,以及Host控制台的wcf配置。
Nlog这里需要配置两个target,一个是作为Console时Nlog写入Console,一个是作为windows service是Nlog写入本地的文件
<target xsi:type="Console" layout="${longdate}[${level}]${message}" name="Console"/>

<target name="TopShelfCSV" xsi:type="File" fileName="${basedir}/Logs/TopShelf-${shortdate}.csv"

        archiveFileName="${basedir}/Archive/TopShelf-{#}.csv"

        archiveNumbering="Date"

        archiveEvery="Day"

        maxArchiveFiles="7"

        archiveDateFormat="yyyy-MM-dd" >

  <layout xsi:type="CsvLayout">

    <column name="time" layout="${longdate}" />

    <column name="message" layout="${message} ${exception:format=tostring}" />

    <column name="logger" layout="${logger}"/>

    <column name="level" layout="${level}"/>

  </layout>

</target>
Nlog的rule配置在Console时配置如下:
<logger name="*" minlevel="Debug" writeTo="Console" />
在widows service的配置如下:
<logger name="*" minlevel="Debug" writeTo="TopShelfCSV" />
现在在Host控制台下添加app.config文件,并配置wcf service节点:
<system.serviceModel>

  <services>

    <service name="JulyLuo.Service.JulyLuoIntroduce" behaviorConfiguration="mexServiceBehavior">

      <host>

        <baseAddresses>

          <add baseAddress="net.tcp://localhost:50129/PdfGenerator" />

        </baseAddresses>

      </host>

      <endpoint address="" binding="netTcpBinding" contract="JulyLuo.Contract.IJulyLuoIntroduce" />

      <endpoint address="mex" binding="mexTcpBinding" contract="IMetadataExchange" />

    </service>

  </services>

  <behaviors>

    <serviceBehaviors>

      <behavior name="mexServiceBehavior">

        <serviceMetadata />

      </behavior>

    </serviceBehaviors>

  </behaviors>

</system.serviceModel>
这里的wcf用的是Tcp的绑定,要主要就是service中name和 endpoint中的contract,其对应的就是以上创建的service和contract的名称。
一切设置完毕之后,设置Host为启动项目,现在可以直接运行,因为传入的参数为空,topshelf将设置为Console,界面如下:

构建Client端
这里的Client端只需要应用Contract工程即可,引用添加之后新创建一个类封装调用wcf:
public class WcfProxy<TContract> : IDisposable

    where TContract : class

{

    public TContract Service { get; private set; }

    public WcfProxy()

    {

        try

        {

            var factory = new ChannelFactory<TContract>(typeof(TContract).Name + "_Endpoint");

            factory.Open();

            Service = factory.CreateChannel();

        }

        catch (Exception ex)

        {

            Console.WriteLine("Could not create proxy: {0}", ex.Message);

            Service = null;

        }

    }

    public void Dispose()

    {

        if (Service != null)

        {

            var internalProxy = Service as ICommunicationObject;

            try

            {

                if (internalProxy != null)

                {

                    if (internalProxy.State != CommunicationState.Closed && internalProxy.State != CommunicationState.Faulted)

                        internalProxy.Close();

                }

            }

            catch (Exception ex)

            {

                Console.WriteLine("Could not close proxy: {0}", ex.Message);

                try

                {

                    if (internalProxy != null)

                        internalProxy.Abort();

                }

                catch (Exception exInternal)

                {

                    Console.WriteLine("Could not abort proxy: {0}", exInternal.Message);

                }

            }

            if (internalProxy is IDisposable)

            {

                try

                {

                    if (internalProxy.State != CommunicationState.Faulted)

                        (internalProxy as IDisposable).Dispose();

                }

                catch (Exception ex)

                {

                    Console.WriteLine("Could not dispose proxy: ", ex.Message);

                }

            }

        }

    }

}
因为是调用wcf,这里的Client端也需要添加app.config并设置如下:
<system.serviceModel>

  <client>

    <endpoint address="net.tcp://localhost:50129/Introduce"

        binding="netTcpBinding"

        contract="JulyLuo.Contract.IJulyLuoIntroduce"

        name="IJulyLuoIntroduce_Endpoint">

    </endpoint>

  </client>

</system.serviceModel>
所有的准备完毕之后,我们就可以在Client端开始编写代码调用wcf:
Console.WriteLine("Press enter to send the introduction request");

Console.ReadLine();

using (var proxy = new WcfProxy<IJulyLuoIntroduce>())

{

    Console.ForegroundColor = ConsoleColor.Blue;

    var request = new JulyLuo.Contract.DTO.JulyLuoRequest

    {

        Greeting = "Hello",

        Name = "world"

    };

    Console.WriteLine("Sending: {0}", request);

    Console.ForegroundColor = ConsoleColor.Green;

    var response = proxy.Service.Introduce(request);

    Console.WriteLine("Received: {0} {1} {2}", response.Greeting, response.ClientName, response.ServiceName);

}

Console.ForegroundColor = ConsoleColor.White;

Console.WriteLine("Press enter to exit");

Console.ReadLine();
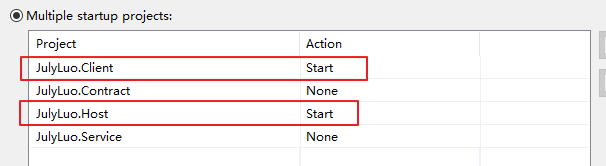
然后设置整个solution将client和host 工程都设置为启动项目:
最后的运行结果如下:

总结
通过以上的步骤,我们成功的整合了几个类库来开发wcf,topshelf还可以宿主为windows service,这样的文章园子里面有很多,这里就不说明了。
Topshelf + ServiceModelEx + Nlog 从头构建WCF的更多相关文章
- WCF:为 SharePoint 2010 Business Connectivity Services 构建 WCF Web 服务(第 1 部分,共 4 部分)
转:http://msdn.microsoft.com/zh-cn/library/gg318615.aspx 摘要:通过此系列文章(共四部分)了解如何在 Microsoft SharePoint F ...
- 从头构建自己的Linux系统
2012-09-10 在博文“Linux系统启动过程分析”中我们了解了linux系统的启动流程,今天我们就来手动一步一步从头来构建一个最小的linux系统,然后用模拟器将其加载起来.常见 ...
- 使用Visual Studio 2013 从头构建Web表单
在这篇文章中,我将采取VS 2013中特定的模板,也就是没有身份验证的Web表单模板,并说明如何构建这个项目从头开始.在本教程的最后,你会最终有一个模板,内容几乎是一样的使用Web表单模板没有认证(文 ...
- 如何一秒钟从头构建一个 ASP.NET Core 中间件
前言 其实地上本没有路,走的人多了,也便成了路. -- 鲁迅 就像上面鲁迅说的那样,其实在我们开发中间件的过程中,微软并没有制定一些策略或者文档来约束你如何编写一个中间件程序, 但是其中却存在者一些最 ...
- 使用Topshelf 5步创建Windows 服务 z
使用Topshelf创建Windows 服务简要的介绍了创建Windows服务的另一种方法,老外的一篇文章Create a .NET Windows Service in 5 steps with T ...
- WCF服务承载(笔记)
自托管(也做自承载) 承载 WCF 服务最灵活.最便捷的方法就是进行自承载.要能够自承载服务,必须满足两个条件.第一,需要 WCF 运行时:第二,需要可以承载 ServiceHost 的托管 .NET ...
- WCF学习资料汇总
微软官方讲解教程: 跟我一起从零开始学WCF系列课程 http://msdnwebcast.net/webcast/1/2692/ 构建WCF面向服务的应用程序系列课程 http://msdnwebc ...
- 三十一、【WCF路由中间件】WCFHosting服务主机的路由器与负载均衡和实现思路
回<[开源]EFW框架系列文章索引> EFW框架源代码下载V1.3:http://pan.baidu.com/s/1c0dADO0 EFW框架实例源代码下载:http://pan.baid ...
- 深入浅出 React Native:使用 JavaScript 构建原生应用
深入浅出 React Native:使用 JavaScript 构建原生应用 链接:https://zhuanlan.zhihu.com/p/19996445 原文:Introducing React ...
随机推荐
- 在Grunt task中集成Protractor
Protractor是专为AngularJS应用程序编写的UI自动化测试框架.前端构建有很多构建工具,比如Grunt.Gulp等.一般我们会把这些构建工具作为集成集成的脚本执行工具.所以如果把Prot ...
- Google 新推出Background sync API
Background sync是Google新推出的Web API,可延迟用户行为,直到用户网络连接稳定.这样有助于保证用户想要发送的数据就是实际发送的数据. 目前存在的问题 网络是消磨用户时间最多的 ...
- 爱上MVC系列~前端验证与后端数据有效性验证
回到目录 有一句话,在10年前就是真理,到现在也一直都是,“前端验证可以没有,但后端验证必须要有”,这句话相信大家都没有意见吧,前端验证一般指通过JS方式实现的,友好的,个性的验证方式,而后端验证是指 ...
- Maven项目环境搭建实例.
前言:最近下班比较早, 总是不愿意让自己闲着, 此时刚好从网上找到了一些项目的资源, 结合自己在公司做的项目, 所以拿来一起学习加复习一些平常用到和没接触过的新知识.做的这个项目的名称叫做babasp ...
- iOS----关于第三方的运用(有待补充)
第三方东西涵盖哪些内容? 1)第三方SDK 2)第三方框架 3)第三方功能代码的封装开源分享 4)第三方工具类等等 PS:1. 对于一个在正在深入学习的程序员而言,有时候参考学习或者使用一下第三方的东 ...
- Asp.Net实现无刷新文件上传并显示进度条(非服务器控件实现)(转)
Asp.Net实现无刷新文件上传并显示进度条(非服务器控件实现) 相信通过Asp.Net的服务器控件上传文件在简单不过了,通过AjaxToolkit控件实现上传进度也不是什么难事,为什么还要自己辛辛苦 ...
- IDE:Eclipse查看接口实现类快捷键
1.打开接口类 2.双击接口名选中 3.Ctrl+T,打开接口实现类
- Python无聊的总结
在公司无聊的时候看了前辈写的python代码,突然发现一个比较好玩的python表达式: lambda x,y:x+y 咋一看,这个应该类似方法之类的,上网查了查,所以特此总结下 lambda:上代码 ...
- 自引用指针this
C++为成员函数提供了一个名字为this的指针,这个指针称为自引用指针,每当创建一个对象时,系统就把this指针初始化为指向该对象,即this指针的值是当前调用成员函数的对象的起始地址.每当调用一个成 ...
- KendoUI系列:PanelBar
<link href="@Url.Content("~/Content/kendo/2014.1.318/kendo.common.min.css")" ...