zabbix系列-Grafana4.6.3+Zabbix 的安装部署
zabbix系列(五) Grafana4.6.3+Zabbix 的安装部署
使用了一段时间Grafana,感觉还挺好用的。部分效果图如下:
zabbix的安装步骤请参考以下地址,就不再描述,本章主要记录Grafana的部署
https://blog.csdn.net/wu2700222/article/details/80520085
grafana官网地址:http://docs.grafana.org/installation/rpm/
从官网下载安装文件到本地,推荐迅雷下载较快http://docs.grafana.org/installation/rpm/版本为grafana-4.6.3-1.x86_64.rpm
也可以选择在线yum安装,但因为在线安装速度较慢不推荐
sudo yum install https://s3-us-west-2.amazonaws.com/grafana-releases/release/grafana-4.6.3-1.x86_64.rpm
下载rpm包到指定目录,通过本地安装:
1、 通过ssh工具上传到centos7服务器/usr/local/src/目录下
2、[root@zabbix ~]# cd /usr/local/src/
[root@zabbix src]# wget https://dl.grafana.com/oss/release/grafana-6.3.4-1.x86_64.rpm
3、 安装最新稳定版
#在CentOS、Redhat/Fedora:手动安装
[root@zabbix src]# sudo yum install initscripts fontconfig urw-fonts
[root@zabbix src]# sudo rpm -Uvh grafana-6.3.4-1.x86_64.rpm
warning: grafana-6.3.4-1.x86_64.rpm: Header V4 RSA/SHA1 Signature, key ID 24098cb6: NOKEY
Preparing... ################################# [100%]
Updating / installing...
1:grafana-6.3.4-1 ################################# [100%]
### NOT starting on installation, please execute the following statements to configure grafana to start automatically using systemd
sudo /bin/systemctl daemon-reload
sudo /bin/systemctl enable grafana-server.service
### You can start grafana-server by executing
sudo /bin/systemctl start grafana-server.service
POSTTRANS: Running script
4、配置grafana源,通过yum仓库安装
先创建文件执行cat /etc/yum.repos.d/grafana.repo
把文件内容复制进去
[grafana]

name=grafana

baseurl=https://packages.grafana.com/oss/rpm

repo_gpgcheck=1

enabled=1

gpgcheck=1

gpgkey=https://packages.grafana.com/gpg.key

sslverify=1

sslcacert=/etc/pki/tls/certs/ca-bundle.crt、
$ sudo yum install grafana安装包详细信息
► 二进制文件/usr/sbin/grafana-server
► 服务管理脚本 /etc/init.d/grafana-server
► 安装默认文件 /etc/sysconfig/grafana-server
► 配置文件 /etc/grafana/grafana.ini
► 安装systemd服务(如果systemd可用 grafana-server.service
► 日志文件 /var/log/grafana/grafana.log
► 缺省配置指定一个数据库sqlite3 /var/lib/grafana/grafana.db
5、启动Grafana
#设置garfana-server开机自启
chkconfig grafana-server on
#启动服务器(通过systemd)
systemctl daemon-reload
systemctl start grafana-server
systemctl status grafana-server
#设置开机自启systemd服务
systemctl enable grafana-server.service
6、环境变量文件
Systemd服务和daemon服务在后台运行时,都使用文件/etc/sysconfig/grafana-server来设置环境变量,可以通过修改garfana-server文件来设置日志目录等其他变量。
#默认日志文件:/var/log/grafana
#数据库设置
#缺省配置指定一sqlite3数据库位于/var/lib/grafana/grafana.db。请在升级前备份这个数据库。还可以使用MySQL或Postgres Grafana数据库。
7、访问测试
#地址栏输入:http://10.0.11.110:3000/?/login
#默认用户和密码:admin admin
当然这里需要选把3000的端口加入防火墙,不然可是会被屏蔽访问的哦
先查看当前开设的端口
[root@localhost soft]# firewall-cmd --list-ports
[root@localhost soft]# firewall-cmd --zone=public --add-port=3000/tcp --permanent
加入成功,再去试试吧!
安装garfana-zabbix插件
官方网站:https://github.com/alexanderzobnin/grafana-zabbix
官网wiki:http://docs.grafana-zabbix.org/installation/
使用grafana-cli工具安装
#获取可用插件列表
grafana-cli plugins list-remote
#安装zabbix插件
grafana-cli plugins install alexanderzobnin-zabbix-app
#安装插件完成之后重启garfana服务
[root@zabbix ~]# service grafana-server restart
#使用grafana-zabbix-app源,其中包含最新版本的插件
cd /var/lib/grafana/plugins/
#克隆grafana-zabbix-app插件项目
git clone https://github.com/alexanderzobnin/grafana-zabbix-app
#注:如果没有git,请先安装git
yum –y install git(该语句建议手打,直接复制执行可能报错)
如果安装时候报Loaded plugins: fastestmirror, langpacks,没关系,多执行几次就好了
# 插件安装完成重启garfana服务
service grafana-server restart
#注:通过这种方式,可以很容易升级插件
cd /var/lib/grafana/plugins/grafana-zabbix-app
git pull
service grafana-server restart
使用源码包安装
#源码安装需要NodeJS,npm和Grunt支持
git clone https://github.com/alexanderzobnin/grafana-zabbix.git
cd grafana-zabbix
npm install
npm install -g grunt-cli
grunt
#插件将建成dist/目录。然后你可以将它复制到你的grafana插件目录或在grafana配置文件中指定编译插件的路径
[plugin.zabbix]
path =/home/your/clone/dir/grafana-zabbix/dist
#如果需要更新,执行下面命令
git pull
grunt
#重启grafana服务
service grafana-server restart
systemctl restart grafana-server
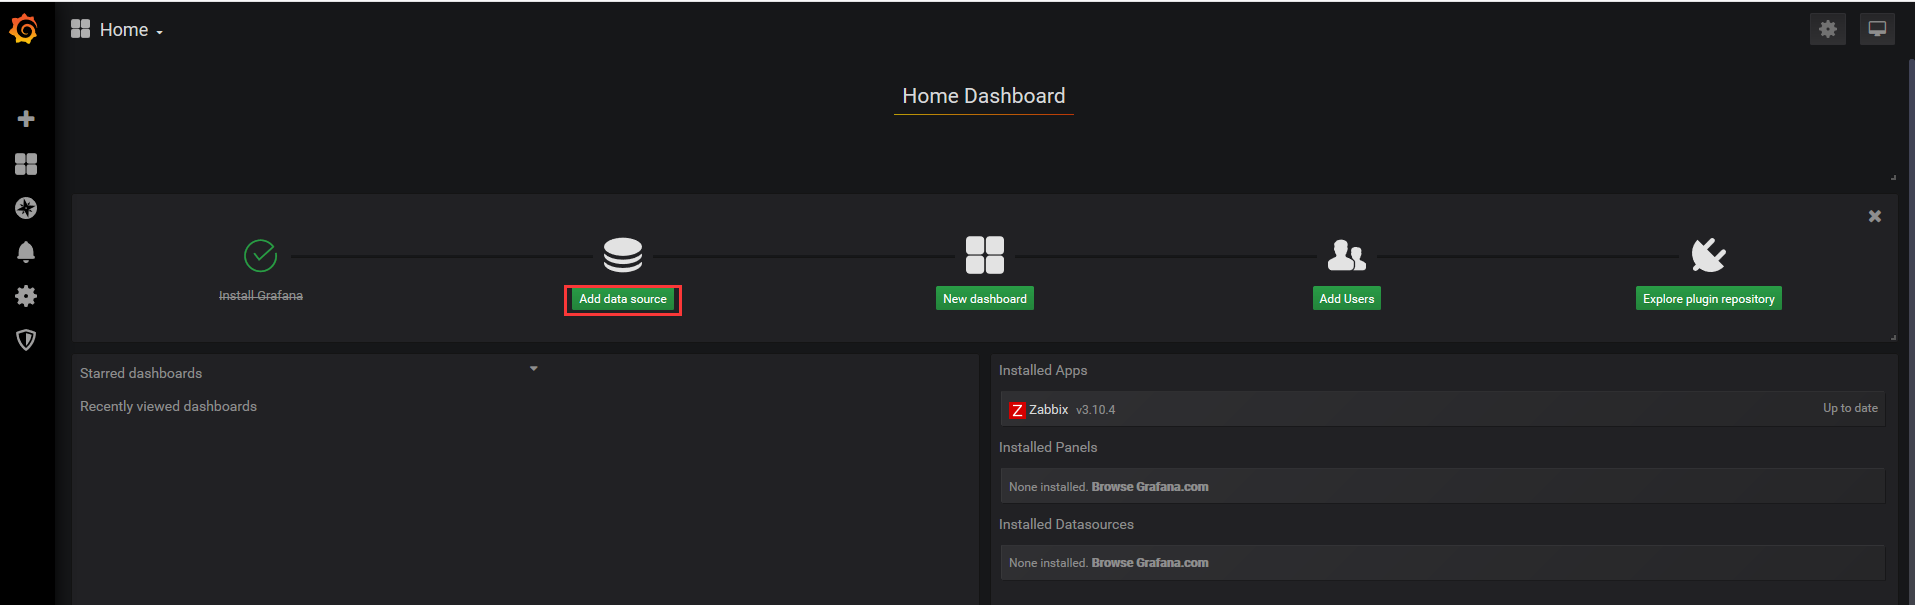
配置Grafana启用插件
#登录到grafana上,移动到grafana左侧面板的插件,选择应用程序选项卡,然后选择“配置”选项卡,打开Zabbix,启用插件。

#配置Zabbix数据源
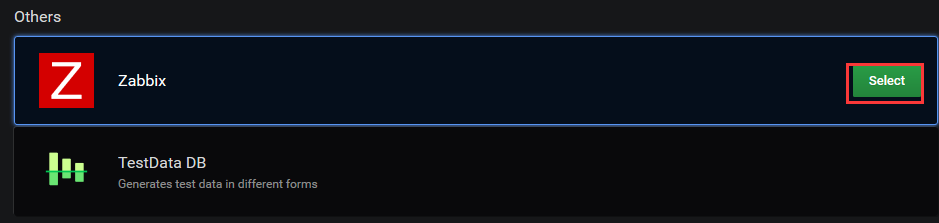
#添加新数据源,打开侧面板Zabbix数据源,单击“添加数据源并选择从下拉列表Zabbix。
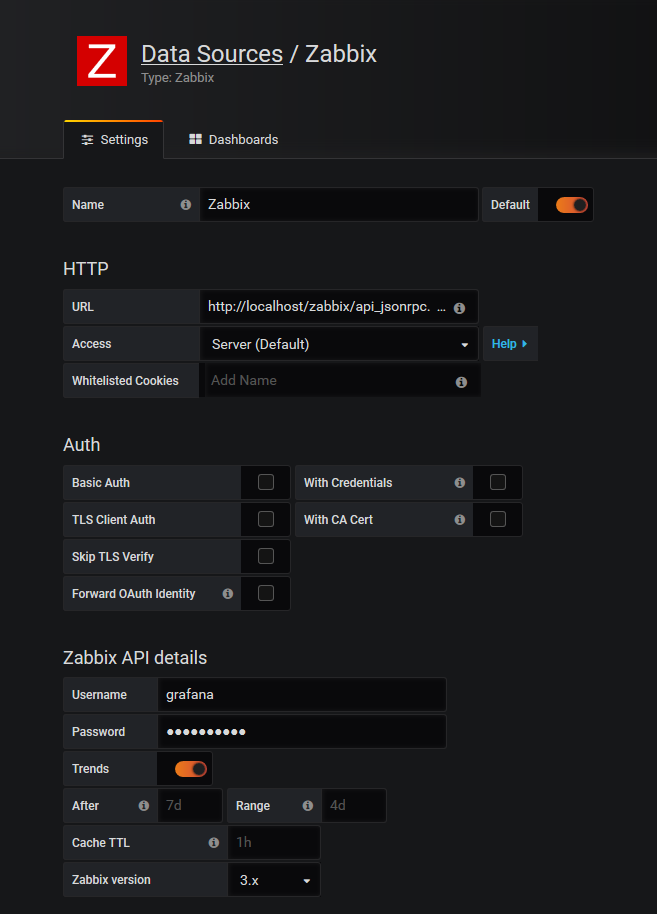
#注意红线标注的地方,Name自定义,Type选择Zabbix,Url填写访问zabbix-web的url(http://10.0.11.133/zabbix/api_jsonrpc.php),加上zabbix-api的php文件,Zabbix details用户名密码需要在Zabbix-web页面中设置,
本文中用户名:grafana,密码:grafana123,
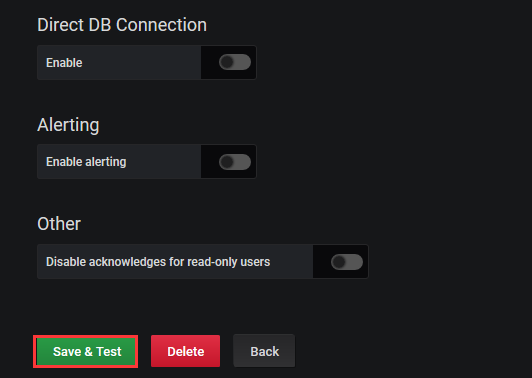
不想新建的话,可以使用Zabbix的初始用户.设置完成点击增加按钮,弹出下图:
#本教程的Zabbix版本为Zabbix-3.4.2,详细配置教程请参考官方文档:
http://docs.grafana-zabbix.org/installation/configuration/
#常见错误解决请参考:http://docs.grafana.org/installation/troubleshooting/
开始使用Grafana-Zabbix
添加新的图形面板到仪表板
grafana插件安装
#插件链接:https://github.com/grafana/grafana
#安装Panel
#使用grafana-cli工具在命令行下面安装Clock
grafana-cli plugins install grafana-clock-panel
#安装apps,Worldping
grafana-cli plugins install raintank-worldping-app
#安装Data source,以SimpleJson为例
grafana-cli plugins install grafana-simple-json-datasource
#安装完成,提示重启grafana服务
/etc/init.d/grafana-server restart
#插件使用及仪表板模板导入
#Worldping使用展示
#到此grafana-zabbix安装及使用完成。
官方地址:http://docs.grafana-zabbix.org
zabbix系列-Grafana4.6.3+Zabbix 的安装部署的更多相关文章
- 04.Linux系统-Zabbix监控服务安装部署
一.环境准备 操作系统:CentOS_Server_7.5_x64_1804.iso 部署组件:Zabbix 二.操作步骤: Zabbix_Server安装部署 2.0.安装依赖组件 [root@lo ...
- zabbix监控系列(1)之zabbix-server安装
推荐使用yum来安装 第一步:LAMP平台 zabbix使用php开发的,所以依赖于LAMP或者LNMP平台,由于http+mysql用yum安装及其方便,所以我在这里使用yum安装. yum -y ...
- 【zabbix系列】安装与加入host
測试环境 Ubuntu 14.04.1 LTS [服务端安装] 关于安装官方提供了非常具体的安装方法,包含各平台的源代码及包安装.关于其它版本号Linux请參考 https://www.zabbix. ...
- Zabbix系列之八——安装agent监控windows
一.下载zabbix-agent客户端 被监控的主机装在windows server 2012 64位操作系统,被监控端需要安装: http://www.zabbix.com/downloads/3. ...
- zabbix系列之七——安装后配置二Userparameters
1User parameters(用户自定义参数) 1.1配置 描述 详细 备注 简介 1执行zabbix中未预定义的agent check时使用 配置 1) zabbix agent的配置文件 ...
- zabbix系列之六——安装后配置二Items
https://www.zabbix.com/documentation/3.4/manual/config/items/itemtypes/snmp 1Items 1.1creating items ...
- zabbix系列之五——安装后配置一
https://www.zabbix.com/documentation/3.4/manual/appliance Configuration 1Hosts and host groups Overv ...
- zabbix系列之三——安装报错
1Zabbix_server启动失败 1.1查看日志:vi /var/log/zabbix/zabbix_server.log zabbix_server [23500]: cannot open l ...
- zabbix系列之二——安装
1Getting zabbix Four ways of getting: Index Option note 1 Install it from the distribution packages ...
随机推荐
- [LC]66题 Plus One (加1)
①英文题目 Given a non-empty array of digits representing a non-negative integer, plus one to the integer ...
- nyoj 305 表达式求值 (递归)
表达式求值 时间限制:3000 ms | 内存限制:65535 KB 难度:3 描述 Dr.Kong设计的机器人卡多掌握了加减法运算以后,最近又学会了一些简单的函数求值,比如,它知道函数min ...
- poj 3461 Oulipo(KMP)
Oulipo Time Limit: 1000MS Memory Limit: 65536K Total Submissions: 49378 Accepted: 19617 Descript ...
- Python3.7.1学习(一):redis的连接和简单使用
1.python 利用 redis 第三方库 首先安装:pip install redis 2.reids的连接 Redis使用StrictRedis对象来管理对一个redis server 的所有连 ...
- DAL
using System;using System.Collections.Generic;using System.Linq;using System.Web;using System.Data;u ...
- 力扣(LeetCode)单值二叉树 个人题解
如果二叉树每个节点都具有相同的值,那么该二叉树就是单值二叉树. 只有给定的树是单值二叉树时,才返回 true:否则返回 false. 示例 1: 输入:[1,1,1,1,1,null,1] 输出:tr ...
- python:类3——魔法方法
一.魔法方法特点 被双上下滑线包围 魔法方法是面向对象的Python的一切,如果你不知道魔法方法,说明你还没能意识到面向对象的Python的强大(不是说Python脚本) 通过对制定方法的重写,完全可 ...
- 扛把子组作业要求 20191024-3 互评Alpha阶段作品
此作业的要求参见[https://edu.cnblogs.com/campus/nenu/2019fall/homework/9860] 组名:扛把子 组长:迟俊文 组员:宋晓丽 梁梦瑶 韩昊 刘信鹏 ...
- Res2net:多尺度骨干网络结构
<Res2Net: A New Multi-scale Backbone Architecture> 来自:南开大学程明明组 论文:https://arxiv.org/abs/1904.0 ...
- JAVA,Python代码是编译执行还是解释执行?
转载地址:http://blog.csdn.net/zv3e189os5c0tsknrbcl/article/details/78661641 有人在讨论 Python 代码是编译执行还是解释执行?这 ...