Spring的常用注解
Spring框架主要包括IoC和AOP,这两大功能都可以使用注解进行配置。
开发环境:IntelliJ IDEA 2019.2.2
Spring Boot版本:2.1.8
新建一个名称为demo的Spring Boot项目。
一、bean定义
在 Spring 中,构成应用程序主干并由Spring IoC容器管理的对象称为bean。
bean是一个由Spring IoC容器实例化、组装和管理的对象。
使用@Component、@Service或@Configuration注解来修饰一个类,这些类会被Spring自动检测并注册到容器中,在类里面使用@Bean注解修
饰的方法,会被视为一个bean存放到Spring容器中。
下面例子实现了怎样根据类型获取bean的名称,获取bean;
1、新建类 MyBean.java
package com.example.demo;

public class MyBean {

    public MyBean(String id){

       this.id = id;

    }

    private String id;

    public String getId() {

        return id;

    }

    public void setId(String id) {

        this.id = id;

    }

}
2、新建类 MyConfig.java
package com.example.demo;

import org.springframework.context.annotation.Bean;

import org.springframework.context.annotation.Configuration;

@Configuration

public class MyConfig {

    //默认bean的名称为方法名,即下面的getMyBean

    @Bean

    public MyBean getMyBean(){

        return new MyBean("1");

    }

    //设置bean的名称为bean

    @Bean("bean2")

    public MyBean getMyBean2(){

        return new MyBean("2");

    }

}
3、修改启动类代码 DemoApplication.java
package com.example.demo;

import org.springframework.beans.factory.annotation.Autowired;

import org.springframework.boot.SpringApplication;

import org.springframework.boot.autoconfigure.SpringBootApplication;

import org.springframework.context.ApplicationContext;

import org.springframework.web.bind.annotation.RequestMapping;

import org.springframework.web.bind.annotation.RestController;

@SpringBootApplication

@RestController

public class DemoApplication  {

    public static void main(String[] args) {

        SpringApplication.run(DemoApplication.class, args);

    }

    @Autowired

    ApplicationContext ctx;

    @RequestMapping(value = "/")

    public String index(){

        //根据类型获取bean的名称

        String[] names = ctx.getBeanNamesForType(MyBean.class);

        for(String name : names){

            System.out.println(name);

        }

        //获取bean

        MyBean bean1 = (MyBean)ctx.getBean("getMyBean");

        System.out.println(bean1.getId());

        MyBean bean2 = (MyBean)ctx.getBean("bean2");

        System.out.println(bean2.getId());

        return "";

    }

}
运行项目后,浏览器访问:http://localhost:8080/,IDEA控制台输出:
getMyBean
bean2
1
2
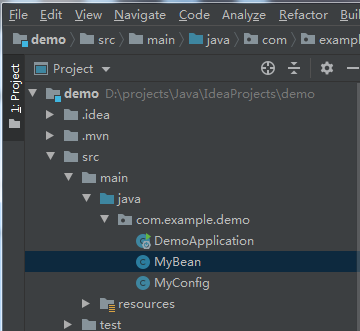
项目结构

二、依赖注入
使用注解可以实现实例的注入,最常用的是@Resource及@Autowired。
@Resource是JSR-250定义的注解,默认会根据名称进行注入。
@Autowired默认会根据类型进行注入。
1、继续使用上面例子的两个类 MyBean.java、MyConfig.java
2、修改启动类代码 DemoApplication.java
package com.example.demo;

import org.springframework.beans.factory.annotation.Autowired;

import org.springframework.boot.SpringApplication;

import org.springframework.boot.autoconfigure.SpringBootApplication;

import org.springframework.web.bind.annotation.RequestMapping;

import org.springframework.web.bind.annotation.RestController;

import javax.annotation.Resource;

@SpringBootApplication

@RestController

public class DemoApplication  {

    public static void main(String[] args) {

        SpringApplication.run(DemoApplication.class, args);

    }

    //使用@Resource注入

    @Resource(name="getMyBean")

    MyBean myBean1;

    //使用@Autowired注入

    @Autowired

    MyBean bean2;

    @RequestMapping(value = "/")

    public String index(){

        System.out.println(myBean1.getId());

        System.out.println(bean2.getId());

        return "";

    }

}
浏览器访问:http://localhost:8080/,IDEA控制台输出:
getMyBean
bean2
1
2
备注:
上面MyBean bean2的bean2不能修改为别的名称。原因:
@Autowired根据类型进行注入,如果容器中只有一个MyBean类型的bean,则bean2可以随便命名。
但本例子容器中有两个MyBean类型的bean,碰到这种有多个bean的情况,则根据属性名来查找,这里属性名bean2最终会找到相应的bean。
如果把MyBean bean2改成MyBean myBean2,则运行时IEAD控制台会报异常信息:
Field myBean2 in com.example.demo.DemoApplication required a single bean, but 2 were found:

	- getMyBean: defined by method 'getMyBean' in class path resource [com/example/demo/MyConfig.class]

	- bean2: defined by method 'getMyBean2' in class path resource [com/example/demo/MyConfig.class]
以上例子的注入方式为设值注入,还可以使用构造注入,向控制器的构造器中注入bean。
修饰构造器只能使用@Autowired注解,@Resource不能修改构造器。
例子:
package com.example.demo;

import org.springframework.beans.factory.annotation.Autowired;

import org.springframework.boot.SpringApplication;

import org.springframework.boot.autoconfigure.SpringBootApplication;

import org.springframework.web.bind.annotation.RequestMapping;

import org.springframework.web.bind.annotation.RestController;

import javax.annotation.Resource;

@SpringBootApplication

@RestController

public class DemoApplication  {

    public static void main(String[] args) {

        SpringApplication.run(DemoApplication.class, args);

    }

    MyBean bean2;

    //构造注入

    @Autowired

    public DemoApplication(MyBean bean2){

        this.bean2 = bean2;

    }

    @RequestMapping(value = "/")

    public String index(){

        System.out.println(bean2.getId());

        return "";

    }

}
三、使用Primary注解
根据类型来注入,如果容器中存在多个相同类型的bean时,会抛异常,因为此时Spring不知道将哪个bean注入。
针对这个问题,可以使用@Primary注解。
1、修改MyConfig.java代码,为第一个bean增加注解@Primary
package com.example.demo;

import org.springframework.context.annotation.Bean;

import org.springframework.context.annotation.Configuration;

import org.springframework.context.annotation.Primary;

@Configuration

public class MyConfig {

    //默认bean的名称为方法名,即下面的getMyBean

    @Bean

    @Primary

    public MyBean getMyBean(){

        return new MyBean("1");

    }

    //设置bean的名称为bean

    @Bean("bean2")

    public MyBean getMyBean2(){

        return new MyBean("2");

    }

}
2、启动类代码 DemoApplication.java还是用上面例子
package com.example.demo;

import org.springframework.beans.factory.annotation.Autowired;

import org.springframework.boot.SpringApplication;

import org.springframework.boot.autoconfigure.SpringBootApplication;

import org.springframework.web.bind.annotation.RequestMapping;

import org.springframework.web.bind.annotation.RestController;

import javax.annotation.Resource;

@SpringBootApplication

@RestController

public class DemoApplication  {

    public static void main(String[] args) {

        SpringApplication.run(DemoApplication.class, args);

    }

    //使用@Resource注入

    @Resource(name="getMyBean")

    MyBean myBean1;

    //使用@Autowired注入

    @Autowired

    MyBean bean2;

    @RequestMapping(value = "/")

    public String index(){

        System.out.println(myBean1.getId());

        System.out.println(bean2.getId());

        return "";

    }

}
浏览器访问:http://localhost:8080/,IDEA控制台输出:
1
1
四、Scope注解
配置bean时可以指定bean的作用域(scope),一般的bean可以配置为单态(singleton)或者非单态(prototype)。
配置为singleton,Spring的bean工厂只返回同一个bean的实例。
配置为prototype,则每次会创建一个新的实例。
1、修改代码 MyConfig.java
package com.example.demo;

import org.springframework.beans.factory.annotation.Autowired;

import org.springframework.boot.SpringApplication;

import org.springframework.boot.autoconfigure.SpringBootApplication;

import org.springframework.context.ApplicationContext;

import org.springframework.web.bind.annotation.RequestMapping;

import org.springframework.web.bind.annotation.RestController;

import javax.annotation.Resource;

@SpringBootApplication

@RestController

public class DemoApplication  {

    public static void main(String[] args) {

        SpringApplication.run(DemoApplication.class, args);

    }

    @Autowired

    ApplicationContext ctx;

    @RequestMapping(value = "/")

    public String index(){

        String s = "prototype:" + ctx.getBean("bean1") + "<br /> "

                  + "singleton:" + ctx.getBean("bean2") + "<br /> ";

        return s;

    }

}
浏览器访问:http://localhost:8080/,多次刷新,页面内容都变化:
prototype:com.example.demo.MyBean@6fce7ec4
singleton:com.example.demo.MyBean@7626c5f9
prototype:com.example.demo.MyBean@357b01f6
......
注意:
如果在一个单态的bean里面注入一个非单态的bean,则这个单态的bean所维护的非单态bean实例,将不会被刷新。
例子Spring MVC的控制器是单态的,如果往控制器里面注入一个非单态的bean,如下所示:
    //注入一个非单态的bean

    @Autowired

    private MyBean bean1;

    @RequestMapping(value = "/")

    public String index(){

        return bean1.toString();

    }
浏览器访问:http://localhost:8080/,多次刷新,页面都是显示如下:
com.example.demo.MyBean@5d0c61c9
说明index()方法输出的MyBean都是调用同一个实例,因为控制器在初始化时,就已经被注入了一个bean,而且一直维护着同一个实例。
五、方法注入
如果在一个单态的bean里面注入一个非单态的bean,则这个单态的bean所维护的非单态bean实例,将不会被刷新。
有两种简单的解决方法:
1、在需要注入的一方(单态的bean),直接使用ApplicationContext,每次调用非单态的bean,都由容器返回。
package com.example.demo;

import org.springframework.beans.factory.annotation.Autowired;

import org.springframework.context.ApplicationContext;

import org.springframework.web.bind.annotation.RequestMapping;

import org.springframework.web.bind.annotation.RestController;

@RestController

public class DemoController {

    @Autowired

    private ApplicationContext ctx;

    private MyBean getBean1(){

        return (MyBean)ctx.getBean("bean1");//一个非单态的bean

    }

    @RequestMapping(value = "/")

    public String index(){

        return getBean1().toString();

    }

}
浏览器访问:http://localhost:8080/,多次刷新,页面每次都变化:
com.example.demo.MyBean@12a7cacc
com.example.demo.MyBean@1776b0ea
......
2、使用Spring的方法注入。
使用@Lookup注解来修饰一个抽象方法,该方法会返回bean的实例。
下面代码运行结果和上面使用ApplicationContext一样。
package com.example.demo;

import org.springframework.beans.factory.annotation.Lookup;

import org.springframework.web.bind.annotation.RequestMapping;

import org.springframework.web.bind.annotation.RestController;

@RestController

public abstract class DemoController {

    @Lookup("bean1")

    public abstract MyBean createBean() ;

    @RequestMapping(value = "/")

    public String index(){

        return createBean().toString();

    }

}
六、AOP注解
实现AOP功能使用AspectJ注解
1、需要在pom.xml加入依赖:
        <dependency>

            <groupId>org.aspectj</groupId>

            <artifactId>aspectjweaver</artifactId>

        </dependency>
2、新建一个业务类 TestServiceImpl.java
package com.example.demo;

import org.springframework.stereotype.Component;

@Component

public class TestServiceImpl {

    public void testService(){

        System.out.println("要代理的业务方法");

    }

}
3、新建一个代理类 ProxyService.java
package com.example.demo;

import org.aspectj.lang.annotation.After;

import org.aspectj.lang.annotation.Aspect;

import org.aspectj.lang.annotation.Before;

import org.springframework.stereotype.Component;

@Aspect

@Component

public class ProxyService {

    @Before("execution(* com.example.demo.*ServiceImpl.*(..))")

    public void before(){

        System.out.println("业务方法调用前执行");

    }

    @After("execution(* com.example.demo.*ServiceImpl.*(..))")

    public void after(){

        System.out.println("业务方法调用后执行");

    }

}
4、修改启动类方法 DemoApplication.java
package com.example.demo;

import org.springframework.boot.SpringApplication;

import org.springframework.boot.autoconfigure.SpringBootApplication;

import org.springframework.boot.builder.SpringApplicationBuilder;

@SpringBootApplication

public abstract class DemoApplication  {

    public static void main(String[] args) {

        //SpringApplication.run(DemoApplication.class, args);

        new SpringApplicationBuilder(DemoApplication.class).properties(

                "spring.aop.proxy-target-class=true"

        ).run(args);

    }

}
5、控制器 DemoController.java
package com.example.demo;

import org.springframework.beans.factory.annotation.Autowired;

import org.springframework.web.bind.annotation.RequestMapping;

import org.springframework.web.bind.annotation.RestController;

@RestController

public class DemoController {

    @Autowired

    TestServiceImpl testService;

    @RequestMapping(value = "/")

    public String index(){

        testService.testService();

        System.out.println("TestServiceImpl的class:" + testService.getClass());

        return "";

    }

}
浏览器访问:http://localhost:8080/,控制台中输出:
业务方法调用前执行
要代理的业务方法
业务方法调用后执行
TestServiceImpl的class:class com.example.demo.TestServiceImpl$$EnhancerBySpringCGLIB$$2a53cdeb
七、ComponentScan注解
ComponentScan注解主要用于检测使用@Component修饰的组件,包括间接使用@Component的组件(如@Service、@Repository、@Controller
),并把它们注册到Spring容器中。
Spring的常用注解的更多相关文章
- Spring Boot常用注解总结
Spring Boot常用注解总结 @RestController和@RequestMapping注解 @RestController注解,它继承自@Controller注解.4.0之前的版本,Spr ...
- Spring MVC学习总结(2)——Spring MVC常用注解说明
使用Spring MVC的注解及其用法和其它相关知识来实现控制器功能. 02 之前在使用Struts2实现MVC的注解时,是借助struts2-convention这个插件,如今我们使 ...
- Spring学习总结(2)——Spring的常用注解
本文汇总了Spring的常用注解,以方便大家查询和使用,具体如下: 使用注解之前要开启自动扫描功能 其中base-package为需要扫描的包(含子包). ? 1 <context:compon ...
- Spring Boot 常用注解汇总
一.启动注解 @SpringBootApplication @Target(ElementType.TYPE) @Retention(RetentionPolicy.RUNTIME) @Documen ...
- 接近8000字的Spring/SpringBoot常用注解总结!安排!
0.前言 大家好,我是 Guide 哥!这是我的 221 篇优质原创文章.如需转载,请在文首注明地址,蟹蟹! 本文已经收录进我的 75K Star 的 Java 开源项目 JavaGuide:http ...
- Spring/SpringBoot常用注解总结
转自:[Guide哥] 0.前言 可以毫不夸张地说,这篇文章介绍的 Spring/SpringBoot 常用注解基本已经涵盖你工作中遇到的大部分常用的场景.对于每一个注解我都说了具体用法,掌握搞懂,使 ...
- Spring MVC常用注解
cp by http://www.cnblogs.com/leskang/p/5445698.html 1.@Controller 在SpringMVC 中,控制器Controller 负责处理由Di ...
- Spring Ioc 常用注解
在开发中spring ioc的配置方式有多种方式,常用的一般都是byName.byType .以及其自动装配可以查看http://www.cnblogs.com/gubai/p/9140840.htm ...
- spring 、spring boot 常用注解
@Profile 1.用户配置文件注解. 2.使用范围: @Configration 和 @Component 注解的类及其方法, 其中包括继承了 @Component 的注解: @Service. ...
- Spring 中常用注解原理剖析
前言 Spring 框架核心组件之一是 IOC,IOC 则管理 Bean 的创建和 Bean 之间的依赖注入,对于 Bean 的创建可以通过在 XML 里面使用 <bean/> 标签来配置 ...
随机推荐
- Hack the 21LTR: Scene 1 VM (Boot to Root)
靶机下载链接: https://www.vulnhub.com/entry/21ltr-scene-1,3/ 主机扫描: ╰─ nmap -p1-65535 -sV -sC -A 192.168.2 ...
- MySQL 有关MHA搭建与切换的几个错误log
1:masterha_check_repl 副本集方面报错 replicates is not defined in the configuration file! 具体信息如下: # /usr/l ...
- linux 定时备份数据库
说明 检查Crontab是否安装 若没有 需要先安装Crontab定时工具 安装定时工具参考(https://www.cnblogs.com/shaohuixia/p/5577738.html) 需要 ...
- Eclipse——关联源代码
Eclipse——关联源代码 摘要:本文主要说明了如何在Eclipse里关联源代码. 下载源码包 首先去想要关联的jar包的官网下载对应jar包的源代码,拿Tomcat的类库举例,先去官网下载源码包: ...
- EtreCheck是否修复恶意软件和广告软件?为什么EtreCheck无法制作截图?
EtreCheck for Mac是一款Mac上的软件,有很对人对这款软件并不熟系,今天小编就来给大家介绍一下这款软件最常出现的问题—EtreCheck是否修复恶意软件和广告软件?为什么EtreChe ...
- render加载vue文件 vue-loader配置
默认webpack无法打包.vue文件,需要安装相关Loader安装 npm install vue-loader vue-template-compiler -D webpack.config.js ...
- C# Task TaskFactory 异步线程/异步任务
Task是.NetFramework3.0出现的,线程是基于线程池,然后提供了丰富的API TaskFactory 提供对创建和计划 Task 对象的支持 创建和启动异步任务 1.Task task ...
- (七十七)c#Winform自定义控件-采样控件-HZHControls
官网 http://www.hzhcontrols.com 前提 入行已经7,8年了,一直想做一套漂亮点的自定义控件,于是就有了本系列文章. GitHub:https://github.com/kww ...
- QT程序自启动
故事背景:最近涉及到客户端更新自启动的一个问题,客户端检测到自己要更新,弹出一个更新界面,然后退出旧版本,启动新版本 技术调研:QProcess 直接上代码吧 qApp->quit(); QPr ...
- MySQL常用DDL、DML、DCL语言整理
DDL ----Data Definition Language 数据库定义语言 如 create procedure之类 创建数据库 CREATE DATABASE [IF NOT EXISTS] ...
