Redis自动化安装以及集群实现
#!/bin/bash

set -e

if [ $# -lt  ]; then

        echo "$(basename $0): Missing script argument"

        echo "$(installdir $0) [installfilename] [port] "

        exit

fi

PotInUse=`netstat -anp |  awk '{print $4}'  | grep $ | wc -l`

if [ $PotInUse -gt  ];then

  echo "ERROR" $ "Port is used by another process!"

  exit

fi

basedir=$

installdir=$

installfilename=$

port=$

cd $basedir

tar -zxvf $installfilename.tar.gz  >/dev/null >& &

cd $installfilename

mkdir -p $installdir

make PREFIX=$installdir install

sleep 1s

cp $basedir/redis.conf $installdir

sed -i "s/instance_port/$port/g"  $installdir/redis.conf

sleep 1s

cd $installdir

./bin/redis-server redis.conf >/dev/null >& &
配置文件模板
################################## INCLUDES ###################################

# include /path/to/local.conf

# include /path/to/other.conf

################################## MODULES #####################################

# loadmodule /path/to/my_module.so

# loadmodule /path/to/other_module.so

################################## NETWORK #####################################

bind 127.0.0.1 & your ip

port instance_port

tcp-backlog 511

timeout 0

tcp-keepalive 300

################################# GENERAL #####################################

daemonize yes

supervised no

pidfile ./redis_instance_port.pid

loglevel notice

logfile ./redis_log.log

databases 16

always-show-logo yes

################################ SNAPSHOTTING  ################################

save 900 1

save 300 10

save 60 10000

stop-writes-on-bgsave-error yes

rdbcompression yes

rdbchecksum yes

dbfilename dump.rdb

dir ./

################################# REPLICATION #################################

# masterauth <master-password>

replica-serve-stale-data yes

replica-read-only yes

repl-diskless-sync no

repl-diskless-sync-delay 5

repl-disable-tcp-nodelay no

replica-priority 100

################################## SECURITY ###################################

requirepass your_passwrod

################################### CLIENTS ####################################

# maxclients 10000

############################## MEMORY MANAGEMENT ################################

# maxmemory <bytes>

# maxmemory-policy noeviction

# maxmemory-samples 5

# replica-ignore-maxmemory yes

############################# LAZY FREEING ####################################

lazyfree-lazy-eviction no

lazyfree-lazy-expire no

lazyfree-lazy-server-del no

replica-lazy-flush no

############################## APPEND ONLY MODE ###############################

appendonly no

appendfilename "appendonly.aof"

# appendfsync always

appendfsync everysec

# appendfsync no

no-appendfsync-on-rewrite no

auto-aof-rewrite-percentage 100

auto-aof-rewrite-min-size 64mb

aof-load-truncated yes

aof-use-rdb-preamble yes

################################ LUA SCRIPTING  ###############################

lua-time-limit 5000

################################ REDIS CLUSTER  ###############################

cluster-enabled yes

# cluster-replica-validity-factor 10

# cluster-require-full-coverage yes

# cluster-replica-no-failover no

########################## CLUSTER DOCKER/NAT support  ########################

################################## SLOW LOG ###################################

slowlog-log-slower-than 10000

slowlog-max-len 128

################################ LATENCY MONITOR ##############################

latency-monitor-threshold 0

############################# EVENT NOTIFICATION ##############################

notify-keyspace-events ""

############################### ADVANCED CONFIG ###############################

hash-max-ziplist-entries 512

hash-max-ziplist-value 64

list-max-ziplist-size -2

list-compress-depth 0

set-max-intset-entries 512

zset-max-ziplist-entries 128

zset-max-ziplist-value 64

hll-sparse-max-bytes 3000

stream-node-max-bytes 4096

stream-node-max-entries 100

activerehashing yes

client-output-buffer-limit normal 0 0 0

client-output-buffer-limit replica 256mb 64mb 60

client-output-buffer-limit pubsub 32mb 8mb 60

# client-query-buffer-limit 1gb

# proto-max-bulk-len 512mb

hz 10

dynamic-hz yes

aof-rewrite-incremental-fsync yes

rdb-save-incremental-fsync yes

########################### ACTIVE DEFRAGMENTATION #######################

# Enabled active defragmentation

# activedefrag yes

# Minimum amount of fragmentation waste to start active defrag

# active-defrag-ignore-bytes 100mb

# Minimum percentage of fragmentation to start active defrag

# active-defrag-threshold-lower 10

# Maximum percentage of fragmentation at which we use maximum effort

# active-defrag-threshold-upper 100

# Minimal effort for defrag in CPU percentage

# active-defrag-cycle-min 5

# Maximal effort for defrag in CPU percentage

# active-defrag-cycle-max 75

# Maximum number of set/hash/zset/list fields that will be processed from

# the main dictionary scan

# active-defrag-max-scan-fields 1000
安装示例
sh redis_install.sh /usr/local/redis/ /usr/local/redis5/redis9008/ redis-5.0.4 9008
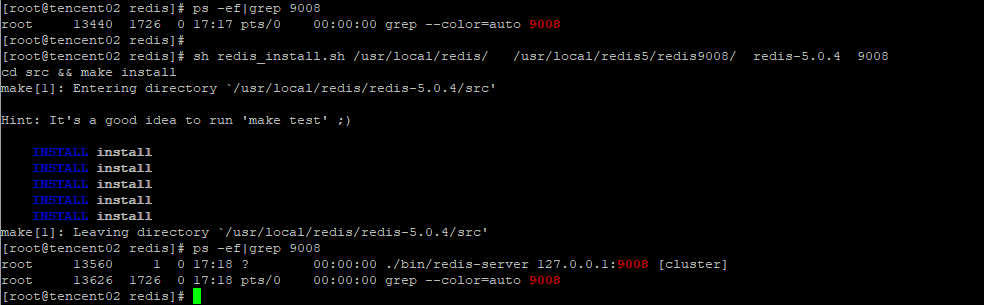
Redi实例的目录结构

基于Python的Redis自动化集群实现
基于Python的自动化集群实现,初始化节点为node_1~node_6,节点实例需要为集群模式,三主三从,自动化集群,分配slots,加入从节点,3秒钟左右完成
import redis

#master

node_1 = {'host': '127.0.0.1', 'port': 9001, 'password': '***'}

node_2 = {'host': '127.0.0.1', 'port': 9002, 'password': '***'}

node_3 = {'host': '127.0.0.1', 'port': 9003, 'password': '***'}

#slave

node_4 = {'host': '127.0.0.1', 'port': 9004, 'password': '***'}

node_5 = {'host': '127.0.0.1', 'port': 9005, 'password': '***'}

node_6 = {'host': '127.0.0.1', 'port': 9006, 'password': '***'}

redis_conn_1 = redis.StrictRedis(host=node_1["host"], port=node_1["port"], password=node_1["password"])

redis_conn_2 = redis.StrictRedis(host=node_2["host"], port=node_2["port"], password=node_2["password"])

redis_conn_3 = redis.StrictRedis(host=node_3["host"], port=node_3["port"], password=node_3["password"])

# cluster meet

redis_conn_1.execute_command("cluster meet {0} {1}".format(node_2["host"],node_2["port"]))

redis_conn_1.execute_command("cluster meet {0} {1}".format(node_3["host"],node_3["port"]))

print('#################flush slots #################')

redis_conn_1.execute_command('cluster flushslots')

redis_conn_2.execute_command('cluster flushslots')

redis_conn_3.execute_command('cluster flushslots')

print('#################add slots#################')

for i in range(0,16383+1):

    if i <= 5461:

        try:

            redis_conn_1.execute_command('cluster addslots {0}'.format(i))

        except:

            print('cluster addslots {0}'.format(i) +' error')

    elif 5461 < i and i <= 10922:

        try:

            redis_conn_2.execute_command('cluster addslots {0}'.format(i))

        except:

            print('cluster addslots {0}'.format(i) + ' error')

    elif 10922 < i:

        try:

            redis_conn_3.execute_command('cluster addslots {0}'.format(i))

        except:

            print('cluster addslots {0}'.format(i) + ' error')

print()

print('#################cluster status#################')

print()

print('##################'+str(node_1["host"])+':'+str(node_1["port"])+'##################')

print(str(redis_conn_1.execute_command('cluster info'), encoding = "utf-8").split("\n")[0])

print('##################'+str(node_2["host"])+':'+str(node_2["port"])+'##################')

print(str(redis_conn_1.execute_command('cluster info'), encoding = "utf-8").split("\n")[0])

print('##################'+str(node_3["host"])+':'+str(node_3["port"])+'##################')

print(str(redis_conn_1.execute_command('cluster info'), encoding = "utf-8").split("\n")[0])

#slave cluster meet

redis_conn_1.execute_command("cluster meet {0} {1}".format(node_4["host"],node_4["port"]))

redis_conn_2.execute_command("cluster meet {0} {1}".format(node_5["host"],node_5["port"]))

redis_conn_3.execute_command("cluster meet {0} {1}".format(node_6["host"],node_6["port"]))

#cluster nodes

print(str(redis_conn_1.execute_command('cluster nodes'), encoding = "utf-8"))

############################add salve in cluster##########################################

#slave cluster meet

print('################# cluster meet slave #################')

redis_conn_1.execute_command("cluster meet {0} {1}".format(node_4["host"],node_4["port"]))

redis_conn_2.execute_command("cluster meet {0} {1}".format(node_5["host"],node_5["port"]))

redis_conn_3.execute_command("cluster meet {0} {1}".format(node_6["host"],node_6["port"]))

sleep(5)

print('################# add slave in cluster #################')

# get 主节点的node_id,按照主节点的顺序依次添加到主节点dict_cluster_nodes中,确保主从按照list中的顺序一一对应

redis_conn_1 = redis.StrictRedis(host=node_1["host"], port=node_1["port"], password=node_1["password"], decode_responses=True)

dict_cluster_nodes = redis_conn_1.cluster('nodes')

print(dict_cluster_nodes)

dict_master_node_id = {}

for m_node in master_node:

    for key, values in dict_cluster_nodes.items():

        if key[0:key.index('@')] == str(m_node["host"])+':'+str(m_node["port"]):

            dict_master_node_id[key[0:key.index('@')]] = values['node_id']

            # 输出示例

            '''

            {

                '127.0.0.1:9001': '84f0c3a21ab6dd6965923915434cc62fc0f5cc2b',

                '127.0.0.1:9002': 'b584f695eb9c1552c25f92e28a50c9ce62ad9ee9',

                '127.0.0.1:9001': 'b95898c17761b448ea88bb9682bac9b69b045adc'

            }

            '''

# 依次添加slave节点

# 如何确保主从于list中的节点一一对应?

# 在主节点上任意一个节点上get 集群的node的时候,按照master节点顺序构造dict_cluster_nodes,然后遍历dict_cluster_nodes的时候自然就一一对应了。

node_index = 0

for s_node in slave_node:

    slave_redis_conn = redis.StrictRedis(host=s_node["host"], port=s_node["port"], password=s_node["password"])

    print(str(s_node["host"])+':'+str(s_node["port"]) + ' slave of----->' + str(master_node[node_index]["host"])+':'+str(master_node[node_index]["port"]))

    repl_command = 'cluster replicate ' + dict_master_node_id[str(master_node[node_index]["host"])+':'+str(master_node[node_index]["port"])]

    print(repl_command)

    slave_redis_conn.execute_command(repl_command)

    node_index = node_index + 1

    '''

    127.0.0.1:9004 slave of-----> 127.0.0.1:9001

    cluster replicate 84f0c3a21ab6dd6965923915434cc62fc0f5cc2b

    127.0.0.1:9005 slave of-----> 127.0.0.1:9002

    cluster replicate b584f695eb9c1552c25f92e28a50c9ce62ad9ee9

    127.0.0.1:9006 slave of-----> 127.0.0.1:9003

    cluster replicate b95898c17761b448ea88bb9682bac9b69b045adc

    '''
示例

这样一个Redis的集群,从实例的安装到集群的安装,环境依赖本身没有问题的话,基本上1分钟之内可以完成这个搭建过程。
Redis自动化安装以及集群实现的更多相关文章
- [k8s]kubespray(ansible)自动化安装k8s集群
kubespray(ansible)自动化安装k8s集群 https://github.com/kubernetes-incubator/kubespray https://kubernetes.io ...
- Redis单机安装以及集群搭建
今天主要来看一下Redis的安装以及集群搭建(我也是第一次搭建). 环境:CentOS 7.1,redis-5.0.7 一.单机安装 1.将Redis安装包放置服务器并解压 2.进入redis安装目录 ...
- linux下redis的安装和集群搭建
一.redis概述 1.1.目前redis支持的cluster特性: 1):节点自动发现. 2):slave->master 选举,集群容错. 3):Hot resharding:在线分片. 4 ...
- Redis集合 安装 哨兵集群 配置
redis相关 redis基础 redis发布订阅 redis持久化RDB与AOF redis不重启,切换RDB备份到AOF备份 redis安全配置 redis主从同步 redis哨兵集群 redis ...
- 利用ansible书写playbook在华为云上批量配置管理工具自动化安装ceph集群
首先在华为云上购买搭建ceph集群所需云主机: 然后购买ceph所需存储磁盘 将购买的磁盘挂载到用来搭建ceph的云主机上 在跳板机上安装ansible 查看ansible版本,检验ansible是否 ...
- Centos7下安装redis实战(单机版以及集群)
一.背景 因项目需要,要引入redis做缓存,就在centos7下亲自安装了一遍redis,刚好趁着这个机会就来把redis的概念以及单机版和集群版redis安装步骤记录下来,在此和大家一起分享. 二 ...
- Redis 3.0 Cluster集群配置
Redis 3.0 Cluster集群配置 安装环境依赖 安装gcc:yum install gcc 安装zlib:yum install zib 安装ruby:yum install ruby 安装 ...
- 分布式缓存技术redis学习系列(四)——redis高级应用(集群搭建、集群分区原理、集群操作)
本文是redis学习系列的第四篇,前面我们学习了redis的数据结构和一些高级特性,点击下面链接可回看 <详细讲解redis数据结构(内存模型)以及常用命令> <redis高级应用( ...
- redis + 主从 + 持久化 + 分片 + 集群 + spring集成
Redis是一个基于内存的数据库,其不仅读写速度快,每秒可以执行大约110000的写操作,81000的读取操作,而且其支持存储字符串,哈希结构,链表,集合丰富的数据类型.所以得到很多开发者的青睐.加之 ...
随机推荐
- win+L键失灵了怎么办?
win+L组合键是比较常用的锁屏快捷键组合,一直用的好好的今天发现突然失灵. 百度大部分方法是改注册表的值,然而对我来说没有用. 最后,才搜到一个帖子说是 win键被锁住了. [解决方法]: Fn+w ...
- 线段树合并学习笔记(P4556)
直入主题: 学习线段树合并..... 从名字就能看出,这个东西要合并线段树..... 线段树怎么能合并呢...... 暴力合就行了啊...... 一次从上往下的遍历,把所有的节点信息暴力合并,然后就没 ...
- P3043 [USACO12JAN]牛联盟(并查集+数学)
(m<n<=1e5,有重边) 题目表述有问题..... 给定一张图(不一定联通),每条边可以选择连接的两个点之一,剩余的点可以自己成对,问方案数. 一开始是真的被吓到了....觉得可写性极 ...
- NOIP原题 斗地主(20190804)
题目描述 牛牛最近迷上了一种叫斗地主的扑克游戏.斗地主是一种使用黑桃.红心.梅花.方片的A到K加上大小王的共54张牌来进行的扑克牌游戏.在斗地主中,牌的大小关 系根据牌的数码表示如下:3<4&l ...
- VSCode JAVA环境配置使遇到的几个小问题
1.出现的问题: The JAVA_HOME environment variable points to a missing or inaccessible folder等三个报错! 2.说明及解决 ...
- LINQ学习——Group
一.Group的作用 1.Group字句把select的对象根据一些标准进行分组. 2.从查询表达式返回的对象是从查询中枚举分组结果的可枚举类型. 3.每一个分组由一个叫做键的字段区分. 4.每一个分 ...
- python多进程总结
概述 由于python中全局解释器锁(GIL)的存在,所以python多线程并不能有效利用CPU多核的性能(相当于单核并发)实现多线程多核并行,所以在对CPU密集型的程序时处理效率较低,反而对IO密集 ...
- logback日志回顾整理--2018年8月8日
几年前使用过logback作为项目的日志框架. 当时觉得这个框架比log4j更加好用. 所以系统的学习了一遍. 后来换了公司, 不再使用logback. 如今, 又有机会使用logback了, 所以, ...
- Python 之路 Day01 笔记-什么是变量,常量等
变量 变量 是 为了存储 程序运算过程中的一些中间 结果,为了方便日后调用 变量的命名规则 1. 要具有描述性 2. 变量名只能'_','数字','字母'组成,不可以是空格或特殊字符(#?<., ...
- C# XML解析之DOM模型
DOM的工作方式是:首先将XML文档一次性的装入内存,然后根据文档中定义的元素和属性在内存中创建一个“树型结构”也就是一个文档对象模型,这里的含义其实是把文档对象化,文档中每个节点对应着模型中一个对象 ...