Spring入门(十三):Spring MVC常用注解讲解
在使用Spring MVC开发Web应用程序时,控制器Controller的开发非常重要,虽然说视图(JSP或者是Thymeleaf)也很重要,因为它才是直接呈现给用户的,不过由于现在前端越来越重要,很多公司都开始采用前后端分离的开发模式,所以我们暂时可以将精力放在开发控制器上。
使用Spring MVC开发控制器主要使用以下7个注解:
- @Controller
- @RequestMapping
- @ResponseBody
- @RequestParam
- @PathVariable
- @RequestBody
- @RestController
接下来,我们依次讲解每个注解的使用方法。
1. @Controller
先回顾下上篇博客中新建的简单控制器HelloController:
package chapter05.controller;

import org.springframework.stereotype.Controller;

import org.springframework.web.bind.annotation.RequestMapping;

import org.springframework.web.bind.annotation.RequestMethod;

@Controller

public class HelloController {

    @RequestMapping(value = "index", method = RequestMethod.GET)

    public String hello() {

        // 这里返回的逻辑视图名

        return "index";

    }

}
这里@Controller注解的作用是用来声明控制器,它的源码如下所示:
package org.springframework.stereotype;

import java.lang.annotation.Documented;

import java.lang.annotation.ElementType;

import java.lang.annotation.Retention;

import java.lang.annotation.RetentionPolicy;

import java.lang.annotation.Target;

@Target({ElementType.TYPE})

@Retention(RetentionPolicy.RUNTIME)

@Documented

@Component

public @interface Controller {

    String value() default "";

}
这里值得注意的是,@Controller注解使用了@Component注解,而@Component注解我们并不陌生,它用来声明一个Bean。
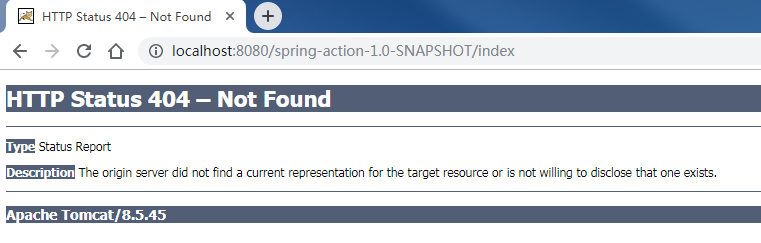
虽然有些书中说可以把@Controller注解替换为@Component注解,运行没有差别,只是表意性差一点,但是如果你将上面代码中的@Controller注解修改为@Component注解,然后重新打包发布到Tomcat,会发现访问地址http://localhost:8080/spring-action-1.0-SNAPSHOT/index时,报如下所示的404错误:
将@Component注解还原为@Controller注解,然后重新打包发布到Tomcat,再次访问地址http://localhost:8080/spring-action-1.0-SNAPSHOT/index时,访问正常:

所以,在Spring MVC中声明控制器时,推荐使用@Controller注解。
注意事项:程序员在阅读技术书籍时,要多思考,多尝试,因为书籍中讲解的,很可能是错的。
2. @RequestMapping
@RequestMapping注解用来映射Web请求,它有2种使用形式:
- 应用在方法级别,如上面的代码中展示的那样。
- 应用在类级别,当控制器在类级别上添加
@RequestMapping注解时,这个注解会应用到控制器的所有处理器方法上,处理器方法上的@RequestMapping注解会对类级别上的@RequestMapping注解的声明进行补充。
@RequestMapping注解常用的3个参数如下所示:
- value:指定映射的URL地址,如index
- method:指定映射的请求类型,如GET请求、POST请求等
- produces:指定返回的response的媒体类型和字符集,如application/json;charset=UTF-8。
指定method值时使用org.springframework.web.bind.annotation.RequestMethod枚举:
package org.springframework.web.bind.annotation;

public enum RequestMethod {

    GET,

    HEAD,

    POST,

    PUT,

    PATCH,

    DELETE,

    OPTIONS,

    TRACE;

    private RequestMethod() {

    }

}
指定produces值时一般使用org.springframework.http.MediaType类下的常量:
public static final String APPLICATION_JSON_VALUE = "application/json";

public static final MediaType APPLICATION_JSON_UTF8 = valueOf("application/json;charset=UTF-8");

public static final String APPLICATION_JSON_UTF8_VALUE = "application/json;charset=UTF-8";
为了更好的理解,我们在HelloController类上添加如下代码:
package chapter05.controller;

import org.springframework.stereotype.Controller;

import org.springframework.web.bind.annotation.RequestMapping;

import org.springframework.web.bind.annotation.RequestMethod;

@Controller

@RequestMapping("/hello")

public class HelloController {

    @RequestMapping(value = "index", method = RequestMethod.GET)

    public String hello() {

        // 这里返回的逻辑视图名

        return "index";

    }

}
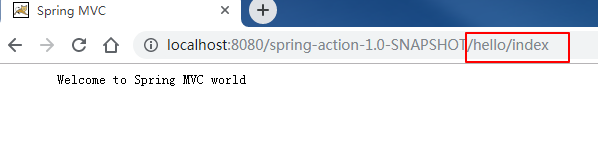
重新打包并部署到Tomcat中,此时的访问地址从之前的http://localhost:8080/spring-action-1.0-SNAPSHOT/index变成了http://localhost:8080/spring-action-1.0-SNAPSHOT/hello/index,如下所示:
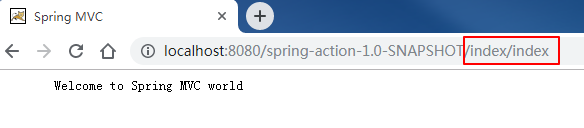
@RequestMapping注解的value属性还支持接受一个String类型的数组,如下所示:
@RequestMapping({"/hello", "/index"})

public class HelloController {

    // 省略其它代码

}
此时也可以通过地址http://localhost:8080/spring-action-1.0-SNAPSHOT/index/index进行访问:
3. @ResponseBody
在上面的代码中,我们的方法是返回逻辑视图名index,然后由视图解析器最终找到运行时的/WEB-INF/classes/views/index.jsp视图,但有时我们不需要返回一个页面,而是直接返回数据给到前端。
此时我们可以使用@ResponseBody注解,该注解可以放在返回值前或者方法上,用于将返回值放在response体内,而不是返回一个页面。
为了更好的理解,我们新建个DemoAnnoController控制器如下所示:
package chapter05.controller;

import org.springframework.http.MediaType;

import org.springframework.stereotype.Controller;

import org.springframework.web.bind.annotation.RequestMapping;

import org.springframework.web.bind.annotation.RequestMethod;

import org.springframework.web.bind.annotation.ResponseBody;

import javax.servlet.http.HttpServletRequest;

@Controller

@RequestMapping("/anno")

public class DemoAnnoController {

    @RequestMapping(value = "/index", method = RequestMethod.GET, produces = MediaType.TEXT_PLAIN_VALUE)

    public @ResponseBody

    String index(HttpServletRequest request) {

        return "url:" + request.getRequestURI() + " can access";

    }

}
重新打包并部署到Tomcat中,访问地址http://localhost:8080/spring-action-1.0-SNAPSHOT/anno/index,效果如下所示:

也可以将@ResponseBody注解放在方法上,如下所示:
@RequestMapping(value = "/index", method = RequestMethod.GET, produces = MediaType.TEXT_PLAIN_VALUE)

@ResponseBody

public String index(HttpServletRequest request) {

    return "url:" + request.getRequestURI() + " can access";

}
4. @RequestParam
@RequestParam注解用于接收URL中的参数信息。
为了更好的理解 ,我们在DemoAnnoController控制器中添加如下方法:
@RequestMapping(value = "/requestParam", method = RequestMethod.GET, produces = "text/plain;charset=UTF-8")

@ResponseBody

public String passRequestParam(@RequestParam("id") Long id, @RequestParam("name") String name, HttpServletRequest request) {

    return "url:" + request.getRequestURI() + " can access,id: " + id + ",name=" + name;

}
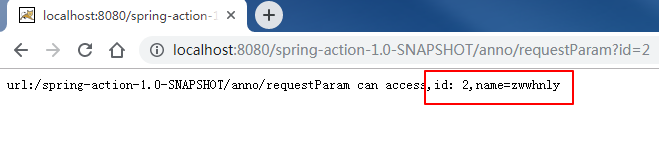
重新打包并部署到Tomcat中,访问地址http://localhost:8080/spring-action-1.0-SNAPSHOT/anno/requestParam?id=1&name=zwwhnly ,效果如下所示:

注意事项:上面示例中,Url中的参数名称和方法中的变量名称完全一致,所以可以省略掉
@RequestParam注解,不过为了代码的易读性,建议保留@RequestParam注解。
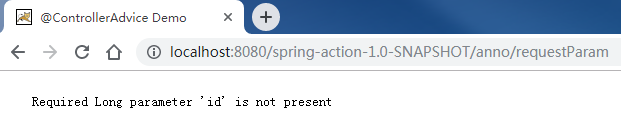
如果不传递参数,访问地址http://localhost:8080/spring-action-1.0-SNAPSHOT/anno/requestParam,则会提示如下信息:
或者只传递其中1个参数,访问地址http://localhost:8080/spring-action-1.0-SNAPSHOT/anno/requestParam?id=1,则会提示如下信息:

由此也说明,使用了
@RequestParam注解的参数,在Url中必须传递。
不过,@RequestParam注解提供了defaultValue属性,可以给参数指定默认值,比如我们给参数id设置默认值1,给参数name设置默认值zwwhnly,然后访问地址http://localhost:8080/spring-action-1.0-SNAPSHOT/anno/requestParam,效果如下所示:

或者访问地址http://localhost:8080/spring-action-1.0-SNAPSHOT/anno/requestParam?id=2,效果如下所示:
不过,还是有一个异常场景需要注意,就是Url中传递的参数和方法中定义的参数类型不匹配,比如我们将id的值传错,访问地址http://localhost:8080/spring-action-1.0-SNAPSHOT/anno/requestParam?id=zwwhnly&name=zwwhnly,会看到如下报错信息:

5. @PathVariable
@PathVariable注解也是用于接收URL中的参数信息,不过和@RequestParam注解稍有不同。
@PathVariable注解用于解析Url中的路径参数,如https://www.cnblogs.com/zwwhnly/中的zwwhnly部分,而@RequestParam注解用于解析Url中的查询参数,如https://i.cnblogs.com/posts?page=2中的page部分。
为了更好的理解 ,我们在DemoAnnoController控制器中添加如下方法:
@RequestMapping(value = "/pathvar/{str}", produces = "text/plain;charset=UTF-8")

public @ResponseBody

String demoPathVar(@PathVariable("str") String str, HttpServletRequest request) {

    return "url:" + request.getRequestURI() + " can access,str: " + str;

}
重新打包并部署到Tomcat中,访问地址http://localhost:8080/spring-action-1.0-SNAPSHOT/anno/pathvar/zwwhnly ,效果如下所示:

注意事项:如果
@PathVariable注解中指定value属性的话,它会假设占位符的名称与方法的参数名相同。
因为这里方法的参数名正好与占位符的名称相同,所以我们可以去掉@PathVariable注解的value属性:
@RequestMapping(value = "/pathvar/{str}", produces = "text/plain;charset=UTF-8")

public @ResponseBody

String demoPathVar(@PathVariable String str, HttpServletRequest request) {

    return "url:" + request.getRequestURI() + " can access,str: " + str;

}
6. @RequestBody
@RequestBody注解允许request的参数在request体中,而不是直接链接在地址后面,该注解放在参数前。
为了更好的理解 ,我们在DemoAnnoController控制器中添加如下方法:
@RequestMapping(value = "/obj", produces = MediaType.APPLICATION_JSON_UTF8_VALUE)

@ResponseBody

public String passObj(@RequestBody DemoObj demoObj, HttpServletRequest request) {

    return "url:" + request.getRequestURI() + " can access,demoObj id:" + demoObj.getId() +

            " demoObj name:" + demoObj.getName();

}
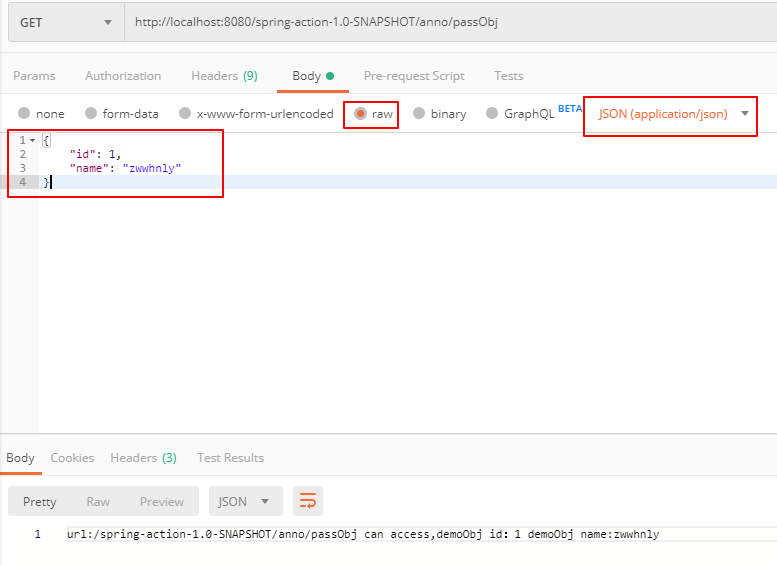
重新打包并部署到Tomcat中,然后使用Postman工具调用接口http://localhost:8080/spring-action-1.0-SNAPSHOT/anno/passObj,效果如下所示:
7. @RestController
@RestController是一个组合注解,它组合了@Controller注解和@ResponseBody注解,源码如下所示:
package org.springframework.web.bind.annotation;

import java.lang.annotation.Documented;

import java.lang.annotation.ElementType;

import java.lang.annotation.Retention;

import java.lang.annotation.RetentionPolicy;

import java.lang.annotation.Target;

import org.springframework.stereotype.Controller;

@Target({ElementType.TYPE})

@Retention(RetentionPolicy.RUNTIME)

@Documented

@Controller

@ResponseBody

public @interface RestController {

    String value() default "";

}
因此,如果某个控制器中所有的方法都只是返回数据而不是页面的话,就可以使用@RestController注解。
为了更好的理解 ,我们举个具体的示例。
首先,在pom.xml中添加如下依赖,用于对象和json之间的转换:
<dependency>

    <groupId>com.fasterxml.jackson.core</groupId>

    <artifactId>jackson-databind</artifactId>

    <version>2.9.9</version>

</dependency>
然后新建控制器DemoRestController如下所示:
package chapter05.controller;

import chapter05.model.DemoObj;

import org.springframework.http.MediaType;

import org.springframework.web.bind.annotation.RequestBody;

import org.springframework.web.bind.annotation.RequestMapping;

import org.springframework.web.bind.annotation.RequestMethod;

import org.springframework.web.bind.annotation.RestController;

@RestController

@RequestMapping("/rest")

public class DemoRestController {

    @RequestMapping(value = "/getjson", method = RequestMethod.GET, produces = MediaType.APPLICATION_JSON_UTF8_VALUE)

    public DemoObj getjson(@RequestBody DemoObj demoObj) {

        return new DemoObj(demoObj.getId(), demoObj.getName());

    }

}
因为使用@RestController注解,相当于同时使用了@Controller注解和@ResponseBody注解,所以上面的代码等价于下面的代码:
package chapter05.controller;

import chapter05.model.DemoObj;

import org.springframework.http.MediaType;

import org.springframework.stereotype.Controller;

import org.springframework.web.bind.annotation.*;

@Controller

@ResponseBody

@RequestMapping("/rest")

public class DemoRestController {

    @RequestMapping(value = "/getjson", method = RequestMethod.GET, produces = MediaType.APPLICATION_JSON_UTF8_VALUE)

    public DemoObj getjson(@RequestBody DemoObj demoObj) {

        return new DemoObj(demoObj.getId(), demoObj.getName());

    }

}
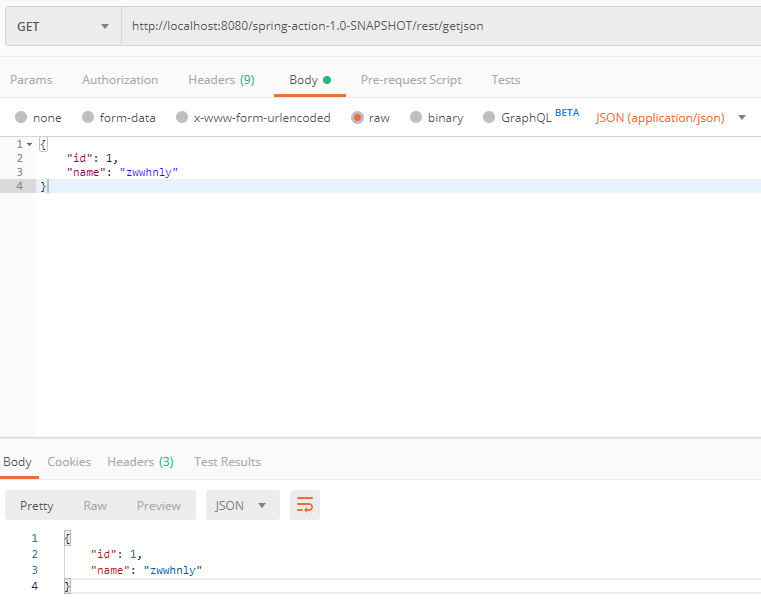
重新打包并部署到Tomcat中,然后使用Postman工具调用接口http://localhost:8080/spring-action-1.0-SNAPSHOT/rest/getjson,效果如下所示:
8. 源码及参考
源码地址:https://github.com/zwwhnly/spring-action.git,欢迎下载。
Craig Walls 《Spring实战(第4版)》
汪云飞《Java EE开发的颠覆者:Spring Boot实战》
原创不易,如果觉得文章能学到东西的话,欢迎点个赞、评个论、关个注,这是我坚持写作的最大动力。
如果有兴趣,欢迎添加我的微信:zwwhnly,等你来聊技术、职场、工作等话题(PS:我是一名奋斗在上海的程序员)。
Spring入门(十三):Spring MVC常用注解讲解的更多相关文章
- Spring MVC学习总结(2)——Spring MVC常用注解说明
使用Spring MVC的注解及其用法和其它相关知识来实现控制器功能. 02 之前在使用Struts2实现MVC的注解时,是借助struts2-convention这个插件,如今我们使 ...
- Spring入门(6)-使用注解装配
Spring入门(6)-使用注解装配 本文介绍如何使用注解装配. 0. 目录 使用Autowired 可选的自动装配 使用Qualifier选择 1. 使用Autowired package com. ...
- JAXB常用注解讲解(超详细)
简介: JAXB(Java Architecture for XML Binding) 是一个业界的标准,是一项可以根据XML Schema产生Java类的技术.该过程中,JAXB也提供了将XML实例 ...
- Spring MVC常用注解
cp by http://www.cnblogs.com/leskang/p/5445698.html 1.@Controller 在SpringMVC 中,控制器Controller 负责处理由Di ...
- spring mvc常用注解的说明
最近一段时间学习了springboot,所以熟悉一下mvc中常用的注解,这样可以方便开发 简介: @RequestMapping RequestMapping是一个用来处理请求地址映射的注解,可用于类 ...
- spring mvc常用注解总结
1.@RequestMapping@RequestMappingRequestMapping是一个用来处理请求地址映射的注解(将请求映射到对应的控制器方法中),可用于类或方法上.用于类上,表示类中的所 ...
- spring mvc常用注解标签
@Controller 在SpringMVC 中,控制器Controller 负责处理由DispatcherServlet 分发的请求,它把用户请求的数据经过业务处理层处理之后封装成一个Model , ...
- Spring MVC常用注解@PathVariable、@RequestHeader、@CookieValue、@RequestParam、@RequestBody、@SessionAttributes、@ModelAttribute
简介: handler method参数绑定常用的注解,我们根据他们处理的Request的不同内容部分分为四类:(主要讲解常用类型) A.处理requet uri部分(这里指uri template中 ...
- spring mvc 常用注解
1.@requestMapping注解,绑定指定的url,requestmapping注解的属性值有value和method. requestmaping可以作用在类上或者方法上 如:@Request ...
随机推荐
- 常用的python内置方法
all ( ) 循环参数,参数全为真就返回Ture any() 只要有一个 ...
- python所有的标准异常类:
异常名称 描述 BaseException 所有异常的基类 SystemExit 解释器请求退出 KeyboardInterrupt 用户中断执行(通常是输入^C) Exception 常规错误的基类 ...
- 04_枚举类型iota
iota是枚举类型的关键字,使用iota可以方便快捷的给常量赋值,主要体现在以下几个方面:1.iota常量自动生成器,每个一行加12.iota给常量赋值使用3.iota遇到const重置为04.可以写 ...
- linux 网络基础之IP地址
IP是英文Internet Protocol的缩写,意思是“网络之间互连的协议”,也就是为计算机网络相互连接进行通信而设计的协议. IP地址类型分为:公有地址.私有地址. 公有地址 公有地址(Publ ...
- Delphi - 通过WinAPI GetCursorPos实现鼠标位置的实时显示
通过WinAPI GetCursorPos实现鼠标位置的实时显示 有时候我们需要将鼠标的位置实时抓取出来,可以通过如下方式实现. 添加一个Timer控件,执行间隔改为100ms,双击控件输入如下代码: ...
- Delphi - cxGrid设定字段类型为CheckBox
cxGrid设定字段类型为CheckBox 1:设定OraQuery属性 CachedUpdates设定为True: 双击打开OraQuery,选中Update SQLs页面,Insert.Updat ...
- Eclipse Paho MQTT Utility
下载地址: https://repo.eclipse.org/content/repositories/paho-releases/org/eclipse/paho/org.eclipse.paho. ...
- 爬虫——网页解析利器--re & xpath
正则解析模块re re模块使用流程 方法一 r_list=re.findall('正则表达式',html,re.S) 方法二 创建正则编译对象 pattern = re.compile('正则表达式 ...
- SQlServer 数据库表名称,字段比较
项目中一般分测试环境(QAS),生产环境(PRD),当我们的项目经历了一次周期跨度较长的更新后,当我们发布到生产环境时,首要的任务是将新增的表,字段更新到生产数据库.很多时候,当我们发布更新的时候,已 ...
- CodeForces Educational Codeforces Round 51 (Rated for Div. 2)
A:Vasya And Password 代码: #include<bits/stdc++.h> using namespace std; #define Fopen freopen(&q ...