Spring系列__04AOP
AOP简介
今天来介绍一下AOP。AOP,中文常被翻译为“面向切面编程”,其作为OOP的扩展,其思想除了在Spring中得到了应用,也是不错的设计方法。通常情况下,一个软件系统,除了正常的业务逻辑代码,往往还有一些功能性的代码,比如:记录日志、数据校验等等。最原始的办法就是直接在你的业务逻辑代码中编写这些功能性代码,但是,这样除了当时开发的时候比较方便以外;代码的阅读性、可维护性都会大大降低。而且,当你需要频繁使用一个功能的时候(比如记录日志),你还需要重复编写。而使用AOP的好处,简单来说就是,它能把这种重复性的功能代码抽离出来,在需要的时候,通过动态代理技术,在不修改源代码的情况下提供增强性功能。
优势:
- 减少重复代码
- 提高开发效率
- 代码更加整洁,提高了可维护性
说了这么多,简单演示一下,我们假定现在要实现一个账户转账的功能,这里面会涉及到一些事务的控制,从代码的合理性角度出发,我们将其放在service层。
@Getter

@Setter

@NoArgsConstructor

@AllArgsConstructor

@ToString

@EqualsAndHashCode

public class Account implements Serializable {

    private Integer id;

    private String name;

    private Float money;

}

public interface AccountDao {

    /**

     * 查询所有

     * @return

     */

    List<Account> findAllAccount();

    /**

     * 查询一个

     * @return

     */

    Account findAccountById(Integer accountId);

    /**

     * 保存

     * @param account

     */

    void saveAccount(Account account);

    /**

     * 更新

     * @param account

     */

    void updateAccount(Account account);

    /**

     * 删除

     * @param acccountId

     */

    void deleteAccount(Integer acccountId);

    /**

     * 根据名称查询账户

     * @param accountName

     * @return  如果有唯一的一个结果就返回,如果没有结果就返回null

     *          如果结果集超过一个就抛异常

     */

    Account findAccountByName(String accountName);

}

public class AccountServiceImpl_OLD implements AccountService {

    private AccountDao accountDao;

    private TransactionManager txManager;

    public void setTxManager(TransactionManager txManager) {

        this.txManager = txManager;

    }

    public void setAccountDao(AccountDao accountDao) {

        this.accountDao = accountDao;

    }

    @Override

    public List<Account> findAllAccount() {

        try {

            //1.开启事务

            txManager.beginTransaction();

            //2.执行操作

            List<Account> accounts = accountDao.findAllAccount();

            //3.提交事务

            txManager.commit();

            //4.返回结果

            return accounts;

        }catch (Exception e){

            //5.回滚操作

            txManager.rollback();

            throw new RuntimeException(e);

        }finally {

            //6.释放连接

            txManager.release();

        }

    }

    @Override

    public Account findAccountById(Integer accountId) {

        try {

            //1.开启事务

            txManager.beginTransaction();

            //2.执行操作

            Account account = accountDao.findAccountById(accountId);

            //3.提交事务

            txManager.commit();

            //4.返回结果

            return account;

        }catch (Exception e){

            //5.回滚操作

            txManager.rollback();

            throw new RuntimeException(e);

        }finally {

            //6.释放连接

            txManager.release();

        }

    }

    @Override

    public void saveAccount(Account account) {

        try {

            //1.开启事务

            txManager.beginTransaction();

            //2.执行操作

            accountDao.saveAccount(account);

            //3.提交事务

            txManager.commit();

        }catch (Exception e){

            //4.回滚操作

            txManager.rollback();

        }finally {

            //5.释放连接

            txManager.release();

        }

    }

    @Override

    public void updateAccount(Account account) {

        try {

            //1.开启事务

            txManager.beginTransaction();

            //2.执行操作

            accountDao.updateAccount(account);

            //3.提交事务

            txManager.commit();

        }catch (Exception e){

            //4.回滚操作

            txManager.rollback();

        }finally {

            //5.释放连接

            txManager.release();

        }

    }

    @Override

    public void deleteAccount(Integer acccountId) {

        try {

            //1.开启事务

            txManager.beginTransaction();

            //2.执行操作

            accountDao.deleteAccount(acccountId);

            //3.提交事务

            txManager.commit();

        }catch (Exception e){

            //4.回滚操作

            txManager.rollback();

        }finally {

            //5.释放连接

            txManager.release();

        }

    }

    @Override

    public void transfer(String sourceName, String targetName, Float money) {

        try {

            //1.开启事务

            txManager.beginTransaction();

            //2.执行操作

            //2.1根据名称查询转出账户

            Account source = accountDao.findAccountByName(sourceName);

            //2.2根据名称查询转入账户

            Account target = accountDao.findAccountByName(targetName);

            //2.3转出账户减钱

            source.setMoney(source.getMoney()-money);

            //2.4转入账户加钱

            target.setMoney(target.getMoney()+money);

            //2.5更新转出账户

            accountDao.updateAccount(source);

            int i=1/0;

            //2.6更新转入账户

            accountDao.updateAccount(target);

            //3.提交事务

            txManager.commit();

        }catch (Exception e){

            //4.回滚操作

            txManager.rollback();

            e.printStackTrace();

        }finally {

            //5.释放连接

            txManager.release();

        }

    }
在这里,我们看见了很恶心的代码:大量重复性的记录日志的代码,而且,当你更改的时候,你发现并不方便。后续我们会对这个代码进行改写。
AOP的实现方式
AOP通过动态代理的来实现。
动态代理简介
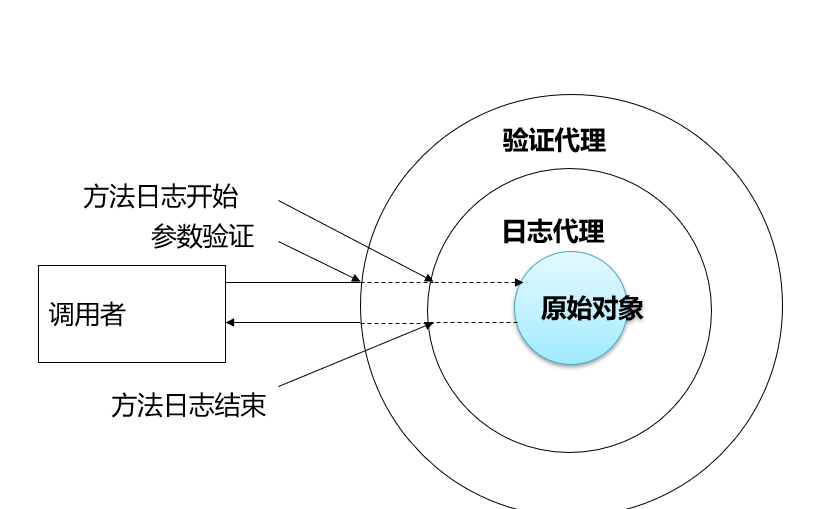
在这里先简单介绍一下动态代理:使用一个代理将对象包装起来, 然后用该代理对象取代原始对象.。任何对原始对象的调用都要通过代理. 代理对象决定是否以及何时将方法调用转到原始对象上。其调用过程如下图所示:
特点:
- 字节码随用随创建,随用随加载。
- 它与静态代理的区别也在于此。因为静态代理是字节码一上来就创建好,并完成加载。
- 装饰者模式就是静态代理的一种体现。
动态代理有两种形式
- 基于接口的动态代理
提供者: JDK 官方的 Proxy 类。
要求:被代理类最少实现一个接口 - 基于子类的动态代理
提供者:第三方的 CGLib,如果报 asmxxxx 异常,需要导入 asm.jar。
要求:被代理类不能用 final 修饰的类(最终类)。
下面结合示例来解释一下这两种动态代理的实现方式:
笔者最近更换了一台新的电脑,就以买电脑来举个例子吧。现在大家买电脑,已经很少去实体店了,多半是通过电商渠道。不管是什么,都是从中间商来买,这一行为,在无形中就体现了代理模式的思想。
电脑生产商最开始的时候,除了生产和组装电脑,同时还可以将电脑出售给消费者或者经销商(代理商),而他对顾客来说,需要完成两种服务:销售商品和售后服务。当行业发展到一定阶段,电脑生产商不断增多,人们就会制定一些行业规范来让大家共同遵守(也就是抽象出来的接口)。而且,电脑生产商为了节约成本,不再提供直接和消费者销售的服务,我们消费者也因此只能从代理商那里购买新的电脑。这便是典型的代理模式。
使用 JDK 官方的 Proxy 类创建代理对象
public interface IProducer {

    public void saleProduct(float money);

    public void afterService(float money);

}

public class Producer implements IProducer {

    @Override

    public void saleProduct(float money) {

        System.out.println("销售产品,并拿到钱:" + money);

    }

    @Override

    public void afterService(float money) {

        System.out.println("提供售后服务,并拿到钱:" + money);

    }

}

//消费者

public class Client {

    public static void main(String[] args) {

        final Producer producer = new Producer();

        /**

         *  如何创建代理对象:

         *  使用Proxy类中的newProxyInstance方法

         *  创建代理对象的要求:

         *      被代理类最少实现一个接口,如果没有则不能使用

         *  newProxyInstance方法的参数:

         *      ClassLoader:类加载器

         *          它是用于加载代理对象字节码的。和被代理对象使用相同的类加载器。固定写法。

         *      Class[]:字节码数组

         *          它是用于让代理对象和被代理对象有相同方法。固定写法。

         *     InvocationHandler:用于提供增强的代码

         *          它是让我们写如何代理。我们一般都是些一个该接口的实现类,通常情况下都是匿名内部类,但不是必须的。

         *          此接口的实现类都是谁用谁写。

         */

        IProducer proxyProducer = (IProducer) Proxy.newProxyInstance(producer.getClass().getClassLoader(),

                producer.getClass().getInterfaces(), new InvocationHandler() {

                    /**

                     * 作用:执行被代理对象的任何接口方法都会经过该方法

                     * 方法参数的含义

                     * @param proxy   代理对象的引用

                     * @param method  当前执行的方法

                     * @param args    当前执行方法所需的参数

                     * @return 和被代理对象方法有相同的返回值

                     * @throws Throwable

                     */

                    @Override

                    public Object invoke(Object proxy, Method method, Object[] args) throws Throwable {

                        //提供增强的代码

                        Object returnValue = null;

                        //1.获取方法执行的参数

                        Float money = (Float)args[0];

                        //2.判断当前方法是不是销售,如果是的话,打八折

                        if("saleProduct".equals(method.getName())) {

                            returnValue = method.invoke(producer, money*0.8f);

                        }

                        return returnValue;

                    }

                });

        proxyProducer.saleProduct(10000f);

    }

}
使用jdk提供的Proxy来创建代理对象的时候,要求别代理对象至少要实现一个接口,代理类需要实现同样的接口并由同一类加载器加载。如果没有这样,就不能使用这种方式了。其他具体内容,请参考官方文档。
cglib方式来实现动态代理
其实,说AOP是OOP的延伸,还是很容易证明的:jdk提供动态代理的方式是实现接口,而cglib的实现方式就是利用了OOP的继承。原理大同小异,主要区别就是不用实现接口而是改用继承,也因此具备继承的限制:被代理的类不能是被final修饰。
public class Client {

    public static void main(String[] args) {

        final Producer producer = new Producer();

        /**

         *  create方法的参数:

         *      Class:字节码

         *          它是用于指定被代理对象的字节码。

         *

         *      Callback:用于提供增强的代码

         *          它是让我们写如何代理。我们一般都是些一个该接口的实现类,通常情况下都是匿名内部类,但不是必须的。

         *          此接口的实现类都是谁用谁写。

         *          我们一般写的都是该接口的子接口实现类:MethodInterceptor

         */

        Producer proxyProducer = (Producer) Enhancer.create(producer.getClass(), new MethodInterceptor() {

            @Override

            public Object intercept(Object o, Method method, Object[] objects,

                                    MethodProxy methodProxy) throws Throwable {

                Object result = null;

                Float price = (Float) objects[0];

                if ("saleProduct".equals(method.getName())) {

                    result = method.invoke(o, price * 0.8f);

                }

                return result;

            }

        });

        proxyProducer.saleProduct(10000f);

    }

}

ublic class Client {

    public static void main(String[] args) {

        final Producer producer = new Producer();

        /**

         *  create方法的参数:

         *      Class:字节码

         *          它是用于指定被代理对象的字节码。

         *

         *      Callback:用于提供增强的代码

         *          它是让我们写如何代理。我们一般都是些一个该接口的实现类,通常情况下都是匿名内部类,但不是必须的。

         *          此接口的实现类都是谁用谁写。

         *          我们一般写的都是该接口的子接口实现类:MethodInterceptor

         */

        Producer proxyProducer = (Producer) Enhancer.create(producer.getClass(), new MethodInterceptor() {

            @Override

            public Object intercept(Object o, Method method, Object[] objects,

                                    MethodProxy methodProxy) throws Throwable {

                Object result = null;

                Float price = (Float) objects[0];

                if ("saleProduct".equals(method.getName())) {

                    result = method.invoke(o, price * 0.8f);

                }

                return result;

            }

        });

        proxyProducer.saleProduct(10000f);

    }

}
Spring中的AOP
以上所述的两种生成代理对象的方法,在Spring中都会应用:默认优先使用jdk自带的方式,当发现别代理类没有实现接口时改用cglib方式。
专业术语直白翻译
- Joinpoint(连接点):
所谓的连击点,就是你的业务逻辑中的每一个方法,都被称作连接点。而且,和AspectJ和JBoss不同,Spring不支持字段和构造器连接点,只支持方法级别的连接点。 - Pointcut(切入点):
当你要对一个连接点进行额外的功能添加时,这个连接点就是切入点。 - Advice(通知/增强):
通知就是你拦截了切点后要做的事情。根据你要做的时机,分为:前置通知、后置通知、返回通知、异常通知和环绕通知。 - Introduction(引介):
引介是一种特殊的通知在不修改类代码的前提下, Introduction 可以在运行期为类动态地添加一些方法或 Field。 - Target(目标对象):
代理的目标对象。 - Weaving(织入):
是指把增强应用到目标对象来创建新的代理对象的过程。spring 采用动态代理织入,而 AspectJ 采用编译期织入和类装载期织入。 - Proxy(代理) :
一个类被 AOP 织入增强后,就产生一个结果代理类。 - Aspect(切面):
是切入点和通知(引介)的结合。
实战演练
这次我们打算做一个简单一点的功能:实现一个能够进行加减乘除运算的计算器,并进行相应的日志记录
过程主要是以下几步:
1.开发业务逻辑代码
2.开发切面代码
3.配置ioc,将计算器和切面配置到Spring容器中
4.切面配置,开启AOP
对于配置的方式,主要是还是两种方式:
Java配置:
public interface ArithmeticCalculator {

	int add(int i, int j);

	int sub(int i, int j);

	int mul(int i, int j);

	int div(int i, int j);

}

@Component("arithmeticCalculator")

public class ArithmeticCalculatorImpl implements ArithmeticCalculator {

	@Override

	public int add(int i, int j) {

		int result = i + j;

		return result;

	}

	@Override

	public int sub(int i, int j) {

		int result = i - j;

		return result;

	}

	@Override

	public int mul(int i, int j) {

		int result = i * j;

		return result;

	}

	@Override

	public int div(int i, int j) {

		int result = i / j;

		return result;

	}

}

package com.spring.demo.springaop;

import org.aspectj.lang.JoinPoint;

import org.aspectj.lang.annotation.*;

import org.springframework.stereotype.Component;

import java.util.Arrays;

/**

 * 可以使用 @Order 注解指定切面的优先级, 值越小优先级越高

 */

@Aspect

@Component

public class LoggingAspect {

    @Pointcut("execution(public int com.spring.demo.springaop.ArithmeticCalculator.*(..))")

    public void declareJoinPoint() {}

    @Before("declareJoinPoint()")

    public void beforeMehtod(JoinPoint joinPoint) {

        String methodName = joinPoint.getSignature().getName();

        Object[] args = joinPoint.getArgs();

        System.out.println("the " + methodName + " begins with " + Arrays.asList(args));

    }

    @AfterReturning(value = "declareJoinPoint()", returning = "result")

    public void afterMethod(JoinPoint joinPoint, Object result) {

        String methodName = joinPoint.getSignature().getName();

        System.out.println("the " + methodName + " ends successfully with result is " + result);

    }

    @AfterThrowing(value = "declareJoinPoint()", throwing = "e")

    public void afterException(JoinPoint joinPoint, Exception e) {

        String methodName = joinPoint.getSignature().getName();

        System.out.println("the " + methodName + "occurs a Exception by" + e.getMessage());

    }

    /**

     * 环绕通知需要携带 ProceedingJoinPoint 类型的参数.

     * 环绕通知类似于动态代理的全过程: ProceedingJoinPoint 类型的参数可以决定是否执行目标方法.

     * 且环绕通知必须有返回值, 返回值即为目标方法的返回值

     */

	/*

	@Around("execution(public int com.spring.demo.springaop.ArithmeticCalculator.*(..))")

	public Object aroundMethod(ProceedingJoinPoint pjd){

		Object result = null;

		String methodName = pjd.getSignature().getName();

		try {

			//前置通知

			System.out.println("The method " + methodName + " begins with " + Arrays.asList(pjd.getArgs()));

			//执行目标方法

			result = pjd.proceed();

			//返回通知

			System.out.println("The method " + methodName + " ends with " + result);

		} catch (Throwable e) {

			//异常通知

			System.out.println("The method " + methodName + " occurs exception:" + e);

			throw new RuntimeException(e);

		}

		//后置通知

		System.out.println("The method " + methodName + " ends");

		return result;

	}

	*/

}

@Order(1)

@Aspect

@Component

public class VlidationAspect {

	@Before("com.spring.demo.springaop.LoggingAspect.declareJoinPoint()")

	public void validateArgs(JoinPoint joinPoint){

		System.out.println("-->validate:" + Arrays.asList(joinPoint.getArgs()));

	}

}

@EnableAspectJAutoProxy

@Configuration

@ComponentScan

public class MainConcig {

}

public class Main {

    public static void main(String[] args) {

        AnnotationConfigApplicationContext context = new AnnotationConfigApplicationContext("com.spring.demo" +

                ".springaop");

        ArithmeticCalculator arithmeticCalculator = (ArithmeticCalculator) context.getBean("arithmeticCalculator");

        int add = arithmeticCalculator.add(100, 200);

    }

}
xml文件配置
JavaBean还是这些,只是将各个注解删除即可,而bean的配置和aop功能的开启,由配置文件来声明。要引入aop命名空间。
<!-- 配置 bean -->

	<bean id="arithmeticCalculator"

		class="com.spring.demo.springaop.xml.ArithmeticCalculatorImpl"></bean>

	<!-- 配置切面的 bean. -->

	<bean id="loggingAspect"

		class="com.spring.demo.springaop.xml.LoggingAspect"></bean>

	<bean id="vlidationAspect"

		class="com.spring.demo.springaop.xml.VlidationAspect"></bean>

	<!-- 配置 AOP -->

	<aop:config>

		<!-- 配置切点表达式 -->

		<aop:pointcut expression="execution(* com.spring.demo.springaop.ArithmeticCalculator.*(int, int))"

			id="pointcut"/>

		<!-- 配置切面及通知 -->

		<aop:aspect ref="loggingAspect" order="2">

			<aop:before method="beforeMethod" pointcut-ref="pointcut"/>

			<aop:after method="afterMethod" pointcut-ref="pointcut"/>

			<aop:after-throwing method="afterThrowing" pointcut-ref="pointcut" throwing="e"/>

			<aop:after-returning method="afterReturning" pointcut-ref="pointcut" returning="result"/>

			<!--

			<aop:around method="aroundMethod" pointcut-ref="pointcut"/>

			-->

		</aop:aspect>

		<aop:aspect ref="vlidationAspect" order="1">

			<aop:before method="validateArgs" pointcut-ref="pointcut"/>

		</aop:aspect>

	</aop:config>
切入点表达式说明(引用别人的,懒得写了)
execution:匹配方法的执行(常用)
execution(表达式)
表达式语法: execution([修饰符] 返回值类型 包名.类名.方法名(参数))
写法说明:
全匹配方式:
public void com.itheima.service.impl.AccountServiceImpl.saveAccount(com.itheima.domain.Account)
访问修饰符可以省略
void com.itheima.service.impl.AccountServiceImpl.saveAccount(com.itheima.domain.Account)
返回值可以使用号,表示任意返回值
*
com.itheima.service.impl.AccountServiceImpl.saveAccount(com.itheima.domain.Account)
包名可以使用号,表示任意包,但是有几级包,需要写几个*
- ....AccountServiceImpl.saveAccount(com.itheima.domain.Account)
使用..来表示当前包,及其子包 - com..AccountServiceImpl.saveAccount(com.itheima.domain.Account)
类名可以使用*号,表示任意类 - com...saveAccount(com.itheima.domain.Account)
方法名可以使用号,表示任意方法 - com...( com.itheima.domain.Account)
参数列表可以使用*,表示参数可以是任意数据类型,但是必须有参数 - com...(*)
参数列表可以使用..表示有无参数均可,有参数可以是任意类型 - com...(..)
全通配方式: - ...(..)
注:
通常情况下,我们都是对业务层的方法进行增强,所以切入点表达式都是切到业务层实现类。
execution( com.itheima.service.impl..(..))
补充说明: 引入通知
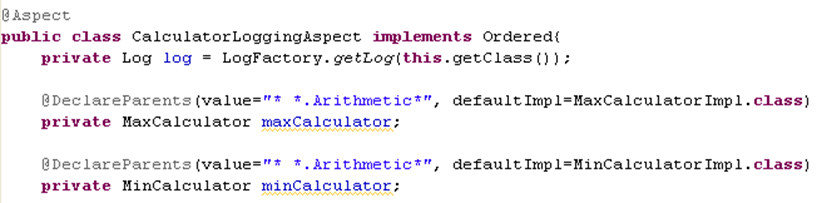
引入通知是一种特殊的通知类型. 它通过为接口提供实现类, 允许对象动态地实现接口, 就像对象已经在运行时扩展了实现类一样。

引入通知可以使用两个实现类 MaxCalculatorImpl 和 MinCalculatorImpl, 让 ArithmeticCalculatorImpl 动态地实现 MaxCalculator 和 MinCalculator 接口. 而这与从 MaxCalculatorImpl 和 MinCalculatorImpl 中实现多继承的效果相同. 但却不需要修改 ArithmeticCalculatorImpl 的源代码。
引入通知也必须在切面中声明。
代码演示

Spring系列__04AOP的更多相关文章
- Spring 系列: Spring 框架简介 -7个部分
Spring 系列: Spring 框架简介 Spring AOP 和 IOC 容器入门 在这由三部分组成的介绍 Spring 框架的系列文章的第一期中,将开始学习如何用 Spring 技术构建轻量级 ...
- Spring 系列: Spring 框架简介
Spring AOP 和 IOC 容器入门(转载) 在这由三部分组成的介绍 Spring 框架的系列文章的第一期中,将开始学习如何用 Spring 技术构建轻量级的.强壮的 J2EE 应用程序.dev ...
- Spring 系列: Spring 框架简介(转载)
Spring 系列: Spring 框架简介 http://www.ibm.com/developerworks/cn/java/wa-spring1/ Spring AOP 和 IOC 容器入门 在 ...
- Spring系列
Spring系列之访问数据库 阅读目录 一.概述 二.JDBC API的最佳实践 三.Spring对ORM的集成 回到顶部 一.概述 Spring的数据访问层是以统一的数据访问异常层体系为核心,结 ...
- 通俗化理解Spring3 IoC的原理和主要组件(spring系列知识二总结)
♣什么是IoC? ♣通俗化理解IoC原理 ♣IoC好处 ♣工厂模式 ♣IoC的主要组件 ♣IoC的应用实例 ♣附:实例代码 1.什么是IoC(控制反转)? Spring3框架的核心是实现控制反转(Io ...
- 【SSH框架】之Spring系列(一)
微信公众号:compassblog 欢迎关注.转发,互相学习,共同进步! 有任何问题,请后台留言联系! 1.前言 前面更新过几篇关于 Struts2 框架和 Hibernate 框架的文章,但鉴于这两 ...
- Spring系列之手写一个SpringMVC
目录 Spring系列之IOC的原理及手动实现 Spring系列之DI的原理及手动实现 Spring系列之AOP的原理及手动实现 Spring系列之手写注解与配置文件的解析 引言 在前面的几个章节中我 ...
- Spring系列(七) Spring MVC 异常处理
Servlet传统异常处理 Servlet规范规定了当web应用发生异常时必须能够指明, 并确定了该如何处理, 规定了错误信息应该包含的内容和展示页面的方式.(详细可以参考servlet规范文档) 处 ...
- 狗鱼IT教程:推介最强最全的Spring系列教程
Spring是一个开源框架,Spring是于2003 年兴起的一个轻量级的Java 开发框架,由Rod Johnson创建. 简单来说,Spring是一个分层的JavaSE/EEfull-stack( ...
随机推荐
- javascript数组去重 js数组去重
数组去重的方法 一.利用ES6 Set去重(ES6中最常用) function unique (arr) { return Array.from(new Set(arr)) } var arr = [ ...
- JS判断字符串长度,结合element el-input el-form 表单验证(英文占1个字符,中文汉字占2个字符)
首先看看判断字符串长度的几种方法(英文占1个字符,中文汉字占2个字符) 方法一: function strlen(str) { var len = 0; for (var i = 0; i < ...
- cs224d---词向量表示
1 Word meaning 1. 1 word meaning的两种定义 Definition meaning:单词的含义指代了客观存在的具体事物,如眼镜. Distributional simil ...
- (二十八)c#Winform自定义控件-文本框(一)
前提 入行已经7,8年了,一直想做一套漂亮点的自定义控件,于是就有了本系列文章. 开源地址:https://gitee.com/kwwwvagaa/net_winform_custom_control ...
- java多线程与并发(基础篇)
一.进程与线程 进程:是代码在数据集合上的一次运行活动,是系统进行资源分配和调度的基本单位. 线程:是进程的一个执行路径,一个进程中至少有一个线程,进程中的多个线程共享进程的 资源. 虽然系统是把资源 ...
- 在centos6系列vps装Tomcat8.0
In the following tutorial you will learn how to install and set-up Apache Tomcat 8 on your CentOS 6 ...
- (三十九)c#Winform自定义控件-面包屑导航
前提 入行已经7,8年了,一直想做一套漂亮点的自定义控件,于是就有了本系列文章. 开源地址:https://gitee.com/kwwwvagaa/net_winform_custom_control ...
- RecyclerView实现混合布局
PS:好长时间不写博客了,起初是不知道写些什么,后来接触了到了很多东西,原本看似简单的东西,背后都隐藏着巨大的秘密,想handler的使用,一般情况下会引起内存泄漏问题,想着找到方法结局不就得了吗,可 ...
- Spring源码剖析9:Spring事务源码剖析
转自:http://www.linkedkeeper.com/detail/blog.action?bid=1045 声明式事务使用 Spring事务是我们日常工作中经常使用的一项技术,Spring提 ...
- Python|队列Queue
一 前言 本文算是一次队列的学习笔记,Queue 模块实现了三种类型的队列,它们的区别仅仅是队列中元素被取回的顺序.在 FIFO 队列中,先添加的任务先取回.在 LIFO 队列中,最近被添加的元素先取 ...