梦琪小生 【转】【WPF】WPF MVVM 简单实例
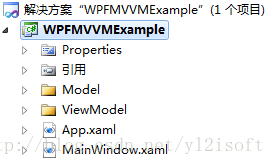
1 新建WPF 应用程序WPFMVVMExample
程序结构如下图所示。
2 Model实现
在Model文件夹下新建业务类StudentModel(类文件StudentModel.cs),类的详细代码如下所示。

using System.ComponentModel; namespace WPFMVVMExample.Model
{
public class StudentModel : INotifyPropertyChanged
{
/// <summary>
/// 学号
/// </summary>
private int studentId;
public int StudentId
{
get
{
return studentId;
}
set
{
studentId = value;
NotifyPropertyChanged("StudentId");
}
} /// <summary>
/// 姓名
/// </summary>
private string studentName;
public string StudentName
{
get
{
return studentName;
}
set
{
studentName = value;
NotifyPropertyChanged("StudentName");
}
} /// <summary>
/// 年龄
/// </summary>
private int studentAge;
public int StudentAge
{
get
{
return studentAge;
}
set
{
studentAge = value;
NotifyPropertyChanged("StudentAge");
}
} /// <summary>
/// </summary>
private string studentEmail;
public string StudentEmail
{
get
{
return studentEmail;
}
set
{
studentEmail = value;
NotifyPropertyChanged("StudentEmail");
}
} /// <summary>
/// 性别
/// </summary>
private string studentSex;
public string StudentSex
{
get
{
return studentSex;
}
set
{
studentSex = value;
NotifyPropertyChanged("StudentSex");
}
} public event PropertyChangedEventHandler PropertyChanged;
public void NotifyPropertyChanged(string propertyName)
{
if (PropertyChanged != null)
{
PropertyChanged(this, new PropertyChangedEventArgs(propertyName));
}
}
}
}
StudentModel类实现了接口INotifyPropertyChanged。当类实现该接口后,便可以向执行绑定的客户端发出某一属性值已更改的通知。
3 ViewModel实现
在ViewModel文件夹下新建类文件StudentViewModel.cs,类文件的详细代码如下所示。
using System;

using System.Windows.Input;

using WPFMVVMExample.Model;

namespace WPFMVVMExample.ViewModel

{

    public class StudentViewModel

    {

        public DelegateCommand ShowCommand { get; set; }

        public StudentModel Student { get; set; }

        public StudentViewModel()

        {

            Student = new StudentModel();

            ShowCommand=new DelegateCommand();

            ShowCommand.ExecuteCommand = new Action<object>(ShowStudentData);

        }

        private void ShowStudentData(object obj)

        {

            Student.StudentId = 1;

            Student.StudentName = "tiana";

            Student.StudentAge = 20;

            Student.StudentEmail = "8644003248@qq.com";

            Student.StudentSex = "大帅哥";

        }

    }

    public class DelegateCommand : ICommand

    {

        public Action<object> ExecuteCommand = null;

        public Func<object, bool> CanExecuteCommand = null;

        public event EventHandler CanExecuteChanged;

        public bool CanExecute(object parameter)

        {

            if (CanExecuteCommand != null)

            {

                return this.CanExecuteCommand(parameter);

            }

            else

            {

                return true;

            }

        }

        public void Execute(object parameter)

        {

            if (this.ExecuteCommand != null)

            {

                this.ExecuteCommand(parameter);

            }

        }

        public void RaiseCanExecuteChanged()

        {

            if (CanExecuteChanged != null)

            {

                CanExecuteChanged(this, EventArgs.Empty);

            }

        }

    }

}
代码中,除了定义StudentViewModel类外,还定义了DelegateCommand类,该类实现了ICommand接口。
ICommand接口中的Execute()方法用于命令的执行,CanExecute()方法用于指示当前命令在目标元素上是否可用,当这种可用性发生改变时便会触发接口中的CanExecuteChanged事件。
我们可以将实现了ICommand接口的命令DelegateCommand赋值给Button(命令源)的Command属性(只有实现了ICommandSource接口的元素才拥有该属性),这样Button便与命令进行了绑定。
4 MainWindow.xaml实现
MainWindow.xaml的界面如下图所示。
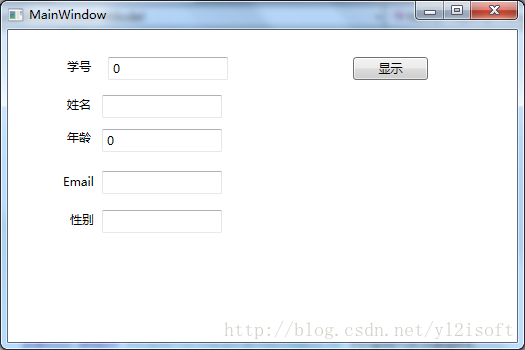
MainWindow.xaml界面的xaml代码如下所示。
<Window x:Class="WPFMVVMExample.MainWindow"

        xmlns="http://schemas.microsoft.com/winfx/2006/xaml/presentation"

        xmlns:x="http://schemas.microsoft.com/winfx/2006/xaml"

        Title="MainWindow" Height="350" Width="525">

    <Grid>

        <Label Content="学号" Height="28" HorizontalAlignment="Left" Margin="54,23,0,0" Name="labelStudentId" VerticalAlignment="Top" />

        <TextBox Text="{Binding Student.StudentId}" IsReadOnly="True" Height="23" HorizontalAlignment="Right" Margin="0,27,289,0" Name="textBoxStudentId" VerticalAlignment="Top" Width="120" />

        <Label Content="姓名" Height="28" HorizontalAlignment="Left" Margin="54,61,0,0" Name="labelStudentName" VerticalAlignment="Top" />

        <TextBox Text="{Binding Student.StudentName}" IsReadOnly="True" Height="23" HorizontalAlignment="Left" Margin="94,65,0,0" Name="textBoxStudentName" VerticalAlignment="Top" Width="120" />

        <Label Content="年龄" Height="28" HorizontalAlignment="Left" Margin="54,94,0,0" Name="labelStudentAge" VerticalAlignment="Top" />

        <TextBox Text="{Binding Student.StudentAge}" IsReadOnly="True" Height="23" HorizontalAlignment="Left" Margin="94,99,0,0" Name="textBoxStudentAge" VerticalAlignment="Top" Width="120" />

        <Label Content="Email" Height="28" HorizontalAlignment="Left" Margin="50,138,0,0" Name="labelStudentEmail" VerticalAlignment="Top" />

        <TextBox Text="{Binding Student.StudentEmail}" IsReadOnly="True" Height="23" HorizontalAlignment="Left" Margin="94,141,0,0" Name="textBoxStudentEmail" VerticalAlignment="Top" Width="120" />

        <Label Content="性别" Height="28" HorizontalAlignment="Left" Margin="57,176,0,0" Name="labelStudentSex" VerticalAlignment="Top" />

        <TextBox Text="{Binding Student.StudentSex}" IsReadOnly="True" Height="23" HorizontalAlignment="Left" Margin="94,180,0,0" Name="textBoxStudentSex" VerticalAlignment="Top" Width="120" />

        <Button Command="{Binding ShowCommand}" Content="显示" Height="23" HorizontalAlignment="Left" Margin="345,27,0,0" Name="buttonShow" VerticalAlignment="Top" Width="75" />

    </Grid>

</Window>
MainWindow.xaml的后端代码如下所示。
using System.Windows;

using WPFMVVMExample.ViewModel;

namespace WPFMVVMExample

{

    /// <summary>

    /// MainWindow.xaml 的交互逻辑

    /// </summary>

    public partial class MainWindow : Window

    {

        public MainWindow()

        {

            InitializeComponent();

            this.DataContext = new StudentViewModel();

        }

    }

}
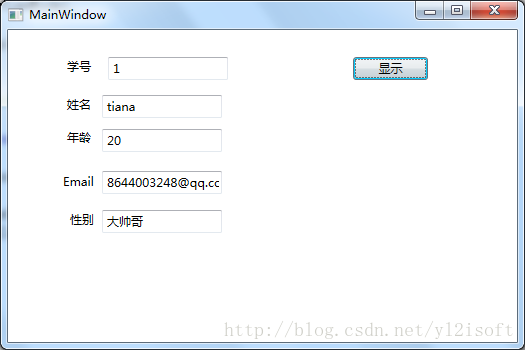
5 运行程序
运行程序,点击“显示”按钮,即将数据绑定至界面显示。
6 说明
WPF中使用MVVM可以降低UI显示与后端逻辑代码的耦合度,即更换界面时,只需要修改很少的逻辑代码就可以实现,甚至不用修改。
在WinForm开发中,我们一般会直接操作界面的元素(如:TextBox1.Text=“aaa”),这样一来,界面变化后,后端逻辑代码也需要做相应的变更。
在WPF中使用数据绑定机制,当数据变化后,数据会通知界面变更的发生,而不需要通过访问界面元素来修改值,这样在后端逻辑代码中也就不必操作或者很少操作界面的元素了。
使用MVVM,可以很好的配合WPF的数据绑定机制来实现UI与逻辑代码的分离,MVVM中的View表示界面,负责页面显示,ViewModel负责逻辑处理,包括准备绑定的数据和命令,ViewModel通过View的DataContext属性绑定至View,Model为业务模型,供ViewModel使用。
梦琪小生 【转】【WPF】WPF MVVM 简单实例的更多相关文章
- Wpf(Storyboard)动画简单实例
原文:Wpf(Storyboard)动画简单实例 动画的三种变换方式 RotateTransform:旋转变换变化值:CenterX围绕转的圆心横坐标 CenterY纵坐标 Angle旋转角度(角度正 ...
- WPF框架MVVM简单例子
MVVM是Model-View-ViewModel的缩写形式,它通常被用于WPF或Silverlight开发.Model——可以理解为带有字段,属性的类.View——可以理解为我们所看到的UI.Vie ...
- 【转】【WPF】WPF MVVM 简单实例
1 新建WPF 应用程序WPFMVVMExample 程序结构如下图所示. 2 Model实现 在Model文件夹下新建业务类StudentModel(类文件StudentModel.cs),类的详细 ...
- WPF单线程定时器 简单实例
//窗体加载完毕 void MyMessageBox_Loaded(object sender, RoutedEventArgs e) { //启动定时期倒计时,多线程计时 //System.Thre ...
- WPF自学入门(十)WPF MVVM简单介绍
前面文章中,我们已经知道,WPF技术的主要特点是数据驱动UI,所以在使用WPF技术开发的过程中是以数据为核心的,WPF提供了数据绑定机制,当数据发生变化时,WPF会自动发出通知去更新UI. 我们不管 ...
- 从0到1:使用Caliburn.Micro(WPF和MVVM)开发简单的计算器
从0到1:使用Caliburn.Micro(WPF和MVVM)开发简单的计算器 之前时间一直在使用Caliburn.Micro这种应用了MVVM模式的WPF框架做开发,是时候总结一下了. Calibu ...
- WPF自学入门(十一)WPF MVVM模式Command命令 WPF自学入门(十)WPF MVVM简单介绍
WPF自学入门(十一)WPF MVVM模式Command命令 在WPF自学入门(十)WPF MVVM简单介绍中的示例似乎运行起来没有什么问题,也可以进行更新.但是这并不是我们使用MVVM的正确方式 ...
- WPF MVVM简单介绍
前面文章中,我们已经知道,WPF技术的主要特点是数据驱动UI,所以在使用WPF技术开发的过程中是以数据为核心的,WPF提供了数据绑定机制,当数据发生变化时,WPF会自动发出通知去更新UI. 我们不管 ...
- WPF 微信 MVVM 【续】发送部分QQ表情
今天主要记录的就是发送QQ表情, WPF 微信 MVVM里写了,后期为了发送QQ表情,需要把TextBox替换为RichTextBox,接下来就说说替换的过程. 一.支持Binding的RichTex ...
随机推荐
- PYTHON 连接SQL2008 导出到EXCEL
#import pymssql from datetime import datetime import pyodbc import os current_dir = os.path.abspath( ...
- matlab——插值与拟合
@ 目录 前言 一.拟合 1.定义 2.三种判别准则 3.最小二乘法 (1)一般形式 (2)常用函数 (3)matlab实现 二.插值 1.定义 2.方法 (1)分段线性插值 (2)拉格朗日插值多项式 ...
- Java基础00-集合进阶26
1. Collection Collection常用方法详解 1.1 集合知识回顾 1.2 集合类体系结构 集合存储数据的方式有单列和双列 Collection中还有List(可以存储可重复的数据)和 ...
- Hector SLAM解读(1)原文翻译
一种带有3D运动状态估计的slam系统 A Flexible and Scalable SLAM System with Full 3D Motion Estimation 摘要: 在许多应用场景 ...
- Maven多模块Spring的注入
第一次做多模块项目,Unit Test的时候发现Biz模块没法注入Dal模块的Mappper,提示找不到Bean. POM文件是正确引入了dependency的,扫描的package也没错,所以卡了好 ...
- Bat脚本备份sqlserver 表结构、存储过程、函数、指定表数据
Bat脚本备份sqlserver 表结构.存储过程.指定表数据: @echo off cd /d %~dp0 ::备份表结构.存储过程和部分配置表的数据 set LogFile=report.log ...
- PAT乙级:1088 三人行 (20分)
PAT乙级:1088 三人行 (20分) 题干 子曰:"三人行,必有我师焉.择其善者而从之,其不善者而改之." 本题给定甲.乙.丙三个人的能力值关系为:甲的能力值确定是 2 位正整 ...
- ui自动化,不显示UI界面运行
from selenium import webdriver from selenium.webdriver.chrome.options import Options chrome_options ...
- 构建后端第3篇之---springb @Alias注解使用
write by 张艳涛 in 202210210,after today i will write aritles by english,because english is so diffent ...
- vscode安装ESlint配置
先安装插件ESLint,后面在设置setting.json中配置加入代码: { "files.autoSave": "afterDelay", "ed ...