springBoot--原理分析
起步依赖分析
分析spring-boot-starter-parent
按住Ctrl点击pom.xml中的spring-boot-starter-parent,跳转到了spring-boot-starter-parent的pom.xml,xml配置如下(只摘抄了部分重点配置):
<parent>

  <groupId>org.springframework.boot</groupId>

  <artifactId>spring-boot-dependencies</artifactId>

  <version>2.2.5.RELEASE</version>

  <relativePath>../../spring-boot-dependencies</relativePath>

</parent>
按住Ctrl点击pom.xml中的spring-boot-starter-dependencies,跳转到了spring-boot-starter-dependencies的pom.xml,xml配置如下(只摘抄了部分重点配置):
<properties>

  <activemq.version>5.15.11</activemq.version>

  <antlr2.version>2.7.7</antlr2.version>

  <appengine-sdk.version>1.9.78</appengine-sdk.version>

  <artemis.version>2.10.1</artemis.version>

  <aspectj.version>1.9.5</aspectj.version>

  <assertj.version>3.13.2</assertj.version>

  <atomikos.version>4.0.6</atomikos.version>

  <awaitility.version>4.0.2</awaitility.version>

  <bitronix.version>2.1.4</bitronix.version>

  <build-helper-maven-plugin.version>3.0.0</build-helper-maven-plugin.version>

  <byte-buddy.version>1.10.8</byte-buddy.version>

  ...  ....  ...

  <dependencyManagement>

  <dependencies>

    <dependency>

      <groupId>org.springframework.boot</groupId>

      <artifactId>spring-boot</artifactId>

      <version>2.2.5.RELEASE</version>

    </dependency>

    <dependency>

      <groupId>org.springframework.boot</groupId>

      <artifactId>spring-boot-test</artifactId>

      <version>2.2.5.RELEASE</version>

    </dependency>

    ... ... ...

    </dependencies>

</dependencyManagement>

<build>

  <pluginManagement>

    <plugins>

      <plugin>

        <groupId>org.apache.johnzon</groupId>

        <artifactId>johnzon-maven-plugin</artifactId>

        <version>${johnzon.version}</version>

      </plugin>

      <plugin>

        <groupId>org.jetbrains.kotlin</groupId>

        <artifactId>kotlin-maven-plugin</artifactId>

        <version>${kotlin.version}</version>

      </plugin>

      <plugin>

        <groupId>org.jooq</groupId>

        <artifactId>jooq-codegen-maven</artifactId>

        <version>${jooq.version}</version>

      </plugin>

      <plugin>

        <groupId>org.springframework.boot</groupId>

        <artifactId>spring-boot-maven-plugin</artifactId>

        <version>2.2.5.RELEASE</version>

      </plugin>

            ... ... ...

        </plugins>

      </pluginManagement>

</build>
从上面的spring-boot-starter-dependencies的pom.xml中我们可以发现,一部分坐标的版本、依赖管理、插件管理已经定义好,所以我们的SpringBoot工程继承spring-boot-starter-parent后已经具备版本锁定等配置了。所以起步依赖的作用就是进行依赖的传递。
分析spring-boot-starter-web
按住Ctrl点击pom.xml中的spring-boot-starter-web,跳转到了spring-boot-starter-web的pom.xml,xml配置如下(只摘抄了部分重点配置):
<parent>

  <groupId>org.springframework.boot</groupId>

  <artifactId>spring-boot-starters</artifactId>

  <version>2.2.5.RELEASE</version>

</parent>

<groupId>org.springframework.boot</groupId>

<artifactId>spring-boot-starter-web</artifactId>

<version>2.2.5.RELEASE</version>

<name>Spring Boot Web Starter</name>

 <dependencies>

    <dependency>

      <groupId>org.springframework.boot</groupId>

      <artifactId>spring-boot-starter</artifactId>

      <version>2.2.5.RELEASE</version>

      <scope>compile</scope>

    </dependency>

    <dependency>

      <groupId>org.springframework.boot</groupId>

      <artifactId>spring-boot-starter-json</artifactId>

      <version>2.2.5.RELEASE</version>

      <scope>compile</scope>

    </dependency>

    <dependency>

      <groupId>org.springframework.boot</groupId>

      <artifactId>spring-boot-starter-tomcat</artifactId>

      <version>2.2.5.RELEASE</version>

      <scope>compile</scope>

    </dependency>

    <dependency>

      <groupId>org.springframework.boot</groupId>

      <artifactId>spring-boot-starter-validation</artifactId>

      <version>2.2.5.RELEASE</version>

      <scope>compile</scope>

      <exclusions>

        <exclusion>

          <artifactId>tomcat-embed-el</artifactId>

          <groupId>org.apache.tomcat.embed</groupId>

        </exclusion>

      </exclusions>

    </dependency>

    <dependency>

      <groupId>org.springframework</groupId>

      <artifactId>spring-web</artifactId>

      <version>5.2.4.RELEASE</version>

      <scope>compile</scope>

    </dependency>

    <dependency>

      <groupId>org.springframework</groupId>

      <artifactId>spring-webmvc</artifactId>

      <version>5.2.4.RELEASE</version>

      <scope>compile</scope>

    </dependency>

  </dependencies>

</project>
自动配置原理解析
按住Ctrl点击查看启动类MySpringBootApplication上的注解@SpringBootApplication
package xyz.ytfs;

import org.springframework.boot.SpringApplication;

import org.springframework.boot.autoconfigure.SpringBootApplication;

@SpringBootApplication

public class SpringbootQuick2Application {

    public static void main(String[] args) {

        SpringApplication.run(SpringbootQuick2Application.class, args);

    }

}
/*

 * Copyright 2012-2019 the original author or authors.

 *

 * Licensed under the Apache License, Version 2.0 (the "License");

 * you may not use this file except in compliance with the License.

 * You may obtain a copy of the License at

 *

 *      https://www.apache.org/licenses/LICENSE-2.0

 *

 * Unless required by applicable law or agreed to in writing, software

 * distributed under the License is distributed on an "AS IS" BASIS,

 * WITHOUT WARRANTIES OR CONDITIONS OF ANY KIND, either express or implied.

 * See the License for the specific language governing permissions and

 * limitations under the License.

 */

package org.springframework.boot.autoconfigure;

import java.lang.annotation.Documented;

import java.lang.annotation.ElementType;

import java.lang.annotation.Inherited;

import java.lang.annotation.Retention;

import java.lang.annotation.RetentionPolicy;

import java.lang.annotation.Target;

import org.springframework.boot.SpringBootConfiguration;

import org.springframework.boot.context.TypeExcludeFilter;

import org.springframework.context.annotation.Bean;

import org.springframework.context.annotation.ComponentScan;

import org.springframework.context.annotation.ComponentScan.Filter;

import org.springframework.context.annotation.Configuration;

import org.springframework.context.annotation.FilterType;

import org.springframework.core.annotation.AliasFor;

import org.springframework.data.repository.Repository;

/**

 * Indicates a {@link Configuration configuration} class that declares one or more

 * {@link Bean @Bean} methods and also triggers {@link EnableAutoConfiguration

 * auto-configuration} and {@link ComponentScan component scanning}. This is a convenience

 * annotation that is equivalent to declaring {@code @Configuration},

 * {@code @EnableAutoConfiguration} and {@code @ComponentScan}.

 *

 * @author Phillip Webb

 * @author Stephane Nicoll

 * @author Andy Wilkinson

 * @since 1.2.0

 */

@Target(ElementType.TYPE)

@Retention(RetentionPolicy.RUNTIME)

@Documented

@Inherited

@SpringBootConfiguration

@EnableAutoConfiguration

@ComponentScan(excludeFilters = { @Filter(type = FilterType.CUSTOM, classes = TypeExcludeFilter.class),

      @Filter(type = FilterType.CUSTOM, classes = AutoConfigurationExcludeFilter.class) })

public @interface SpringBootApplication {

   /**

    * Exclude specific auto-configuration classes such that they will never be applied.

    * @return the classes to exclude

    */

   @AliasFor(annotation = EnableAutoConfiguration.class)

   Class<?>[] exclude() default {};

   /**

    * Exclude specific auto-configuration class names such that they will never be

    * applied.

    * @return the class names to exclude

    * @since 1.3.0

    */

   @AliasFor(annotation = EnableAutoConfiguration.class)

   String[] excludeName() default {};

       ... ... ...

}
其中,
@SpringBootConfiguration:等同与@Configuration,既标注该类是Spring的一个配置类
@EnableAutoConfiguration:SpringBoot自动配置功能开启
按住Ctrl点击查看注解@EnableAutoConfiguration
@Target(ElementType.TYPE)

@Retention(RetentionPolicy.RUNTIME)

@Documented

@Inherited

@AutoConfigurationPackage

@Import(AutoConfigurationImportSelector.class)

public @interface EnableAutoConfiguration {

    ... ... ...

}
其中,@Import(AutoConfigurationImportSelector.class) 导入了AutoConfigurationImportSelector类
按住Ctrl点击查看AutoConfigurationImportSelector源码
public String[] selectImports(AnnotationMetadata annotationMetadata) {

   if (!isEnabled(annotationMetadata)) {

      return NO_IMPORTS;

   }

   AutoConfigurationMetadata autoConfigurationMetadata = AutoConfigurationMetadataLoader

         .loadMetadata(this.beanClassLoader);

   AutoConfigurationEntry autoConfigurationEntry = getAutoConfigurationEntry(autoConfigurationMetadata,

         annotationMetadata);

   return StringUtils.toStringArray(autoConfigurationEntry.getConfigurations());

}

protected List<String> getCandidateConfigurations(AnnotationMetadata metadata, AnnotationAttributes attributes) {

   List<String> configurations = SpringFactoriesLoader.loadFactoryNames(getSpringFactoriesLoaderFactoryClass(),

         getBeanClassLoader());

   Assert.notEmpty(configurations, "No auto configuration classes found in META-INF/spring.factories. If you "

         + "are using a custom packaging, make sure that file is correct.");

   return configurations;

}
其中,SpringFactoriesLoader.loadFactoryNames 方法的作用就是从META-INF/spring.factories文件中读取指定类对应的类名称列表
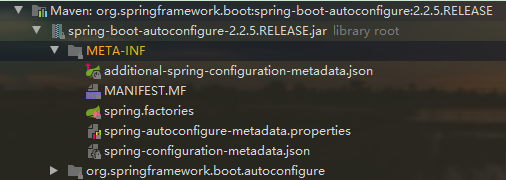
spring.factories 文件中有关自动配置的配置信息如下:
... ... ...

org.springframework.boot.autoconfigure.web.reactive.function.client.ClientHttpConnectorAutoConfiguration,\

org.springframework.boot.autoconfigure.web.reactive.function.client.WebClientAutoConfiguration,\

org.springframework.boot.autoconfigure.web.servlet.DispatcherServletAutoConfiguration,\

org.springframework.boot.autoconfigure.web.servlet.ServletWebServerFactoryAutoConfiguration,\

org.springframework.boot.autoconfigure.web.servlet.error.ErrorMvcAutoConfiguration,\

org.springframework.boot.autoconfigure.web.servlet.HttpEncodingAutoConfiguration,\

org.springframework.boot.autoconfigure.web.servlet.MultipartAutoConfiguration,\

org.springframework.boot.autoconfigure.web.servlet.WebMvcAutoConfiguration,\

... ... ...
上面配置文件存在大量的以Configuration为结尾的类名称,这些类就是存有自动配置信息的类,而SpringApplication在获取这些类名后再加载
我们以ServletWebServerFactoryAutoConfiguration为例来分析源码:
@Configuration(proxyBeanMethods = false)

@AutoConfigureOrder(Ordered.HIGHEST_PRECEDENCE)

@ConditionalOnClass(ServletRequest.class)

@ConditionalOnWebApplication(type = Type.SERVLET)

@EnableConfigurationProperties(ServerProperties.class)

@Import({ ServletWebServerFactoryAutoConfiguration.BeanPostProcessorsRegistrar.class,

      ServletWebServerFactoryConfiguration.EmbeddedTomcat.class,

      ServletWebServerFactoryConfiguration.EmbeddedJetty.class,

      ServletWebServerFactoryConfiguration.EmbeddedUndertow.class })

public class ServletWebServerFactoryAutoConfiguration {

    ... ... ...

    }
其中,
@EnableConfigurationProperties(ServerProperties.class) 代表加载ServerProperties服务器配置属性类
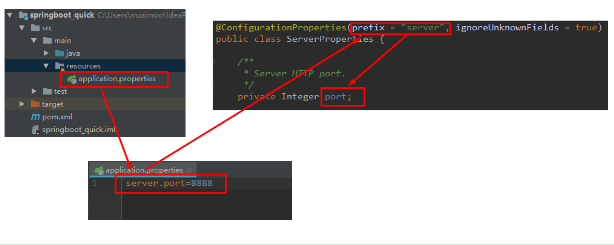
进入ServerProperties.class源码如下:
@ConfigurationProperties(prefix = "server", ignoreUnknownFields = true)

public class ServerProperties {

   /**

    * Server HTTP port.

    */

   private Integer port;

   /**

    * Network address to which the server should bind.

    */

   private InetAddress address;;

      ... ... ...

}
其中,
prefix = "server" 表示SpringBoot配置文件中的前缀,SpringBoot会将配置文件中以server开始的属性映射到该类的字段中。映射关系如下

springBoot--原理分析的更多相关文章
- SpringBoot原理分析与配置
1.1 起步依赖原理分析 1.1.1 分析spring-boot-starter-parent 按住Ctrl点击pom.xml中的spring-boot-starter-parent,跳转到了spri ...
- SpringBoot原理—分析SpringBoot启动机制(starter机制)
一:前言使用过springboot的同学应该已经知道,springboot通过默认配置了很多框架的使用方式帮我们大大简化了项目初始搭建以及开发过程.本文的目的就是一步步分析springboot的启动过 ...
- SpringBoot 原理分析、监控、项目部署
目录 SpringBoot 监控 概述 使用 SpringBoot Admin 概述 使用 SpringBoot 项目部署 SpringBoot 监控 概述 SpringBoot 自带监控功能 Act ...
- SpringBoot入门(0) HelloWorld的实现与原理分析
SpringBoot(0) HelloWorld的实现与原理分析 一.环境准备 1.1 环境约束 –jdk1.8:Spring Boot 推荐jdk1.7及以上:java version “1.8.0 ...
- springboot创建,自动装配原理分析,run方法启动
使用IDEA快速创建一个springboot项目 创建Spring Initializr,然后一直下一步下一步直至完成 选择web,表示创建web项目 运行原理分析 我们先来看看pom.xml文件 核 ...
- 深入springboot原理——动手封装一个starter
从上一篇文章<深入springboot原理——一步步分析springboot启动机制(starter机制)> 我们已经知道springboot的起步依赖与自动配置的机制.spring-bo ...
- spring boot 运行jsp原理分析
Spring-boot运行jsp原理分析 结论: 启动server的时候会创建临时目录 在浏览器中访问jsp文件的时候通过内置Tomcat将jsp转换为java,保存在临时目录中 然后编译为cla ...
- SpringBoot原理发现(一)
说明: 本系列基于SpringBoot 2.2.9.RELEASE 版本,对SpringBoot的原理进行分析,一共分为四节: SpringBoot原理发现(一):创建Hello World,对pom ...
- Spring Cloud之负载均衡组件Ribbon原理分析
目录 前言 一个问题引发的思考 Ribbon的简单使用 Ribbon 原理分析 @LoadBalanced 注解 @Qualifier注解 LoadBalancerAutoConfiguration ...
- Handler系列之原理分析
上一节我们讲解了Handler的基本使用方法,也是平时大家用到的最多的使用方式.那么本节让我们来学习一下Handler的工作原理吧!!! 我们知道Android中我们只能在ui线程(主线程)更新ui信 ...
随机推荐
- CF1092B Teams Forming 题解
Content 有 \(n\) 个学生,每个学生有一个能力值 \(a_i\).现在想把学生两两分成一组,但是不能让每个组里面的学生能力值不相同,因此可以通过刷题来提升自己的能力值,每次解出一道题,能力 ...
- atexit模块介绍
atexit 模块介绍 python atexit 模块定义了一个 register 函数,用于在 python 解释器中注册一个退出函数,这个函数在解释器正常终止时自动执行,一般用来做一些资源清理的 ...
- Spring Boot整合Thymeleaf及Thymeleaf页面基本语法
引入依赖 <dependency> <groupId>org.springframework.boot</groupId> <artifactId>sp ...
- JAVA获取本机的MAC地址
/** * 获取本机的Mac地址 * @return */ public String getMac() { InetAddress ia; byte[] mac = null; try { // 获 ...
- win10使用cmake编译libevent(解决依赖openssl)
概述 win10没有安装openssl cmake version: 3.18 libevent version: 2.1.10-stable libevent目前的版本中写好了 CMakeLists ...
- 【LeetCode】226. Invert Binary Tree 翻转二叉树(Python)
作者: 负雪明烛 id: fuxuemingzhu 个人博客: http://fuxuemingzhu.cn/ 目录 题目描述 题目大意 解题方法 递归 迭代 日期 题目地址: https://lee ...
- 【转】最小生成树——Kruskal算法
[转]最小生成树--Kruskal算法 标签(空格分隔): 算法 本文是转载,原文在最小生成树-Prim算法和Kruskal算法,因为复试的时候只用到Kruskal算法即可,故这里不再涉及Prim算法 ...
- 【LeetCode】234. Palindrome Linked List 解题报告(Python)
作者: 负雪明烛 id: fuxuemingzhu 个人博客: http://fuxuemingzhu.cn/ 目录 题目描述 题目大意 解题方法 日期 题目地址:https://leetcode.c ...
- 【LeetCode】922. Sort Array By Parity II 解题报告(Python)
作者: 负雪明烛 id: fuxuemingzhu 个人博客: http://fuxuemingzhu.cn/ 目录 题目描述 题目大意 解题方法 使用奇偶数组 排序 奇偶数位置变量 日期 题目地址: ...
- 【LeetCode】213. House Robber II 解题报告(Python)
作者: 负雪明烛 id: fuxuemingzhu 个人博客: http://fuxuemingzhu.cn/ 题目地址:https://leetcode.com/problems/house-rob ...