
学问Chat UI(1)
前言
由于项目需要,最近开始借鉴学习下开源的Android即时通信聊天UI框架,为此结合市面上加上本项目需求列了ChatUI要实现的基本功能与扩展功能。

融云聊天UI-Android SDK 2.8.0+
为了实现业务与UI分离,分析融云UI部分代码,下面主要从IMKit下的ConversationFragment,RongExtension,plugin包下类实现插件化;
ConversationFragment的UI
简单点来讲,上面是一个LIstView,下面是个带有EditText扩展横向布局器--输入聊天框,如下图所示,相对布局中存在两个id为:rc_layout_msg_list与rc_extension的布局;
本文的重点是分析输入聊天框以及扩展功能插件的代码,涉及到IMLib的代码会跳过,更好的分析UI是如何实现的;

核心容器-RongExtension
直观的来看布局,它有4个部分组成,语音按钮,输入框,表情按钮,扩展按钮;
四个控件点击事件需要控制其他控件的显示与隐藏,简化图如下:
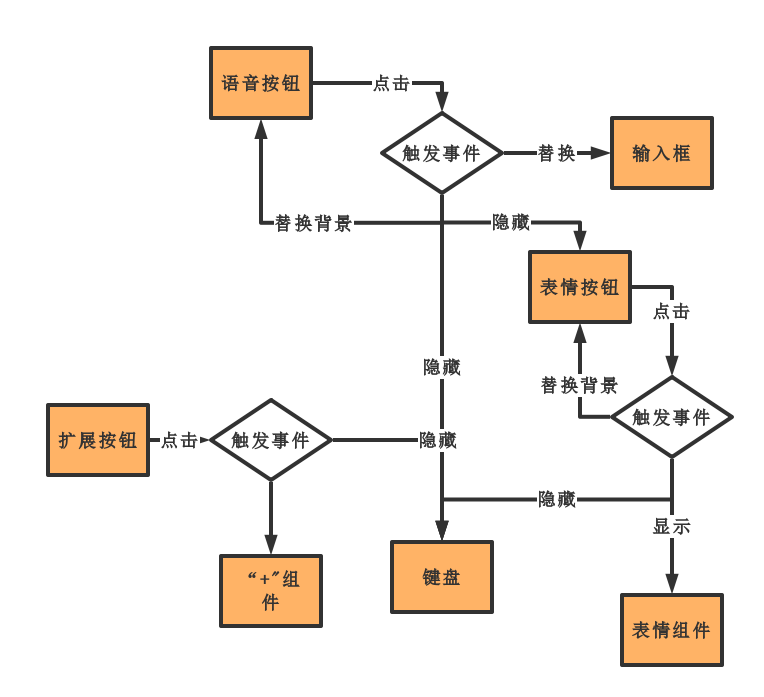
UI布局
inflate方法
- 首先上面讲的四个控件说起,为啥通过这个分析?能看到并进行操作的是最直观的,也是最容易明白的。由于调用多次inflate方法,这里先讲下inflate,看源码是最快的,RongExtension的initView方法中使用两种重载方法;
很明显第一个方法内部实际是调用了第二个方法,只不过是attachToRoot是根据root的值来得到的。
   public View inflate(XmlPullParser parser, @Nullable ViewGroup root) {

        return inflate(parser, root, root != null);

    }

   public View inflate(@LayoutRes int resource, @Nullable ViewGroup root, boolean attachToRoot) {

        final Resources res = getContext().getResources();

        if (DEBUG) {

            Log.d(TAG, "INFLATING from resource: \"" + res.getResourceName(resource) + "\" ("

                    + Integer.toHexString(resource) + ")");

        }

        final XmlResourceParser parser = res.getLayout(resource);

        try {

            return inflate(parser, root, attachToRoot);//核心方法

        } finally {

            parser.close();

        }

    }
- inflate内部方法,观察核心的代码,当然这里分为好几种情况,这里分析两种:root!=null&&attachToRoot=true与root==null&&attachToRoot=false,也就是代码中使用的两种情况;
- 若root!=null&&attachToRoot=true则把xml布局添加到root并返回root对象;若rootnull&&attachToRoot=false||rootnull则返回xml布局对象
 public View inflate(XmlPullParser parser, @Nullable ViewGroup root, boolean attachToRoot) {

        synchronized (mConstructorArgs) {

            Trace.traceBegin(Trace.TRACE_TAG_VIEW, "inflate");

            final Context inflaterContext = mContext;

            final AttributeSet attrs = Xml.asAttributeSet(parser);

            Context lastContext = (Context) mConstructorArgs[0];

            mConstructorArgs[0] = inflaterContext;

            View result = root;

            try {

                // Look for the root node.

                int type;

                while ((type = parser.next()) != XmlPullParser.START_TAG &&

                        type != XmlPullParser.END_DOCUMENT) {

                    // Empty

                }

                if (type != XmlPullParser.START_TAG) {

                    throw new InflateException(parser.getPositionDescription()

                            + ": No start tag found!");

                }

                final String name = parser.getName();

                if (TAG_MERGE.equals(name)) {

                    if (root == null || !attachToRoot) {

                        throw new InflateException("<merge /> can be used only with a valid "

                                + "ViewGroup root and attachToRoot=true");

                    }

                    rInflate(parser, root, inflaterContext, attrs, false);

                } else {

                    // 关注下面一部分代码

                    // Temp is the root view that was found in the xml

                    final View temp = createViewFromTag(root, name, inflaterContext, attrs);

                    ViewGroup.LayoutParams params = null;

                    if (root != null) {

                        if (DEBUG) {

                            System.out.println("Creating params from root: " +

                                    root);

                        }

                        // Create layout params that match root, if supplied

                        params = root.generateLayoutParams(attrs);

                        if (!attachToRoot) {

                            // Set the layout params for temp if we are not

                            // attaching. (If we are, we use addView, below)

                            temp.setLayoutParams(params);

                        }

                    }

                    // Inflate all children under temp against its context.

                    rInflateChildren(parser, temp, attrs, true);

                    // We are supposed to attach all the views we found (int temp)

                    // to root. Do that now. xml布局添加到root返回xml布局

                    if (root != null && attachToRoot) {

                        root.addView(temp, params);

                    }

                    // Decide whether to return the root that was passed in or the

                    // top view found in xml.result 赋值为xml布局对象

                    if (root == null || !attachToRoot) {

                        result = temp;

                    }

                }

            } catch (XmlPullParserException e) {

                InflateException ex = new InflateException(e.getMessage());

                ex.initCause(e);

                throw ex;

            } catch (Exception e) {

                InflateException ex = new InflateException(

                        parser.getPositionDescription()

                                + ": " + e.getMessage());

                ex.initCause(e);

                throw ex;

            } finally {

                // Don't retain static reference on context.

                mConstructorArgs[0] = lastContext;

                mConstructorArgs[1] = null;

            }

            Trace.traceEnd(Trace.TRACE_TAG_VIEW);

            return result;

        }

    }
一谈initView
RongExtension容器继承自线性容器--LinearLayout
layout.rc_ext_extension_bar布局见下方代码,xml布局总共包含四个控件布局
id.rc_container_layout是一个FrameLauout,占据中间编辑框部分
layout.rc_ext_input_edit_text是编辑框,接下来把这个布局加到rc_container_layout中,并显示
layout.rc_ext_voice_input是录取语音按钮布局,调用的方法是
inflate(R.layout.rc_ext_voice_input, this.mContainerLayout, true),根据上面可知这个效果是把录取语音按钮加到mContainerLayout中并返回mContainerLayout对象,那么现在存在两个孩子View,因为Framelayout布局中存在多个子控件会覆盖,因此这个先隐藏起来下面是initView方法代码
        this.mExtensionBar = (ViewGroup)LayoutInflater.from(this.getContext()).inflate(R.layout.rc_ext_extension_bar, (ViewGroup)null);

        this.mMainBar = (LinearLayout)this.mExtensionBar.findViewById(R.id.ext_main_bar);

        this.mSwitchLayout = (ViewGroup)this.mExtensionBar.findViewById(R.id.rc_switch_layout);

        this.mContainerLayout = (ViewGroup)this.mExtensionBar.findViewById(R.id.rc_container_layout);

        this.mPluginLayout = (ViewGroup)this.mExtensionBar.findViewById(R.id.rc_plugin_layout);

        this.mEditTextLayout = LayoutInflater.from(this.getContext()).inflate(R.layout.rc_ext_input_edit_text, (ViewGroup)null);

        this.mEditTextLayout.setVisibility(VISIBLE);

        this.mContainerLayout.addView(this.mEditTextLayout);

        LayoutInflater.from(this.getContext()).inflate(R.layout.rc_ext_voice_input, this.mContainerLayout, true);

        this.mVoiceInputToggle = this.mContainerLayout.findViewById(R.id.rc_audio_input_toggle);

        this.mVoiceInputToggle.setVisibility(GONE);

        //省略若干代码

        this.addView(this.mExtensionBar);
- 下面是rc_ext_extension_bar布局代码
<?xml version="1.0" encoding="utf-8"?>

<RelativeLayout

    xmlns:android="http://schemas.android.com/apk/res/android"

    android:layout_width="match_parent"

    android:layout_height="wrap_content"

    android:minHeight="48dp">

    <LinearLayout

        android:id="@+id/ext_main_bar"

        android:layout_width="match_parent"

        android:layout_height="wrap_content"

        android:layout_centerVertical="true"

        android:gravity="center_vertical"

        android:orientation="horizontal"

        android:paddingLeft="6dp"

        android:paddingRight="6dp">

        <!-- “语音” “公众号菜单” 布局-->

        <LinearLayout

            android:id="@+id/rc_switch_layout"

            android:layout_width="wrap_content"

            android:layout_height="wrap_content"

            android:orientation="horizontal">

            <ImageView

                android:id="@+id/rc_switch_to_menu"

                android:layout_width="41dp"

                android:layout_height="wrap_content"

                android:layout_gravity="center_vertical"

                android:layout_marginRight="6dp"

                android:scaleType="center"

                android:src="@drawable/rc_menu_text_selector"

                android:visibility="gone"/>

            <View

                android:id="@+id/rc_switch_divider"

                android:layout_width="1px"

                android:layout_height="48dp"

                android:background="@color/rc_divider_line"

                android:visibility="gone"/>

            <ImageView

                android:id="@+id/rc_voice_toggle"

                android:layout_width="wrap_content"

                android:layout_height="wrap_content"

                android:layout_gravity="center_vertical"

                android:layout_marginLeft="6dp"

                android:layout_marginRight="6dp"

                android:src="@drawable/rc_voice_toggle_selector"/>

        </LinearLayout>

        <!-- 文本,表情输入容器,通过控制“语音”,容器中填充不同的内容 -->

        <FrameLayout

            android:id="@+id/rc_container_layout"

            android:layout_width="0dp"

            android:layout_height="wrap_content"

            android:layout_weight="1"

            android:paddingTop="3dp"

            android:paddingBottom="3dp"

            android:gravity="center_vertical"/>

        <!-- 扩展栏 “+号” 布局-->

        <LinearLayout

            android:id="@+id/rc_plugin_layout"

            android:layout_width="wrap_content"

            android:layout_height="wrap_content"

            android:layout_marginLeft="6dp"

            android:layout_marginRight="6dp"

            android:orientation="horizontal">

            <ImageView

                android:id="@+id/rc_plugin_toggle"

                android:layout_width="wrap_content"

                android:layout_height="wrap_content"

                android:src="@drawable/rc_plugin_toggle_selector"/>

        </LinearLayout>

    </LinearLayout>

    <!-- 底部分割线 -->

    <View

        android:layout_width="match_parent"

        android:layout_height="2px"

        android:layout_alignParentTop="true"

        android:background="@color/rc_divider_color"/>

</RelativeLayout>
事件处理--IExtensionClickListener的实现
- 本文开始部分在讲核心容器中做了粗略的图表示按钮事件触发后各个控件改变情况
- 下面看下IExtensionClickListener接口与调用接口方法的代码,重点关注按钮相关事件
1.IExtensionClickListener接口继承自TextWatcher,这个接口包含了文本框变化3个方法
   //文本框输入之前

   public void beforeTextChanged(CharSequence s, int start,

                                  int count, int after);

    //文本框正在输入

    public void onTextChanged(CharSequence s, int start, int before, int count);

    //文本框输入后

    public void afterTextChanged(Editable s);
2.IExtensionClickListener接口定义
public interface IExtensionClickListener extends TextWatcher {

    //发送按钮回调事件

    void onSendToggleClick(View var1, String var2);

    //发送图片回调事件

    void onImageResult(List<Uri> var1, boolean var2);

    //发送地理位置回调事件

    void onLocationResult(double var1, double var3, String var5, Uri var6);

    //语音按钮切换回调事件

    void onSwitchToggleClick(View var1, ViewGroup var2);

    //声音按钮触摸回调事件

    void onVoiceInputToggleTouch(View var1, MotionEvent var2);

    //表情按钮点击回调事件

    void onEmoticonToggleClick(View var1, ViewGroup var2);

    //‘+’按钮点击回调事件

    void onPluginToggleClick(View var1, ViewGroup var2);

    void onMenuClick(int var1, int var2);

    //文本框点击回调事件

    void onEditTextClick(EditText var1);

    //回调setOnKeyListener事件

    boolean onKey(View var1, int var2, KeyEvent var3);

    void onExtensionCollapsed();

    void onExtensionExpanded(int var1);

    //插件Item点击回调事件

    void onPluginClicked(IPluginModule var1, int var2);

}
后续将学习表情功能与插件功能
学问Chat UI(1)的更多相关文章
- 学问Chat UI(3)
前言 上文学问Chat UI(2)分析了消息适配器的实现; 本文主要学习下插件功能如何实现的.并以图片插件功能作为例子详细说明,分析从具体代码入手; 概要 分析策略说明 "+"功能 ...
- 学问Chat UI(2)
前言 上文讲了下要去做哪些事,重点分析了融云Sdk中RongExtension这个扩展控件,本文来学习下同样是融云Sdk中的AutoRefreshListView如何适配多种消息的实现方式,写的有不足 ...
- 学问Chat UI(4)
前言 写这个组件是在几个月前,那时候是因为老大讲RN项目APP的通讯聊天部分后面有可能自己实现,让我那时候尝试着搞下Android通讯聊天UI实现的部分,在这期间,找了不少的Android原生项目:蘑 ...
- 77.Android之代码混淆
转载:http://www.jianshu.com/p/7436a1a32891 简介 作为Android开发者,如果你不想开源你的应用,那么在应用发布前,就需要对代码进行混淆处理,从而让我们代码即使 ...
- 【SignalR学习系列】5. SignalR WPF程序
首先创建 WPF Server 端,新建一个 WPF 项目 安装 Nuget 包 替换 MainWindows 的Xaml代码 <Window x:Class="WPFServer.M ...
- 如何用ABP框架快速完成项目(8) - 用ABP一个人快速完成项目(4) - 能自动化就不要手动 - 使用自动化测试(BDD/TDD)
做为一个程序员, 深深知道计算机自动化的速度是比人手动的速度快的, 所以”快速”完成项目的一个重要武器就是: 能自动化就不要手动. BDD/TDD有很多优势, 其中之一就是自动化, 我们这节文章先 ...
- Android: apk反编译 及 AS代码混淆防反编译
一.工具下载: 1.apktool(资源文件获取,如提取出图片文件和布局文件) 反编译apk:apktool d file.apk –o path 回编译apk:apktool b path –o f ...
- 带你彻底明白 Android Studio 打包混淆
前言 在使用Android Studio混淆打包时,该IDE自身集成了Java语言的ProGuard作为压缩,优化和混淆工具,配合Gradle构建工具使用很简单.只需要在工程应用目录的gradle文件 ...
- “四核”驱动的“三维”导航 -- 淘宝新UI(需求分析篇)
前言 孔子说:"软件是对客观世界的抽象". 首先声明,这里的"三维导航"和地图没一毛钱关系,"四核驱动"和硬件也没关系,而是为了复杂的应用而 ...
随机推荐
- 2.如何搭建MQTT环境
1.源码下载https://github.com/andsel/moquette 注意下载2016.2版本2.idea下载http://confluence.jetbrains.com/display ...
- react-router 踩坑记
react-router踩坑分享 背景 辛苦历程 JavaScript动态修改 第一次尝试 第二次尝试 第三次尝试 第四次尝试 总结步骤 其他方案 原理 History 常见的3种History Br ...
- Unity 游戏框架搭建 (五) 简易消息机制
什么是消息机制? 23333333,让我先笑一会. 为什么用消息机制? 三个字,解!!!!耦!!!!合!!!!. 我的框架中的消息机制用例: 1.接收者 ``` using UnityEngine ...
- Oracle11g 创建表空间、创建用户、角色授权、导入导出表以及中文字符乱码问题
前提:本机已经安装了Oracle11g数据库. 需求:使用PL SQL数据库连接工具操作Oracle数据库 一.创建表空间和用户 想要操作数据库,首先需要创建用户并给用户授予权限:在创建用户 ...
- VB6之调整任务栏按钮的位置
好无聊,睡前一更~ XP的任务栏没办法像win7那样随意拖动交换顺序,偶觉不爽,遂写程序搞之.这个不算什么新东西,参考了很多别人写的东东. 程序启动后,会在右下角托盘区显示钢铁侠的图标.右键击之,可选 ...
- php中curl的使用(一)
cURL 是一个利用URL语法规定来传输文件和数据的工具,PHP的curl是通过libcurl库与服务器使用各种类型的协议,如HTTP.FTP.TELNET等. PHP curl函数 curl_clo ...
- Android Studio和eclipse混淆打包总结
最近项目有点闲,考虑到以前的项目没有做过混淆,只是用了加固软件进行加固,为了安全性,准备给项目加上,这里做个总结,都经本人亲自在项目实践,说是为了安全性,这好像说大了,一来项目中没用到什么特别的技术, ...
- C# TryParse()用法
形式(以decimal为例): decimal.TryParse(str1,out num1) 功能:将str1转化成decimal类型,若转化成功,将值赋给num1,并返回true; 若转化失败,返 ...
- 深入分析Java的内置日志API(java.util.logging)(一)
简介 任何的软件系统,日志都是非常重要的一部分.良好统一的日志规范会大大提高应用程序的可维护性.可靠性,并进而提高开发效率,指导业务.在早期,Java工程师往往都是利用 System.err.pr ...
- Hadoop的介绍、搭建、环境
HADOOP背景介绍 1.1Hadoop产生背景 HADOOP最早起源于Nutch.Nutch的设计目标是构建一个大型的全网搜索引擎,包括网页抓取.索引.查询等功能,但随着抓取网页数量的增加,遇到了严 ...