.net Core 1.0.1 下的Web框架的的搭建过程step by step
环境:ubuntu+VScode 数据库:mysql ,ORM框架:chloe 官网
看完本篇文章你能学会 在Vscode下创建项目,一些基础的命令 ,以及得到一个配置文件的简单读取实例
1,在VScode下安装插件:C# 和 NuGet PackageManager
2,打开终端执行项目的创建:
siecan@siecan-Lenovo-H3050:~/dotnetproject/test2$ mkdir Model

siecan@siecan-Lenovo-H3050:~/dotnetproject/test2$ mkdir Bll

siecan@siecan-Lenovo-H3050:~/dotnetproject/test2$ mkdir Web

siecan@siecan-Lenovo-H3050:~/dotnetproject/test2$ cd Model

siecan@siecan-Lenovo-H3050:~/dotnetproject/test2/Model$ dotnet new ClassLib

Content generation time: 30.2507 ms

The template "Class library" created successfully.

siecan@siecan-Lenovo-H3050:~/dotnetproject/test2/Model$ cd ../Bll

siecan@siecan-Lenovo-H3050:~/dotnetproject/test2/Bll$ dotnet new ClassLib

Content generation time: 27.063 ms

The template "Class library" created successfully.

siecan@siecan-Lenovo-H3050:~/dotnetproject/test2/Bll$ cd ../Web

siecan@siecan-Lenovo-H3050:~/dotnetproject/test2/Web$ dotnet new mvc

Content generation time: 317.1098 ms

The template "ASP.NET Core Web App" created successfully.

siecan@siecan-Lenovo-H3050:~/dotnetproject/test2/Web$ cd ../

siecan@siecan-Lenovo-H3050:~/dotnetproject/test2$ dotnet new sln

Content generation time: 28.6445 ms

The template "Solution File" created successfully.

siecan@siecan-Lenovo-H3050:~/dotnetproject/test2$ dotnet sln test2.sln add Bll/Bll.csproj

Project `Bll/Bll.csproj` added to the solution.

siecan@siecan-Lenovo-H3050:~/dotnetproject/test2$ dotnet sln test2.sln add Model/Model.csproj

Project `Model/Model.csproj` added to the solution.

siecan@siecan-Lenovo-H3050:~/dotnetproject/test2$ dotnet sln test2.sln add Web/Web.csproj

Project `Web/Web.csproj` added to the solution.

siecan@siecan-Lenovo-H3050:~/dotnetproject/test2$ dotnet add Bll/Bll.csproj reference Model/Model.csproj
注:通过命令:dotnet sln test2.sln add Bll/Bll.csproj 将bll添加到解决方案 下同,
add Bll/Bll.csproj reference Model/Model.csproj 给Bll添加model的引用
修改Bll.csproj中 <TargetFramework>节点的值为:netcoreapp1.1
在新打开的vscode上单独打开bll 【相关的类库没有做类库的兼容导致的问题,后期可能就不需要这么麻烦在解决方案下就可以添加】
使用nuget方式给Bll添加引用 MySql.Data 和 ChloeCore.Mysql 和ChloeCore
操作方式:在VScode界面按F1 输入nuget 回车 输入 mysql 回车 选择mysql.data 回车,选择最新版本回车,
ChloeCore.mysql同上
执行完毕后在bll.csproj中会多出如下内容: 也可以手动添加内容到Bll.csproj
 <ItemGroup>

    <PackageReference Include="MySql.Data" Version="7.0.7-m61"/>

    <PackageReference Include="ChloeCore.MySql" Version="2.5.0"/>

  </ItemGroup>
读取配置文件需要用到 Microsoft.Extensions.Configuration和Microsoft.Extensions.Configuration.Json 添加方式同上 nuget方式
当前Bll.csproj的内容如下:
<?xml version="1.0" encoding="utf-8" standalone="yes"?>

<Project Sdk="Microsoft.NET.Sdk">

   <ItemGroup>

    <ProjectReference Include="..\Model\Model.csproj" />

  </ItemGroup>

  <ItemGroup>

    <PackageReference Include="ChloeCore.MySql" Version="2.5.0" />

    <PackageReference Include="MySql.Data" Version="7.0.7-m61" />

    <PackageReference Include="Microsoft.Extensions.Configuration" Version="1.1.1" />

    <PackageReference Include="Microsoft.Extensions.Configuration.Json" Version="1.1.1" />

  </ItemGroup>

  <PropertyGroup>

    <TargetFramework>netcoreapp1.1</TargetFramework>

  </PropertyGroup>

</Project>
bll中添加数据上下文类:
DbContext:
using System.IO;

using Chloe.MySql;

using Microsoft.Extensions.Configuration;

namespace Bll

{

    public class DataContent

    {

        static MySqlContext ctx = null;

        public static MySqlContext Context()

        {

            if (DataContent.ctx == null)

            {

                IConfigurationRoot Configuration;

                ConfigurationBuilder Builder=new ConfigurationBuilder();

                Builder.SetBasePath(Directory.GetCurrentDirectory());

                Builder.AddJsonFile("appsettings.json");

                Configuration =Builder.Build();

                string ConnectionStr =Configuration.GetConnectionString("MySqlConnectionString");

                MySqlConnectionFactory factory = new MySqlConnectionFactory(ConnectionStr);

                DataContent.ctx = new MySqlContext(factory);

            }

            return DataContent.ctx;

        }

    }

}
using System;

using System.Data;

using Chloe;

using Chloe.MySql;

using MySql.Data.MySqlClient;

namespace Bll

{

    public class MySqlConnectionFactory : Chloe.Infrastructure.IDbConnectionFactory

    {

        string _connString = null;

        public MySqlConnectionFactory(string connString)

        {

            this._connString = connString;

        }

        public IDbConnection CreateConnection()

        {

            MySqlConnection conn = new MySqlConnection(this._connString);

            return conn;

        }

    }

}
测试类Person:
using System;

using System.Collections.Generic;

namespace Bll

{

    public class Person

    {

        public List<Model.Person> GetAllPerson()

        {

            return DataContent.Context().Query<Model.Person>().ToList();

        }

        public int AddPerson()

        {

            Random r=new Random();

            Model.Person p=new Model.Person(Guid.NewGuid().ToString(),r.Next(),Guid.NewGuid().ToString(),Guid.NewGuid().ToString());

            Model.Person presult = DataContent.Context().Insert<Model.Person>(p);

            return presult.id;

        }

        public int DelPerson(int id)

        {

            return DataContent.Context().Delete<Model.Person>((x)=>x.id==id);

        }

    }

}
Model中添加Person实体类:
namespace Model

{

    public class Person

    {

        public Person(string name,int age,string username,string password)

        {

            this.Name=name;

            this.Age=age;

            this.UserName=username;

            this.PassWord=password;

        }

        public Person(){}

        public int id {get;set;}

        public string Name{get;set;}

        public int Age{get;set;}

        public string UserName{get;set;}

        public string PassWord{get;set;}

    }

}
在Web文件夹中找到appsettings.json,添加数据库连接语句:
"ConnectionStrings":{

    "MySqlConnectionString":"Database=Test;Data Source=localhost;User Id=root;Password=123;pooling=false;CharSet=utf8;port=3306"

  }
appsettings.json最终结构如下:
{

  "Logging": {

    "IncludeScopes": false,

    "LogLevel": {

      "Default": "Warning"

    }

  },

  "ConnectionStrings":{

    "MySqlConnectionString":"Database=Test;Data Source=localhost;User Id=root;Password=123;pooling=false;CharSet=utf8;port=3306"

  }

}
在homecontroller中 添加测试代码:
using System;

using System.Collections.Generic;

using System.Linq;

using System.Threading.Tasks;

using Microsoft.AspNetCore.Mvc;

using Bll;

namespace Web.Controllers

{

    public class HomeController : Controller

    {

        public IActionResult Index()

        {

            Bll.Person p= new Bll.Person();

            List<Model.Person> lst = p.GetAllPerson();

            ViewBag.lst=lst;

            return View();

        }

        [HttpPost]

        public int DelTestData(int id)

        {

             Bll.Person p=new Bll.Person();

             return p.DelPerson(id);

        }

        [HttpPost]

        public int AddTestData()

        {

            Bll.Person p=new Bll.Person();

             return p.AddPerson();

        }

        public IActionResult Error()

        {

            return View();

        }

    }

}
在添加视图前有个坑,.netcore项目在调试的时候看不到样式效果,使用F1->nuget也无法把所需要的css和javascript添加到项目中 ,无奈。 心情烦躁之际在终端写下 sudo apt-get install nuget。敲了个回车居然可以安装,暗爽了一把,等执行完毕以后,打开到web目录执行nuget install bootstrap 。奇迹发生了,需要的文件居然添加到项目中了。
然后把母版页中的那些引用改成自己的路径, 这里还有一坑 静态文件是不能放到根目录下的,不然会找不到,必须放到静态文件目录 默认是wwwroot目录,这时才能通过~/... 路径来定位到对应的CSS和javascript
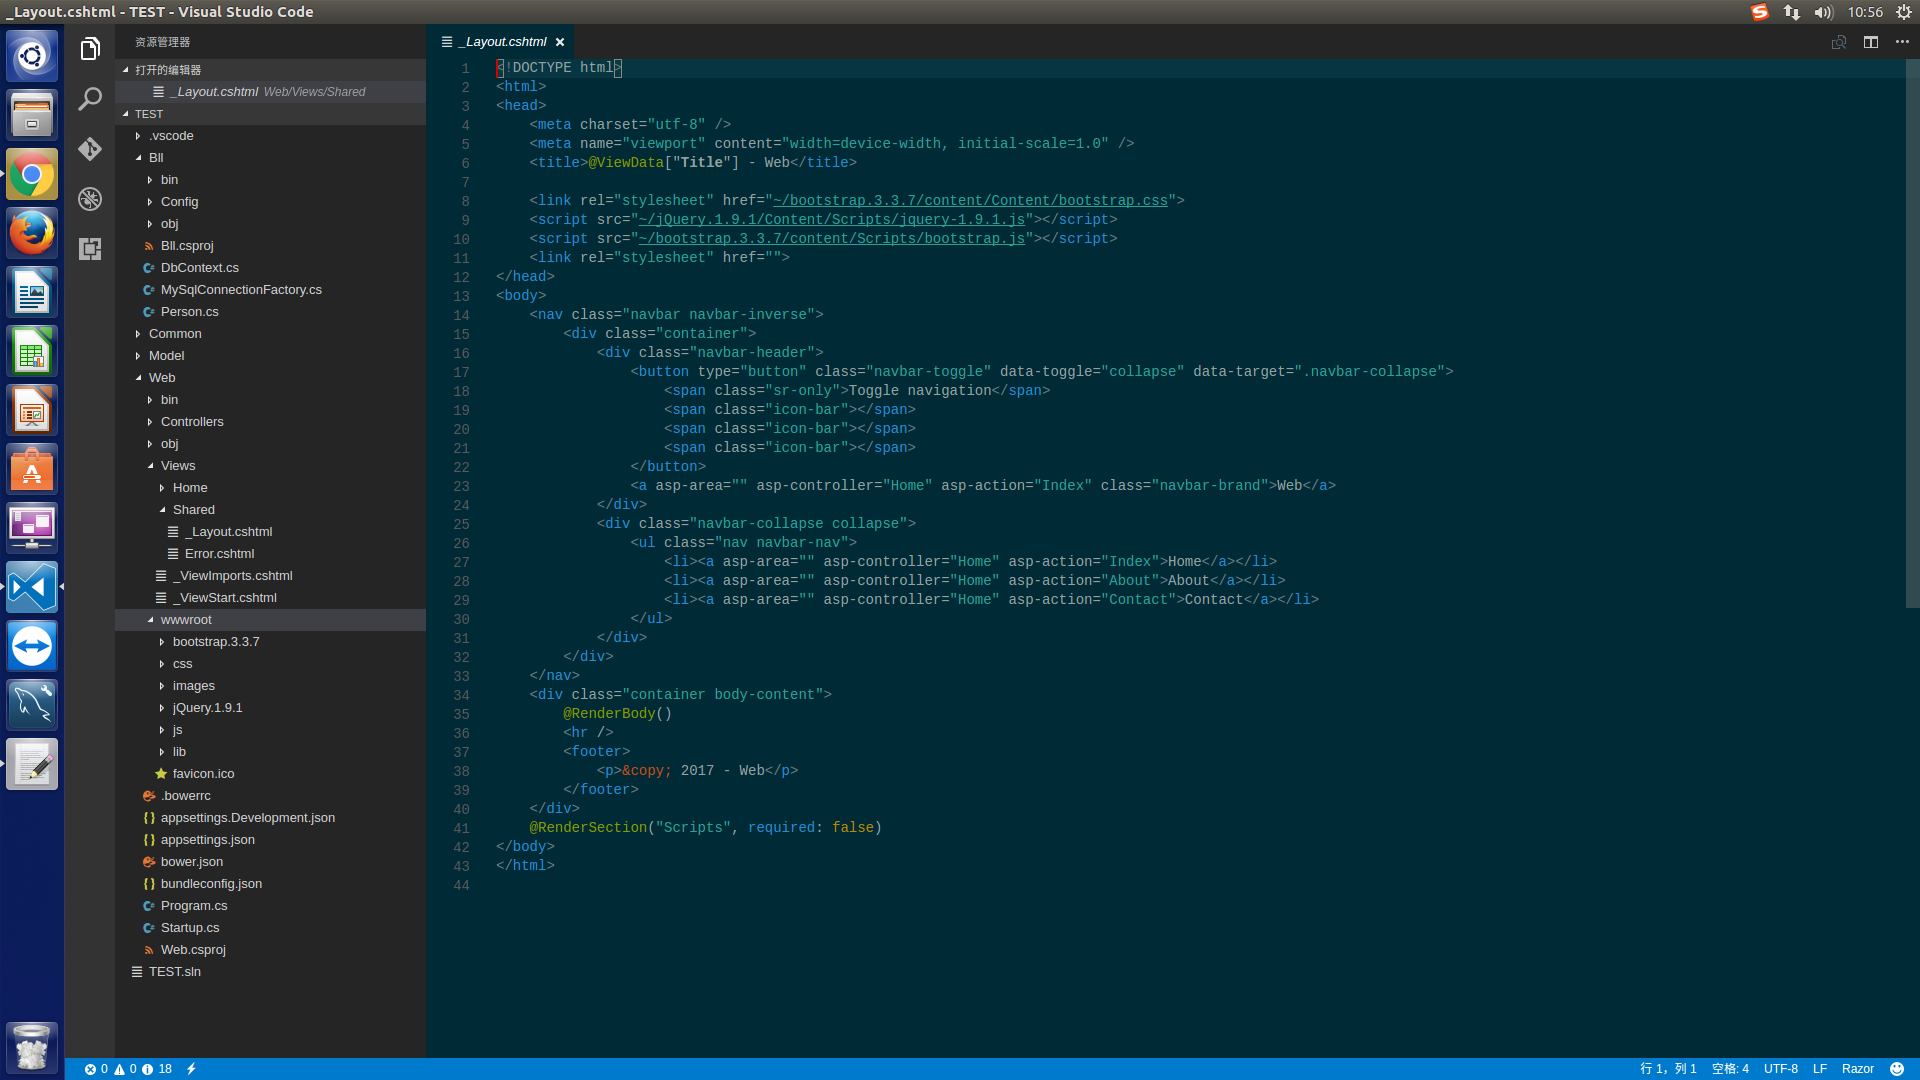
来张项目结构图压压惊
视图:Index.cshtml
@{

    ViewData["Title"] = "Home Page";

}

<script type="text/javascript">

    $(document).ready(function(){

        $("#btnAddtest").click(function(){

            $.ajax({

                url:"AddTestData",

                data:{},

                type:"Post",

                success:function(obj){

                    if(obj>0){

                        location.reload();

                    }

                }

            }) ;

        });

        $("[Name='del']").click(function(){

            $.ajax({

                url:"DelTestData",

                data:{"Id":this.id},

                type:"Post",

                success:function(obj){

                    if(obj>0)

                    {

                        location.reload();

                    }

                }

            })

        });

    });

</script>

@using Model;

<button id="btnAddtest">添加测试数据</button>

用户列表:

<table class="table table-bordered table-hover">

    <tr>

        <th>名称</th>

        <th>年龄</th>

        <th>用户名</th>

        <th>密码</th>

        <th>操作</th>

    </tr>

@foreach(Person s in @ViewBag.lst as List<Person>)

{

    <tr>

        <td>@s.Name</td>

        <td>@s.Age</td>

        <td>@s.UserName</td>

        <td>@s.PassWord</td>

        <td>

        <button type="button" class="btn btn-large btn-block btn-default" name="del" id="@s.id">删除</button>

        </td>

    </tr>

}

</table>
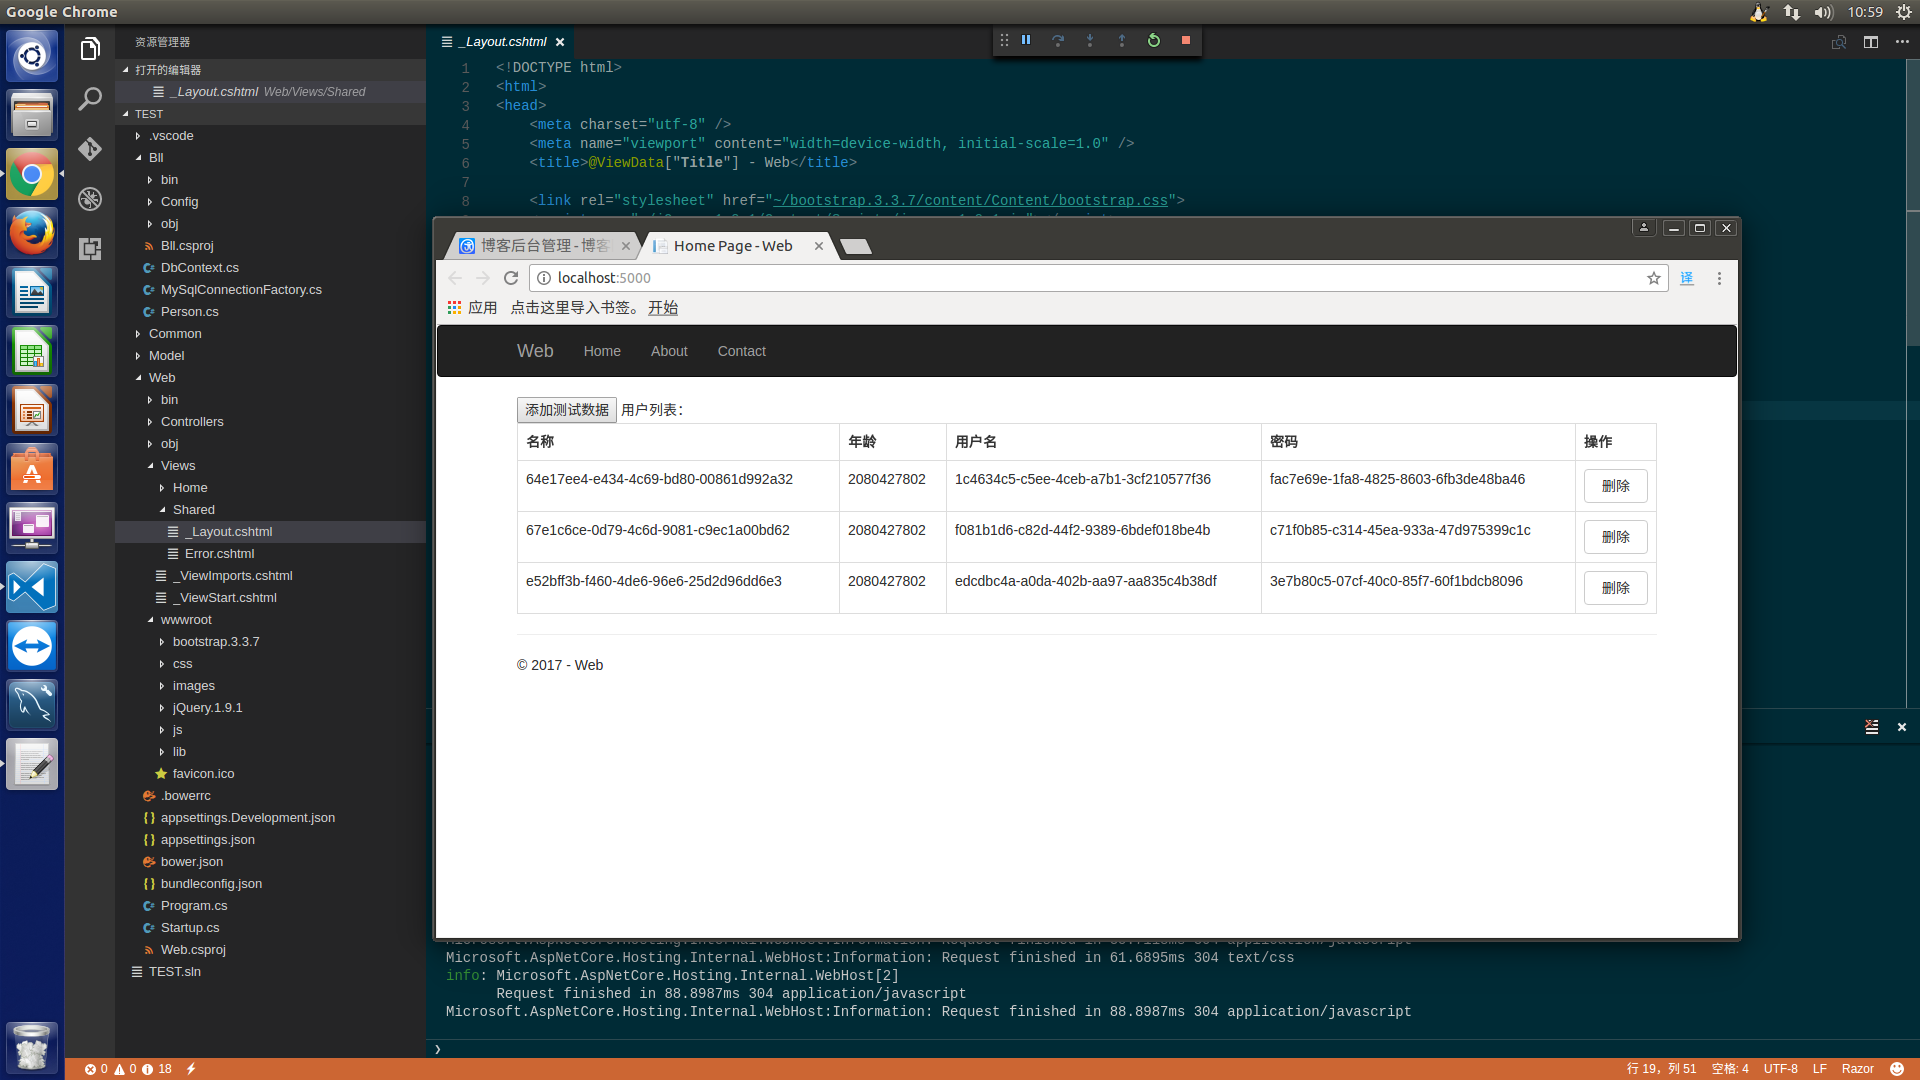
前台写的非常简单,请打开完整路径查看效果 localhost:5000/Home/index
基本结束了,最后再附一张运行效果图
有问题请留言,欢迎讨论学习
.net Core 1.0.1 下的Web框架的的搭建过程step by step的更多相关文章
- Linux下MySQL/MariaDB Galera集群搭建过程【转】
MariaDB介绍 MariaDB是开源社区维护的一个MySQL分支,由MySQL的创始人Michael Widenius主导开发,采用GPL授权许可证. MariaDB的目的是完全兼容MySQL,包 ...
- .NET Core 2.0迁移技巧之web.config配置文件
大家都知道.NET Core现在不再支持原来的web.config配置文件了,取而代之的是json或xml配置文件.官方推荐的项目配置方式是使用appsettings.json配置文件,这对现有一些重 ...
- windows下python web开发环境的搭建
windows下python web开发环境: python2.7,django1.5.1,eclipse4.3.2,pydev3.4.1 一. python环境安装 https://www.pyth ...
- Django 2.0 学习(15):Web框架
Web框架的本质 对于学习Python的同学,相信对Flask.Django.Web.py等不会陌生,这些都是Python语言的web框架.那么问题来了,web服务器是什么?它和web框架有什么关系? ...
- Asp.Net Core 3.0 学习3、Web Api 文件上传 Ajax请求以及跨域问题
1.创建Api项目 我用的是VS2019 Core3.1 .打开Vs2019 创建Asp.Net Core Web应用程序命名CoreWebApi 创建选择API 在Controller文件夹下面添加 ...
- Windows下Nginx+Web.py+FastCGI服务搭建
在搭建之前,有必要了解下什么是fastcgi,但鉴于我自己也不大了解,这里就不搬门弄斧了,请参考各种百科和官网资料. 1.资源下载 python下载地址:戳这里webpy下载地址:戳这里flup下载地 ...
- Linux下MySQL/MariaDB Galera集群搭建过程
MariaDB介绍 MariaDB是开源社区维护的一个MySQL分支,由MySQL的创始人Michael Widenius主导开发,采用GPL授权许可证. MariaDB的目的是完全兼容MySQL,包 ...
- LINUX下QT FOR ARM开发环境搭建过程 (使用qt-x11-opensource-src-4.5.2.tar.gz进行编译)
在PC上,我们需要得到两个版本的Qt,分别是:Qt-4.5.2和QtEmbedded-4.5.2-arm.前者包括了Qt Designer等基本工具,用于在PC上对程序的开发调试,使我们能确保程序放到 ...
- windows7 64,32位下scrapy爬虫框架的环境搭建
适用于python 2.7 64位安装 一.操作系统:WIN7 64位 二.python版本:2.7 64位(scrapy目前不支持3.x) 不确定位数的,看图 三.安装相关软件:(可以从我的百度网盘 ...
随机推荐
- SpringMVC通过实体类返回json格式的字符串,并在前端显示
一.除了搭建springmvc框架需要的jar包外,还需要这两个jar包 jackson-core-asl-1.9.2.jar和jackson-mapper-asl-1.9.2.jar 二.web,. ...
- <C++Primer>第四版 阅读笔记 第二部分 “容器和算法”
泛型算法中,所谓"泛型(generic)"指的是两个方面:这些算法可作用于各种不同的容器类型,而这些容器又可以容纳多种不同类型的元素. 第九章 顺序容器 顺序容器的元素排列次序与元 ...
- 笑谈ArcToolbox (1) ArcToolbox 的发展方向
笑谈ArcToolbox (1) ArcToolbox 的发展方向 by 李远祥 ArcGIS工具箱ArcToolbox具有非常多的工具,相信用过的人都非常惊叹,其功能完备并且强大,种类繁多,总能找到 ...
- Java编程规范(一)
最近在看一本有关Java编程规范的书,书中精炼阐述了使用java语言时应该遵循的一些原则.接下来的一段时间我将在这里总结我的学习内容,也希望这一系列文章能够对有需要的人有所帮助. 不考虑任何编码规范的 ...
- 从C#到TypeScript - 装饰器
总目录 从C#到TypeScript - 类型 从C#到TypeScript - 高级类型 从C#到TypeScript - 变量 从C#到TypeScript - 接口 从C#到TypeScript ...
- BDD框架:behave学习记录
本人学习的时候基本上是按照behave的tutorial教程一步步学习的,这篇文章就当Behave教程的翻译版吧(*^__^*) 嘻嘻--. 1 安装behave 安装好python后 ...
- php编译安装
php编译安装含mcrypt扩展 开始前准备 1.php源码下载 这里用的是php5.6.22版本 wget -c http://cn2.php.net/get/php-5.6.22.tar.gz/f ...
- 【开源】NodeJS仿WebApi路由
用过WebApi或Asp.net MVC的都知道微软的路由设计得非常好,十分方便,也十分灵活.虽然个人看来是有的太灵活了,team内的不同开发很容易使用不同的路由方式而显得有点混乱. 不过这不是重点, ...
- vue2.0全局组件之pdf
目的:像elementUI那样注册全局组件 预览pdf文件 技术支持:使用火狐的pdf.js http://mozilla.github.io/pdf.js/ 准备:新建一个CPdf.vue文件,把火 ...
- AlloyTouch之无限循环select插件
写在前面 当滚动的内容很多,比如闹钟里设置秒,一共有60项.让使用者从59ms滚回01ms是一件很痛苦的事情,所以: 在列表项太多的情况下,我们希望能够有个无限循环的滚动.00ms和01ms是无缝链接 ...