
基于 Spring + Atomikos + Mybatis的多数据源配置demo
1.spring配置文件
<?xml version="1.0" encoding="UTF-8"?>
<beans xmlns="http://www.springframework.org/schema/beans"
xmlns:xsi="http://www.w3.org/2001/XMLSchema-instance" xmlns:p="http://www.springframework.org/schema/p"
xmlns:context="http://www.springframework.org/schema/context"
xmlns:tx="http://www.springframework.org/schema/tx"
xmlns:mvc="http://www.springframework.org/schema/mvc"
xsi:schemaLocation="http://www.springframework.org/schema/beans
http://www.springframework.org/schema/beans/spring-beans-3.1.xsd
http://www.springframework.org/schema/context
http://www.springframework.org/schema/context/spring-context-3.1.xsd
http://www.springframework.org/schema/tx
http://www.springframework.org/schema/tx/spring-tx-3.2.xsd
http://www.springframework.org/schema/mvc
http://www.springframework.org/schema/mvc/spring-mvc-4.0.xsd">
<!-- 自动扫描 -->
<context:component-scan base-package="com.cn" />
<!-- 引入配置文件 -->
<!--<bean id="propertyConfigurer"
class="org.springframework.beans.factory.config.PropertyPlaceholderConfigurer">
<property name="location" value="classpath:jdbc.properties" />
</bean>--> <bean id="dataSourceOracle" class="com.atomikos.jdbc.AtomikosDataSourceBean"
init-method="init" destroy-method="close">
<property name="uniqueResourceName" value="oracle_ds" />
<property name="xaDataSourceClassName"
value="oracle.jdbc.xa.client.OracleXADataSource" />
<property name="xaProperties">
<props>
<prop key="URL">jdbc:oracle:thin:@192.168.222.1:1521:orcl</prop>
<prop key="user">scott</prop>
<prop key="password">orcl</prop>
</props>
</property>
<property name="minPoolSize" value="10" />
<property name="maxPoolSize" value="100" />
<property name="borrowConnectionTimeout" value="30" />
<property name="maintenanceInterval" value="60" />
</bean> <bean id="dataSourceMysql" class="com.atomikos.jdbc.AtomikosDataSourceBean"
init-method="init" destroy-method="close">
<property name="uniqueResourceName" value="mysql_ds" />
<property name="xaDataSourceClassName"
value="com.mysql.jdbc.jdbc2.optional.MysqlXADataSource" />
<property name="xaProperties">
<props>
<prop key="url">jdbc:mysql://localhost:3306/test</prop>
<prop key="user">root</prop>
<prop key="password"></prop>
</props>
</property>
<property name="minPoolSize" value="10" />
<property name="maxPoolSize" value="100" />
<property name="borrowConnectionTimeout" value="30" />
<property name="maintenanceInterval" value="60" />
</bean> <bean id="sqlSessionFactoryOracle" class="org.mybatis.spring.SqlSessionFactoryBean">
<property name="dataSource" ref="dataSourceOracle" />
<!-- 自动扫描mapping.xml文件 -->
<property name="mapperLocations">
<array>
<value>classpath:com/cn/dao/dept/DeptDaoMapper.xml</value>
</array>
</property>
</bean>
<bean id="sqlSessionFactoryMysql" class="org.mybatis.spring.SqlSessionFactoryBean">
<property name="dataSource" ref="dataSourceMysql" />
<!-- 自动扫描mapping.xml文件 -->
<property name="mapperLocations">
<array>
<value>classpath:com/cn/dao/brand/BrandDaoMapper.xml</value>
</array>
</property>
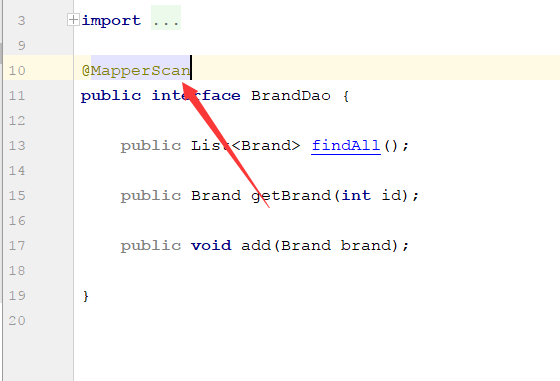
</bean> <!--去dao层扫描对应的接口,接口上边要添加MapperScan注解-->
<bean class="org.mybatis.spring.mapper.MapperScannerConfigurer">
<property name="basePackage" value="com.cn.dao.dept" />
<property name="sqlSessionFactoryBeanName" value="sqlSessionFactoryOracle"></property>
</bean>
<bean class="org.mybatis.spring.mapper.MapperScannerConfigurer">
<property name="basePackage" value="com.cn.dao.brand" />
<property name="sqlSessionFactoryBeanName" value="sqlSessionFactoryMysql"></property>
</bean> <!-- atomikos事务管理器 -->
<bean id="atomikosTransactionManager" class="com.atomikos.icatch.jta.UserTransactionManager"
init-method="init" destroy-method="close">
<description>UserTransactionManager</description>
<property name="forceShutdown">
<value>true</value>
</property>
</bean> <bean id="atomikosUserTransaction" class="com.atomikos.icatch.jta.UserTransactionImp">
<property name="transactionTimeout" value="300" />
</bean> <!-- spring 事务管理器 -->
<bean id="transactionManager"
class="org.springframework.transaction.jta.JtaTransactionManager">
<property name="transactionManager" ref="atomikosTransactionManager"/>
<property name="userTransaction" ref="atomikosUserTransaction" />
<property name="allowCustomIsolationLevels" value="true"/>
</bean> <!-- 使用annotation定义事务,对于要加入事物的类,只需对该类加 @Transactional -->
<tx:annotation-driven transaction-manager="transactionManager" /> <!--<bean id="dataSource" class="org.apache.commons.dbcp.BasicDataSource"
destroy-method="close">
<property name="driverClassName" value="${driverClassName}" />
<property name="url" value="${url}" />
<property name="username" value="${username}" />
<property name="password" value="${password}" />
<!– 初始化连接大小 –>
<property name="initialSize" value="${initialSize}"></property>
<!– 连接池最大数量 –>
<property name="maxActive" value="${maxActive}"></property>
<!– 连接池最大空闲 –>
<property name="maxIdle" value="${maxIdle}"></property>
<!– 连接池最小空闲 –>
<property name="minIdle" value="${minIdle}"></property>
<!– 获取连接最大等待时间 –>
<property name="maxWait" value="${maxWait}"></property>
</bean>--> <!-- spring和MyBatis完美整合,不需要mybatis的配置映射文件 -->
<!--<bean id="sqlSessionFactory" class="org.mybatis.spring.SqlSessionFactoryBean">
<property name="dataSource" ref="dataSource" />
<!–<property name="configLocation" value="classpath:mybatis-config.xml"/>–>
<!– 自动扫描mapping.xml文件 –>
<property name="mapperLocations" value="classpath:com/cn/**/*.xml"></property>
</bean>--> <!-- DAO接口所在包名,Spring会自动查找其下的类 -->
<!--<bean class="org.mybatis.spring.mapper.MapperScannerConfigurer">
<property name="basePackage" value="com.cn.dao" />
<property name="sqlSessionFactoryBeanName" value="sqlSessionFactory"></property>
</bean>--> <!-- (事务管理)transaction manager, use JtaTransactionManager for global tx -->
<!--<bean id="transactionManager"
class="org.springframework.jdbc.datasource.DataSourceTransactionManager">
<property name="dataSource" ref="dataSource" />
</bean>
-->
</beans>
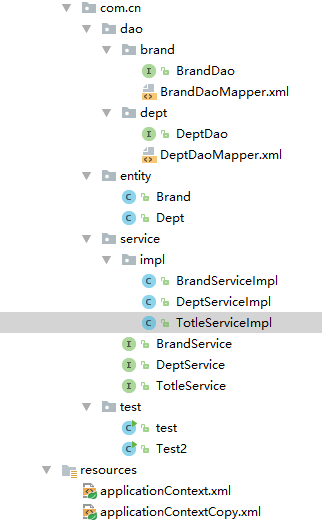
2.项目结构
3.mybatis映射文件

基于 Spring + Atomikos + Mybatis的多数据源配置demo的更多相关文章
- 基于 Spring + Atomikos + Mybatis的多数据源配置(含有BaseDao,BaseService)
1.spring配置文件 <?xml version="1.0" encoding="UTF-8"?> <beans xmlns=" ...
- spring boot +mybatis+druid 多数据源配置
因为我的工程需要在两个数据库中操作数据,所以要配置两个数据库,我这里没有数据源没有什么主从之分,只是配合多数据源必须要指定一个主数据源,所以我就把 操作相对要对的那个数据库设置为主数据(dataBas ...
- spring,mybatis,多数据源配置
spring.xml配置 <!-- 对数据源进行事务管理 --> <bean id="transactionManager" class="org.sp ...
- Spring Boot 2.x基础教程:MyBatis的多数据源配置
前两天,我们已经介绍了关于JdbcTemplate的多数据源配置以及Spring Data JPA的多数据源配置,接下来具体说说使用MyBatis时候的多数据源场景该如何配置. 添加多数据源的配置 先 ...
- Spring Boot 2.x 多数据源配置之 MyBatis 篇
场景假设:现有电商业务,商品和库存分别放在不同的库 配置数据库连接 app: datasource: first: driver-class-name: com.mysql.cj.jdbc.Drive ...
- Spring Boot + Mybatis 实现动态数据源
动态数据源 在很多具体应用场景的时候,我们需要用到动态数据源的情况,比如多租户的场景,系统登录时需要根据用户信息切换到用户对应的数据库.又比如业务A要访问A数据库,业务B要访问B数据库等,都可以使用动 ...
- 基于Spring框架的简单多数据源切换解决办法
基于Spring框架的简单多数据源切换解决办法 Spring框架JDBC包提供了一个抽象类AbstractRoutingDataSource提供了动态切换数据库的基础方法.我们仅仅需要实现一个简单的数 ...
- 13、Spring Boot 2.x 多数据源配置
1.13 Spring Boot 2.x 多数据源配置 完整源码: Spring-Boot-Demos
- Spring Boot 2.x基础教程:Spring Data JPA的多数据源配置
上一篇我们介绍了在使用JdbcTemplate来做数据访问时候的多数据源配置实现.接下来我们继续学习如何在使用Spring Data JPA的时候,完成多数据源的配置和使用. 添加多数据源的配置 先在 ...
随机推荐
- spring中少用的注解@primary解析
这次看下spring中少见的注解@primary注解,例子 @Component public class MetalSinger implements Singer{ @Override publi ...
- MongoDB Wiredtiger存储引擎实现原理
Mongodb-3.2已经WiredTiger设置为了默认的存储引擎,最近通过阅读wiredtiger源代码(在不了解其内部实现的情况下,读代码难度相当大,代码量太大,强烈建议官方多出些介绍文章),理 ...
- TensorFlow(十二):使用RNN实现手写数字识别
上代码: import tensorflow as tf from tensorflow.examples.tutorials.mnist import input_data #载入数据集 mnist ...
- Pythton3实例
计算1-100之和 #add.py n = 0 sum = 0 for n in range(0,101): sum += n print(sum) 实现99乘法法则 #mul.py i = 1 wh ...
- H-Fashion in Berland
#include <bits/stdc++.h> using namespace std; int a[1005]; int main() { int n; scanf("%d& ...
- 【原创】go语言学习(十二)struct介绍1
目录: struct声明和定义 struct的内存布局以及构造函数 匿名字段和struct嵌套 struct与tag应用 struct声明和定义 1.Go中面向对象是通过struct来实现的, str ...
- php des 对称加解密类
<?php header("Content-Type: text/html;charset=utf-8"); /** * des 对称加解密 */ class des { p ...
- Jedis API操作redis数据库
1.配置文件 classpath路径下,新建redis.properties配置文件 配置文件内容 # Redis settings redis.host=127.0.0.1 redis.port=6 ...
- ElasticSearch java客户端更新时出现的错误:NoNodeAvailableException[None of the configured nodes are available
下午尝试 用ElasticSearch 的java客户端去做数据检索工作,测试了一下批量更新,代码如下: public static void bulkUpdateGoods(List<Goo ...
- BitmapFactory: inSampleSize 的一些思考
一. BitmapFactory.Options 中inSampleSize的取值问题 关于inSampleSize的取值问题Google已经给出了一个推荐的算法:(https://developer ...