
kvm虚拟机的克隆
kvm虚拟机的克隆分为两种情况
(1) KVM主机本机虚拟机直接克隆。
(2) 通过复制配置文件与磁盘文件的虚拟机复制克隆(适用于异机的静态迁移)。
1. 本机虚拟机直接克隆
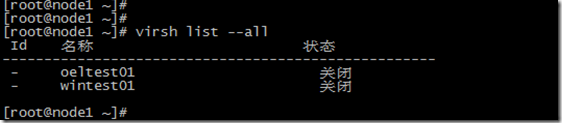
(1) 查看虚拟机配置文件
[root@node1 ~]# cat /etc/libvirt/qemu/oeltest01.xml
<!--

WARNING: THIS IS AN AUTO-GENERATED FILE. CHANGES TO IT ARE LIKELY TO BE

OVERWRITTEN AND LOST. Changes to this xml configuration should be made using:

virsh edit oeltest01

or other application using the libvirt API.

-->

<domain type='kvm'>

<name>oeltest01</name>

<uuid>8f2bb4a7-c7ed-32aa-3676-9fb05923269d</uuid>

<memory unit='KiB'>524288</memory>

<currentMemory unit='KiB'>524288</currentMemory>

<vcpu placement='static'>1</vcpu>

<os>

<type arch='x86_64' machine='rhel6.4.0'>hvm</type>

<boot dev='hd'/>

</os>

<features>

<acpi/>

<apic/>

<pae/>

</features>

<clock offset='utc'/>

<on_poweroff>destroy</on_poweroff>

<on_reboot>restart</on_reboot>

<on_crash>restart</on_crash>

<devices>

<emulator>/usr/libexec/qemu-kvm</emulator>

<disk type='file' device='disk'>

<driver name='qemu' type='raw' cache='none'/>

<source file='/data/test01.img'/>

<target dev='hda' bus='ide'/>

<address type='drive' controller='0' bus='0' target='0' unit='0'/>

</disk>

<disk type='block' device='cdrom'>

<driver name='qemu' type='raw'/>

<target dev='hdc' bus='ide'/>

<readonly/>

<address type='drive' controller='0' bus='1' target='0' unit='0'/>

</disk>

<controller type='usb' index='0'>

<address type='pci' domain='0x0000' bus='0x00' slot='0x01' function='0x2'/>

</controller>

<controller type='ide' index='0'>

<address type='pci' domain='0x0000' bus='0x00' slot='0x01' function='0x1'/>

</controller>

<interface type='bridge'>

<mac address='52:54:00:82:39:01'/>

<source bridge='br0'/>

<model type='virtio'/>

<address type='pci' domain='0x0000' bus='0x00' slot='0x03' function='0x0'/>

</interface>

<serial type='pty'>

<target port='0'/>

</serial>

<console type='pty'>

<target type='serial' port='0'/>

</console>

<input type='tablet' bus='usb'/>

<input type='mouse' bus='ps2'/>

<graphics type='vnc' port='5910' autoport='no' listen='0.0.0.0'>

<listen type='address' address='0.0.0.0'/>

</graphics>

<video>

<model type='cirrus' vram='9216' heads='1'/>

<address type='pci' domain='0x0000' bus='0x00' slot='0x02' function='0x0'/>

</video>

<memballoon model='virtio'>

<address type='pci' domain='0x0000' bus='0x00' slot='0x04' function='0x0'/>

</memballoon>

</devices>

</domain>
虚拟机磁盘文件: /data/test01.img
虚拟机名称:oeltest01
(2) 开始克隆
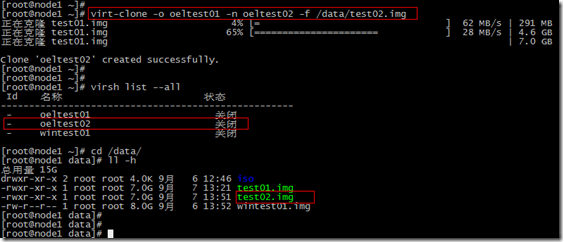
# virt-clone -o oeltest01 -n oeltest02 -f /data/test02.img
说明:以oeltest01做为源,克隆oeltest01虚拟机,并创建名称为oeltest02虚拟机,使用磁盘文件/data/test02.img
(3) 启动虚拟机并配置主机名,IP地址等
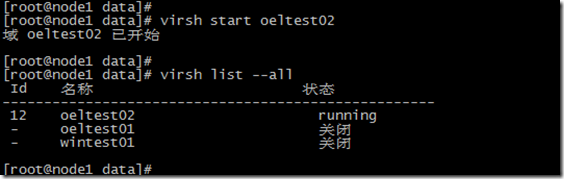
[root@node1 data]# virsh console oeltest02
连接到域 oeltest02

Escape character is ^]

Found volume group "vg" using metadata type lvm2

2 logical volume(s) in volume group "vg" now active

Welcome to Oracle Linux Oracle Linux Server release 5.8

Press 'I' to enter interactive startup.

Starting udev: [  OK  ]

Loading default keymap (us): [  OK  ]

Setting hostname test01:  [  OK  ]

Setting up Logical Volume Management:   2 logical volume(s) in volume group "vg" now active

[  OK  ]

Checking filesystems

Checking all file systems.

[/sbin/fsck.ext3 (1) -- /] fsck.ext3 -a /dev/vg/root

/dev/vg/root: clean, 135384/1540096 files, 851398/1540096 blocks

[/sbin/fsck.ext3 (1) -- /boot] fsck.ext3 -a /dev/hda1

/boot: clean, 39/26104 files, 26897/104388 blocks

[  OK  ]

Remounting root filesystem in read-write mode:  [  OK  ]

Mounting local filesystems:  [  OK  ]

Enabling local filesystem quotas:  [  OK  ]

Enabling /etc/fstab swaps:  [  OK  ]

INIT: Entering runlevel: 5

Entering non-interactive startup

Applying Intel CPU microcode update: [  OK  ]

Starting background readahead: [  OK  ]

Checking for hardware changes [  OK  ]

[  OK  ] iSCSI daemon: [  OK  ]

[  OK  ]

Bringing up loopback interface:  [  OK  ]

Bringing up interface eth0:

Determining IP information for eth0... done.

[  OK  ]

Starting auditd: [  OK  ]

Starting system logger: [  OK  ]

Starting kernel logger: [  OK  ]

Starting irqbalance: [  OK  ]

iscsid (pid  1555) is running...

Setting up iSCSI targets: iscsiadm: No records found

[  OK  ]

Starting portmap: [  OK  ]

Starting NFS statd: [  OK  ]

Starting RPC idmapd: [  OK  ]

Starting system message bus: [  OK  ]

Starting o2cb:  [  OK  ]

[  OK  ] Bluetooth services:[  OK  ]

Mounting other filesystems:  [  OK  ]

Starting PC/SC smart card daemon (pcscd): [  OK  ]

Starting acpi daemon: [  OK  ]

Starting HAL daemon: [  OK  ]

Starting hidd: [  OK  ]

Starting monitoring for VG vg:   2 logical volume(s) in volume group "vg" monitored

[  OK  ]

Starting autofs:  Loading autofs4: [  OK  ]

Starting automount: [  OK  ]

[  OK  ]

Starting hpiod: [  OK  ]

Starting hpssd: [  OK  ]

Starting sshd: [  OK  ]

Starting cups: [  OK  ]

Starting xinetd: [  OK  ]

Starting console mouse services: [  OK  ]

Starting crond: [  OK  ]

Starting xfs: [  OK  ]

Starting anacron: [  OK  ]

[  OK  ] atd: [  OK  ]

Starting background readahead: [  OK  ]

Starting yum-updatesd: [  OK  ]

Starting Avahi daemon... [  OK  ]

Starting smartd: hdc: drive_cmd: status=0x41 { DriveReady Error }

hdc: drive_cmd: error=0x04 { AbortedCommand }

ide: failed opcode was: 0xec

[  OK  ]

Oracle Linux Server release 5.8

Kernel 2.6.18-308.el5 on an x86_64

test01 login: mtrr: type mismatch for f0000000,100000 old: uncachable new: write-combining

mtrr: type mismatch for f0000000,400000 old: uncachable new: write-combining

Oracle Linux Server release 5.8

Kernel 2.6.18-308.el5 on an x86_64

test01 login:

Oracle Linux Server release 5.8

Kernel 2.6.18-308.el5 on an x86_64

test01 login: root

Password:

Last login: Sat Sep  7 05:21:11 on ttyS0

[root@test01 ~]#

[root@test01 ~]#

[root@test01 ~]#
2. 复制配置文件与磁盘文件克隆
(1) 导入kvm虚拟机配置文件
这里采用oeltest01做为模板,进行克隆。
# virsh shutdown oeltest01
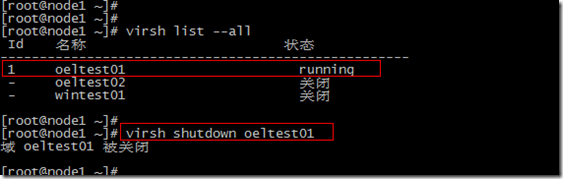
# virsh dumpxml oeltest01 > /etc/libvirt/qemu/oeltest03.xml
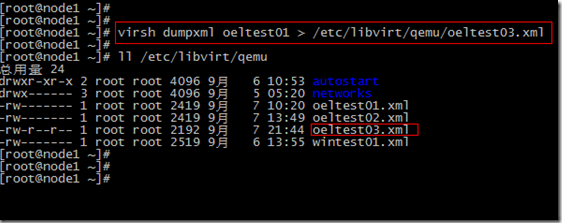
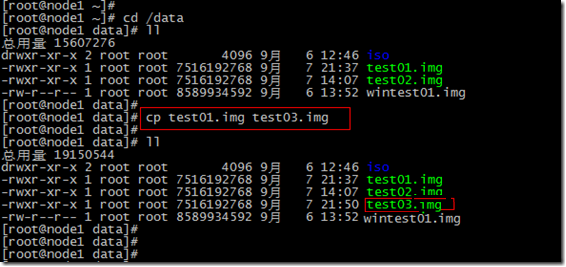
(2) 复制kvm虚拟机磁盘文件
本系列文章都是采用虚拟磁盘文件进行测试,没有使用lvm卷。
通过查看配置文件:虚拟磁盘位置<source file='/data/test01.img'/>
(3) 直接编辑修改配置文件
修改name,uuid,disk位置,vnc端口
此时还是将该配置文件注册进来,无法通过virsh edit进行编辑。
[root@node1 data]# vi /etc/libvirt/qemu/oeltest03.xml
<domain type='kvm'>

  <name>oeltest03</name>

  <uuid>8f2bb4a7-c7ed-32aa-3676-9fb05923260d</uuid>

  <memory unit='KiB'>524288</memory>

  <currentMemory unit='KiB'>524288</currentMemory>

  <vcpu placement='static'>1</vcpu>

  <os>

    <type arch='x86_64' machine='rhel6.4.0'>hvm</type>

    <boot dev='hd'/>

  </os>

  <features>

    <acpi/>

    <apic/>

    <pae/>

  </features>

  <clock offset='utc'/>

  <on_poweroff>destroy</on_poweroff>

  <on_reboot>restart</on_reboot>

  <on_crash>restart</on_crash>

  <devices>

    <emulator>/usr/libexec/qemu-kvm</emulator>

    <disk type='file' device='disk'>

      <driver name='qemu' type='raw' cache='none'/>

      <source file='/data/test03.img'/>

      <target dev='hda' bus='ide'/>

      <address type='drive' controller='0' bus='0' target='0' unit='0'/>

    </disk>

    <disk type='block' device='cdrom'>

      <driver name='qemu' type='raw'/>

      <target dev='hdc' bus='ide'/>

      <readonly/>

      <address type='drive' controller='0' bus='1' target='0' unit='0'/>

    </disk>

    <controller type='usb' index='0'>

      <address type='pci' domain='0x0000' bus='0x00' slot='0x01' function='0x2'/>

    </controller>

    <controller type='ide' index='0'>

      <address type='pci' domain='0x0000' bus='0x00' slot='0x01' function='0x1'/>

    </controller>

    <interface type='bridge'>

      <mac address='52:54:00:82:39:11'/>

      <source bridge='br0'/>

      <model type='virtio'/>

      <address type='pci' domain='0x0000' bus='0x00' slot='0x03' function='0x0'/>

    </interface>

    <serial type='pty'>

      <target port='0'/>

    </serial>

    <console type='pty'>

      <target type='serial' port='0'/>

    </console>

    <input type='tablet' bus='usb'/>

    <input type='mouse' bus='ps2'/>

    <graphics type='vnc' port='5911' autoport='no' listen='0.0.0.0'>

      <listen type='address' address='0.0.0.0'/>

    </graphics>

    <video>

      <model type='cirrus' vram='9216' heads='1'/>

      <address type='pci' domain='0x0000' bus='0x00' slot='0x02' function='0x0'/>

    </video>

    <memballoon model='virtio'>

      <address type='pci' domain='0x0000' bus='0x00' slot='0x04' function='0x0'/>

    </memballoon>

  </devices>

</domain>
(4) 定义新虚拟机配置文件
[root@node1 data]# virsh define /etc/libvirt/qemu/oeltest03.xml
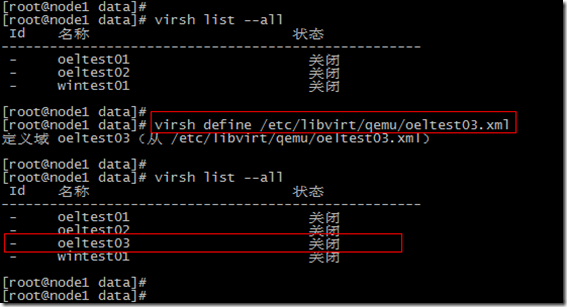
启动虚拟机
[root@node1 data]# virsh start oeltest03
(5) 登录虚拟机进行主机名,IP等修改
[root@node1 data]# virsh console oeltest03

连接到域 oeltest03

Escape character is ^]

Oracle Linux Server release 5.8

Kernel 2.6.18-308.el5 on an x86_64

test01 login: mtrr: type mismatch for f0000000,100000 old: uncachable new: write-combining

mtrr: type mismatch for f0000000,400000 old: uncachable new: write-combining

Oracle Linux Server release 5.8

Kernel 2.6.18-308.el5 on an x86_64

test01 login: root

Password:

Last login: Sat Sep  7 05:21:11 on ttyS0
[root@test01 ~]#
[root@test01 ~]#
修改主机名
# vi /etc/hosts

# Do not remove the following line, or various programs

# that require network functionality will fail.

127.0.0.1 test03 localhost.localdomain localhost

::1 localhost6.localdomain6 localhost6
# vi /etc/sysconfig/network
NETWORKING=yes

NETWORKING_IPV6=no

HOSTNAME=test03

GATEWAY=192.168.233.2
修改IP地址
# vi /etc/sysconfig/network-script/ifcfg-eth0

# Virtio Network Device

DEVICE=eth0

BOOTPROTO=static

ONBOOT=yes

HWADDR=52:54:00:56:bd:3b

IPADDR=192.168.233.143

NETMASK=255.255.255.0
service network restart
Shutting down interface eth0: [ OK ]

Shutting down loopback interface: [ OK ]

Bringing up loopback interface: [ OK ]

Bringing up interface eth0: [ OK ]
本文克隆的虚拟机是oel5.8,如果克隆的虚拟机是RHEL/CentOS/OEL6.x操作系统,还需要修改/etc/udev/rules.d/70-persistent-net.rules文件。
转自:https://blog.51cto.com/koumm/1291793
kvm虚拟机的克隆的更多相关文章
- 关于kvm虚拟机的克隆方法总结
kvm虚拟机的克隆分为两种情况,第一种kvm宿主机上对虚拟机直接克隆 第二种通过复制配置文件与磁盘文件的虚拟机复制克隆(适用于异机的静态迁移). 现笔者将分别两种kvm虚拟机克隆的的详细操作过程都记录 ...
- 转:KVM 虚拟机的克隆
KVM 虚拟机的克隆 首先把需要克隆的源虚拟机先关闭,然后使用以下命令来进行克隆,注意我这里使用的是相对路径. virsh shutdown VM02 virt-clone -o VM02 -n ...
- kvm虚拟机的克隆以及快照
克隆(常见有3种方法) 1 直接克隆(克隆虚拟机使用自己的磁盘) virt-clone -o vm-01 -n vm-02 -f /kvm/os/vm-02.qcow2 virsh start vm- ...
- 烂泥:KVM虚拟机克隆
本文由秀依林枫提供友情赞助,首发于烂泥行天下. 上一篇文章介绍了有关KVM虚拟机快照的创建与恢复,这篇文章我们来介绍有关KVM虚拟机克隆. KVM虚拟机的克隆,我们可以分以下几步: 1. 使用virt ...
- Linux中如何克隆KVM虚拟机
转载:https://yq.aliyun.com/articles/64860 作者 digoal 日期 2016-11-11 标签 Linux , KVM , 虚拟化 , 克隆 背景 当需要批量部署 ...
- kvm虚拟化之kvm虚拟机克隆
kvm虚拟机的克隆分为两种情况,本文也就通过以下两种情况进行克隆,克隆虚拟机为OEL5.8X64. (1) KVM主机本机虚拟机直接克隆. (2) 通过复制配置文件与磁盘文件的虚拟机复制克隆(适用于异 ...
- CentOS 6.9下KVM虚拟机通过virt-clone克隆虚拟机(转)
一.virt-clone概述 1.virt-clone作用简介 virt-clone主要是用来克隆kvm虚拟机,并且通过Options.General Option.Storage Configura ...
- 如何克隆kvm虚拟机
关于如何使用kvm虚拟化技术创建虚拟机,这里有一系列博客讲的已经非常清楚了,这里不再赘述,不过其中有些小坑可能需要大家注意: 0. 写在创建虚拟机之前(即教程的系列三之前) 1. 确认防火墙是否关闭, ...
- KVM虚拟机管理——虚拟机克隆
1. 概述2. 部署基本操作系统虚拟机3. 配置虚拟机3.1 修改/etc/sysconfig/network3.2 删除/etc/sysconfig/network-scripts/ifcfg-et ...
随机推荐
- ios开发的技巧
http://www.cocoachina.com/ios/20141231/10783.html
- Arcgis CreateFishnet工具,生成到FileGDB中要素类的格网大小不一致
我的第一篇博客!哈哈 最近在做一些关于创建渔网的工作,发现一些问题,做个总结. 1.问题描述:如图1,设置好渔网的必要参数,输出目录为gdb里的矢量图层,(行列数比较大,渔网的地理范围较小),输出的格 ...
- ObjectARX之Mac os开发
网上关于ObjectARX开发的相关介绍都基于Windows环境.Mac 环境的开发几乎没有,下面介绍Mac环境下ObjectARX的开发. AutoCAD ObjectARX开发必备条件: 1. 安 ...
- 201871020225-牟星源《面向对象程序设计(java)》第十一周学习总结
201871020225-牟星源<面向对象程序设计(java)>第十一周学习总结 博文正文开头: 项目 内容 这个作业属于哪个课程 https://www.cnblogs.com/nwnu ...
- dp的一些练习
#include<iostream> #include<vector> using namespace std; class Backpack { public: int ma ...
- Nginx配置文件nginx.conf(八)
原文链接:https://www.cnblogs.com/knowledgesea/p/5175711.html 在nginx.conf的注释符号是#. 默认的nginx.conf内容为: #user ...
- maven warnning 'build.plugins.plugin.version' is missing
裝完maven后,package或clean时出错:[WARN] [WARN] Some problems were encountered while building the effective ...
- nwjs-简单应用于基本结构
简单应用 1.在解压目录下创建文件夹dmeo01 2.在文件夹中创建index.html和package.json两个文件 3.index.html内容: <!DOCTYPE html> ...
- Day01 确定选题
一起来选题 一.谁想个选题? 今天是第一节大软课,大家需要进行分组和确定选题.分组固然是快乐的,但是确定选题是让人费脑筋的.要新颖!要有需求!要我们能实现(笑)......大家面面相觑.面对这种情况, ...
- git npm包管理
#Node # node 一.安装nodejs 下载地址:http://nodejs.cn/download/ 二.安装git 下载地址:https://git-scm.com/download/wi ...