
springboot+https+http
http访问不安全,使用https相对好些。
参考网址:https://blog.csdn.net/bock1984/article/details/90116965
操作如下:
- 1. 使用JDK自带keytool工具,创建本地SSL证书
启动命令行工具,进入jdk的bin目录执行以下命令:
keytool -genkey -v -alias tomcat -keyalg RSA -keystore F:\tomcat.keystore -validity 36500

1.-keyalg 生证书的算法名称,RSA是一种非对称加密算法

.-keystore 生成的证书文件的存储路径

.-validity 证书的有效期
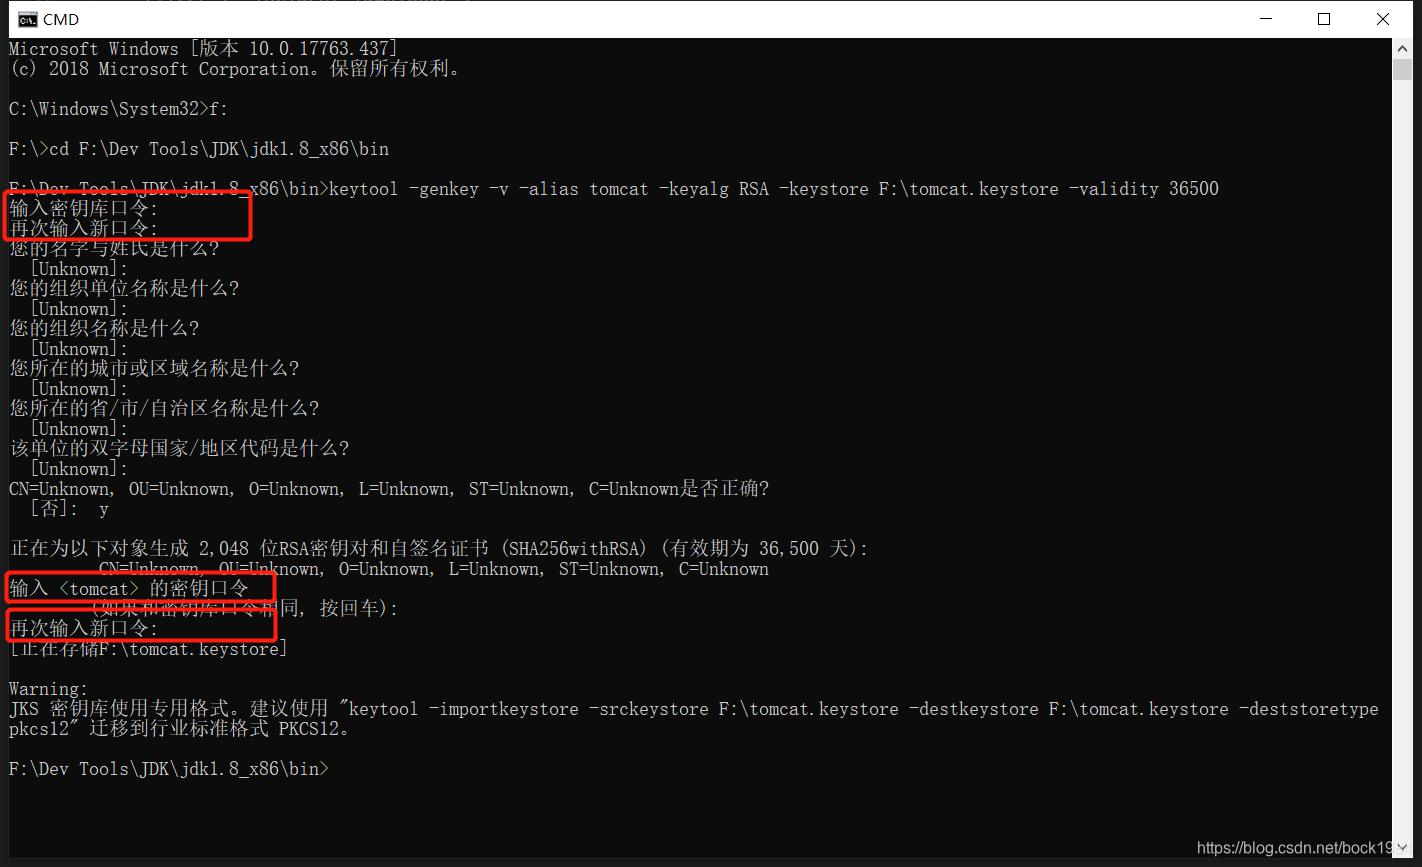
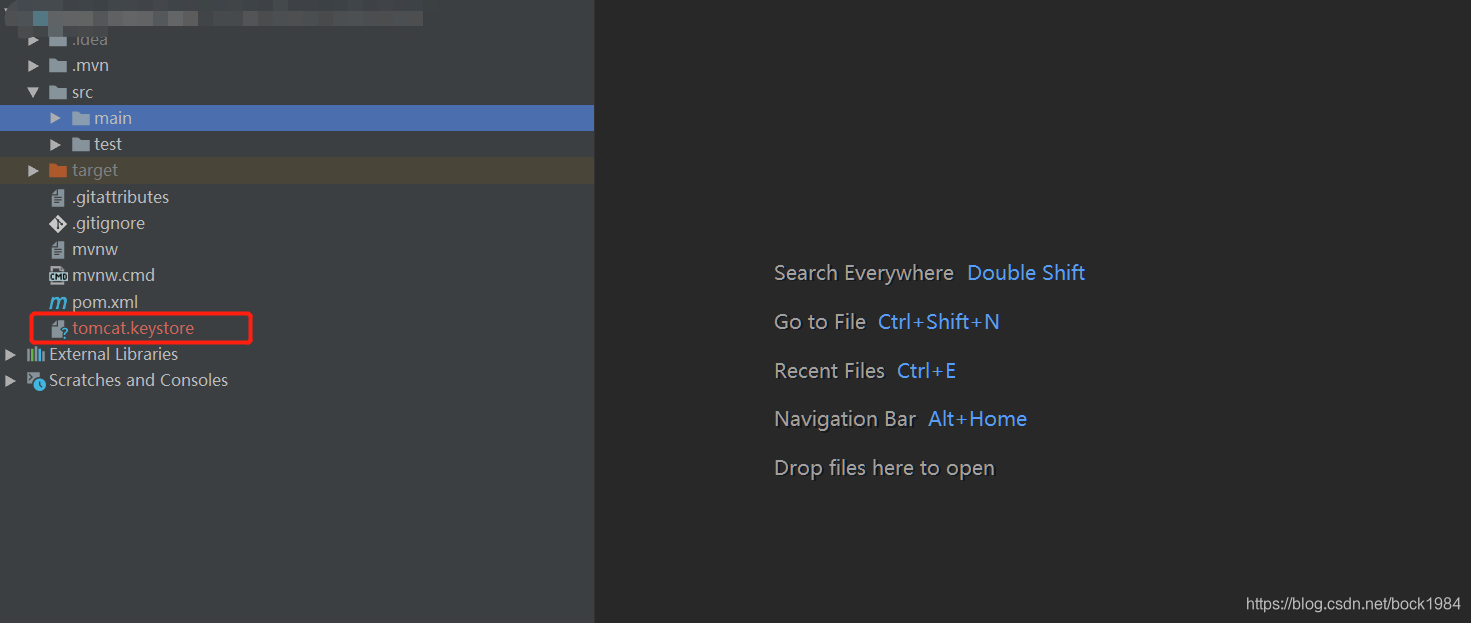
- 2.将生成的tomcat.keystore文件拷贝到springboot项目根目录下:
- 3.修改application.properties文件
·
- 4.启动服务即可访问 https://localhost:8443。
看application.properties配置文件可知,后面只能用https协议访问了。
1) http访问自动转https
(用户前期用http协议,突然改成只用https访问,这样有的客户还用http访问时就访问不到服务器了,针对这种情况可做http访问自动转到https)
package com.nsoft.gkzp.syscore.config;

import org.apache.catalina.Context;

import org.apache.catalina.connector.Connector;

import org.apache.tomcat.util.descriptor.web.SecurityCollection;

import org.apache.tomcat.util.descriptor.web.SecurityConstraint;

import org.springframework.beans.factory.annotation.Value;

import org.springframework.boot.web.embedded.tomcat.TomcatServletWebServerFactory;

import org.springframework.context.annotation.Bean;

import org.springframework.context.annotation.Configuration;

import org.springframework.context.annotation.PropertySource;

/**

 * 监听http端口,如访问网址为http协议的,自动转换为Https

 */

@Configuration

@PropertySource(value="classpath:application.properties")

public class HttpsComponent {

    //读取application.properties配置文件配置的https访问端口号

    @Value("${server.port}")

    public  int SYSTEM_HTTPS_PORT;

    //读取application.properties配置文件配置的http监控端口(自动转换为https)

    @Value("${server.http.port}")

    public  int SYSTEM_HTTP_PORT;

    @Bean

    public Connector connector(){

        Connector connector=new Connector("org.apache.coyote.http11.Http11NioProtocol");

        connector.setScheme("http");

        connector.setPort(SYSTEM_HTTP_PORT);//Connector监听的http的端口号

        connector.setSecure(false);

        connector.setRedirectPort(SYSTEM_HTTPS_PORT);//监听到http的端口号后转向到的https的端口号(一般会用443端口)

        return connector;

    }

    @Bean

    public TomcatServletWebServerFactory tomcatServletWebServerFactory(){

        TomcatServletWebServerFactory tomcat =new TomcatServletWebServerFactory(){

            @Override

            protected void postProcessContext(Context context) {

                SecurityConstraint securityConstraint=new SecurityConstraint();

                securityConstraint.setUserConstraint("CONFIDENTIAL");

                SecurityCollection collection=new SecurityCollection();

                collection.addPattern("/*");

                securityConstraint.addCollection(collection);

                context.addConstraint(securityConstraint);

            }

        };

        tomcat.addAdditionalTomcatConnectors(connector());

        return tomcat;

    }

}
package com.nsoft.gkzp.syscore.config;

import org.apache.catalina.Context;

import org.apache.catalina.connector.Connector;

import org.apache.tomcat.util.descriptor.web.SecurityCollection;

import org.apache.tomcat.util.descriptor.web.SecurityConstraint;

import org.springframework.boot.web.embedded.tomcat.TomcatServletWebServerFactory;

import org.springframework.context.annotation.Bean;

import org.springframework.context.annotation.Configuration;

/**

 * 监听http端口,如访问网址为http协议的,自动转换为Https

 */

@Configuration

public class HttpsComponent {

    @Bean

    public Connector connector(){

        Connector connector=new Connector("org.apache.coyote.http11.Http11NioProtocol");

        connector.setScheme("http");

        connector.setPort(8082);//Connector监听的http的端口号

        connector.setSecure(false);

        connector.setRedirectPort(8443);//监听到http的端口号后转向到的https的端口号(一般会用443端口)

        return connector;

    }

    @Bean

    public TomcatServletWebServerFactory tomcatServletWebServerFactory(){

        TomcatServletWebServerFactory tomcat =new TomcatServletWebServerFactory(){

            @Override

            protected void postProcessContext(Context context) {

                SecurityConstraint securityConstraint=new SecurityConstraint();

                securityConstraint.setUserConstraint("CONFIDENTIAL");

                SecurityCollection collection=new SecurityCollection();

                collection.addPattern("/*");

                securityConstraint.addCollection(collection);

                context.addConstraint(securityConstraint);

            }

        };

        tomcat.addAdditionalTomcatConnectors(connector());

        return tomcat;

    }

}
直接写端口号,理解更直观些
另:
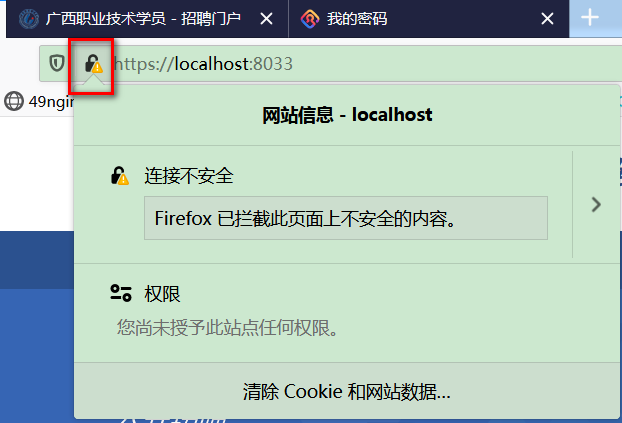
这边自己生成的证书,是不被公网认证的。如下图。要想公网认证,需要去网上相关机构的去买(将域名提供给他们,他们生成公网可认证的证书),便宜点的大约一年一千多块钱吧。
2) 同时支持http和https访问
(参考 : https://blog.csdn.net/qq_38288606/article/details/89478353)
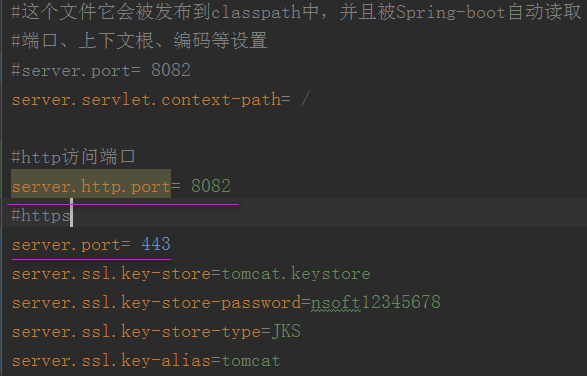
注意:Spring Boot不支持通过application.properties同时配置HTTP连接器和HTTPS连接器
故我在application.properties配置了https相关配置,然后添加了一个自定义的server.http.port参数,然后新建httpComponent.java配置java类,来启动http端口访问
application.properties
新建类D:\workspace-gzy-gkzp\src\main\java\com\nsoft\gkzp\syscore\config\httpComponent.java
package com.nsoft.gkzp.syscore.config;

import org.apache.catalina.connector.Connector;

import org.springframework.beans.factory.annotation.Value;

import org.springframework.boot.web.embedded.tomcat.TomcatServletWebServerFactory;

import org.springframework.boot.web.servlet.server.ServletWebServerFactory;

import org.springframework.context.annotation.Bean;

import org.springframework.context.annotation.Configuration;

import org.springframework.context.annotation.PropertySource;

/**

 * 监听http端口,使http访问端口生效

 */

@Configuration

@PropertySource(value="classpath:application.properties")

public class httpComponent {

    //读取application.properties配置文件配置的http监控端口

    @Value("${server.http.port}")

    public  int SYSTEM_HTTP_PORT;

    @Bean

    public ServletWebServerFactory servletContainer() {

        TomcatServletWebServerFactory tomcat = new TomcatServletWebServerFactory();

        tomcat.addAdditionalTomcatConnectors(createStandardConnector()); // 添加http

        return tomcat;

    }

    private Connector createStandardConnector() {

        Connector connector = new Connector("org.apache.coyote.http11.Http11NioProtocol");

        connector.setPort(SYSTEM_HTTP_PORT);

        return connector;

    }

}
至此,就可以用 https://localhost 和 http://localhost:8082 访问了。这是spring2.x的配法。

注意: 上面在application.properties配置文件中配置访问端口号,是因为工程用了内置的tomcat容器(如下图pom.xml引入的tomcat依赖)。如果是用外部的tomcat,则直接在tomcat的\conf\server.xml配置文件里配置相关参数。

参考文章:
springboot+https+http的更多相关文章
- springboot https证书配置
如果公司有提供证书如: 拿到证书秘钥可直接在springboot 的配置文件中配置: server.ssl.key-store=classpath:cert.pfx server.ssl.key-st ...
- https证书制作及springboot配置https
1.生成秘钥 openssl genrsa -out private.key 2048 2.生成用于申请请求的证书文件csr,一般会将该文件发送给CA机构进行认证,本例使用自签名证书 openssl ...
- springBoot+springSecurity 数据库动态管理用户、角色、权限
使用spring Security3的四种方法概述 那么在Spring Security3的使用中,有4种方法: 一种是全部利用配置文件,将用户.权限.资源(url)硬编码在xml文件中,已经实现过, ...
- SpringBoot开发案例之打造私有云网盘
前言 最近在做工作流的事情,正好有个需求,要添加一个附件上传的功能,曾找过不少上传插件,都不是特别满意.无意中发现一个很好用的开源web文件管理器插件 elfinder,功能比较完善,社区也很活跃,还 ...
- springCloud、springBoot学习
http://projects.spring.io/spring-cloud/ 官网https://springcloud.cc/spring-cloud-netflix.htmlhttp://cl ...
- SpringBoot 使用Mybatis-Plus
简介 Mybatis-Plus(简称MP)是一个 Mybatis 的增强工具,在 Mybatis 的基础上只做增强不做改变,为简化开发.提高效率而生. 特性 无侵入:Mybatis-Plus 在 My ...
- springboot 有用网址收集
http://www.ityouknow.com/spring-boot.html springboot多数据源配置: https://blog.csdn.net/neosmith/article/d ...
- redis 安装使用 & SpringBoot Redis配置
1.安装 https://www.cnblogs.com/dingguofeng/p/8709476.html https://www.runoob.com/redis/redis-keys.html ...
- java客户端验证https连接(忽略证书验证和证书验证两种方式)
首先根据如下操作生成证书,配置springboot https,生成一个简单的https web服务 https://www.cnblogs.com/qq931399960/p/11889349.ht ...
随机推荐
- ABP 报错 System.InvalidOperationException: 实例失败。
错误:System.InvalidOperationException: 实例失败. 解决:数据库链接写错了,斜杠的问题 core:两根斜杠 .net framework:一根斜杠 core的写法: ...
- Kali系统改国内源配置和SSH配置
一.Kali系统更新源 使用官网的虚拟化镜像安装,默认为英文界面,更新源也是官方源.因为官方服务器在国外,速度不是很理想,现在就来改国内源并且更新系统. 1.使用编辑器打开系统源文本(在终端内操作,先 ...
- 图的遍历 | 1034 map处理输入数据,连通块判断
这题写得比较痛苦.首先有点不在状态,其次题目比较难读懂. “Gang”成立的两个条件:①成员数大于两个 ②边权总和大于阈值K 首先,在录数据的时候通过map或者字符串哈希建立string到int的映 ...
- p1842 奶牛玩杂技 题解
感觉其他dalao讲的不是很明白啊,我这样的蒟蒻看不懂啊. 在luogu这个dalao遍地的地方我蒟蒻看个题解也不明白,我为跟我同病相怜的蒟蒻写一篇吧 其实真是不太明白,大部分题解都是只说 体重大的在 ...
- 【JZOJ5740】【20190706】幻想世界
题目 小 $\omega $ 想要进行烟火表演,她一开始有\(n\)颗彗星和\(n\)颗陨石 如果小 \(\omega\) 有\(i\)颗彗星而没有陨石,那么她会消耗\(i\)颗彗星并得到\(a_i\ ...
- 复旦大学2018--2019学年第二学期高等代数II期末考试情况分析
一.期末考试成绩班级前十名 丁思成(99).周烁星(97).王捷翔(96).顾文颢(92).顾天翊(90).封清(89).张思哲(89).李哲蔚(88).陈钦品(88).邹年轶(88).王祝斌(88) ...
- Android studio中怎么导入android.support.v4包
Android studio中怎么导入android.support.v4包 1.File点击选择projectStructure选择对应的APP然后点击Dependencies 2.点击+号,点击第 ...
- python总结二
1.在命令行:dd是删除光标所在的那一整行 yy是复制光标所在的那一整行 p是将已复制的数据在光标的下一行粘贴 P是将已复制的数据在光标的上一行粘贴 2.在命令行中查找的话 从上往下查找:/ 从下往上 ...
- ##xcode 文件模板自定义
xcode 文件模板自定义 在使用xcode内部模板创建C++类文件时,创建出来的头文件是.hpp结尾的,但是我想用.h结尾的, 所以就网上找了下资料看能不能自定义模板,这样还可以修改文档注释.在网上 ...
- spring学习-ApplicationContext-spring上下文深入理解
4月份开始复习一遍spring相关知识.让自己巩固一下spring大法的深奥益处,所以就看了大佬的博客,转载留下来日后继续研读.认为重点的标记为红色 以下文章内容转载自:http://www.cnbl ...