
Ansible自动部署lnmp架构+上线电商
1、首先准备3台机器
ansible机器:192.168.52.34
目标主机:192.168.52.35
目标主机:192.168.52.36
2、关闭防火墙
[root@localhost ~]# systemctl stop firewalld

[root@localhost ~]# setenforce
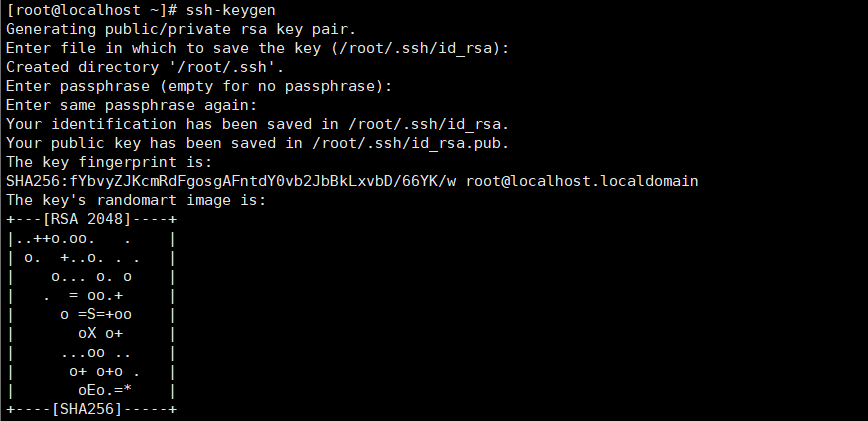
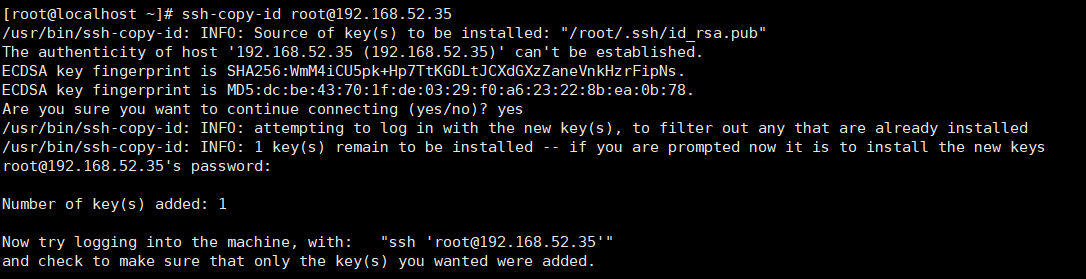
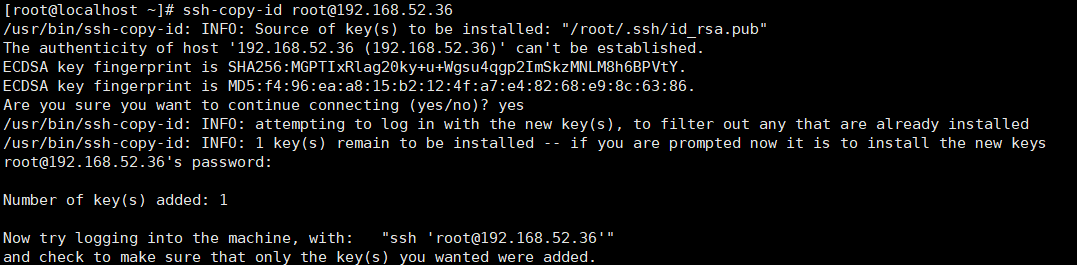
3、配置免密登录
4、安装ansible
yum -y install ansible
5、在ansible的配置文件中添加目标主机
vim /etc/ansible/hosts

## [webservers]

## alpha.example.org

## beta.example.org

## 192.168.1.100

## 192.168.1.110

[lnmp]

192.168.52.35

192.168.52.36

# If you have multiple hosts following a pattern you can specify

# them like this:

## www[:].example.com
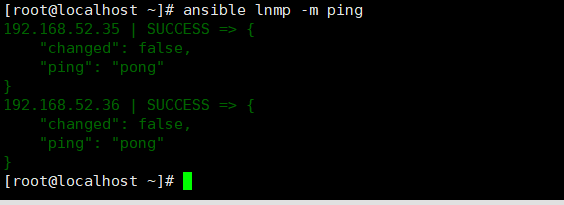
6、检查ansible与目标主机是否连通
7、上传nginx
[root@localhost ~]# rz

[root@localhost ~]# ls

anaconda-ks.cfg  lnmp.yml  nginx-1.16..tar.gz  original-ks.cfg
8、解压nginx
tar -zxvf nginx-1.16..tar.gz
9、配置nginx文件
[root@localhost nginx-1.16.]# cd conf/

[root@localhost conf]# vim nginx.conf

 server {

        listen       ;

        server_name  localhost;

        #charset koi8-r;

        #access_log  logs/host.access.log  main;

        location / {

            root   html;

            index  index.php index.html index.htm;

        }

   location ~ \.php$ {

            root           html;

            fastcgi_pass   127.0.0.1:;

            fastcgi_index  index.php;

            fastcgi_param  SCRIPT_FILENAME  $document_root$fastcgi_script_name;

            include        fastcgi_params;

        }
9、将nginx配置文件拷贝到/root下
[root@localhost conf]# cp nginx.conf /root
10、删除nginx解压包
[root@localhost ~]# rm -rf nginx-1.16.
11、上传电商包
[root@localhost ~]# rz

[root@localhost ~]# ls

anaconda-ks.cfg  lnmp.yml  nginx-1.16..tar.gz  nginx.conf  original-ks.cfg  tinyshopV2.5_data.zip
12、编写lnmp,yml
[root@localhost ~]# vim lnmp.yml

---

- hosts: lnmp

  tasks:

    - name: 关闭防火墙

      shell: systemctl stop firewalld

    - name: 关闭selinux

      shell: setenforce

    - name: 安装相关依赖

      yum: name=zlib-devel,pcre-devel,gcc,gcc-c++,php,php-mysql,php-gd,php-fpm state=latest

    - name: 推送nginx安装包

      unarchive: src=nginx-1.16..tar.gz dest=/root

    - name: 安装nginx

      shell: cd /root/nginx-1.16. && ./configure && make && make install

    - name: 启动nginx

      shell: netstat -ntlp | grep nginx || /usr/local/nginx/sbin/nginx

    - name: 推送ningx的配置文件

      template: src=nginx.conf dest=/usr/local/nginx/conf/nginx.conf

      tags: config-nginx

      notify: restart-nginx

    - name: 启动php-fpm

      shell: systemctl start php-fpm

    - name: 安装mysql

      yum: name=mariadb,mariadb-server state=latest

    - name: 启动mysql

      shell: systemctl start mariadb

    - name: 删除数据库如果存在

      shell: mysql -e "drop database if exists ds;"

    - name: 创建数据库

      shell: mysql -e "create database ds charset=utf8;"

    - name: 给用户授权

      shell: mysql -e "grant all on *.* to 'tom'@'%' identified by '123';"

    - name: 刷新权限

      shell: mysql -e "flush privileges;"

    - name: 推送电商的安装包并给予权限

      unarchive: src=tinyshopV2.5_data.zip dest=/usr/local/nginx/html/ mode=

  handlers:

    - name: restart-nginx

      shell: /usr/local/nginx/sbin/nginx -s reload
13、检查lnmp.yml
[root@localhost ~]# ansible-playbook --syntax-check lnmp.yml
14、执行文件
[root@localhost ~]# ansible-playbook lnmp.yml
15、完成
Ansible自动部署lnmp架构+上线电商的更多相关文章
- Java生鲜电商平台-如何使用微服务来架构生鲜电商B2B2C平台?
Java生鲜电商平台-如何使用微服务来架构生鲜电商B2B2C平台? 说明:随着互联网的日益普及,人们通过手机下单买菜的人越来越多,生鲜这个行业有两个显著的特点,一个是刚需.(你每天都要吃饭,都要吃菜) ...
- nginx详解反向代理、负载均衡、LNMP架构上线动态网站(week4_day1_part1)-技术流ken
nginx介绍 Nginx是俄罗斯人编写的十分轻量级的HTTP服务器,Nginx,它的发音为“engine X”,是一个高性能的HTTP和反向代理服务器,同时也是一个IMAP/POP3/SMTP 代理 ...
- nginx详解反向代理,负载均衡,LNMP架构上线动态网站
1.nginx介绍 nginx.org Nginx是俄罗斯人编写的十分轻量级的HTTP服务器,Nginx,它的发音为“engine X”,是一个高性能的HTTP和反向代理服务器,同时也是一个IMAP/ ...
- 部署LNMP架构及其应用
部署企业LNMP架构 (一)首先安装nginx服务,具体请见另一篇关于nginx的博文. (二)安装MySQL数据库 .安装前准备 [root@localhost ~]# rpm -e mysql-s ...
- 基于docker的gitlab+gitlabrunner+ansible自动部署
系统架构图 网络架构 一.安装docker,确保hostname没有问题 ,查看/etc/hostname./etc/hosts. https://docs.docker.com/engine/ins ...
- 微服务架构开发电商系统需要用Redis、ES和MQ吗?
如果不用什么很高大上的东西,就是有多个微服务就行这种技术架构会很难吗? 我看了一些视频,他们都用到了es.mq.redis的东西,我想不用这些东西,就简单的有多个服务,这样可行吗? 01 使用微服务你 ...
- ansible自动部署Keepalived实现Nginx服务双机热备
脚本实现通过ansible-playbook自动化安装Keepalived和配置,主要解决问题如下: Keepalived自动化安装: keepalived_vrid配置,自动根据vip获取最后一段作 ...
- 部署LNMP架构Blog博客平台 ---惟净
部署环境:VM虚拟机 操作系统:CentOS-6.8-x64 IP地址:192.168.31.91Mysql数据库版本:5.6.34 Cmake软件包版本:3.5.2Nginx软件包版本:1.10.2 ...
- Ansible自动部署tomcat
1.首先准备3台机器 ansible机器:192.168.52.34 目标主机:192.168.52.35 目标主机:192.168.52.36 2.关闭防火墙 [root@localhost ~]# ...
随机推荐
- 排行榜 和 zset
ZSET 使用 https://blog.csdn.net/weixin_37490221/article/details/78135036 https://www.cnblogs.com/chenz ...
- Prometheus 标签使用示例整合
Prometheus 监控实例 一.Prometheus 根据标签聚合总CPU使用率 1.主机添加标签(可在多个主机内添加相同标签实现聚合):vim prometheus.conf static_co ...
- 【LeetCode】633. Sum of Square Numbers
Difficulty: Easy More:[目录]LeetCode Java实现 Description https://leetcode.com/problems/sum-of-square-n ...
- Java中使用OpenSSL生成公钥私钥进行数据加解密
当前使用的是Linux系统,已经安装OpenSSL软件包. 一.使用OpenSSL来生成私钥和公钥1.执行命令openssl version -a 验证机器上已经安装openssl $ openssl ...
- jsMind思维导图模式展示数据
效果图: jsmind组件下载地址:https://files.cnblogs.com/files/fengyeqingxiang/jsmind.zip 后端代码,此处以C#编写的后台,Java或其他 ...
- Javascript数组原型方法大全以及实例!!
数组的方法有数组原型方法,也有从object对象继承来的方法,这里我们只介绍数组的原型方法,数组原型方法主要有以下这些: join() push()和pop() shift() 和 unshift() ...
- selenium 开启开发者工具(F12)
selenium 开启开发者工具(F12) options = webdriver.ChromeOptions(); options.add_argument("--auto-open-de ...
- linux mysql连接
1. 添加头文件 # apt-get install libmysqlclient-dev 引入头文件 #include <mysql/mysql.h> 2. 举例 MYSQL *mysq ...
- mysql新加用户设置权限
1.开通操作权限和表权限 GRANT CREATE,ALTER,DROP,INSERT,UPDATE,DELETE,SELECT ON interface.* TO test1@'%' identif ...
- SQLAlchemy的常用数据类型
SQLAlchemy常用的数据类型 Column 代表数据库表中的一列 是创建对象时数据类型所依赖的对象,通过在Column对象中指明具体的数据类型来实现相应的数据库表中的列的格式自定义. Strin ...