008 BOM
一:说明
1.说明
浏览器对象模型
2.顶级对象
浏览器中的顶级对象是window
页面中的顶级对象是document
因此:
变量属于window的,函数也是window的。
就可以使用window.变量,window.函数。
3.window的另一个名字
top=window
 <!DOCTYPE html>

 <html lang="en">

 <head>

     <meta charset="UTF-8">

     <title>Title</title>

 </head>

 <body>

 <script>

     var name="tom";

     console.log(top.name);

 </script>

 </body>

 </html>
4.系统的对话框
都不建议使用,一是外表都不同,影响加载。
window.alert("mnmnmn")
window.prompt("输入:");
var result = window.confirm(); true或者false是返回值
二:加载事件
1.页面加载完成之后触发的事件
 window.onload=function () {

 }
2.扩展事件
事件关闭之前触发:onbeforeunload
页面关闭后才触发:onunload
三:Location对象
1.说明
是地址栏
可以设置和获取URL
2.程序
 <!DOCTYPE html>

 <html lang="en">

 <head>

     <meta charset="UTF-8">

     <title>Title</title>

 </head>

 <body>

     <script>

         console.log(window.location);

     </script>

 </body>

 </html>
效果:

3.示例
 <!DOCTYPE html>

 <html lang="en">

 <head>

     <meta charset="UTF-8">

     <title>Title</title>

 </head>

 <body>

     <input type="button" value="显示" id="btn">

     <script>

         console.log(window.location.hash);     //#,以及之后的内容

         console.log(window.location.host);     //主机名及端口号

         console.log(window.location.hostname);

         console.log(window.location.pathname);

         console.log(window.location.port);

         console.log(window.location.protocol);

         console.log(window.location.search); //搜索的内容

         onload=function () {

             document.getElementById("btn").onclick=function () {

                 location.href="https://www.baidu.com";     //属性:设置跳转的地址,有后退

                 location.assign("https://www.baidu.com");  //方法,与上面的相同,有后退

                 location.reload(); //刷新

                 location.replace("https://www.baidu.com");  //没有后退,因为没有历史记录

             }

         }

     </script>

 </body>

 </html>
四:history
1.程序
forward
back
 <!DOCTYPE html>

 <html lang="en">

 <head>

     <meta charset="UTF-8">

     <title>Title</title>

 </head>

 <body>

     <input type="button" value="跳转" id="btn">

     <input type="button" value="前进" id="come">

     <script>

         document.getElementById("btn").onclick=function () {

             window.location.href="demo20.html";

         }

         document.getElementById("come").onclick=function () {

             window.history.forward();

         }

     </script>

 </body>

 </html>
 <!DOCTYPE html>

 <html lang="en">

 <head>

     <meta charset="UTF-8">

     <title>Title</title>

 </head>

 <body>

     <input type="button" value="后退" id="back">

     <script>

         document.getElementById("back").onclick=function () {

             window.history.back();

         }

     </script>

 </body>

 </html>
五:navigator
1.说明
主要是两个方法
2.程序
 <!DOCTYPE html>

 <html lang="en">

 <head>

     <meta charset="UTF-8">

     <title>Title</title>

 </head>

 <body>

     <script>

         //

         console.log(window.navigator.userAgent);

         //知道浏览器所在的系统平台类型

         console.log(window.navigator.platform);

     </script>

 </body>

 </html>
效果:

六:定时器
1.说明
在BOM中有两个定时器
window.setInterval()
参数1:函数
参数2:时间,毫秒,页面加载完成后,过了多久,开始执行函数。
2.程序
 <!DOCTYPE html>

 <html lang="en">

 <head>

     <meta charset="UTF-8">

     <title>Title</title>

 </head>

 <body>

     <input type="button" value="停止" id="btn">

     <script>

         //循环弹出

         var timeId = window.setInterval(function () {

             alert("-====")

         },2000);

         //清除定时器,将上面的id清除

         document.getElementById("btn").onclick=function () {

             window.clearInterval(timeId);

         }

     </script>

 </body>

 </html>
效果:
3.摇起来
 <!DOCTYPE html>

 <html lang="en">

 <head>

     <meta charset="UTF-8">

     <title>Title</title>

     <style>

         img {

             height: 200px;

         }

         div {

             position: absolute;

         }

     </style>

 </head>

 <body>

     <input type="button" value="动起来" id="btn">

     <input type="button" value="停止" id="stop">

     <div id="di">

         <img src="data:image/00_1.png" alt="">

         <img src="data:image/00_3.jpg" alt="">

     </div>

     <script>

         var timeId = null;

         document.getElementById("btn").onclick=function () {

             timeId = window.setInterval(function () {

                 var x = parseInt(Math.random()*100+1);

                 var y = parseInt(Math.random()*100+1);

                 document.getElementById("di").style.left=x+"px";

                 document.getElementById("di").style.top=y+"px";

             },10);

         }

         document.getElementById("btn").onclick=function (){

             window.clearInterval(timeId);

         }

     </script>

 </body>

 </html>
4.图片时钟
 <!DOCTYPE html>

 <html lang="en">

 <head>

     <meta charset="UTF-8">

     <title>Title</title>

 </head>

 <body>

     <img src="" alt="" id="img">

     <script>

         //先执行一次

         function f1(){

             var dt = new Date();

             var hour = dt.getHours();

             var second = dt.getSeconds();

             hour = hour<10 ? "0"+hour : hour;

             second = second<10 ? "0"+second : second;

             //赋值

             document.getElementById("img").src="meimei/"+hour+"_"+second+".jpg";

         }

         //然后定时器

         window.setInterval(f1,1000);

     </script>

 </body>

 </html>
效果:

5.第二个定时器
一次性的定时器,执行完就不再执行了。
参数1:函数
参数2:时间,毫秒
返回定时器的id
 <!DOCTYPE html>

 <html lang="en">

 <head>

     <meta charset="UTF-8">

     <title>Title</title>

 </head>

 <body>

     <script>

         var timeId = window.setTimeout(function () {

             alert("==")

         },1000);

         window.clearTimeout(timeId);

     </script>

 </body>

 </html>
在上面要执行setInterval,虽然是一次性的定时器,但是还在内存中,需要清理,所以要再执行。
不过这个需要手动执行,这样是不会起到清理的作用。
6.协议按钮禁用
 <!DOCTYPE html>

 <html lang="en">

 <head>

     <meta charset="UTF-8">

     <title>Title</title>

 </head>

 <body>

     <textarea name="" id="" cols="30" rows="10">

         请阅读协议

     </textarea>

     <input type="button" value="请阅读(6)" id="btn" disabled="disabled">

     <!-- 倒计时-->

     <script>

         var time = 5;

         var timeid=window.setInterval(function () {

             time--;

             if(time<=0){

                 clearInterval(timeid);

                 document.getElementById("btn").value="同意";

                 document.getElementById("btn").disabled=false;

             }

             document.getElementById("btn").value="请阅读("+time+")";

         },1000);

     </script>

 </body>

 </html>
效果:
7.div渐变
 <!DOCTYPE html>

 <html lang="en">

 <head>

     <meta charset="UTF-8">

     <title>Title</title>

     <style>

         div {

             width: 300px;

             height: 200px;

             background-color: hotpink;

         }

     </style>

 </head>

 <body>

     <div id="div"></div>

     <br>

     <input type="button" value="渐变" id="btn">

     <script>

         //透明化

         var opacity = 10;

         document.getElementById("btn").onclick=function () {

             var timeId=window.setInterval(function () {

                 opacity--;

                 if(opacity<=0){

                     window.clearInterval(timeId);

                 }

                 document.getElementById("div").style.opacity=opacity/10;

             },100)

         }

     </script>

 </body>

 </html>
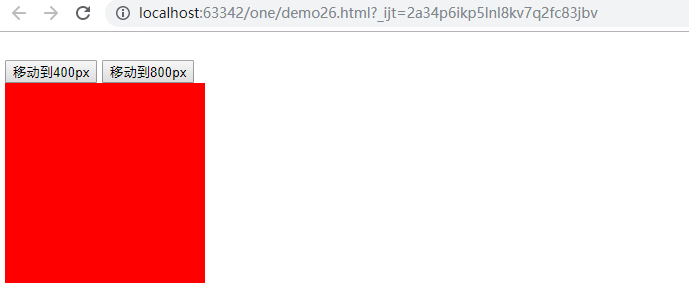
七:动画
1.封装动画函数
 <!DOCTYPE html>

 <html lang="en">

 <head>

     <meta charset="UTF-8">

     <title>Title</title>

     <style>

         div{

             width: 200px;

             height: 200px;

             background-color: red;

             /*脱离文档流*/

             position: absolute;

         }

         input {

             margin-top: 20px;

         }

     </style>

 </head>

 <body>

     <input type="button" value="移动到400px" id="btn1"/>

     <input type="button" value="移动到800px" id="btn2"/>

     <div id="dv"></div>

     <script>

         //设置任意的一个元素,移动到指定的目标位置

         function animate(element, target) {

             clearInterval(element.timeId);

             //定时器的id值存储到对象的一个属性中

             element.timeId = setInterval(function () {

                 //获取元素的当前的位置,数字类型

                 var current = element.offsetLeft;

                 //每次移动的距离

                 var step = 10;

                 step = current < target ? step : -step;

                 //当前移动到位置

                 current += step;

                 if (Math.abs(current - target) > Math.abs(step)) {

                     element.style.left = current + "px";

                 } else {

                     //清理定时器

                     clearInterval(element.timeId);

                     //直接到达目标

                     element.style.left = target + "px";

                 }

             }, 20);

         }

         document.getElementById("btn1").onclick = function () {

             animate(document.getElementById("dv"), 400);

         };

         //点击第二个按钮移动到800px

         document.getElementById("btn2").onclick = function () {

             animate(document.getElementById("dv"), 800);

         };

     </script>

 </body>

 </html>
2.效果
008 BOM的更多相关文章
- 前端之BOM与DOM-JQuery
一.前端基础之BOM和DOM: 1: JavaScript分为 ECMAScript,DOM,BOM BOM:指的是浏览器对象模型,它使JavaScript有能力与浏览器进行“对话” DOM:是指文档 ...
- HTML BOM Browser对象
BOM:Browser Object Model,即浏览器对象模型,提供了独立于内容的.可以与浏览器窗口进行互动的对象结构. Browser对象:指BOM提供的多个对象,包括:Window.Navig ...
- 一步步学习javascript基础篇(7):BOM和DOM
一.什么是BOM.什么是DOM BOM即浏览器对象模型,主要用了访问一些和网页无关的浏览器功能.如:window.location.navigator.screen.history等对象. DOM即文 ...
- BOM,DOM,ECMAScripts三者的关系
一:DOM 文档对象模型(DOM)是表示文档(比如HTML和XML)和访问.操作构成文档的各种元素的应用程序接口(API) DOM是HTML与JavaScript之间沟通的桥梁. DOM下,HTM ...
- javascript学习之BOM
BOM是browser object model的缩写,简称浏览器对象模型.先看看下面这张图 window对象是BOM的顶层(核心)对象,所有对象都是通过它延伸出来的,也可以称为window的子对象. ...
- BOM以及定时器
一.BOM 1.操作浏览器的一些方法 (浏览器对象模型) 2.window是is中的顶级变量,是一个全局的变量,所有人都可以访问到它,基本 的方法和属性 (document,alert,console ...
- js浏览器对象模型(BOM)
浏览器对象模型(Browser Object Model,BOM):浏览器为js提供的对象集合. 1 windows对象 windows对象:表示浏览器的框架以及与其相关的内容,比如滚动条和导航栏图标 ...
- BOM操作
BOM操作 //浏览器对象模型 opener=window.open(页面的url,打开方式) opener.document.body.style.background="red" ...
- 什么是BOM头,BOM头有什么影响,怎么去掉BOM头
什么是bom头? 在utf-8编码文件中BOM在文件头部,占用三个字节,用来标示该文件属于utf-8编码,现在已经有很多软件识别bom头,但是还有些不能识别bom头,比如PHP就不能识别bom头,这也 ...
随机推荐
- jquery属性文档事件等操作
1.jq方法attr removeAttr script标签大部分都是写在body标签上.下面的情况下$符号是拿不到的. 将它放到上面就能拿到$对象了.但是不能获取body里的元素.因为代码执行顺序从 ...
- python高级特性-列表生成
概述 [x *x for x in range(1,11)][k+'='+v for k,v in d.items()] [s.lower() for s in L] 详解 1.单层迭代 >&g ...
- 检查SQL Server数据库各个库表空间使用的方法
/*创建一张表:表名Data,列名:表名,列数,预留空间,数据占用空间,索引占用空间,剩余空间*/ CREATE TABLE Data ( 表名 ), 列数 ), 预留空间 ), 数据占用空间 ), ...
- 《BUG创造队》作业8:软件测试与Alpha冲刺(第五天)
项目 内容 这个作业属于哪个课程 2016级软件工程 这个作业的要求在哪里 实验十二 团队作业8:软件测试与ALPHA冲刺 团队名称 BUG创造队 作业学习目标 (1)掌握软件测试基础技术.(2)学习 ...
- python_面向对象——动态创建类和isinstance和issubclass方法
# 给动态生产的类定义一个方法 def __init__(self,name): self.name = name print(self.name) def take(self,obj): print ...
- Net线程间通信的异步机制
线程间通信 我们看下面的图 我们来看线程间通信的原理:线程(Thread B)和线程(Thread A)通信, 首先线程A 必须实现同步上下文对象(Synchronization Context), ...
- jsp里导入java包的问题
写jsp导包的时候出了两处错误(什么?特么两处,总共就一句话啊...): 新建jsp文件会自动生成一句: <%@ page language="java" import=&q ...
- iframe使用总结(实战)
说在前面的话,iframe是可以做很多事情的.例如:a>通过iframe实现跨域;b>使用iframe解决IE6下select遮挡不住的问题c>通过iframe解决Ajax的前进后退 ...
- zmq使用记录
zmq套接字介绍 https://www.cnblogs.com/fengbohello/p/4354989.html zmq示例 https://github.com/booksbyus/zguid ...
- sublime test 3 配置安装fortran开发环境
1.ST3下安装包管理工具Package Control https://jingyan.baidu.com/article/3c343ff7dca2b10d3779633b.html ST主界面下c ...