SnapKit swift实现高度自适应的新浪微博布局
SnapKit swift版的自动布局框架,第一次使用感觉还不错。
GtiHub地址:https://github.com/SnapKit/SnapKit
1.uitableview高度自适应的关键代码:
self.tableView.estimatedRowHeight=50//预估值随意写一个差不多的就可以
self.tableView.rowHeight=UITableViewAutomaticDimension
2.布局约束时一定要从上往下不然高度也无法适应
3.在最后一个view一定要添加与底部的一个约束: make.bottom.equalTo(-10)
以下是示例代码
//
// TableViewCell.swift
// Test
// Copyright © 2017年 All rights reserved.
//
import UIKit
import SnapKit
class TableViewCell: UITableViewCell {
override func awakeFromNib() {
super.awakeFromNib()
//约束头像
self.headImageView.backgroundColor=UIColor.red
self.addSubview(headImageView)
self.headImageView.snp.makeConstraints({make in
make.top.left.equalTo(10)
make.width.height.equalTo(40)
})
//约束用户名
self.addSubview(nameLabel)
self.nameLabel.snp.makeConstraints({make in
make.top.equalTo(headImageView.snp.top)
make.left.equalTo(headImageView.snp.right).offset(5)
})
self.addSubview(timeLabel)
self.timeLabel.snp.makeConstraints({make in
make.left.equalTo(headImageView.snp.right).offset(5)
make.bottom.equalTo(headImageView.snp.bottom)
})
//约束文字内容
self.addSubview(contentLabel)
self.contentLabel.snp.makeConstraints({make in
make.top.equalTo(headImageView.snp.bottom).offset(5)
make.left.equalTo(headImageView.snp.left)
make.right.equalTo(-10)
})
//约束图片
self.picView.dataSource=self
self.picView.delegate=self
// let nib = UINib.init(nibName: "CollectionViewCell", bundle: nil)
self.picView.register(UICollectionViewCell.self, forCellWithReuseIdentifier: "imgCell")
self.addSubview(picView)
self.picView.snp.makeConstraints({make in
make.top.equalTo(contentLabel.snp.bottom).offset(5)
make.height.equalTo(0)
make.left.equalTo(contentLabel.snp.left)
make.right.equalTo(-10)
})
//约束底部工具条
self.addSubview(bottomBar)
self.bottomBar.snp.makeConstraints({make in
make.top.equalTo(picView.snp.bottom).offset(5)
make.left.equalTo(10)
make.right.equalTo(-10)
make.height.equalTo(40)
make.bottom.equalTo(-10)//这句一定要放在最后一个view不然无法自动计算高度
})
}
//懒加载头像
lazy private var headImageView:UIImageView={
let headImageView = UIImageView()
return headImageView
}()
//懒加载用户名
lazy private var nameLabel:UILabel={
let nameLabel=UILabel()
return nameLabel
}()
//懒加载时间
lazy private var timeLabel:UILabel={
let timeLabel = UILabel()
timeLabel.font=UIFont.systemFont(ofSize: 14)
timeLabel.textColor=UIColor.darkGray
return timeLabel
}()
//懒加载文字内容
lazy private var contentLabel:UILabel={
let contentLabel = UILabel()
return contentLabel
}()
//懒加载图片容器
lazy private var picView:UICollectionView={
let picView=UICollectionView(frame:CGRect.zero,collectionViewLayout: UICollectionViewFlowLayout())
return picView
}()
//底部工条
lazy private var bottomBar:UIView={
let bottomBar=UIView()
bottomBar.backgroundColor=UIColor.cyan
return bottomBar
}()
var model:Model?{
didSet{
guard let model=model else {
return
}
self.nameLabel.text="用户名"
self.timeLabel.text="时间"
self.contentLabel.text=model.text ?? ""
//这里更新图片容器(注意:这里测试写死的,开发中应根据图片张数计算图片容器高度)
self.picView.snp.updateConstraints({make in
make.height.equalTo(310)
})
}
}
}
extension TableViewCell:UICollectionViewDataSource,UICollectionViewDelegate,UICollectionViewDelegateFlowLayout{
func numberOfSections(in collectionView: UICollectionView) -> Int {
return 1
}
func collectionView(_ collectionView: UICollectionView, numberOfItemsInSection section: Int) -> Int {
return 9
}
func collectionView(_ collectionView: UICollectionView, layout collectionViewLayout: UICollectionViewLayout, minimumLineSpacingForSectionAt section: Int) -> CGFloat {
return 5
}
func collectionView(_ collectionView: UICollectionView, layout collectionViewLayout: UICollectionViewLayout, minimumInteritemSpacingForSectionAt section: Int) -> CGFloat {
return 0
}
func collectionView(_ collectionView: UICollectionView, layout collectionViewLayout: UICollectionViewLayout, sizeForItemAt indexPath: IndexPath) -> CGSize {
return CGSize(width:(UIScreen.main.bounds.size.width-30)/3,height:100)
}
func collectionView(_ collectionView: UICollectionView, cellForItemAt indexPath: IndexPath) -> UICollectionViewCell {
let cell = collectionView.dequeueReusableCell(withReuseIdentifier: "imgCell", for: indexPath)
cell.backgroundColor=UIColor.orange
return cell
}
}
//
// TableViewController.swift
// Test
//
// Created by admin
// Copyright © 2017年 tdin360. All rights reserved.
//
import UIKit
class TableViewController: UITableViewController {
var datas = [Model]()
override func viewDidLoad() {
super.viewDidLoad()
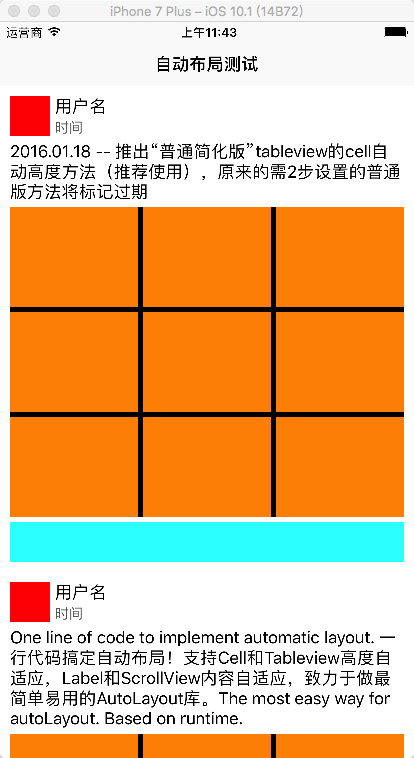
datas.append(Model(text: "2016.01.18 -- 推出“普通简化版”tableview的cell自动高度方法(推荐使用),原来的需2步设置的普通版方法将标记过期"))
datas.append(Model(text: "One line of code to implement automatic layout. 一行代码搞定自动布局!支持Cell和Tableview高度自适应,Label和ScrollView内容自适应,致力于做最简单易用的AutoLayout库。The most easy way for autoLayout. Based on runtime."))
datas.append(Model(text: "One line of code to implement automatic layout. 一行代码搞定自动布局!支持Cell和Tableview高度自适应,Label和ScrollView内容自适应,致力于做最简单易用的AutoLayout库。The most easy way for autoLayout. Based on runtime.One line of code to implement automatic layout. 一行代码搞定自动布局!支持Cell和Tableview高度自适应,Label和ScrollView内容自适应,致力于做最简单易用的AutoLayout库。The most easy way for autoLayout. Based on runtime."))
datas.append(Model(text: "One line of code to implement automatic layout. 一行代码搞定自动布局!支持Cell和Tableview高度自适应,Label和ScrollView内容自适应,致力于做最简单易用的AutoLayout库。The most easy way for autoLayout. Based on runtime.One line of code to implement automatic layout. 一行代码搞定自动布局!支持Cell和Tableview高度自适应,Label和ScrollView内容自适应,致力于做最简单易用的AutoLayout库。The most easy way for autoLayout. Based on runtime.One line of code to implement automatic layout. 一行代码搞定自动布局!支持Cell和Tableview高度自适应,Label和ScrollView内容自适应,致力于做最简单易用的AutoLayout库。The most easy way for autoLayout. Based on runtime."))
datas.append(Model(text: "One line of code to implement automatic layout. 一行代码搞定自动布局!支持Cell和Tableview高度自适应,Label和ScrollView内容自适应,致力于做最简单易用的AutoLayout库。The most easy way for autoLayout. Based on runtime."))
//这两句是实现高度自适应的关键代码
self
self.tableView.rowHeight=UITableViewAutomaticDimension
}
override func didReceiveMemoryWarning() {
super.didReceiveMemoryWarning()
}
// MARK: - Table view data source
override func numberOfSections(in tableView: UITableView) -> Int {
return 1
}
override func tableView(_ tableView: UITableView, numberOfRowsInSection section: Int) -> Int {
return datas.count
}
override func tableView(_ tableView: UITableView, cellForRowAt indexPath: IndexPath) -> UITableViewCell {
let cell = tableView.dequeueReusableCell(withIdentifier: "cell", for: indexPath) as! TableViewCell
cell.model=datas[indexPath.row]
return cell
}
}
效果图
SnapKit swift实现高度自适应的新浪微博布局的更多相关文章
- ios swift UITextView高度自适应
在ios开发中,用到多行输入时一般都会用到UITextView.常见的比如说聊天输入框,评论输入框等,当用户输入多内容时,我们希望高度能根据用户输入的内容扩大而扩大.其实实现这个功能也不是很难,只需要 ...
- [Swift通天遁地]二、表格表单-(3)在表格中嵌套另一个表格并使Cell的高度自适应
★★★★★★★★★★★★★★★★★★★★★★★★★★★★★★★★★★★★★★★★➤微信公众号:山青咏芝(shanqingyongzhi)➤博客园地址:山青咏芝(https://www.cnblogs. ...
- css经典布局——头尾固定高度中间高度自适应布局
转载:穆乙 http://www.cnblogs.com/pigtail/ 相信做过后台管理界面的同学,都非常清楚这个布局.最直观的方式是框架这个我不想多写费话,因为我们的重心不在这里.如果有不了解的 ...
- 典型的DIV CSS三行二列居中高度自适应布局
如何使整个页面内容居中,如何使高度适应内容自动伸缩.这是学习CSS布局最常见的问题.下面就给出一个实际的例子,并详细解释.(本文的经验和是蓝色理想论坛xpoint.guoshuang共同讨论得出的.) ...
- flex布局嵌套之高度自适应
查遍各大资源无任何flex嵌套布局的例子,经过自己折腾完成了项目中的高度自适应需求(更多应用于前端组件) 效果图: html代码:(关键地方已经用颜色特别标识 ^_^) <!DOCTYPE ht ...
- 布局:高度已知,布局一个三栏布局,左栏和右栏宽度为200px,中间自适应
需求:高度已知为200px,写出三栏布局,左栏和右栏各位200px,中间自适应,如下图所示: 方法一:float浮动布局 原理是:定义三个区块,需要注意的是中间的区块放在右边区块的下面,统一设置高度为 ...
- css高度已知,左右定宽,中间自适应三栏布局
css高度已知,左右定宽,中间自适应三栏布局: <!DOCTYPE html> <html lang="en"> <head> <meta ...
- CSS布局之-高度自适应
何为高度自适应? 高度自适应就是高度能跟随浏览器窗口的大小改变而改变,典型的运用在一些后台界面中上面一栏高度固定用作菜单栏或导航栏,下面一栏高度自适应用于显示内容.高度自适应不像宽度自适应那样简单,在 ...
- 让tableView的高度等于contentSize的高度、动态调整tableView的高度、tableView的高度自适应布局
文章概要: 1.简介下,tableView中的内容如何高度自适应的布局 2.如何做到让tableView的高度动态调整 还是看图作文吧- 首先,tableView的高度就是用户能够看见里面更大世界的那 ...
随机推荐
- hibernate 一级缓存、二级缓存
一级缓存:——session一旦关掉就没有了.使用 load和get加载对象的时候,会自动加载到缓存,读取的也会读缓存. public void huancun(){ Session session= ...
- [原]NYOJ-字符串替换-113
大学生程序代写 /*http://acm.nyist.net/JudgeOnline/problem.php?pid=113 字符串替换 时间限制:3000 ms | 内存限制:65535 KB ...
- Hexo 版本
Mac hexo s 启动Hexo服务报错如下: Error: The module '/usr/local/lib/node_modules/hexo-cli/node_modules/.0.8.0 ...
- codeforces914G Sum the Fibonacci
题目大意:给定一个长为$n$($n\leq 10^6$)的序列S,定义一个合法的五元组$(a,b,c,d,e)$合法当且仅当 $$ ( S_a \mid S_b ) and S_c and ( S_d ...
- Linux CentOS 6.5 64位 静默安装Oracle11g 云主机
本例: 通过SSH远程连接云主机,上传oracle11g安装包,在centos6.5上无图形化界面静默安装oracle11g. 涉及工具及环境: 1.本地环境windows7+ssh远程连接工具xSh ...
- Oracle 12c 多租户在 CDB 中 Plug A PDB,Unplugging A PDB
Oracle 数据库 12 c 中介绍了多租户选项允许单个容器数据库 (CDB) 来承载多个单独的可插拔数据库 (PDB).本文简单的演示了如何在 CDB 中 Plug A PDB,Unpluggin ...
- python setuptools安装
执行# python setup.py install 时发生如下错误 Traceback (most recent call last): File "setup.py", li ...
- IOS+openCV在Xcode的入门开发
昨天折腾了一天,终于搞定了openCV+IOS在Xcode下的环境并且实现一个基于霍夫算法的圆形识别程序.废话不多说,下面就是具体的折腾流程: ---------------------------- ...
- CentOS7 搭建LNMP
一. 安装依赖文件 1. sudo yum install gcc gcc-c++ zlib zlib-devel libxml2 libxml2-devel openssl open ...
- 第七篇 elasticsearch 链接mysql不会更新
这是我键的索引 "settings":{ "number_of_shards":3, "number_of_replicas":2 }, & ...