
ubuntu 14.04安装quickbuild buildagent (二)
使用方法:
/home/carloz/programfiles/quickbuild6/buildagent/bin/agent.sh start
/home/carloz/programfiles/quickbuild6/buildagent/bin/agent.sh stop
==============================================================
安装指南 http://wiki.pmease.com/display/QB60/Build+Agent+Installation+Guide
1. 启动 QuickBuild server, 并且login to QuickBuild as administrator, 然后打开 Grid tab

点击 download build agent , 下载 buildagent 软件,并解压在 安装目录下
carloz@linux:~/programfiles/quickbuild6$ cd buildagent/

carloz@linux:~/programfiles/quickbuild6/buildagent$ pwd

/home/carloz/programfiles/quickbuild6/buildagent

carloz@linux:~/programfiles/quickbuild6/buildagent$ ls

asset  bin  conf  logs  plugins
保证当前用户有足够的权限
2. 保证系统已经安装了 JDK6 or JDK7 , 环境变量已经被设定,并且java 命令能够被执行
3. 运行 <agent install dir>/bin/config.bat|sh 来设置build agent的属性, 如 IP address, port number, SSL setting, 等等
carloz@linux:~/programfiles/quickbuild6/buildagent$ bin/config.sh

java version "1.8.0_60"

Java(TM) SE Runtime Environment (build 1.8.0_60-b27)

Java HotSpot(TM) -Bit Server VM (build 25.60-b23, mixed mode)

===========================================================

carloz@linux:~/programfiles/quickbuild6/buildagent$

信息保存在 /home/carloz/programfiles/quickbuild6/buildagent/conf/node.properties里, 如下

carloz@linux:~/programfiles/quickbuild6/buildagent$ bin/agent.sh

Usage: bin/agent.sh [ console | start | stop | restart | condrestart | status | install | remove | dump ]

Commands:

  console      Launch in the current console.

  start        Start in the background as a daemon process.

  stop         Stop if running as a daemon or in another console.

  restart      Stop if running and then start.

  condrestart  Restart only if already running.

  status       Query the current status.

  install      Install to start automatically when system boots.

  remove       Uninstall.

  dump         Request a Java thread dump if running.

carloz@linux:~/programfiles/quickbuild6/buildagent$ bin/agent.sh start

Starting QuickBuild Build Agent...

Waiting for QuickBuild Build Agent......

running: PID:

carloz@linux:~/programfiles/quickbuild6/buildagent$
4. 在build agent 启动以后, 我们会发现我们并不能运行它, 我们需要在 QuickBuild server 中添加, 并且授权加入网络
4.1 打开 http://localhost:8810/grid/active_nodes

这里仅仅有一个节点, 这个节点 就是QuickBuild server 本身.
我们需要在这里添加 build agent, 方法参考 Working with Build Grid , 在未授权 节点列表里找到并选中它, 给他授权, 如下

然后 Active nodes 列表就变成了两个

然而 我发现 http://localhost:8811/ 这个网址还是不能访问, 返回404, 需要继续解决
============================================
Supported operating systems
- Windows 2000/XP/Vista/7, Windows server 2003/2008, 32 bit and 64 bit, x86 and IA architecture
- Linux, 32 bit and 64 bit, x86, PowerPC and S/390 architecture
- Mac OS X, 32 bit and 64 bit
- Solaris, 32 bit and 64 bit, Sparc and x86 architecture
- AIX, 32 bit and 64 bit, PowerPC architecture
- HP-UX, 32 bit and 64 bit, IA and PARISC architecture
- FreeBSD, 32 bit and 64 bit, x86 architecture
Memory requirement
- 64M minimum, 256M recommended
Installation Steps
- Make sure QuickBuild server is up and running, login to QuickBuild as administrator and navigate to Grid tab, follow the download build agent link to download the build agent. Extract downloaded file into the directory where the build agent should be installed. Make sure the user running user agent has full access rights to the installation directory.
- Make sure you have JDK6 or JDK7 installed. Download the appropriate JDK version from http://java.sun.com
 if needed.
 - Make sure the java command exists in the system path; if not, you will need to modify the file conf/wrapper.conf under the build agent's installation directory, and point the entry wrapper.java.command to path of the java command.
- Optionally run <agent install dir>/bin/config.bat|sh) to configure build agent properties such as IP address, port number, SSL setting, etc.
- Open a command prompt window, switch to folder <agent install dir>/bin, and run command agent.(bat|sh) console to start the agent.

Follow this guide on how to install the agent as system service so that it auto-starts when machine reboots.
- After the agent starts up, it may complain with the message "This build agent is not authorized to join the grid". Upon this, you need to login to QuickBuild server and authorize the agent to join the grid. Refer to Working with Build Grid for how to authorize build agents to join grid.
- If the build agent is connected to QuickBuild server correctly, you will see its entry in active node list of the build grid like below by logging in as administrator:
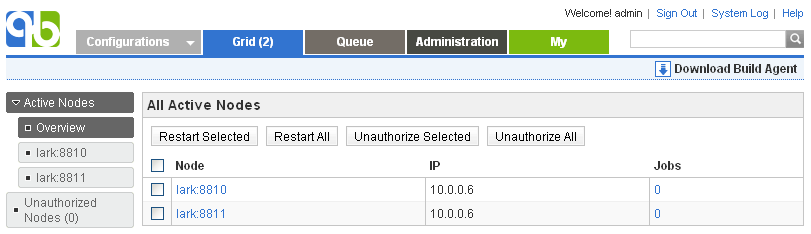
Trouble Shooting
If your agent does not connect with server, please make sure that:
- You can telnet to server port from agent machine with below command:
telnet _<server host name>_ _<server port>_
Here <server host name> and <server port> has to be extracted from serverUrl in file conf/node.properties of under agent directory.
- You can telnet to agent port from server machine with below command:
telnet <agent ip address> <agent port> - If auto-detected agent ip reported in server console log is incorrect, specify it explicitly by editing conf/node.properties of the agent to add below property:
ip=_<agent ip address>_
- Recently we found a case where QB agent from other subnets connects to server but then times out during initialization (agents from same subnet works fine), and it turns out that server response package is dropped for some reason (maybe the package content matches some pre-set drop rule) across the gateway, and the problem is solved by connecting to server via ssl port so that server response package is encrypted.
ubuntu 14.04安装quickbuild buildagent (二)的更多相关文章
- ubuntu 14.04安装quickbuild server (一)
官网: http://www.pmease.com/ 指导网站: http://wiki.pmease.com/display/QB60/ 1. 安装quickbuild server ------ ...
- 在Ubuntu 14.04安装和使用Docker
Docker是一个开源软件,它可以把一个Linux应用和它所依赖的一切(比如配置文件)都封装到一个容器.然而,Docker与虚拟机不同,它使用了沙箱机制,Docker容器不运行操作系统,它共享主机上的 ...
- [转]在Ubuntu 14.04安装和使用Docker
在Ubuntu 14.04安装和使用Docker 作者:chszs,版权所有,未经同意,不得转载.博主主页:http://blog.csdn.net/chszs Docker是一个开源软件,它可以把一 ...
- Ubuntu 14.04 安装VMware 12
/*********************************************************************** * Ubuntu 14.04 安装VMware 12 ...
- Ubuntu 14.04安装Chromium浏览器并添加Flash插件Pepper Flas
转自Ubuntu 14.04安装Chromium浏览器并添加Flash插件Pepper Flash Player Chromium谷歌的开源浏览器将不再支持Netscape浏览器插件API,Adobe ...
- ubuntu 14.04 安装搜狗拼音输入法
原文:ubuntu 14.04 安装搜狗拼音输入法 ubuntu桌面系统下终于有了好用的拼音法-搜狗拼音输入法,欲在ubuntu 14.04下安装搜狗拼音输入法相当的简单. 先到搜狗拼音官网下载对应的 ...
- ubuntu 14.04 安装torch及编译环境zbstudio
ubuntu 14.04 安装torch及编译环境zbstudio torch zbstudio 本来是安装官网给的步骤安装torch的,可是碰到一系列的问题,后来参考网上的安装方法安装成功了 官网安 ...
- ubuntu 14.04 安装svn server (subversionedge )
ubuntu 14.04 安装subversionedge 请仔细阅读安装包自带的readme文件! 1.先去官网,找安装包: http://subversion.apache.org/ http:/ ...
- Ubuntu 14.04 安装 sysrepo v0.7.5
参考: Tentative gNMI support with sysrepo protobuf-c/protobuf-c Ubuntu 14.04 安装 sysrepo v0.7.5 安装依赖: s ...
随机推荐
- 探索AutoLayout的本质和解决一些问题
最近频繁使用AutoLayout,记录下自己的一些发现和问题的解决(不是教程) 1.简介 Auto Layout 是苹果在 iOS 6中新引入的布局方式,旨在解决不同尺寸屏幕的适配问题. 屏幕适配工作 ...
- hadoop启动后jps查不到namenode的解决办法
最近由于项目需要开始接触hadoop,在配置伪分布式启动后,jps查询进程发现少了namenode,而DataNode却存在. 下面是我的core-site.xml和hdfs-site.xml配置: ...
- 对tomcat来说,每一个进来的请求(request)都需要一个线程,直到该请求结束。
这段时间折腾了哈java web应用的压力测试,部署容器是tomcat 7.期间学到了蛮多散碎的知识点,及时梳理总结,构建良好且易理解的知识架构把它们组织起来,以备忘.对web应用开发者来说,我们很关 ...
- 利用Linq对集合元素合并、去重复处理
本文转载:http://www.cnblogs.com/yjmyzz/archive/2012/12/18/2823170.html 今天写代码时,需要对一个数组对象中按一定规则合并.去重处理,不想再 ...
- 【转】java.lang.StackOverflowError
http://blog.csdn.net/g19920917/article/details/8765638 出现一个java.lang.StackOverflowError异常.弄了半天,又是问高手 ...
- JavaScript-每隔5分钟执行一次ajax请求的实现方法
个页面好像只能有一个 window.onload=function(){},所以要有多个事件,这样写就好了 window.onload=function(){ //假设这里每个五分钟执行一次test函 ...
- MVC 音乐商店 第 9 部分: 注册和结帐
MVC 音乐商店是介绍,并分步说明了如何使用 ASP.NET MVC 和 Visual Studio 为 web 开发教程应用程序. MVC 音乐商店是一个轻量级的示例存储实现它卖音乐专辑在线,并实现 ...
- mysql触发器的作用及语法
触发器是一种特殊的存储过程,它在插入,删除或改动特定表中的数据时触发运行,它比数据库本身标准的功能有更精细和更复杂的数据控制能力. 数据库触发器有下面的作用: 1.安全性.能够基于数据库的值使用户具有 ...
- java多线程样例
这里我们做一个完整的样例来说明线程产生的方式不同而生成的线程的差别: package debug; import java.io.*;import java.lang.Thread; class My ...
- 用Module元素实现SharePoint Webpart Page的自动生成
最近研发的项目中开发了很多的WebPart,每次部署这些WebPart到新环境中总是很麻烦,因为自己要新创建WebpartPage,同时还要把这些WebPart放到指定的WebPart页中去: 为了方 ...