
cocos2d-x 绘制基本图元
转自:http://4137613.blog.51cto.com/4127613/754729
第一部分:基本图形绘制
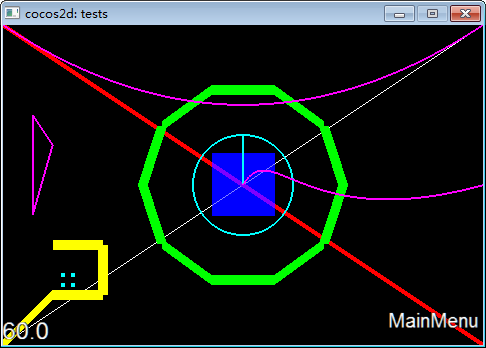
void DrawPrimitivesTest::draw()

{

    CCLayer::draw();

    CCSize s = CCDirector::sharedDirector()->getWinSize();

        // draw a simple line

        // The default state is:

        // Line Width: 1

        // color: 255,255,255,255 (white, non-transparent)

        // Anti-Aliased

        glEnable(GL_LINE_SMOOTH);

        ccDrawLine( CCPointMake(, ), CCPointMake(s.width, s.height) );

        // line: color, width, aliased

        // glLineWidth > 1 and GL_LINE_SMOOTH are not compatible

        //注意:线宽>1 则不支持GL_LINE_SMOOTH

        // GL_SMOOTH_LINE_WIDTH_RANGE = (1,1) on iPhone

        glDisable(GL_LINE_SMOOTH);

        glLineWidth( 5.0f );

        /*glColor4ub(255,0,0,255);*/

        glColor4f(1.0, 0.0, 0.0, 1.0);

        ccDrawLine( CCPointMake(, s.height), CCPointMake(s.width, ) );

        // TIP:

        // If you are going to use always the same color or width, you don't

        // need to call it before every draw

        //

        // Remember: OpenGL is a state-machine.

        // draw big point in the center

        // 注意:cocos2dx绘制的是方块点

        glPointSize();

        /*glColor4ub(0,0,255,128);*/

        glColor4f(0.0, 0.0, 1.0, 0.5);

        ccDrawPoint( CCPointMake(s.width / , s.height / ) );

        // draw 4 small points

        // 注意:cocos2dx绘制的是方块点

        CCPoint points[] = { CCPointMake(,), CCPointMake(,), CCPointMake(,), CCPointMake(,) };

        glPointSize();

        /*glColor4ub(0,255,255,255);*/

        glColor4f(0.0, 1.0, 1.0, 1.0);

        ccDrawPoints( points, );

        // draw a green circle with 10 segments

        glLineWidth();

        /*glColor4ub(0, 255, 0, 255);*/

        glColor4f(0.0, 1.0, 0.0, 1.0);

       //参数依次是:中心点,半径,角度,分段数,是否连接中心点

        ccDrawCircle( CCPointMake(s.width/,  s.height/), , , , false);

        // draw a green circle with 50 segments with line to center

        glLineWidth();

        /*glColor4ub(0, 255, 255, 255);*/

        glColor4f(0.0, 1.0, 1.0, 1.0);

        ccDrawCircle( CCPointMake(s.width/, s.height/), , CC_DEGREES_TO_RADIANS(), , true);

        // open yellow poly

        /*glColor4ub(255, 255, 0, 255);*/

        glColor4f(1.0, 1.0, 0.0, 1.0);

        glLineWidth();

        CCPoint vertices[] = { CCPointMake(,), CCPointMake(,), CCPointMake(,), CCPointMake(,), CCPointMake(,) };

        //参数依次是:点数组,点数量,是否封闭

        ccDrawPoly( vertices, , false);

        // closed purple poly

        /*glColor4ub(255, 0, 255, 255);*/

        glColor4f(1.0, 0.0, 1.0, 1.0);

        glLineWidth();

        CCPoint vertices2[] = { CCPointMake(,), CCPointMake(,), CCPointMake(,) };

        ccDrawPoly( vertices2, , true);

        // draw quad bezier path

          //绘制有一个控制点的贝塞尔曲线

       ccDrawQuadBezier(CCPointMake(,s.height), CCPointMake(s.width/,s.height/), CCPointMake(s.width,s.height), );

       // draw cubic bezier path

       //绘制有两个控制点的贝塞尔曲线

       ccDrawCubicBezier(CCPointMake(s.width/, s.height/), CCPointMake(s.width/+,s.height/+), CCPointMake(s.width/+,s.height/-),CCPointMake(s.width, s.height/),);

        //恢复opengl的正常参数

        // restore original values

        glLineWidth();

        /*glColor4ub(255,255,255,255);*/

        glColor4f(1.0, 1.0, 1.0, 1.0);

        glPointSize();

}
// Create a label and initialize with string "Hello World".

CCLabelTTF* pLabel = CCLabelTTF::labelWithString("Hello World", "Thonburi", );

CC_BREAK_IF(! pLabel);

// Get window size and place the label upper.

CCSize size = CCDirector::sharedDirector()->getWinSize();

pLabel->setPosition(ccp(size.width / , size.height - ));

// Add the label to HelloWorld layer as a child layer.

this->addChild(pLabel, );
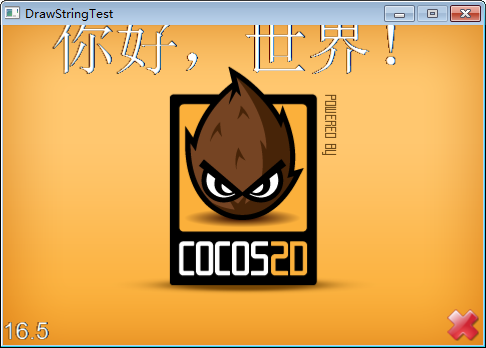
CCLabelTTF* pLabel = CCLabelTTF::labelWithString("你好,世界", "Thonburi", );

void HelloWorldLayer::draw()

{

        CCLayer::draw();

       CCSize s = CCDirector::sharedDirector()->getWinSize();

        glEnable(GL_LINE_SMOOTH);

        ccDrawLine( CCPointMake(, s.height/), CCPointMake(s.width, s.height/) );

        ccDrawLine( CCPointMake(s.width/, ), CCPointMake(s.width/, s.height) );

}
然后,我们重写绘制字体函数,将坐标修改为屏幕正中
pLabel->setPosition(ccp(size.width / , size.height/));
.png)

// 3. Add add a splash screen, show the cocos2d splash image.

CCSprite* pSprite = CCSprite::spriteWithFile("HelloWorld.png");

CC_BREAK_IF(! pSprite);

// Place the sprite on the center of the screen

pSprite->setFlipX(true); //可以手动设置图形旋转和镜像,而不是使用Action,因为有许多Action是个过程,而不是直接显示结果

pSprite->setRotation();

pSprite->setPosition(ccp(size.width/, size.height/));

// Add the sprite to HelloWorld layer as a child layer.

this->addChild(pSprite, );
绘制后的效果如下:

cocos2d-x 绘制基本图元的更多相关文章
- WebGL学习笔记二——绘制基本图元
webGL的基本图元点.线.三角形 gl.drawArrays(mode, first,count) first,代表从第几个点开始绘制即顶点的起始位置 count,代表绘制的点的数量. mode,代 ...
- 【转】cocos2d-x学习笔记03:绘制基本图元
第一部分:基本图形绘制 cocos2dx封装了大量opengl函数,用于快速绘制基本图形,这些代码的例子在,tests\DrawPrimitivesTest目录下 注意,该方法是重载node的draw ...
- Cocos2d 利用继承Draw方法制作可显示三维数据(宠物三维等)的三角形显示面板
很久没有写博客了,这段时间比较忙,又是搬家又是做自己的项目,还有太多琐碎的事情缠身,好不容易抽出时间把最近自己做的一些简单例子记录一下. 在我的项目中,我需要一个显示面板来显示游戏中的一个三维数据,例 ...
- Modern OpenGL用Shader拾取VBO内单一图元的思路和实现(2)
Modern OpenGL用Shader拾取VBO内单一图元的思路和实现(2) 上一篇里介绍了Color-Coded Picking的思路和最基本的实现.在处理GL_POINTS时已经没有问题,但是处 ...
- Direct基础学习系列3 绘制+实例
3.1.1顶点缓存 索引缓存 放置在显存中能够加快绘制速度 创建顶点缓存 HRESULT CreateVertexBuffer( UINT Length, //为缓存分配的字节数 DWORD Usag ...
- osg 基本几何图元
转自:osg 基本几何图元 //osg 基本几何图元 // ogs中所有加入场景中的数据都会加入到一个Group类对象中,几何图元作为一个对象由osg::Geode类来组织管理. // 绘制几何图元对 ...
- Direct3D中的绘制
1.顶点缓存和索引缓存 一个顶点缓存是一个包含顶点数据的连续内存空间:一个索引缓存是一个包含索引数据的连续内存空间. 顶点缓存用接口IDirect3DVertexBuffer9表示:索引缓存用接口ID ...
- 如何在Cocos2D 1.0 中掩饰一个精灵(四)
大熊猫猪·侯佩原创或翻译作品.欢迎转载,转载请注明出处. 如果觉得写的不好请告诉我,如果觉得不错请多多支持点赞.谢谢! hopy ;) 为了完成需要的效果,我们将使用如下策略: 我们将首先绘制掩饰精灵 ...
- (转)GPU图形绘制管线
摘抄“GPU Programming And Cg Language Primer 1rd Edition” 中文名“GPU编程与CG语言之阳春白雪下里巴人”第二章. 图形绘制管线描述GPU渲染流程, ...
随机推荐
- 玩玩EXPRESSJS
呵呵,反正有的是学习时间哈哈, 这个EXPRESSJS,看看实现的大约. 看的是http://www.expressjs.com.cn/ 代码A: var express = require('exp ...
- ERP 推式 拉式 工序拉式 装配拉式 倒冲
ERP 推式 拉式 工序拉式 装配拉式 倒冲 以上為生产订单(wip)中的原料供应方式,最常用的有Pull和Push. PULL即拉动方式: 拉式生产是生产为主,原材料是由专门的配送人员按 ...
- HTML5标签一览
HTML5标签一览,点击下载 访问密码:1907
- 推荐GitHub上10 个开源深度学习框架
推荐GitHub上10 个开源深度学习框架 日前,Google 开源了 TensorFlow(GitHub),此举在深度学习领域影响巨大,因为 Google 在人工智能领域的研发成绩斐然,有着雄厚 ...
- 结构体dtuple_t
/* SQL data tuple struct */ typedef struct dtuple_struct dtuple_t; /** Structure for an SQL data tup ...
- Hibernate: org.hibernate.exception.SQLGrammarException: could not insert: 错误
最近在学习Java Web,今天刚接触Hibernate.学习的书籍是<轻量级Java EE企业应用实战(第3版)>.书中367页5.2.2中给予的Hibernate例子中的代码运行有以下 ...
- js 获取服务器控件
大致是HtmlControl被服务器发送到页面ID不变,比如<div id="a" runat="sever"></div> WebCo ...
- C#实现调用Java类中方法
基本思路: 用C#实现调用Java编写的类中的方法:重点是将Java编写的程序打包成Jar,然后使用开源工具IKVM将其转化成DLL控件,在.NET环境下调用. 分为以下步骤: 1.下载JDK6(注: ...
- NEsper事件处理 z
http://esper.codehaus.org/nesper/documentation/documentation.html 环境配置 NEsper库下载:下载网址 Vs2010环境集成 在项目 ...
- lightoj 1004
很水的一个dp #include<cstdio> #include<iostream> #include<cstring> #include<algorith ...