【socket-python应用】控制泓格ET-7044通信模块输入DI输出DO
socket-python应用:控制泓格ET-7044通信模块输入DI输出DO
本节主要内容:
1、socket-python建立TCP通信
2、配合泓格通信模块说明书,查看输入输出寄存器地址,发送指令
3、发送\接收的数据都是16进制,要进行字符处理
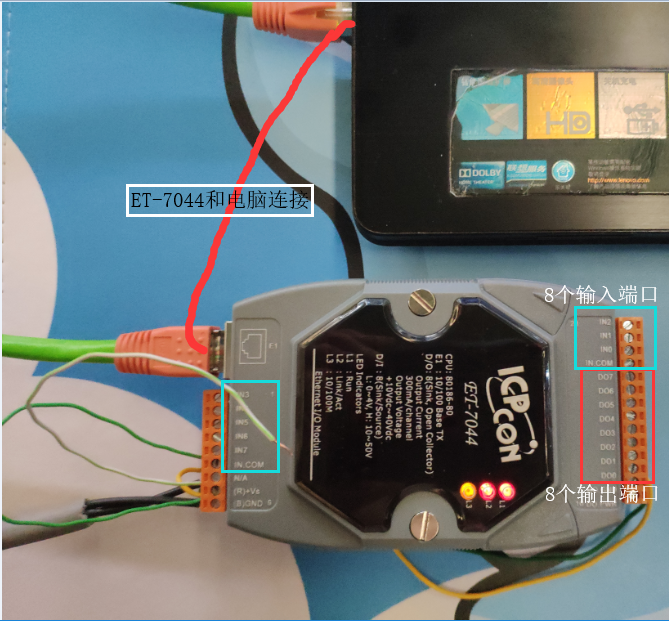
物理连接图:
泓格ET7044通信模块编程资料:
输出:

01 02 00 00 00 06 01 05 00 01 FF 00 (01表示第2个输出口、FF表示端口使能输出)
01 02 00 00 00 06 01 05 00 02 00 00 (01表示第2个输出口、00表示端口关闭输出)
输入:
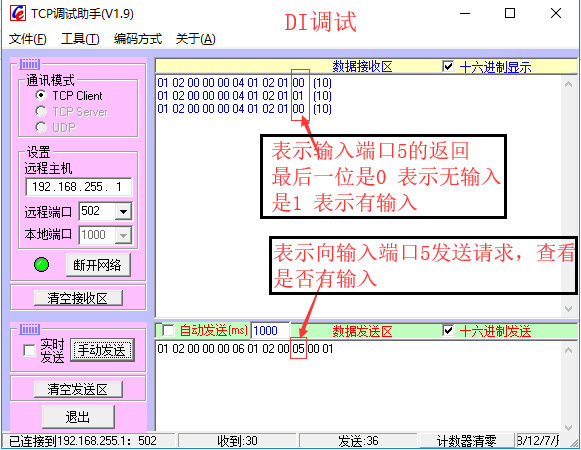
注意:输入 和 输出端口的请求是不同的,数据是以十六进制发送的
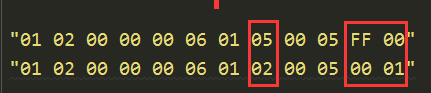
第一行是输出端口发送请求数据,其中倒数第3个字节 05 对应第5个输出端口,FF使能输出,将FF变为00关闭输出
第二行是输入端口发送请求数据,其中倒数第3个字节 05 对应第5个输出端口
思路整理:
由于用TCP测试工具发送 01 02 00 00 00 06 01 05 00 01 FF 00 ,可以控制模块的输出口DO1使能,
因此猜想 01 02 00 00 00 06 01 05 00 01 FF 00 ,直接对应的控制 ET-7044模块
故在程序中使用tcp_client.send() 发送相应代码也可以实现控制ET-7044模块端口
代码层面:
将字符串转为16进制格式
 """#将输入的一串10进制字符串,表示为b'\x' 16进制格式
 # 010200000006010200000001 ---> \x01\x02\x00\x00\x00\x06\x01\x05\x00\x00\xFF\x00
 """
 def dataSwitch(data):
     str1 = ''
     str2 = b''
     while data:
         str1 = data[0:2]
         # print(str1)
         s = int(str1,16)
         str2 += struct.pack('B',s)
         data = data[2:]
     return str2
字符串转为16进制格式
通过发送指令打开所有输入通道,监听是否有输入
 #通过发送指令打开所有输入通道,监听是否有输入
 while True:
     inputPort0 = "
     tcp_client.sendall(dataSwitch(inputPort0))
     if tcp_client.recv(buffer_size)[-1]:
         print('收到服务端第0个输入端口的消息')
         # continue

     inputPort1 = "
     tcp_client.sendall(dataSwitch(inputPort1))
     if tcp_client.recv(buffer_size)[-1]:
         print('收到服务端第1个输入端口的消息')

     inputPort2 = "
     tcp_client.sendall(dataSwitch(inputPort2))
     if tcp_client.recv(buffer_size)[-1]:
         print('收到服务端第2个输入端口的消息')

     inputPort3 = "
     tcp_client.sendall(dataSwitch(inputPort3))
     if tcp_client.recv(buffer_size)[-1]:
         print('收到服务端第3个输入端口的消息')

     inputPort4 = "
     tcp_client.sendall(dataSwitch(inputPort4))
     if tcp_client.recv(buffer_size)[-1]:
         print('收到服务端第4个输入端口的消息')

     inputPort5 = "
     tcp_client.sendall(dataSwitch(inputPort5))
     if tcp_client.recv(buffer_size)[-1]:
         print('收到服务端第5个输入端口的消息')

     inputPort6 = "
     tcp_client.sendall(dataSwitch(inputPort6))
     if tcp_client.recv(buffer_size)[-1]:
         print('收到服务端第6个输入端口的消息')

     inputPort7 = "
     tcp_client.sendall(dataSwitch(inputPort7))
     if tcp_client.recv(buffer_size)[-1]:
         print('收到服务端第7个输入端口的消息')
发送指令打开所有输入通道,监听是否有输入
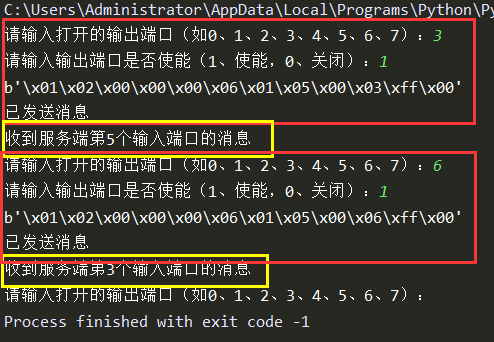
手动指定输出端口
 #输出D0
 while True:
     DO = input("请输入打开的输出端口(如0、1、2、3、4、5、6、7):")
     IfAble = input("请输入输出端口是否使能(1、使能,0、关闭):")
     ":
         IfAble = "FF"
     ":
         IfAble = "
       # 01 02 00 00 00 06 01 05 00 00 FF 00
     data = "0102000000060105000{}{}00".format(DO,IfAble)
     print(dataSwitch(data))
     tcp_client.sendall(dataSwitch(data))
     print("已发送消息")
手动控制输出端口DO
最后贴出完整的代码,仅供参考:
from socket import *
import struct

ip_port = ('192.168.255.1',502)
buffer_size = 1024
tcp_client = socket(AF_INET,SOCK_STREAM)
tcp_client.connect(ip_port)

#将输入的一串10进制字符串,表示为b'\x' 16进制格式
# 010200000006010200000001 ---> \x01\x02\x00\x00\x00\x06\x01\x05\x00\x00\xFF\x00
def dataSwitch(data):
    str1 = ''
    str2 = b''
    while data:
        str1 = data[0:2]
        # print(str1)
        s = int(str1,16)
        str2 += struct.pack('B',s)
        data = data[2:]
    return str2

#通过发送指令打开所有输入通道,监听是否有输入
# while True:
#     inputPort0 = "010200000006010200000001"
#     tcp_client.sendall(dataSwitch(inputPort0))
#     if tcp_client.recv(buffer_size)[-1]:
#         print('收到服务端第0个输入端口的消息')
#         # continue
#
#     inputPort1 = "010200000006010200010001"
#     tcp_client.sendall(dataSwitch(inputPort1))
#     if tcp_client.recv(buffer_size)[-1]:
#         print('收到服务端第1个输入端口的消息')
#
#     inputPort2 = "010200000006010200020001"
#     tcp_client.sendall(dataSwitch(inputPort2))
#     if tcp_client.recv(buffer_size)[-1]:
#         print('收到服务端第2个输入端口的消息')
#
#     inputPort3 = "010200000006010200030001"
#     tcp_client.sendall(dataSwitch(inputPort3))
#     if tcp_client.recv(buffer_size)[-1]:
#         print('收到服务端第3个输入端口的消息')
#
#     inputPort4 = "010200000006010200040001"
#     tcp_client.sendall(dataSwitch(inputPort4))
#     if tcp_client.recv(buffer_size)[-1]:
#         print('收到服务端第4个输入端口的消息')
#
#     inputPort5 = "010200000006010200050001"
#     tcp_client.sendall(dataSwitch(inputPort5))
#     if tcp_client.recv(buffer_size)[-1]:
#         print('收到服务端第5个输入端口的消息')
#
#     inputPort6 = "010200000006010200060001"
#     tcp_client.sendall(dataSwitch(inputPort6))
#     if tcp_client.recv(buffer_size)[-1]:
#         print('收到服务端第6个输入端口的消息')
#
#     inputPort7 = "010200000006010200070001"
#     tcp_client.sendall(dataSwitch(inputPort7))
#     if tcp_client.recv(buffer_size)[-1]:
#         print('收到服务端第7个输入端口的消息')

### 输出D0
while True:
    DO = input("请输入打开的输出端口(如0、1、2、3、4、5、6、7):")
    IfAble = input("请输入输出端口是否使能(1、使能,0、关闭):")
    ":
        IfAble = "FF"
    ":
        IfAble = "
      # 01 02 00 00 00 06 01 05 00 00 FF 00
    data = "0102000000060105000{}{}00".format(DO,IfAble)
    print(dataSwitch(data))
    tcp_client.sendall(dataSwitch(data))
    print("已发送消息")

    inputPort0 = "
    tcp_client.sendall(dataSwitch(inputPort0))
    if tcp_client.recv(buffer_size)[-1]:
        print('收到服务端第0个输入端口的消息')

    inputPort1 = "
    tcp_client.sendall(dataSwitch(inputPort1))
    if tcp_client.recv(buffer_size)[-1]:
        print('收到服务端第1个输入端口的消息')

    inputPort2 = "
    tcp_client.sendall(dataSwitch(inputPort2))
    if tcp_client.recv(buffer_size)[-1]:
        print('收到服务端第2个输入端口的消息')

    inputPort3 = "
    tcp_client.sendall(dataSwitch(inputPort3))
    if tcp_client.recv(buffer_size)[-1]:
        print('收到服务端第3个输入端口的消息')

    inputPort4 = "
    tcp_client.sendall(dataSwitch(inputPort4))
    if tcp_client.recv(buffer_size)[-1]:
        print('收到服务端第4个输入端口的消息')

    inputPort5 = "
    tcp_client.sendall(dataSwitch(inputPort5))
    if tcp_client.recv(buffer_size)[-1]:
        print('收到服务端第5个输入端口的消息')

    inputPort6 = "
    tcp_client.sendall(dataSwitch(inputPort6))
    if tcp_client.recv(buffer_size)[-1]:
        print('收到服务端第6个输入端口的消息')

    inputPort7 = "
    tcp_client.sendall(dataSwitch(inputPort7))
    if tcp_client.recv(buffer_size)[-1]:
        print('收到服务端第7个输入端口的消息')

tcp_client.close()
测试软件下载地址:
https://pan.baidu.com/s/15R57mskaKzRowtYNq2WjNQ
【微语】You only get one life,it's actually your duty to live it as fully as possible
生命只有一次,你有责任让它活出精彩
【socket-python应用】控制泓格ET-7044通信模块输入DI输出DO的更多相关文章
- Python基础系列----环境的搭建及简单输入、输出
1.Python 以下信 ...
- Python趣味入门3:变量、字串输入与输出
安装配置python环境完毕,非常有必要花十分钟对一些基本概念:变量.数学字符.输入.输出等4个概念进行理解,下面通过简单示例,深入了解python的基本语法. 本文的示例均在IDLE的命令行模式中完 ...
- Python(输入、输出;简单运算符;流程控制;转译)
一 输入输出 python3中统一都是input,python2中有raw_input等同于python3的input,另外python2中也有input 1.res=input("pyth ...
- Python直接控制鼠标键盘
Python直接控制鼠标键盘 之前因为期末的原因已经很久没写博客了,今天博主发现一个好玩的模块PyAutoGUI,借助它可以使用Python脚本直接控制键盘鼠标,感觉可以解决很多无聊的机械运动.这里记 ...
- Python 条件控制
Python 条件控制 Python条件语句是通过一条或多条语句的执行结果(True或者False)来决定执行的代码块. 可以通过下图来简单了解条件语句的执行过程: if 语句 Python中if语 ...
- python 流程控制(条件语句)
1,python流程控制单条件基本语句 2,python流程流程多条件控制语句 3,三元运算 1,python流程控制单条件基本语句 if 判断条件: 执行语句…… else: 执行语句…… 判断条件 ...
- Python(四)之Python流程控制(if、while、for)
Python流程控制 if测试: if 条件测试表达式: 组合条件测试: x and y:与运算 x or y:或运算 not x:非运算 while: break:跳出最内层的循环 continue ...
- Python - 条件控制、循环语句 - 第十二天
Python 条件控制.循环语句 end 关键字 关键字end可以用于将结果输出到同一行,或者在输出的末尾添加不同的字符,实例如下: Python 条件语句是通过一条或多条语句的执行结果(True 或 ...
- 泓格WINPAC主机与第三方模块rs 485 modbus rtu通信测试
开发语言:C# 开发环境:VS2008(支持WINCE开发的最后一个版本) 运行环境:Windows CE 5.0~7.0 项目说明:多台涨格winpac系列的主机,原来使用泓格SDK开发的程序,采集 ...
随机推荐
- Go指南_切片的长度与容量
源地址 https://tour.go-zh.org/moretypes/11 一.描述 切片拥有 长度 和 容量. 切片的长度就是它所包含的元素个数. 切片的容量是从它的第一个元素开始数,到其底层数 ...
- Java如何使服务器允许连接到套接字端口?
在Java编程中,如何使服务器允许连接到套接字端口? 以下示例显示如何使服务器通过使用ServerSocket类的server.accept()方法和Socket类的sock.getInetAddre ...
- WAS生成的文件:javacore.***.txt 、heapdump.***.phd、core.***.dmp、Snap.***.trc
WAS生成的常见文件有哪些? 原文链接:http://blog.csdn.net/pqh20085101092/article/details/39370389 javacore.***.txt : ...
- [Tensorflow] Cookbook - Object Classification based on CIFAR-10
Convolutional Neural Networks (CNNs) are responsible for the major breakthroughs in image recognitio ...
- [PHP] 03 - Form & Input
PHP 完整表单实例 一.表单示范 二.对应代码 <!DOCTYPE HTML> <html> <head> <meta charset="utf- ...
- Zookeeper安装使用及JavaAPI使用
一.Zookeeper单击模式安装及使用 1.系统环境 2.导入JDK和Zookeeper包 1).使用SecureCRT工具打开SFTP连接,直接拖拽,到当前用户文件夹下,然后使用mv命令(mv 文 ...
- Chrome浏览器端调试JavaScript
1. 一个超级简单的html文件拉入chrome浏览器 2. 右键-->检查 3. 点击Sources 4. html的12行加个断点 5. 刷新页面,点开Console面板,输入变量num,我 ...
- html div+css做页面布局
http://blog.csdn.net/mercop/article/details/7882000 HTML CSS + DIV实现整体布局 1.技术目标: 开发符合W3C标准的Web页面 理解盒 ...
- 关于git CRLF LF结尾的问题
在使用git的过程中,如果我们的项目是跨平台开发的 那么CRLF的处理也许会成为一个很头疼的事情,有可能会出以下的莫名其妙的问题: 我们的某个开发人员在linux上提交的一个文件 当从windows上 ...
- FIFO设计中的深度计算【zz】
FIFO设计中的深度计算: 写时钟频率 w_clk, 读时钟频率 r_clk, 写时钟周期里,每B个时钟周期会有A个数据写入FIFO: 读时钟周期里,每Y个时钟周期会有X个数据读出FIFO: 则,FI ...