Python笔记 #19# 实现bpnn
代码编辑&解释工具:Jupyter Notebook 快速入门
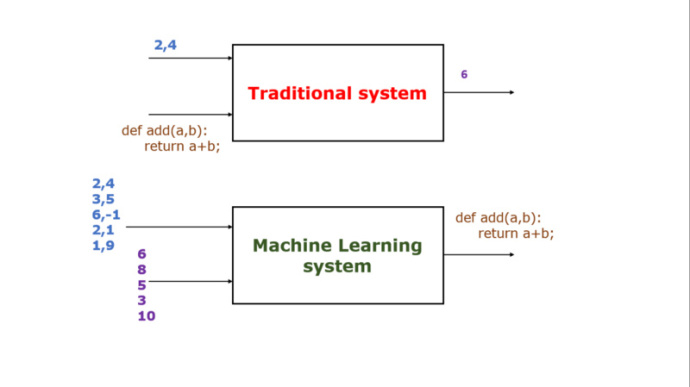
形象说明BP神经网络的用法(图片来自推特):
Bpnn类最主要的三个方法:
- initialize方法,用于设定神经网络的层数、各层节点数
- predict方法,方便用户应用模型做预测
- train方法,用来训练模型
所有代码如下(需要导入numpy模块):
import numpy as np

import math

def linear_transformation(matrix, vector):

    return vector.dot(matrix)

# vector = np.array([1, 2])

# matrix = [[1, 2], [3, 4]]

# vector = linear_transformation(matrix, vector)

# print("linear_transformation:", vector)

# print("linear_transformation:", type(vector))

def active(vector, f):

    return np.array(list(map(lambda x: f(x), vector)))

def sigmoid(x): # 激活函数

    return 1.0 / (1.0 + math.exp(-x))

# result = active(vector, sigmoid)

# print("active:", result)

# print("active:", type(result))

class Bpnn:

    # model是一个list,例如[2, 2, 3, 1]表示输入结点2个,第一个隐含层有2个节点,第二个隐含层有3个节点,输出结点1个

    def initialize(self, model):

        # 随机生成模型对应的矩阵(网络权重)和偏置

        self.matrixs = []

        self.biases = []

        for i in range(len(model) - 1): # 矩阵个数为总层数减1,例如4层的网络只需要3个矩阵就可以了

            self.matrixs.append(np.random.randn(model[i], model[i + 1])) # 矩阵的列数是对应输入节点的个数,矩阵的行数对应输出节点的个数

        for i in range(len(model) - 1):

            # 列表中的每个np数组代表一整层节点的偏置

            self.biases.append(np.random.randn(model[i + 1]))

    def predict(self, vector):

        result = np.array(vector)

        for i in range(len(self.matrixs)): # 其实就是对一个向量做多次线性变换

            result = linear_transformation(self.matrixs[i], result) + self.biases[i]

            result = active(result, sigmoid)

        return result

    def neural_net_output(self, feature): # 记录各层的输出

        result = []

        output = active(linear_transformation(self.matrixs[0], np.array(feature)) + self.biases[0], sigmoid)

        result.append(output)

        for i in range(len(self.matrixs) - 1):

            output = active(linear_transformation(self.matrixs[i + 1], output) + self.biases[i + 1], sigmoid)

            result.append(output)

        return result # 格式为[[代表第1层输出的向量], [代表第2层输出的向量], ...,[代表最终输出的向量]],所有向量都是一维的np.array,向量长度为该层节点数

    def compute_error(self, prediction, actual): # 计算各层的误差,actual是样本标记值(期望获得的值)

        result = []

        prediction = prediction[:] # 后面的处理都不影响原始数组

        prediction.reverse() # 转置便于处理

        error = prediction[0] * (1 - prediction[0]) * (actual - prediction[0]) # 计算最终输出的误差

        result.append(error)

        for i in range(len(self.matrixs) - 1): # 计算每层的误差,可以通过转置矩阵计算上一层误差的一个因子

            error = prediction[i + 1] * (1- prediction[i + 1]) * linear_transformation(self.matrixs[-1 - i].T, error)

            result.append(error)

        result.reverse()

        return result # 格式为[[代表第1层输出误差的向量], [代表第2层输出误差的向量], ...,[代表最终输出误差的向量]],所有向量都是一维的np.array,向量长度为该层节点数数

    def update_network(self, feature, prediction, error, LEARING_RATE):

        # 更新权重(手算凑出来的计算方法↓)

        temp = np.ones_like(self.matrixs[0])

        temp = temp * LEARING_RATE * error[0]

        temp = temp.T * np.array(feature)

        temp = temp.T

        self.matrixs[0] += temp;

        for i in range(len(self.matrixs) - 1):

            temp = np.ones_like(self.matrixs[i + 1])

            temp = temp * LEARING_RATE * error[i + 1]

            temp = temp.T * prediction[i]

            temp = temp.T

            self.matrixs[i + 1] += temp;

        # 更新偏置

        for i in range(len(self.biases)):

            self.biases[i] += LEARING_RATE * error[i]

    def train(self, get_batch, MAX_ITERATION, LEARING_RATE, MAX_LOSS):

        loss = MAX_LOSS = abs(MAX_LOSS)

        count = MAX_ITERATION

        while abs(loss) >= MAX_LOSS and count > 0:

            batch = get_batch()

            for example in batch:

                prediction = self.neural_net_output(example.feature)

                error = self.compute_error(prediction, example.label)

                self.update_network(example.feature, prediction, error, LEARING_RATE)

            loss = abs(np.mean(error[-1])) # 取最后一次迭代最终输出的平均值作为本批次的误差

            count = count - 1

        print("迭代次数:", MAX_ITERATION - count)

        print("误差:", loss)

class LabeledExample:

    def __init__(self, feature, label):

        self.feature = feature

        self.label = label

# 训练一个类似于异或(xor)运算的函数,相同为假,相异为真

labeled_examples = [LabeledExample([0, 0], [0]), LabeledExample([0, 1], [1]), LabeledExample([1, 0], [1]), LabeledExample([1, 1], [0])]

def full_batch():

    return labeled_examples

bpnn = Bpnn()

bpnn.initialize([2, 2, 1]) # 构造一个三层的神经网络,输入节点2个,隐含层节点2个,输出节点1个

bpnn.train(full_batch, 10000, 0.6, 0.01) # 学习因子为0.6, 最大允许误差0.01

print("输入层与隐含层权值", bpnn.matrixs[0])

print("隐含层权值与输出层权值", bpnn.matrixs[1])

print("隐含层阈值", bpnn.biases[0])

print("输出层阈值", bpnn.biases[1])

sample1 = [0.05, 0.1]

sample2 = [0.2, 0.9]

sample3 = [0.86, 0.95]

print("预测样本", sample1, "的结果是:", bpnn.predict(sample1))

print("预测样本", sample2, "的结果是:", bpnn.predict(sample2))

print("预测样本", sample3, "的结果是:", bpnn.predict(sample3))
Python笔记 #19# 实现bpnn的更多相关文章
- python笔记-19 javascript补充、web框架、django基础
一.JavaScript的补充 1 正则表达式 1.1 test的使用 test 测试是否符合条件 返回true or false 1.2 exec的使用 exec 从字符串中截取匹配的字符 1.3 ...
- python笔记19
今日内容 面向对象基本用法 好处和应用场景 面向对象的三大特性 内容详细 1.面向对象基本格式 # ###### 定义类 ###### class 类名: def 方法名(self,name): pr ...
- python笔记 - day6
python笔记 - day6 参考: http://www.cnblogs.com/wupeiqi/articles/5501365.html 大纲: 利用递归,实现阶乘: Python反射 pyt ...
- python笔记 - day5
python笔记 - day5 参考: http://www.cnblogs.com/wupeiqi/articles/5484747.html http://www.cnblogs.com/alex ...
- s21day21 python笔记
s21day21 python笔记 一.内容回顾及补充 内置函数补充 type():查看数据类型 class Foo: pass obj = Foo() if type(obj) == Foo: pr ...
- s21day19 python笔记
s21day19 python笔记 一.面向对象的基本知识 1.1 基本格式 # 定义类 class 类名: def 方法名(self,name): print(name) return 123 de ...
- s21day05 python笔记
s21day05 python笔记 一.昨日内容回顾及补充 回顾 补充 列表独有功能 extend:循环添加到一个列表中 1.users = ['张三',66],people = ['王五',99] ...
- python笔记-1(import导入、time/datetime/random/os/sys模块)
python笔记-6(import导入.time/datetime/random/os/sys模块) 一.了解模块导入的基本知识 此部分此处不展开细说import导入,仅写几个点目前的认知即可.其 ...
- python笔记(2)--字符串
一.字符串 字符串是不可变序列,具有序列的公共操作方法,具体操作见python笔记(1)--序列(列表 元组 range) 1.创建字符串 单引号:'Hello , I am Logan ! ' 双引 ...
随机推荐
- HyperlinkedIdentityField
1.简介 其实就是创建一个链接,把查询到对象放到链接上,点链接可以查看.实际上用的很少. 2. views代码 查找的是一个对象的所有数据,link只是放在这个对象其中一个字段上的数据. from d ...
- ES7 async 函数
async 函数 let getdata=function(){ return new Promise((resolve,reject)=>{ resolve('aaa'); }) } let ...
- 微服务——RestTemplate
GET请求: 第一种:getForEntity: 此方法返回的是ResponseEntity,该对象是Spring对HTTP请求响应的封装. RestTemplate rt = new RestTem ...
- [py]python之信用卡ATM
python之信用卡ATM 参考: http://www.cnblogs.com/wushank/p/5248916.html 他的博客写的很ok 需求介绍 模拟实现一个ATM + 购物商城程序 额度 ...
- 关于SimpleDateFormat时间转换总是显示1970年的问题
今天遇到了一个奇怪的问题, long time = 1488606363; Date date = new Date(time); java.text.SimpleDateFormat sDateFo ...
- 15个Node.js项目列表
前言: Node.js 是一个基于Chrome JavaScript 运行时建立的一个平台,是一个事件驱动I/O服务端JavaScript环境,基于Google的V8引擎,V8引擎执行Javascri ...
- 10.C# 构造函数
1.构造函数 构造函数是用来初始化对象的,只能由new运算符调用.构造函数与类同名,没有返回值,不能用void修饰,可以有public和private两种修饰符,当用private修饰时外界不能访问到 ...
- 从零开始一起学习SLAM | 相机成像模型
上一篇文章<从零开始一起学习SLAM | 为啥需要李群与李代数?>以小白和师兄的对话展开,受到了很多读者的好评.本文继续采用对话的方式来学习一下相机成像模型,这个是SLAM中极其重要的内容 ...
- MFC AfxMessageBox MessageBox MessageBoxA 默认标题修改
在工程的资源里添加String Table资源,AFX_IDS_APP_TITLE,然后设置其值即可,AFX_IDS_APP_TITLE的值就是AfxMessageBox.MessageBox.Mes ...
- Linux SSH 免秘钥登录
SSH 免秘钥登录 ssh:是一种安全加密协议 ssh username@hostname ssh gongziyuan.com:以当前用户登录该机器(如果不是当前用户,需要这么干:ssh ...