Spring声明式事务总结
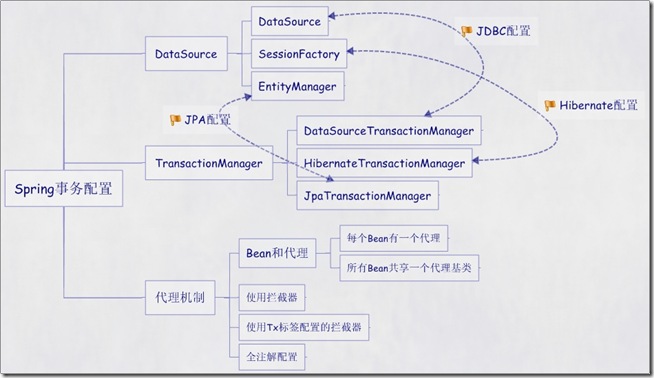
Spring配置文件中关于事务配置总是由三个组成部分,分别是DataSource、TransactionManager和代理机制这三部分,无论哪种配置方式,一般变化的只是代理机制这部分。
DataSource、TransactionManager这两部分只是会根据数据访问方式有所变化,比如使用Hibernate进行数据访问时,DataSource实际为SessionFactory,TransactionManager的实现为HibernateTransactionManager。
具体如下图:
#一个完整的常用的配置方便的事务配置例子
    <!-- 配置dataSource -->

    <bean id="dataSource"  class="com.mchange.v2.c3p0.ComboPooledDataSource"  destroy-method="close">

        <property name="driverClass" value="${driverClass}"></property>

        <property name="jdbcUrl" value="${jdbcUrl}"></property>

        <property name="user" value="${user}"></property>

        <property name="password" value="${password}"></property>

    </bean>

    <!-- 配置transactionManager -->

    <bean id="transactionManager" class="org.springframework.orm.hibernate3.HibernateTransactionManager">

        <property name="sessionFactory" ref="sessionFactory"/>

    </bean>

    <!-- 定义事务处理规则(通知):service接口方法名,以什么开头有事务或没事务 -->

    <tx:advice id="txAdvice" transaction-manager="transactionManager">

        <tx:attributes>

            <!-- 事务传播属性、隔离级别、最优化为只读事务、事务超时 -->

            <tx:method name="*" propagation="REQUIRED" isolation="DEFAULT" read-only="true" timeout="-1"/>

        </tx:attributes>

    </tx:advice>

    <aop:config>

        <!-- 定义切面(事务要控制在哪些层,即哪些包下) -->

        <aop:pointcut id="pointcutId" expression="execution(* com.google.code..*.*Service.*(..))"/>

        <!-- 定义织入点规则 -->

        <aop:advisor advice-ref="txAdvice" pointcut-ref="pointcutId"/>

    </aop:config>
根据代理机制的不同,总结了五种Spring事务的配置方式,配置文件如下:
第一种方式:每个Bean都有一个代理
<?xml version="1.0" encoding="UTF-8"?>

<beans xmlns="http://www.springframework.org/schema/beans"

    xmlns:xsi="http://www.w3.org/2001/XMLSchema-instance" xmlns:context="http://www.springframework.org/schema/context"

    xmlns:aop="http://www.springframework.org/schema/aop"

    xsi:schemaLocation="http://www.springframework.org/schema/beans

           http://www.springframework.org/schema/beans/spring-beans-2.5.xsd

           http://www.springframework.org/schema/context

           http://www.springframework.org/schema/context/spring-context-2.5.xsd

           http://www.springframework.org/schema/aop http://www.springframework.org/schema/aop/spring-aop-2.5.xsd">

    <bean id="sessionFactory" class="org.springframework.orm.hibernate3.LocalSessionFactoryBean">

        <property name="configLocation" value="classpath:hibernate.cfg.xml" />

        <property name="configurationClass" value="org.hibernate.cfg.AnnotationConfiguration" />

    </bean>

    <!-- 定义事务管理器(声明式的事务) -->

    <bean id="transactionManager" class="org.springframework.orm.hibernate3.HibernateTransactionManager">

        <property name="sessionFactory" ref="sessionFactory" />

    </bean>

    <!-- 配置DAO -->

    <bean id="userDaoTarget" class="com.bluesky.spring.dao.UserDaoImpl">

        <property name="sessionFactory" ref="sessionFactory" />

    </bean>

    <bean id="userDao" class="org.springframework.transaction.interceptor.TransactionProxyFactoryBean">

        <!-- 配置事务管理器 -->

        <property name="transactionManager" ref="transactionManager" />

        <property name="target" ref="userDaoTarget" />

        <property name="proxyInterfaces" value="com.bluesky.spring.dao.GeneratorDao" />

        <!-- 配置事务属性 -->

        <property name="transactionAttributes">

            <props>

                <prop key="*">PROPAGATION_REQUIRED</prop>

            </props>

        </property>

    </bean>

</beans>
第二种方式:所有Bean共享一个代理基类
......

    <bean id="sessionFactory" class="org.springframework.orm.hibernate3.LocalSessionFactoryBean">

        <property name="configLocation" value="classpath:hibernate.cfg.xml" />

        <property name="configurationClass" value="org.hibernate.cfg.AnnotationConfiguration" />

    </bean>

    <!-- 定义事务管理器(声明式的事务) -->

    <bean id="transactionManager" class="org.springframework.orm.hibernate3.HibernateTransactionManager">

        <property name="sessionFactory" ref="sessionFactory" />

    </bean>

    <bean id="transactionBase" class="org.springframework.transaction.interceptor.TransactionProxyFactoryBean" lazy-init="true" abstract="true">

        <!-- 配置事务管理器 -->

        <property name="transactionManager" ref="transactionManager" />

        <!-- 配置事务属性 -->

        <property name="transactionAttributes">

            <props>

                <prop key="*">PROPAGATION_REQUIRED</prop>

            </props>

        </property>

    </bean>

    <!-- 配置DAO -->

    <bean id="userDaoTarget" class="com.bluesky.spring.dao.UserDaoImpl">

        <property name="sessionFactory" ref="sessionFactory" />

    </bean>

    <bean id="userDao" parent="transactionBase">

        <property name="target" ref="userDaoTarget" />

    </bean>
第三种方式:使用拦截器
......

    <bean id="sessionFactory" class="org.springframework.orm.hibernate3.LocalSessionFactoryBean">

        <property name="configLocation" value="classpath:hibernate.cfg.xml" />

        <property name="configurationClass" value="org.hibernate.cfg.AnnotationConfiguration" />

    </bean>

    <!-- 定义事务管理器(声明式的事务) -->

    <bean id="transactionManager" class="org.springframework.orm.hibernate3.HibernateTransactionManager">

        <property name="sessionFactory" ref="sessionFactory" />

    </bean>

    <bean id="transactionInterceptor" class="org.springframework.transaction.interceptor.TransactionInterceptor">

        <property name="transactionManager" ref="transactionManager" />

        <!-- 配置事务属性 -->

        <property name="transactionAttributes">

            <props>

                <prop key="*">PROPAGATION_REQUIRED</prop>

            </props>

        </property>

    </bean>

    <bean class="org.springframework.aop.framework.autoproxy.BeanNameAutoProxyCreator">

        <property name="beanNames">

            <list>

                <value>*Dao</value>

            </list>

        </property>

        <property name="interceptorNames">

            <list>

                <value>transactionInterceptor</value>

            </list>

        </property>

    </bean>

    <!-- 配置DAO -->

    <bean id="userDao" class="com.bluesky.spring.dao.UserDaoImpl">

        <property name="sessionFactory" ref="sessionFactory" />

    </bean>
第四种方式:使用tx标签配置的拦截器
<?xml version="1.0" encoding="UTF-8"?>
<beans xmlns="http://www.springframework.org/schema/beans"
    xmlns:xsi="http://www.w3.org/2001/XMLSchema-instance"
    xmlns:context="http://www.springframework.org/schema/context"
    xmlns:aop="http://www.springframework.org/schema/aop"
    xmlns:tx="http://www.springframework.org/schema/tx"
    xsi:schemaLocation="http://www.springframework.org/schema/beans
           http://www.springframework.org/schema/beans/spring-beans-2.5.xsd
           http://www.springframework.org/schema/context
           http://www.springframework.org/schema/context/spring-context-2.5.xsd
           http://www.springframework.org/schema/aop http://www.springframework.org/schema/aop/spring-aop-2.5.xsd
           http://www.springframework.org/schema/tx http://www.springframework.org/schema/tx/spring-tx-2.5.xsd">

    <context:annotation-config />

    <context:component-scan base-package="com.bluesky" />

    <bean id="sessionFactory" class="org.springframework.orm.hibernate3.LocalSessionFactoryBean">

        <property name="configLocation" value="classpath:hibernate.cfg.xml" />

        <property name="configurationClass" value="org.hibernate.cfg.AnnotationConfiguration" />

    </bean>

    <!-- 定义事务管理器(声明式的事务) -->

    <bean id="transactionManager" class="org.springframework.orm.hibernate3.HibernateTransactionManager">

        <property name="sessionFactory" ref="sessionFactory" />

    </bean>

    <tx:advice id="txAdvice" transaction-manager="transactionManager">

        <tx:attributes>

            <tx:method name="*" propagation="REQUIRED" />

        </tx:attributes>

    </tx:advice>

    <aop:config>

        <aop:pointcut id="interceptorPointCuts" expression="execution(* com.bluesky.spring.dao.*.*(..))" />

        <aop:advisor advice-ref="txAdvice" pointcut-ref="interceptorPointCuts" />

    </aop:config>
</bean>
第五种方式:全注解
......

    <context:annotation-config />

    <context:component-scan base-package="com.bluesky" />

    <tx:annotation-driven transaction-manager="transactionManager" />

    <bean id="sessionFactory" class="org.springframework.orm.hibernate3.LocalSessionFactoryBean">

        <property name="configLocation" value="classpath:hibernate.cfg.xml" />

        <property name="configurationClass" value="org.hibernate.cfg.AnnotationConfiguration" />

    </bean>

    <!-- 定义事务管理器(声明式的事务) -->

    <bean id="transactionManager" class="org.springframework.orm.hibernate3.HibernateTransactionManager">

        <property name="sessionFactory" ref="sessionFactory" />

    </bean>
此时在DAO上需加上@Transactional注解,如下:
@Transactional

@Component("userDao")

public class UserDaoImpl extends HibernateDaoSupport implements UserDao {

    public List<User> listUsers() {

        return this.getSession().createQuery("from User").list();

    }

    ......

}
2、事务的传播属性(Propagation)
Propagation :key属性确定代理应该给哪个方法增加事务行为。这样的属性最重要的部份是传播行为。有以下选项可供使用:PROPAGATION_REQUIRED--支持当前事务,如果当前没有事务,就新建一个事务。这是最常见的选择。
PROPAGATION_REQUIRED--支持当前事务,如果当前没有事务,就新建一个事务。这是最常见的选择。
PROPAGATION_SUPPORTS--支持当前事务,如果当前没有事务,就以非事务方式执行。
PROPAGATION_MANDATORY--支持当前事务,如果当前没有事务,就抛出异常。
PROPAGATION_REQUIRES_NEW--新建事务,如果当前存在事务,把当前事务挂起。
PROPAGATION_NOT_SUPPORTED--以非事务方式执行操作,如果当前存在事务,就把当前事务挂起。
PROPAGATION_NEVER--以非事务方式执行,如果当前存在事务,则抛出异常。
1: PROPAGATION_REQUIRED
加入当前正要执行的事务不在另外一个事务里,那么就起一个新的事务。
比如说,ServiceB.methodB的事务级别定义为PROPAGATION_REQUIRED, 那么由于执行ServiceA.methodA的时候,ServiceA.methodA已经起了事务,这时调用ServiceB.methodB,ServiceB.methodB看到自己已经运行在ServiceA.methodA的事务内部,就不再起新的事务。而假如ServiceA.methodA运行的时候发现自己没有在事务中,他就会为自己分配一个事务。这样,在ServiceA.methodA或者在ServiceB.methodB内的任何地方出现异常,事务都会被回滚。即使ServiceB.methodB的事务已经被提交,但是ServiceA.methodA在接下来fail要回滚,ServiceB.methodB也要回滚
2: PROPAGATION_SUPPORTS
如果当前在事务中,即以事务的形式运行,如果当前不再一个事务中,那么就以非事务的形式运行
3: PROPAGATION_MANDATORY
必须在一个事务中运行。也就是说,他只能被一个父事务调用。否则,他就要抛出异常
4: PROPAGATION_REQUIRES_NEW
这个就比较绕口了。 比如我们设计ServiceA.methodA的事务级别为PROPAGATION_REQUIRED,ServiceB.methodB的事务级别为PROPAGATION_REQUIRES_NEW,那么当执行到ServiceB.methodB的时候,ServiceA.methodA所在的事务就会挂起,ServiceB.methodB会起一个新的事务,等待ServiceB.methodB的事务完成以后,他才继续执行。他与PROPAGATION_REQUIRED 的事务区别在于事务的回滚程度了。因为ServiceB.methodB是新起一个事务,那么就是存在两个不同的事务。如果ServiceB.methodB已经提交,那么ServiceA.methodA失败回滚,ServiceB.methodB是不会回滚的。如果ServiceB.methodB失败回滚,如果他抛出的异常被ServiceA.methodA捕获,ServiceA.methodA事务仍然可能提交。
5: PROPAGATION_NOT_SUPPORTED
当前不支持事务。比如ServiceA.methodA的事务级别是PROPAGATION_REQUIRED ,而ServiceB.methodB的事务级别是PROPAGATION_NOT_SUPPORTED ,那么当执行到ServiceB.methodB时,ServiceA.methodA的事务挂起,而他以非事务的状态运行完,再继续ServiceA.methodA的事务。
6: PROPAGATION_NEVER
不能在事务中运行。假设ServiceA.methodA的事务级别是PROPAGATION_REQUIRED, 而ServiceB.methodB的事务级别是PROPAGATION_NEVER ,那么ServiceB.methodB就要抛出异常了。
7: PROPAGATION_NESTED
理解Nested的关键是savepoint。他与PROPAGATION_REQUIRES_NEW的区别是,PROPAGATION_REQUIRES_NEW另起一个事务,将会与他的父事务相互独立,而Nested的事务和他的父事务是相依的,他的提交是要等和他的父事务一块提交的。也就是说,如果父事务最后回滚,他也要回滚的。
而Nested事务的好处是他有一个savepoint。
ServiceA {

    //事务属性配置为 PROPAGATION_REQUIRED

    void methodA() {

        try {

            //savepoint

            ServiceB.methodB(); //PROPAGATION_NESTED 级别

        } catch (SomeException) {

            // 执行其他业务, 如 ServiceC.methodC();

        }

    }

}
也就是说ServiceB.methodB失败回滚,那么ServiceA.methodA也会回滚到savepoint点上,ServiceA.methodA可以选择另外一个分支,比如ServiceC.methodC,继续执行,来尝试完成自己的事务。但是这个事务并没有在EJB标准中定义。
3、Spring事务的隔离级别(Isolation level)
由隔离级别从低到高:
1. ISOLATION_DEFAULT:这是一个PlatfromTransactionManager默认的隔离级别,使用数据库默认的事务隔离级别。
另外四个与JDBC的隔离级别相对应
2. ISOLATION_READ_UNCOMMITTED:这是事务最低的隔离级别,它充许令外一个事务可以看到这个事务未提交的数据。
这种隔离级别会产生脏读,不可重复读和幻像读。
3. ISOLATION_READ_COMMITTED: 保证一个事务不能读到另一个并行事务已修改但未提交的数据。数据提交后才能被读取。
避免了脏数据。该级别适应于大多数系统。大多数主流数据库默认的级别。
4. ISOLATION_REPEATABLE_READ:它除了保证一个事务不能读取另一个事务未提交的数据外,还保证了避免下面的情况产生(不可重复读)。
避免了脏读,不可重复读。但是可能出现幻像读。但是也带来更多的性能损失。
5. ISOLATION_SERIALIZABLE 事务被处理为顺序执行。
除了防止脏读,不可重复读外,还避免了幻像读。这是花费最高代价但是最可靠的事务隔离级别。
什么是脏数据,脏读,不可重复读,幻觉读?
脏读: 指当一个事务正在访问数据,并且对数据进行了修改,而这种修改还没有提交到数据库中,这时,另外一个事务也访问这个数据,然后使用了这个数据。因为这个数据是还没有提交的数据,那么另外一个事务读到的这个数据是脏数据,依据脏数据所做的操作可能是不正确的。
不可重复读: 指在一个事务内,多次读同一数据。在这个事务还没有结束时,另外一个事务也访问该同一数据。 那么,在第一个事务中的两次读数据之间,由于第二个事务的修改,那么第一个事务两次读到的数据可能是不一样的。这样就发生了在一个事务内两次读到的数据是不一样的,因此称为是不可重复读。
幻觉读: 指当事务不是独立执行时发生的一种现象,例如第一个事务对一个表中的数据进行了修改,这种修改涉及到表中的全部数据行。同时,第二个事务也修改这个表中的数据,这种修改是向表中插入一行新数据。那么,以后就会发生操作第一个事务的用户发现表中还有没有修改的数据行,就好象发生了幻觉一样。
不可重复读与幻觉读区别:幻觉读与不可重复读有点相似,但是不可重复读读取的数据不一致是因为他所要取的数据集被改变了。但是phantom reads所要读的数据的不一致却不是他所要读的数据集改变,而是他的条件数据集改变。比如Select account.id where account.name="ppgogo*",第一次读去了6个符合条件的id,第二次读取的时候,由于事务b把一个帐号的名字由"dd"改成"ppgogo1",结果取出来了7个数据。
1)不可重复读的重点是修改:
同样的条件, 你读取过的数据, 再次读取出来发现值不一样了
2)幻读的重点在于新增或者删除:
同样的条件, 第1次和第2次读出来的记录数不一样
当然, 从总的结果来看, 似乎两者都表现为两次读取的结果不一致.
但如果你从控制的角度来看, 两者的区别就比较大:
对于前者, 只需要锁住满足条件的记录
对于后者, 要锁住满足条件及其相近的记录
Spring声明式事务总结的更多相关文章
- spring声明式事务管理总结
事务配置 首先在/WEB-INF/applicationContext.xml添加以下内容: <!-- 配置事务管理器 --> <bean id="transactionM ...
- spring 声明式事务管理
简单理解事务: 比如你去ATM机取5000块钱,大体有两个步骤:首先输入密码金额,银行卡扣掉5000元钱:然后ATM出5000元钱.这两个步骤必须是要么都执行要么都不执行.如果银行卡扣除了5000块但 ...
- Spring声明式事务管理基于@Transactional注解
概述:我们已知道Spring声明式事务管理有两种常用的方式,一种是基于tx/aop命名空间的xml配置文件,另一种则是基于@Transactional 注解. 第一种方式我已在上文为大 ...
- Spring声明式事务管理基于tx/aop命名空间
目的:通过Spring AOP 实现Spring声明式事务管理; Spring支持编程式事务管理和声明式事务管理两种方式. 而声明式事务管理也有两种常用的方式,一种是基于tx/aop命名空间的xml配 ...
- Spring声明式事务配置管理方法
环境配置 项目使用SSH架构,现在要添加Spring事务管理功能,针对当前环境,只需要添加Spring 2.0 AOP类库即可.添加方法: 点击项目右键->Build Path->Add ...
- 161117、使用spring声明式事务抛出 identifier of an instance of
今天项目组有成员使用spring声明式事务出现下面异常,这里跟大家分享学习下. 异常信息: org.springframework.orm.hibernate3.HibernateSystemExce ...
- Spring声明式事务管理与配置详解
转载:http://www.cnblogs.com/hellojava/archive/2012/11/21/2780694.html 1.Spring声明式事务配置的五种方式 前段时间对Spring ...
- Spring声明式事务配置管理方法(转)
项目使用SSH架构,现在要添加Spring事务管理功能,针对当前环境,只需要添加Spring 2.0 AOP类库即可.添加方法: 点击项目右键->Build Path->Add libra ...
- Spring声明式事务的配置~~~
/*2011年8月28日 10:03:30 by Rush */ 环境配置 项目使用SSH架构,现在要添加Spring事务管理功能,针对当前环境,只需要添加Spring 2.0 AOP类库即可.添加 ...
- Spring 声明式事务,propagation属性列表及isolation(隔离级别)
Spring 声明式事务,propagation属性列表 TransactionDefinition接口中定义,共有7种选项可用: PROPAGATION_REQUIRED:支持当前事务,如果当前没有 ...
随机推荐
- 学习React系列(十)——Render Props
解决问题:将行为封装,供多个组件使用(在多个组件之间分享某段代码) 组件中的props属性中包含一个"render"属性(该属性为一个返回值为元素的方法),然后在该组件的rende ...
- WPF Command
使用CustomControl时绑定Command用法 C# Part public static RoutedUICommand ClearCommand { get; private set; } ...
- 关于Unity中NGUI图片精灵响应鼠标的方法
我在Unity里做NGUI的时候发现一个问题. 在Unity2D场景当中,一个精灵图片只要加上了Box Collider或者Box Collider2D,就可以相应OnMouseEnter和OnMou ...
- 三 Django模型层之Meta
模型的Meta选项 本文阐述所有可用的元数据选项,你可以在模型的Meta类中设置他们 Meta选项 abstract 如果为True,就表示抽象基类 app_label 如果模型在INSTALLED_ ...
- python-文件操作和集合
1.打开文件 如果文件不存在会报错 f = open('information.txt','r+') 2.读取文件 read 读取文件 readline 读取文件的一行内容 readlines 读取文 ...
- 实验吧_NSCTF web200&FALSE(代码审计)
挺简单的一个代码审计,这里只要倒序解密就行了,这里给一下python版的wp import codecs import base64 strs = 'a1zLbgQsCESEIqRLwuQAyMwLy ...
- [NOIp 2016]换教室
Description 对于刚上大学的牛牛来说,他面临的第一个问题是如何根据实际情况申请合适的课程. 在可以选择的课程中,有 $2n$ 节课程安排在 $n$ 个时间段上.在第 $i$($1 \leq ...
- 【BZOJ3631】【JLOI2014】松鼠的新家
原题传送门 题意:给你一棵树,然后有一个遍历顺序,你需要补全这个遍历顺序,然后输出这个遍历顺序中每个点的出现次数. 解题思路:本来想找树剖的题,结果发现了一题可以直接写lca的.... 做法1:非常简 ...
- 2015 多校联赛 ——HDU5363(快速幂)
Problem Description soda has a set S with n integers {1,2,…,n}. A set is called key set if the sum o ...
- list,tuple,dict,set的使用方法
list list是一种有序的集合,可以随时添加和删除其中的元素 classmates = ['Michael', 'Bob', 'Tracy'] len()函数可以获得list元素的个数.lis ...