
使用TensorFlow的卷积神经网络识别自己的单个手写数字,填坑总结
折腾了几天,爬了大大小小若干的坑,特记录如下。代码在最后面。
环境:
Python3.6.4 + TensorFlow 1.5.1 + Win7 64位 + I5 3570 CPU
方法:
先用MNIST手写数字库对CNN(卷积神经网络)进行训练,准确度达到98%以上时,再准备独家手写数字10个、画图软件编辑的数字10个共计20个,让训练好的CNN进行识别,考察其识别准确度。
调试代码:
坑1:ModuleNotFoundError: No module named 'google'
解决:pip install protobuf
不用翻墙
坑2:ModuleNotFoundError: No module named 'absl'
解决:pip install absl-py
坑3:tensorflow.python.framework.errors_impl.InvalidArgumentError: You must feed a value for placeholder tensor 'Placeholder_2' with dtype float
解决:这个问题折腾我好久,但是最终的解决方法很无语。。。
原来的代码是这样的:
output = sess.run(y_conv, feed_dict={x: ndarrayImgs}) # ndarrayImgs为自己的样本图片数据
查了不少资料,最后发现是自己少写了一个参数 /笑哭/笑哭, 写成这样就没问题了:
output = sess.run(y_conv, feed_dict={x: ndarrayImgs, keep_prob:1.0})
代码调通了之后,大坑来了:训练后的CNN识别自己的手写数字和用画图软件编辑出来的数字,正确率只有70%左右,惨不忍睹。
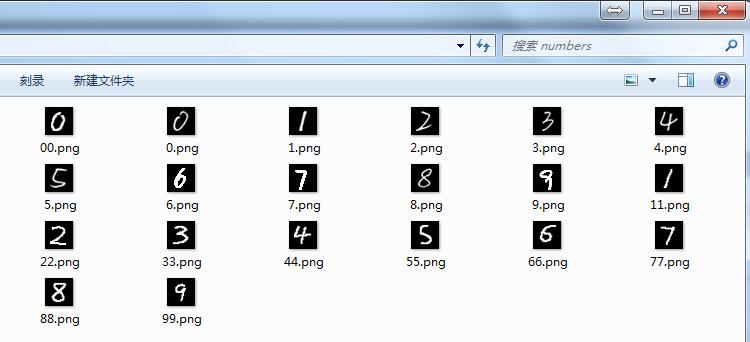
考虑到上面20个数字都是五官端正的,那么准确率低多半是其它原因。调试思路:
1)检查20个数字图片的格式:灰度图片,黑底白字,28x28像素。没问题。
2)用MNIST自带的测试数据进行测试,正确率95%左右。说明CNN训练的还算到位。
3)去网上搜索,终于在知乎里发现了一条回复:MNIST的数字都是20*20大小,图片大小28*28。把自己的图片伸缩到20*20大小,然后平移到28*28的中心就可以了。
纳尼??原来数字轮廓大小是20x20像素,这个细节我没注意到。开动PS,利用裁切和调整画布功能,对图片处理了一番。
附:MNIST数据库及其说明 http://yann.lecun.com/exdb/mnist/
再次测试,正确率在85-90%左右,有明显提升。
然而仔细分析发现,有几个数字的识别结果经常出错,分别是手写的6、7、9。将这几个数字的图片和样本库中的图片对比了一下,猜想可能是这几个图片中的数字的线条有些细,于是用PS又调整了一下,把线条变粗,结果识别正确率可以达到95-100%了(奇怪的是,数字1-5线条也细,为何能准确识别?)
调试过程记录完毕,放代码。使用时注意系统环境和相关软件版本,如开头所述。
这个代码在每次识别前都会先训练,在CPU上进行计算真是痛苦。。。以后打算将训练和预测分开,训练好的模型保存起来,预测的时候直接加载,这样能省不少时间。
代码没优化,有点凌乱,建议移步去看我的《使用TensorFlow的卷积神经网络识别手写数字》1、2、3系列。
 import matplotlib

 import matplotlib.pyplot as plt

 import matplotlib.cm as cm

 import pylab

 from tensorflow.examples.tutorials.mnist import input_data

 def showMnistImg(nBytes):

     imgBytes = nBytes.reshape((28, 28))

     print(imgBytes)

     plt.figure(figsize=(2.8,2.8))

     #plt.grid() #开启网格

     plt.imshow(imgBytes, cmap=cm.gray)

     pylab.show()

 def MaxMinNormalization(x,Max,Min):

     x = (x - Min) / (Max - Min);

     return x;

 def loadHandWritingImage(strFilePath):

     im=Image.open(strFilePath, 'r')

     ndarrayImg = np.array(im.convert("L"), dtype='float64')

     return ndarrayImg

 def normalizeImage(ndarrayImg, maxVal = 255, minVal = 0):

     w, h = ndarrayImg.shape[0], ndarrayImg.shape[1]

     for i in range(w):

       for j in range(h):

         ndarrayImg[i,j] = MaxMinNormalization(ndarrayImg[i,j], maxVal, minVal) #???

     return ndarrayImg

 mnist = input_data.read_data_sets('MNIST_data', one_hot=True)

 # 单个手写数字的784个字节的灰度值,浮点数,范围[0,1)

 print('type(mnist.train.images): ', type(mnist.train.images))  # <class 'numpy.ndarray'>

 print('mnist.train.images.shape: ', mnist.train.images.shape)

 ##print(mnist.train.images[0])

 ##showMnistImg(mnist.train.images[0])

 # 单个手写数字的标签

 # 一个one-hot向量除了某一位的数字是1以外其余各维度数字都是0

 # 数字n将表示成一个只有在第n维度(从0开始)数字为1的10维向量。

 #print('type(mnist.train.labels[0]): ', type(mnist.train.labels[0]))# <class 'numpy.ndarray'>

 #print(mnist.train.labels[19])      # [0. 0. 0. 0. 0. 0. 0. 1. 0. 0.]

 #构造自己的手写图片集合,作为test。  cnblogs.com/hatemath

 from PIL import *

 import numpy as np

 import tensorflow as tf

 # 构建测试样本集合

 files = ['0.png', '1.png', '2.png', '3.png', '4.png', '5.png', '6.png', '7.png', '8.png', '9.png',

          '00.png', '11.png', '22.png', '33.png', '44.png', '55.png', '66.png', '77.png', '88.png', '99.png']

 ndarrayImgs = np.zeros((len(files), 784)) # x行784列

 #print('type(ndarrayImgs): ', type(ndarrayImgs))

 #print('ndarrayImgs.shape: ', ndarrayImgs.shape)

 index = 0

 for file in files:

     # 加载图片

     ndarrayImg = loadHandWritingImage('numbers/' + file)

     #print('type(ndarrayImg): ', type(ndarrayImg))

     #print(ndarrayImg)

     # 归一化

     normalizeImage(ndarrayImg)

     # 转为1x784的数组

     ndarrayImg = ndarrayImg.reshape((1, 784))

     #print('type(ndarrayImg): ', type(ndarrayImg))

     #print('ndarrayImg.shape: ', ndarrayImg.shape)

     # 放到测试样本集中

     ndarrayImgs[index] = ndarrayImg

     index = index + 1

 # 构建测试样本的实际值集合,用于计算正确率

 ndarrayLabels = np.array([   [1., 0., 0., 0., 0., 0., 0., 0., 0., 0.],

                              [0., 1., 0., 0., 0., 0., 0., 0., 0., 0.],

                              [0., 0., 1., 0., 0., 0., 0., 0., 0., 0.],

                              [0., 0., 0., 1., 0., 0., 0., 0., 0., 0.],

                              [0., 0., 0., 0., 1., 0., 0., 0., 0., 0.],

                              [0., 0., 0., 0., 0., 1., 0., 0., 0., 0.],

                              [0., 0., 0., 0., 0., 0., 1., 0., 0., 0.],

                              [0., 0., 0., 0., 0., 0., 0., 1., 0., 0.],

                              [0., 0., 0., 0., 0., 0., 0., 0., 1., 0.],

                              [0., 0., 0., 0., 0., 0., 0., 0., 0., 1.],

                              [1., 0., 0., 0., 0., 0., 0., 0., 0., 0.],

                              [0., 1., 0., 0., 0., 0., 0., 0., 0., 0.],

                              [0., 0., 1., 0., 0., 0., 0., 0., 0., 0.],

                              [0., 0., 0., 1., 0., 0., 0., 0., 0., 0.],

                              [0., 0., 0., 0., 1., 0., 0., 0., 0., 0.],

                              [0., 0., 0., 0., 0., 1., 0., 0., 0., 0.],

                              [0., 0., 0., 0., 0., 0., 1., 0., 0., 0.],

                              [0., 0., 0., 0., 0., 0., 0., 1., 0., 0.],

                              [0., 0., 0., 0., 0., 0., 0., 0., 1., 0.],

                              [0., 0., 0., 0., 0., 0., 0., 0., 0., 1.]

                              ])

 print('type(ndarrayLabels): ', type(ndarrayLabels))

 #print(ndarrayImgs[3])

 ##showMnistImg(ndarrayImgs[3])

 #print(ndarrayLabels[3])

 # 下面开始CNN相关

 def conv2d(x, W):

   return tf.nn.conv2d(x, W, strides=[1, 1, 1, 1], padding='SAME')

 def max_pool_2x2(x):

   return tf.nn.max_pool(x, ksize=[1, 2, 2, 1],

                         strides=[1, 2, 2, 1], padding='SAME')

 def weight_variable(shape):

   initial = tf.truncated_normal(shape, stddev=0.1)

   return tf.Variable(initial)

 def bias_variable(shape):

   initial = tf.constant(0.1, shape=shape)

   return tf.Variable(initial)

 x = tf.placeholder(tf.float32, shape=[None, 784])

 y_ = tf.placeholder(tf.float32, shape=[None, 10])

 W_conv1 = weight_variable([5, 5, 1, 32])

 b_conv1 = bias_variable([32])

 x_image = tf.reshape(x, [-1, 28, 28, 1])

 h_conv1 = tf.nn.relu(conv2d(x_image, W_conv1) + b_conv1)

 h_pool1 = max_pool_2x2(h_conv1)

 W_conv2 = weight_variable([5, 5, 32, 64])

 b_conv2 = bias_variable([64])

 h_conv2 = tf.nn.relu(conv2d(h_pool1, W_conv2) + b_conv2)

 h_pool2 = max_pool_2x2(h_conv2)

 W_fc1 = weight_variable([7 * 7 * 64, 1024])

 b_fc1 = bias_variable([1024])

 h_pool2_flat = tf.reshape(h_pool2, [-1, 7*7*64])

 h_fc1 = tf.nn.relu(tf.matmul(h_pool2_flat, W_fc1) + b_fc1)

 keep_prob = tf.placeholder(tf.float32)

 h_fc1_drop = tf.nn.dropout(h_fc1, keep_prob)

 W_fc2 = weight_variable([1024, 10])

 b_fc2 = bias_variable([10])

 y_conv = tf.matmul(h_fc1_drop, W_fc2) + b_fc2

 #print(y_conv)

 cross_entropy = tf.reduce_mean(

     tf.nn.softmax_cross_entropy_with_logits_v2(labels=y_, logits=y_conv))

 train_step = tf.train.AdamOptimizer(1e-4).minimize(cross_entropy)

 correct_prediction = tf.equal(tf.argmax(y_conv, 1), tf.argmax(y_, 1))

 accuracy = tf.reduce_mean(tf.cast(correct_prediction, tf.float32))

 with tf.Session() as sess:

   sess.run(tf.global_variables_initializer())

   for i in range(1000):

     batch = mnist.train.next_batch(50)

     if i % 100 == 0:

       train_accuracy = accuracy.eval(feed_dict={

           x: batch[0], y_: batch[1], keep_prob: 1.0})

       print('step %d, training accuracy %g' % (i, train_accuracy))

       if(train_accuracy>0.98):

           break

     train_step.run(feed_dict={x: batch[0], y_: batch[1], keep_prob: 0.5})

   print('测试Mnist test数据集 准确率 %g' % accuracy.eval(feed_dict={

       x: mnist.test.images, y_: mnist.test.labels, keep_prob: 1.0}))

   # 测试耗时

   import time

   start = time.time()

   accu = accuracy.eval(feed_dict={x: ndarrayImgs, y_: ndarrayLabels, keep_prob: 1.0})

   end = time.time()

   print('识别zzh手写数据%d个, 准确率为 %g, 每个耗时%g秒' % (len(ndarrayImgs), accu, (end-start)/len(ndarrayImgs)))

   output = sess.run(y_conv, feed_dict={x: ndarrayImgs, keep_prob:1.0})

   print('预测值:', output.argmax(axis=1)) # axis:0表示按列,1表示按行

   print('实际值:', ndarrayLabels.argmax(axis=1))
贴2次运行结果,供参考:
Extracting MNIST_data\train-images-idx3-ubyte.gz

Extracting MNIST_data\train-labels-idx1-ubyte.gz

Extracting MNIST_data\t10k-images-idx3-ubyte.gz

Extracting MNIST_data\t10k-labels-idx1-ubyte.gz

type(mnist.train.images):  <class 'numpy.ndarray'>

mnist.train.images.shape:  (55000, 784)

type(ndarrayLabels):  <class 'numpy.ndarray'>

step 0, training accuracy 0.14

step 100, training accuracy 0.86

step 200, training accuracy 0.82

step 300, training accuracy 0.98

测试Mnist test数据集 准确率 0.9213

识别zzh手写数据20个, 准确率为 0.9, 每个耗时0.000750029秒

预测值: [0 1 2 3 4 5 6 1 8 9 0 1 2 3 4 5 6 2 8 9]

实际值: [0 1 2 3 4 5 6 7 8 9 0 1 2 3 4 5 6 7 8 9]

>>>
Extracting MNIST_data\train-images-idx3-ubyte.gz

Extracting MNIST_data\train-labels-idx1-ubyte.gz

Extracting MNIST_data\t10k-images-idx3-ubyte.gz

Extracting MNIST_data\t10k-labels-idx1-ubyte.gz

type(mnist.train.images):  <class 'numpy.ndarray'>

mnist.train.images.shape:  (55000, 784)

type(ndarrayLabels):  <class 'numpy.ndarray'>

step 0, training accuracy 0.14

step 100, training accuracy 0.84

step 200, training accuracy 0.92

step 300, training accuracy 0.88

step 400, training accuracy 0.96

step 500, training accuracy 0.98

测试Mnist test数据集 准确率 0.9445

识别zzh手写数据20个, 准确率为 1, 每个耗时0.000779998秒

预测值: [0 1 2 3 4 5 6 7 8 9 0 1 2 3 4 5 6 7 8 9]

实际值: [0 1 2 3 4 5 6 7 8 9 0 1 2 3 4 5 6 7 8 9]

>>>
总结:
1) CNN虽然是个神器,但是要想提高手写数字识别率,除了CNN的训练外,还要在手写图片上做足前戏,啊呸,做足预处理,要把手写图片按照MNIST规范进行调整,毕竟训练的样本就是按照那些规范来的。
2) 再次重申一下图片规范:灰度图片,黑底白字,数字的外围轮廓大小是20x20像素,图片总体的大小是28x28像素。自动化的预处理可以用opencv来做。
3) 用CPU做训练,非常慢。我的机器上,训练500次耗时1分钟,每次调试都这么等,太浪费时间了。考虑保存/加载模型的方案,或者搞一块N卡,用CUDA计算应该会快很多。
使用TensorFlow的卷积神经网络识别自己的单个手写数字,填坑总结的更多相关文章
- tensorflow学习之(十)使用卷积神经网络(CNN)分类手写数字0-9
#卷积神经网络cnn import tensorflow as tf from tensorflow.examples.tutorials.mnist import input_data #数据包,如 ...
- 吴裕雄 python 神经网络——TensorFlow 使用卷积神经网络训练和预测MNIST手写数据集
import tensorflow as tf import numpy as np from tensorflow.examples.tutorials.mnist import input_dat ...
- 使用TensorFlow的卷积神经网络识别手写数字(2)-训练篇
import numpy as np import tensorflow as tf import matplotlib import matplotlib.pyplot as plt import ...
- 利用神经网络算法的C#手写数字识别(一)
利用神经网络算法的C#手写数字识别 转发来自云加社区,用于学习机器学习与神经网络 欢迎大家前往云+社区,获取更多腾讯海量技术实践干货哦~ 下载Demo - 2.77 MB (原始地址):handwri ...
- 利用神经网络算法的C#手写数字识别(二)
利用神经网络算法的C#手写数字识别(二) 本篇主要内容: 让项目编译通过,并能打开图片进行识别. 1. 从上一篇<利用神经网络算法的C#手写数字识别>中的源码地址下载源码与资源, ...
- Tensorflow搭建卷积神经网络识别手写英语字母
更新记录: 2018年2月5日 初始文章版本 近几天需要进行英语手写体识别,查阅了很多资料,但是大多数资料都是针对MNIST数据集的,并且主要识别手写数字.为了满足实际的英文手写识别需求,需要从训练集 ...
- 利用神经网络算法的C#手写数字识别
欢迎大家前往云+社区,获取更多腾讯海量技术实践干货哦~ 下载Demo - 2.77 MB (原始地址):handwritten_character_recognition.zip 下载源码 - 70. ...
- 使用TensorFlow的卷积神经网络识别手写数字(3)-识别篇
from PIL import Image import numpy as np import tensorflow as tf import time bShowAccuracy = True # ...
- 使用TensorFlow的卷积神经网络识别手写数字(1)-预处理篇
功能: 将文件夹下的20*20像素黑白图片,根据重心位置绘制到28*28图片上,然后保存.经过预处理的图片有利于数字的准确识别.参见MNIST对图片的要求. 此处可下载已处理好的图片: https:/ ...
随机推荐
- 机器学习-GBDT和XGboost
参考: 陈天奇slides : https://homes.cs.washington.edu/~tqchen/pdf/BoostedTree.pdf Friedman GBDT 论文: htt ...
- <%@include file="a.jsp"%> jsp引用jsp文件时候注意
被包含的a.jsp文件: a.jsp文件的page指令要么不要写.要么与主jsp文件的page指令一样.
- linux服务器配置pyspark解决py4j报错等问题
1.下载spark,python包 略 2.环境变量配置 打开 ~/.bashrc配置文件 如图添加下列环境变量及path 3.退出配置文件,输入 source ~/.bashrc 来执行你添加的一些 ...
- 如何将top命令输出重定向为文件
命令: # top -b -n 2 -d 3 > /tmp/top.out 解析: -b: batch 模式,可以重定向到文件中 -n:一共取2次top数据 -d:每次top数据间隔为3秒
- BZOJ 2005: [Noi2010]能量采集 [莫比乌斯反演]
题意:\((0,0)\)到\((x,y),\ x \le n, y \le m\)连线上的整点数\(*2-1\)的和 \((0,0)\)到\((a,b)\)的整点数就是\(gcd(a,b)\) 因为. ...
- 《Web Scraping With Python》Chapter 1的学习笔记
urllib urllib是python library自带的库,可以直接用. urlopen from urllib.request import urlopen html = urlopen(&q ...
- ubuntu 双网卡建网桥脚本实现
#!/bin/bash interface1=`ls /sys/class/net|grep en|awk 'NR==1{print}'` interface2=`ls /sys/class/net| ...
- [bzoj3998][TJOI2015]弦论-后缀自动机
Brief Description 给定一个字符串, 您需要求出他的严格k小子串或非严格k小子串. Algorithm Design 考察使用后缀自动机. 首先原串建SAM, 然后如果考察每个状态代表 ...
- WEB页面的生命周期,DOMContentLoaded,load,beforeunload,unload
简言 理解WEB页面的生命周期,文档加载事件及顺序对WEB开发有十分的重要意义.如果不理解,在元素未加载就提前操作元素,则得不到想要的结果.而如果页面完全加载完成后,再进行操作,则又会影响用户体验. ...
- LaTeX 各种命令,符号
函数.符号及特殊字符 声调 语法 效果 语法 效果 语法 效果 \bar{x} \acute{\eta} \check{\alpha} \grave{\eta} \breve{a} \ddot{y} ...