
tensorflow 笔记13:了解机器翻译,google NMT,Attention
一、关于Attention,关于NMT
未完待续、、、
以google 的 nmt 代码引入 探讨下端到端:
项目地址:https://github.com/tensorflow/nmt
机器翻译算是深度学习在垂直领域应用最成功的之一了,深度学习在垂直领域的应用的确能解决很多之前繁琐的问题,但是缺乏范化能力不足,这也是各大公司一直解决的问题;
最近开源的模型:
lingvo:一种新的侧重于sequence2sequence的框架;
bert :一种基于深度双向Transform的语言模型预训练策略;
端到端的解决方案,依然是目前很多NLP任务中常用的模型框架;
二、tensorflow 中的attention:
tensorflow 中主要有两种Attention:
1、Bahdanau 的 Attention
2、Luong 的 Attention
两种的计算如下所示:
分别来自两篇NMT的论文也是nmt 最经典的两篇论文:(深扒的话还是看论文吧)
1、Bahdanau 的 Attention
NEURAL MACHINE TRANSLATION BY JOINTLY LEARNING TO ALIGN AND TRANSLATE
https://arxiv.org/pdf/1409.0473.pdf
2、Luong 的 Attention
Effective Approaches to Attention-based Neural Machine Translation
https://arxiv.org/pdf/1508.04025.pdf
以下是两篇论文中如何使用Attention:
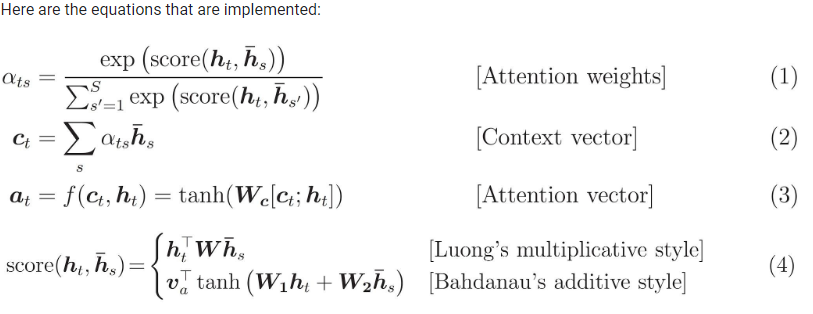
图:两个attention
两者的区别:
主要区别在于如何评估当前解码器输入和编码器输出之间的相似性。
tensorflow代码中封装好的,共有四个attention函数:
1、加入了得分偏置 bias 的 Bahdanau 的 attention
class BahdanauMonotonicAttention()
2、无得分偏置的Bahdanau 的 attention
class BahdanauAttention()
3、加入了得分偏置 bias 的Luong 的 attention
class LuongMonotonicAttention()
4、无得分偏置的Luong 的 attention
class LuongAttention()
贴一个直接封装好的代码encode 和 decoder 的代码:详细代码稍后续上
主要用到有以下几个函数:attention + beamsearch
tf.contrib.seq2seq.tile_batch
tf.contrib.seq2seq.LuongAttention
tf.contrib.seq2seq.BahdanauAttention
tf.contrib.seq2seq.AttentionWrapper
tf.contrib.seq2seq.TrainingHelper
代码片段:
def decoder(mode,encoder_outputs,encoder_state,X_len,word2id_tar,embeddings_Y,embedded_Y):

    k_initializer = tf.contrib.layers.xavier_initializer()

    with tf.variable_scope('decoder'):

        net_mode  = hp.dec_mode

        beam_width = hp.beam_size

        batch_size = hp.batch_size

        memory = encoder_outputs

        num_layers = hp.dec_num_layers

        if mode == 'infer':

            memory = tf.contrib.seq2seq.tile_batch(memory, beam_width)

            X_len = tf.contrib.seq2seq.tile_batch(X_len, beam_width)

            encoder_state = tf.contrib.seq2seq.tile_batch(encoder_state, beam_width)

            bs = batch_size * beam_width

        else:

            bs = batch_size

        attention = tf.contrib.seq2seq.LuongAttention(hp.dec_hidden_size, memory, X_len, scale=True) # multiplicative

        # attention = tf.contrib.seq2seq.BahdanauAttention(hidden_size, memory, X_len, normalize=True) # additive

        cell = multi_cells(num_layers * 2,mode,net_mode)

        cell = tf.contrib.seq2seq.AttentionWrapper(cell, attention, hp.dec_hidden_size, name='attention')

        decoder_initial_state = cell.zero_state(bs, tf.float32).clone(cell_state=encoder_state)

        with tf.variable_scope('projected'):

            output_layer = tf.layers.Dense(len(word2id_tar), use_bias=False, kernel_initializer=k_initializer)

        if mode == 'infer':

            start = tf.fill([batch_size], word2id_tar['<s>'])

            decoder = tf.contrib.seq2seq.BeamSearchDecoder(cell, embeddings_Y, start, word2id_tar['</s>'],

                                                           decoder_initial_state, beam_width, output_layer)

            outputs, final_context_state, _ = tf.contrib.seq2seq.dynamic_decode(decoder,

                                                                                output_time_major=True,

                                                                                maximum_iterations=1 * tf.reduce_max(X_len))

            sample_id = outputs.predicted_ids

            print ("sample_id shape")

            print (sample_id.get_shape())

            return "",sample_id

        else:

            helper = tf.contrib.seq2seq.TrainingHelper(embedded_Y, [hp.maxlen - 1 for b in range(batch_size)])

            decoder = tf.contrib.seq2seq.BasicDecoder(cell, helper, decoder_initial_state, output_layer)

            outputs, final_context_state, _ = tf.contrib.seq2seq.dynamic_decode(decoder,

                                                                                output_time_major=True)

            logits = outputs.rnn_output

            logits = tf.transpose(logits, (1, 0, 2))

            print(logits)

            return logits,""
贴一下 google nmt 的代码:google 里面写的也很详细了
主要三部分: attention,encoder,decoder,计算方式如上图,流程如以下代码所描述;
#两个 attention代码:依据的是: 上图:两个attention

class LuongAttentionAttention(tf.keras.Model):

  def __init__(self, units):

    super(LuongAttention, self).__init__()

    self.W = tf.keras.layers.Dense(units)

  def call(self, query, values):

    # hidden shape == (batch_size, hidden size)

    # hidden_with_time_axis shape == (batch_size, 1, hidden size)

    # we are doing this to perform addition to calculate the score

    hidden_with_time_axis = tf.expand_dims(query, 1)

    # score shape == (batch_size, max_length, hidden_size)

    #矩阵转置 转置前:[batch_size,max_length,hidden_size] 转置后:[batch_size,hidden_size,max_length]

    score = tf.transpose(values, perm=[0, 2, 1])*self.W(hidden_with_time_axis)))

    # attention_weights shape == (batch_size, max_length, 1)

    # we get 1 at the last axis because we are applying score to self.V

    attention_weights = tf.nn.softmax(score, axis=1)

    # context_vector shape after sum == (batch_size, hidden_size)

    context_vector = attention_weights * values

    context_vector = tf.reduce_sum(context_vector, axis=1)

    return context_vector, attention_weights

#BahdanauAttention:#计算 attention

class BahdanauAttention(tf.keras.Model):

  def __init__(self, units):

    super(BahdanauAttention, self).__init__()

    self.W1 = tf.keras.layers.Dense(units)

    self.W2 = tf.keras.layers.Dense(units)

    self.V = tf.keras.layers.Dense(1)

  def call(self, query, values):

    # hidden shape == (batch_size, hidden size)

    # hidden_with_time_axis shape == (batch_size, 1, hidden size)

    # we are doing this to perform addition to calculate the score

    hidden_with_time_axis = tf.expand_dims(query, 1)

    # score shape == (batch_size, max_length, hidden_size)

    score = self.V(tf.nn.tanh(

        self.W1(values) + self.W2(hidden_with_time_axis)))

    # attention_weights shape == (batch_size, max_length, 1)

    # we get 1 at the last axis because we are applying score to self.V

    attention_weights = tf.nn.softmax(score, axis=1)

    # context_vector shape after sum == (batch_size, hidden_size)

    context_vector = attention_weights * values

    context_vector = tf.reduce_sum(context_vector, axis=1)

    return context_vector, attention_weights

decoder 的部分代码

class Decoder(tf.keras.Model):

  def __init__(self, vocab_size, embedding_dim, dec_units, batch_sz):

    super(Decoder, self).__init__()

    self.batch_sz = batch_sz

    self.dec_units = dec_units

    self.embedding = tf.keras.layers.Embedding(vocab_size, embedding_dim)

    # 参数简说:

    self.gru = tf.keras.layers.GRU(self.dec_units,

                                   return_sequences=True,

                                   return_state=True,

                                   recurrent_initializer='glorot_uniform')

    self.fc = tf.keras.layers.Dense(vocab_size)

    # used for attention

    self.attention = BahdanauAttention(self.dec_units)

  def call(self, x, hidden, enc_output):

    # enc_output shape == (batch_size, max_length, hidden_size)

    #调用 attention 函数,传入,上个时刻的 hidden 和 encoder 的 outputs

    # context_vector 加权平均后的 Ci(论文中的),attention_weights 权重值

    context_vector, attention_weights = self.attention(hidden, enc_output)

    # x shape after passing through embedding == (batch_size, 1, embedding_dim)

    x = self.embedding(x)

    # x shape after concatenation == (batch_size, 1, embedding_dim + hidden_size)

    # context_vector 和 embedding 后的 X 进行结合

    x = tf.concat([tf.expand_dims(context_vector, 1), x], axis=-1)

    # passing the concatenated vector to the GRU

    # 此时的 output 应该 等于 state;

    output, state = self.gru(x)

    # output shape == (batch_size * 1, hidden_size)

    output = tf.reshape(output, (-1, output.shape[2]))

    # output shape == (batch_size, vocab)

    x = self.fc(output)

    # 输出 outputs 全连接之后的 x,隐藏层的state,attention 的score,x在训练的时候直接作为损失;

    return x, state, attention_weights

#训练的部分代码:

def train_step(inp, targ, enc_hidden):

  loss = 0

  with tf.GradientTape() as tape:

    # encoder 部分的代码,直接取的所有的输出和最后的隐藏层;

    enc_output, enc_hidden = encoder(inp, enc_hidden)

    dec_hidden = enc_hidden

    dec_input = tf.expand_dims([targ_lang.word_index['<start>']] * BATCH_SIZE, 1)

    # Teacher forcing - feeding the target as the next input

    #按照句子的长度一个一个的进行输入;

    for t in range(1, targ.shape[1]):

      # passing enc_output to the decoder

      # 获得decoder 每一时刻的输出 和隐藏层的输出;

      predictions, dec_hidden, _ = decoder(dec_input, dec_hidden, enc_output)

      loss += loss_function(targ[:, t], predictions)

      # using teacher forcing

      dec_input = tf.expand_dims(targ[:, t], 1)

  batch_loss = (loss / int(targ.shape[1]))

  variables = encoder.trainable_variables + decoder.trainable_variables

  gradients = tape.gradient(loss, variables)

  optimizer.apply_gradients(zip(gradients, variables))

  return batch_loss
tensorflow 笔记13:了解机器翻译,google NMT,Attention的更多相关文章
- 神经机器翻译(NMT)相关资料整理
作者:zhbzz2007 出处:http://www.cnblogs.com/zhbzz2007 欢迎转载,也请保留这段声明.谢谢! 1 简介 自2013年提出了神经机器翻译系统之后,神经机器翻译系统 ...
- google nmt 实验踩坑记录
最近因为要做一个title压缩的任务,所以调研了一些text summary的方法. text summary 一般分为抽取式和生成式两种.前者一般是从原始的文本中抽取出重要的word o ...
- tensorflow笔记(三)之 tensorboard的使用
tensorflow笔记(三)之 tensorboard的使用 版权声明:本文为博主原创文章,转载请指明转载地址 http://www.cnblogs.com/fydeblog/p/7429344.h ...
- tensorflow笔记:多层LSTM代码分析
tensorflow笔记:多层LSTM代码分析 标签(空格分隔): tensorflow笔记 tensorflow笔记系列: (一) tensorflow笔记:流程,概念和简单代码注释 (二) ten ...
- tensorflow笔记:使用tf来实现word2vec
(一) tensorflow笔记:流程,概念和简单代码注释 (二) tensorflow笔记:多层CNN代码分析 (三) tensorflow笔记:多层LSTM代码分析 (四) tensorflow笔 ...
- tensorflow笔记:流程,概念和简单代码注释
tensorflow是google在2015年开源的深度学习框架,可以很方便的检验算法效果.这两天看了看官方的tutorial,极客学院的文档,以及综合tensorflow的源码,把自己的心得整理了一 ...
- 20180929 北京大学 人工智能实践:Tensorflow笔记01
北京大学 人工智能实践:Tensorflow笔记 https://www.bilibili.com/video/av22530538/?p=13 (完)
- 机器学习实战 - 读书笔记(13) - 利用PCA来简化数据
前言 最近在看Peter Harrington写的"机器学习实战",这是我的学习心得,这次是第13章 - 利用PCA来简化数据. 这里介绍,机器学习中的降维技术,可简化样品数据. ...
- Ext.Net学习笔记13:Ext.Net GridPanel Sorter用法
Ext.Net学习笔记13:Ext.Net GridPanel Sorter用法 这篇笔记将介绍如何使用Ext.Net GridPanel 中使用Sorter. 默认情况下,Ext.Net GridP ...
随机推荐
- Android视图动画集合AndoridViewAnimations
Android视图动画集合AndoridViewAnimations Android视图动画是针对视图对象的动画效果,包括对象平移.旋转.缩放和渐变四种类型.通过组合这四种类型,可以创建出无数种动画效 ...
- 表单提交和ajax提交数据的请求区别
在http请求中,我们通常会看到请求字段以query string parameters,或form data,或request payload形式发送到服务器,究竟他们有什么区别呢?下面为您揭晓答案 ...
- [C程序设计基础]快速排序
//从大到小排序 ///三个参数 a要排序的 数组, l扫左边的 r扫右边 void quickSort(int a[],int l, int r){ /// 左边要小于 右边才有意义 if (l & ...
- Navicat破解
Navicat是一款我们经常使用的可视化sql工具,可偏偏它呢又收费,本着浪费可耻的理念,只有去网上找各种破解方法,却发现很多方法对于Navicat 12都不支持(本人使用的Navicat 12).最 ...
- Java并发编程(十四)-- 线程池实现原理
在上一章我们从宏观上介绍了ThreadPoolExecutor,本文将深入解析一下线程池的具体实现原理 原理解析 线程池状态 在ThreadPoolExecutor中定义了一个volatile变量,另 ...
- go 单元测试时读取配置文件
在go项目中读取配置文件时,如果使用的是相对路径,在执行run test时也会在test文件所在的目录下去读取配置文件,如果文件没在此目录下会报错:“open env1.json: The syste ...
- 潭州课堂25班:Ph201805201 django 项目 第十一课 手机号是否存在,短信验证分析 (课堂笔记)
判断手机号是否注册功能实现 1.分析 请求方法:GET url定义:/mobiles/(?P<mobile>1[3-9]\d{9})/ 请求参数:url路径参数 参数 类型 前端是否必须传 ...
- BZOJ2255 : [Swerc2010]Palindromic DNA
考虑2-SAT建图,设$a[i][0..1]$表示$i$变不变,$b[i][0..1]$表示$i$是下降还是上升. 首先相邻的不能同时动,说明$a[i]$和$a[i+1]$里最多选一个. 对于$x$和 ...
- ftp修改上传后目录、文件权限问题 aix
问题:在AIX操作系统中,用root用户ftp文件到AIX上后,文件的默认权限是rw-r-----,Oracle用户无法读取.有没有办法指定上传文件的权限呢? 环境: AIX 6.1 解决方法: 1. ...
- UltralEdit 替换回车换行符
打开 Ue 工具,写下内容,如下图: 然后按 Ctrl + r,输入 ^p,点击按钮 “全部替换”, 如下图: