
Linux 下安装nginx的总结 (之前写的有问题))
1. 下载niginx的 tar包
下载路径
http://nginx.org/en/download.html
也可以直接使用命令下载
wget http://nginx.org/download/nginx-1.15.1.tar.gz
2. 下载目录下解压缩
tar -zxvf nginx-1.15.1.tar.gz
3. cd 到目录里面进行处理
./configure
4. 安装时会报错 主要有:
./configure: error: the HTTP rewrite module requires the PCRE library.

You can either disable the module by using --without-http_rewrite_module

option, or install the PCRE library into the system, or build the PCRE library

statically from the source with nginx by using --with-pcre=<path> option.

需要pcre

./configure: error: the HTTP gzip module requires the zlib library.

You can either disable the module by using --without-http_gzip_module

option, or install the zlib library into the system, or build the zlib library

statically from the source with nginx by using --with-zlib=<path> option.

需要zlib
一般linux里面安装了 prce和 zlib 但是没有安装devel 包 需要进行安装
yum install -y prce-devel

yum install -y zlib-devel
5. 再次执行 ./confiure命令成功
反馈安装信息
Configuration summary

  + using system PCRE library

  + OpenSSL library is not used

  + using system zlib library

  nginx path prefix: "/usr/local/nginx"

  nginx binary file: "/usr/local/nginx/sbin/nginx"

  nginx modules path: "/usr/local/nginx/modules"

  nginx configuration prefix: "/usr/local/nginx/conf"

  nginx configuration file: "/usr/local/nginx/conf/nginx.conf"

  nginx pid file: "/usr/local/nginx/logs/nginx.pid"

  nginx error log file: "/usr/local/nginx/logs/error.log"

  nginx http access log file: "/usr/local/nginx/logs/access.log"

  nginx http client request body temporary files: "client_body_temp"

  nginx http proxy temporary files: "proxy_temp"

  nginx http fastcgi temporary files: "fastcgi_temp"

  nginx http uwsgi temporary files: "uwsgi_temp"

  nginx http scgi temporary files: "scgi_temp"
6. 执行 make 和 make install 进行安装
make and make install
9. 创建软连接
ln /usr/local/nginx/sbin/nginx /usr/local/bin/nginx
10. 直接启动
nginx
遇到报错如图示时
nginx: [emerg] bind() to 0.0.0.0: failed (: Address already in use)

nginx: [emerg] bind() to 0.0.0.0: failed (: Address already in use)

nginx: [emerg] bind() to 0.0.0.0: failed (: Address already in use)

nginx: [emerg] bind() to 0.0.0.0: failed (: Address already in use)

nginx: [emerg] bind() to 0.0.0.0: failed (: Address already in use)

nginx: [emerg] still could not bind()
11. 修改配置文件
查看配置文件位置

nginx -t
结果为
nginx: the configuration file /usr/local/nginx/conf/nginx.conf syntax is ok
nginx: configuration file /usr/local/nginx/conf/nginx.conf test is successful
修改配置文件
vim /usr/local/nginx/conf/nginx.conf
将端口绑定修改一下
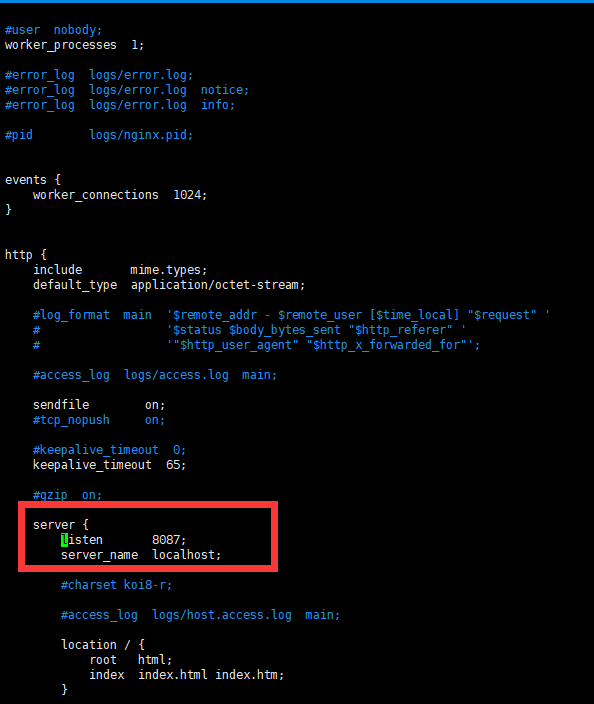
再次启动即可
Linux 下安装nginx的总结 (之前写的有问题))的更多相关文章
- 【云服务器部署】---Linux下安装nginx
[云服务器部署]---Linux下安装nginx 之前两篇,分别讲了:Linux下安装MySQL 和 springboot项目部署云服务器 nginx安装也是挺简单的.具体步骤如下: 第一步,下载 ...
- linux下安装nginx及初步认识
linux下安装配置nginx nginx:是一个高性能的反向代理服务器正向代理代理的是客户端,反向代理代理的是服务端. 这里以nginx-1.12.2版本为例子 1.首先去官网下载nginx-1.1 ...
- linux 下 安装nginx及压力测试
linux 编译安装nginx,配置自启动脚本 下载nginx: wget http://nginx.org/download/nginx-1.8.0.tar.gz下载openssl : wget h ...
- linux 下安装 nginx
安装nginx版本为1.7.5 一.下载nginx 官方地址:http://www.nginx.org/ 下载地址:http://nginx.org/download/ Nginx官网提供了三个类型的 ...
- Linux下安装Nginx并配置一个图片服务器
首先安装nginx安装环境 nginx是C语言开发,建议在linux上运行,本教程使用Centos6.5作为安装环境. gcc 安装nginx需要先将官网下载的源码进行编译,编译依赖gcc环境,如果没 ...
- linux下安装nginx和配置
1.系统:centos6.8 2.安装准备: 安装nginx前,我们首先要确保系统安装了g++.gcc.openssl-devel.pcre-devel和zlib-devel软件,可通过如图所示命令进 ...
- linux下安装nginx+php+mysql环境 详细教程
话不多说上代码 linux环境:centos 7.0 64位 nginx:nginx-1.8.0.tar.gz php: php-7.1.1.tar.gz mysql: mysql-5.6.21.ta ...
- Linux下安装Nginx并实现socket代理
nginx可以使用各平台的默认包来安装,本文是介绍使用源码编译安装,包括具体的编译参数信息. 正式开始前,编译环境gcc g++ 开发库之类的需要提前装好,这里默认你已经装好. ububtu平台编译环 ...
- Linux下安装Nginx服务器
安装Nginx之前,首先要安装好编译环境gcc和g++,然后以CentOS为例安装Nginx,安装Nginx需要PRCE库.zlib库和ssl的支持,除了ssl外其他的我们都是去官网下载: Nginx ...
随机推荐
- Grunt-Kmc基于KISSY项目打包
Grunt-Kmc基于KISSY项目打包 1. Grunt-Kmc 是基于nodejs开发的,所以未安装nodeJS,先需要安装nodejs.安装步骤如下: 1. 下载安装文件,下载地址 ...
- JAVA 框架hibernate (三)(数据库更新丢失)
一.场景: 我们在并发操作数据库同一个字段,比如:name:tom age:22这条数据.有2个同时进行操作.A操作该数据的name改成admin,B操作这条数据的age改成:35.然后A先把数据更 ...
- JavaScript函数注意点
1.return 请注意,函数体内部的语句在执行时,一旦执行到return时,函数就执行完毕,并将结果返回.因此,函数内部通过条件判断和循环可以实现非常复杂的逻辑. 如果没有return语句,函数执行 ...
- 1-51单片机ESP8266学习-AT指令(开发板介绍)
51单片机+ESP8266开发教程(AT指令篇) 开发板资源分布: 开发板部分原理图: 1--通信下载 2--51单片机 3--ESP8266(WIFI模块) 4--DHT11(温湿度传感器) 5-- ...
- LIN、CAN、FlexRay、MOST,三分钟搞明白四大汽车总线
LIN.CAN.FlexRay.MOST,三分钟搞明白四大汽车总线 2016-09-21 13:09 汽车中的电子部件越来越多,光是ECU就有几十个,这么多的电子单元都要进行信息交互.传统的点对点通信 ...
- IC设计推荐书籍
IC设计推荐书籍 听语音 | 浏览:779 | 更新:2014-07-19 10:52 1 2 3 4 5 6 7 分步阅读 接触IC设计这一行已经有7年的时间了,前面4年是大学本科,用来学习知识,现 ...
- 解决Ubuntu14.04安装Chrome浏览器打不开的问题
1.安装Chrome浏览器 wget http://www.linuxidc.com/files/repo/google-chrome.list -P /etc/apt/sources.list.d/ ...
- 20155202张旭 Exp7 网络欺诈技术防范
20155202张旭 Exp7 网络欺诈技术防范 基础问题回答 通常在什么场景下容易受到DNS spoof攻击? 在同一局域网下比较容易受到DNS spoof攻击,攻击者可以冒充域名服务器,来发送伪造 ...
- 20155317王新玮《网络对抗技术》实验9 web安全基础实践
20155317王新玮<网络对抗技术>实验9 web安全基础实践 一.实验准备 1.0 实验目标和内容 Web前端HTML.能正常安装.启停Apache.理解HTML,理解表单,理解GET ...
- python sorted三个例子
# 例1. 按照元素出现的次数来排序 seq = [2,4,3,1,2,2,3] # 按次数排序 seq2 = sorted(seq, key=lambda x:seq.count(x)) print ...