管理KVM虚拟机(二)
管理KVM虚拟机
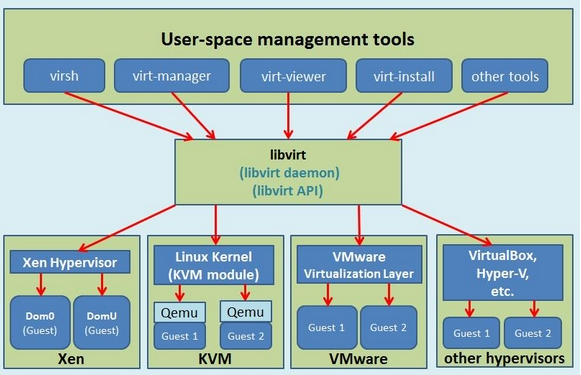
工具:libvirt
介绍:Libvirt 库是一种实现 Linux 虚拟化功能的 Linux® API,它支持各种虚拟机监控程序,包括 Xen 和 KVM,以及 QEMU 和用于其他操作系统的一些虚拟产品。
工作原理如下图
配置文件
KVM创建的虚拟机配置文件路径: /etc/libvirt/qemu,它是xml后缀文件,如之前我们创建的 CentOS-7-X86_64,它的配置文件是CentOS-7-X86_64.xml
备注:这个文件不能使用vi、vim命令进行修改,可以通过命令virsh edit CentOS-7-X86_64修改。

配置文件样例说明:
 <domain type='kvm'>

   <name>CentOS--X86_64</name>  名称

   <uuid>ae53ced4-573c-4de0-9bd9-0852451b8573</uuid>  唯一

   <memory unit='KiB'></memory>   内存

   <currentMemory unit='KiB'></currentMemory>   当前内存

   <vcpu placement='static'></vcpu>   CPU

   <os>

     <type arch='x86_64' machine='pc-i440fx-rhel7.0.0'>hvm</type>  hvm表示硬件虚拟机

     <boot dev='hd'/>  启动硬盘

   </os>

   <features>

     <acpi/>

     <apic/>

   </features>

   <cpu mode='custom' match='exact'>

     <model fallback='allow'>Broadwell-noTSX</model>

   </cpu>

   <clock offset='utc'>

     <timer name='rtc' tickpolicy='catchup'/>

     <timer name='pit' tickpolicy='delay'/>

     <timer name='hpet' present='no'/>

   </clock>

   <on_poweroff>destroy</on_poweroff>

   <on_reboot>restart</on_reboot>

   <on_crash>restart</on_crash>

   <pm>

     <suspend-to-mem enabled='no'/>

     <suspend-to-disk enabled='no'/>

   </pm>

   <devices>

     <emulator>/usr/libexec/qemu-kvm</emulator>

     <disk type='file' device='disk'>  硬盘

       <driver name='qemu' type='raw'/>

       <source file='/opt/CentOS-7-x86_64.raw'/>

       <target dev='vda' bus='virtio'/>

       <address type='pci' domain='0x0000' bus='0x00' slot='0x06' function='0x0'/>

     </disk>

     <disk type='file' device='cdrom'>

       <driver name='qemu' type='raw'/>

       <target dev='hda' bus='ide'/>

       <readonly/>

       <address type='drive' controller='' bus='' target='' unit=''/>

     </disk>

     <controller type='usb' index='' model='ich9-ehci1'>

       <address type='pci' domain='0x0000' bus='0x00' slot='0x05' function='0x7'/>

     </controller>

     <controller type='usb' index='' model='ich9-uhci1'>

       <master startport=''/>

       <address type='pci' domain='0x0000' bus='0x00' slot='0x05' function='0x0' multifunction='on'/>

     </controller>

     <controller type='usb' index='' model='ich9-uhci2'>

       <master startport=''/>

       <address type='pci' domain='0x0000' bus='0x00' slot='0x05' function='0x1'/>

     </controller>

     <controller type='usb' index='' model='ich9-uhci3'>

       <master startport=''/>

       <address type='pci' domain='0x0000' bus='0x00' slot='0x05' function='0x2'/>

     </controller>

     <controller type='pci' index='' model='pci-root'/>

     <controller type='ide' index=''>

       <address type='pci' domain='0x0000' bus='0x00' slot='0x01' function='0x1'/>

     </controller>

     <controller type='virtio-serial' index=''>

       <address type='pci' domain='0x0000' bus='0x00' slot='0x04' function='0x0'/>

     </controller>

     <interface type='network'>  网络

       <mac address='52:54:00:d0:dd:c9'/>

       <source network='default'/>

       <model type='virtio'/>

       <address type='pci' domain='0x0000' bus='0x00' slot='0x03' function='0x0'/>

     </interface>

     <serial type='pty'>

       <target port=''/>

     </serial>

     <console type='pty'>

       <target type='serial' port=''/>

     </console>

     <channel type='unix'>

       <target type='virtio' name='org.qemu.guest_agent.0'/>

       <address type='virtio-serial' controller='' bus='' port=''/>

     </channel>

     <input type='tablet' bus='usb'>

       <address type='usb' bus='' port=''/>

     </input>

     <input type='mouse' bus='ps2'/>

     <input type='keyboard' bus='ps2'/>

     <graphics type='vnc' port='-1' autoport='yes' listen='0.0.0.0'>

       <listen type='address' address='0.0.0.0'/>

     </graphics>

     <video>

       <model type='cirrus' vram='' heads='' primary='yes'/>

       <address type='pci' domain='0x0000' bus='0x00' slot='0x02' function='0x0'/>

     </video>

     <memballoon model='virtio'>

       <address type='pci' domain='0x0000' bus='0x00' slot='0x07' function='0x0'/>

     </memballoon>

   </devices>

 </domain>
xml配置
重要命令
- 帮助命令
virsh --help
- dumpxml导出命令,将虚拟机配置文件导出做备份
virsh dumpxml CentOS-7-X86_64 > backup.xml
- 恢复备份,如果虚拟机通过undefine命令误删除,但是xml还存在,可以通过这个命令恢复
virsh define backup.xml
- 创建快照
virsh snapshot-create CentOS-7-X86_64
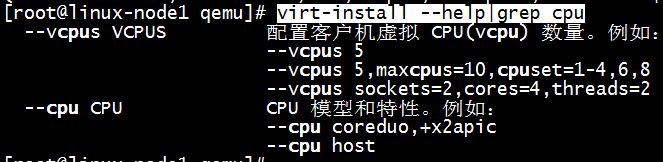
CPU动态扩容
centos 7上,kvm支持CPU动态扩容
1、在创建时需要设置maxcpus,如下图
2、对于已创建的虚拟机,修改它的xml文,例
virsh edit CentOS-7-X86_64
将 <vcpu placement='static'>1</vcpu>
修改成 <vcpu placement='auto' current='1'>4</vcpu>
表示动态VCPU,当前CPU为1,最大CPU为4
重启
virsh shutdown CentOS-7-X86_64

virsh start CentOS-7-X86_64
将虚拟机CPU改成2
virsh setvcpus CentOS-7-X86_64 2 --live
查看CPU个数,cat /proc/cpuinfo
查看CPU状态是否工作,cat /sys/devices/system/cpu/cpu1/online
内存动态扩容
修改内存为512
virsh qemu-monitor-command CentOS-7-X86_64 --hmp --cmd balloon 512
备注:内存最大值为创建时设置的值
查看虚拟机内存
virsh qemu-monitor-command CentOS-7-X86_64 --hmp --cmd info balloon
KVM磁盘
硬盘格式总体上分为两种:1为全镜像格式,2为稀疏格式
- 全镜像格式(典型代表raw格式),其特点:设置多大就是多大,写入速度快,方便的转换为其他格式,性能最优,但是占用空间大,不支持快照
- 稀疏模式(典型代表qcow2格式),其特点:支持压缩,快照,镜像,更小的存储空间(即用多少占多少)
查看文件格式
qemu-img info CentOS-7-x86_64.raw
raw转化成qcow2
qemu-img convert -f raw -0 qcow2 /opt/CentOS-7-x86_64.raw /opt/test.qcow2
KVM网络
1、查看网络
brctl show
2、创建桥接网络
brctl addbr br0

brctl addbrif br0 eth0

ip addr del eth0 192.168.137.11/24

ifconfig br0 192.168.137.11/24 up

route add default gw 192.168.137.2
virsh edit CentOS-7-X86_64
    <interface type='network'>

      <mac address='52:54:00:d0:dd:c9'/>

      <source network='default'/>

      <model type='virtio'/>

      <address type='pci' domain='0x0000' bus='0x00' slot='0x03' function='0x0'/>

    </interface>
改成
    <interface type='bridge'>

      <mac address='52:54:00:d0:dd:c9'/>

      <source bridge='br0'/>

      <model type='virtio'/>

      <address type='pci' domain='0x0000' bus='0x00' slot='0x03' function='0x0'/>

    </interface>
重启
virsh shutdown CentOS-7-X86_64

virsh start CentOS-7-X86_64
KVM优化
三方面:CPU、内存、IO
1、CPU优化
taskset --help 帮助命令
taskset -cp 0 pid

指定6573进程使用CPU0,减少cache miss
2、内存优化
- 开启大页内存
- 内存合并 cat /sys/kernel/mm/transparent_hugepage/enabled
3、IO优化
查看IO调度算法 cat /sys/block/sda/queue/scheduler,CentOS 7调度算法三种:noop、deadline、cfq
- noop 什么都不做,适用于SSD硬盘
- deadline “最后期限”算法
- cfq 完全公平队列

管理KVM虚拟机(二)的更多相关文章
- Linux 中使用 virsh 管理 KVM 虚拟机 (转)
术语 虚拟化指的是:在相同的物理(硬件)系统上,同时运行多个操作系统,且这几个系统相互隔离的可能性,而那个硬件在虚拟化架构中被称作宿主机(host).虚拟机监视器(也被称为虚拟机管理程序(hyperv ...
- 使用Wok管理kvm虚拟机
[Centos7.4] !!!测试环境我们首关闭防火墙和selinux [root@localhost ~]# systemctl stop firewalld [root@localhost ~]# ...
- 使用 libvirt创建和管理KVM虚拟机
1. libvirt介绍 Libvirt是一个软件集合,便于使用者管理虚拟机和其他虚拟化功能,比如存储和网络接口管理等等.Libvirt概括起来包括一个API库.一个 daemon(libv ...
- 使用cockpit管理kvm虚拟机
在Centos8.2主机上部署kvm,使用cockpit管理 首先检测cpu是否支持虚拟化 [root@localhost ~]# cat /proc/cpuinfo | grep vmx flags ...
- 通过python-libvirt管理KVM虚拟机 代码实现
初步代码 <span style="font-size:18px;">''''' Work with virtual machines managed by libvi ...
- 安装libvirt管理套件(C/S架构模式,用户管理kvm虚拟机)
# 1:安装程序包 yum install -y libvirt virt-manager virt-viewer virt-install qemu-kvm # 2:启动libvirtd守护进程 ...
- 通过python-libvirt管理KVM虚拟机 源码
版本:0.9.13 libvirt库可真是大,先看看该版本里面都有哪些类和方法,验证过的方法我会用O开头,|开头的标示还没亲自验证过. <span style="font-size:1 ...
- Kvm04 kvm虚拟机热迁移,可视化管理
目录 1.kvm虚拟机热迁移 1). 冷迁移 修改配置文件,将定义的格式raw,改成qcow2格式! 修改完成,重启服务 2).热迁移 2.Virt-manager管理Kvm虚拟机 1.kvm虚拟机热 ...
- kvm虚拟机管理(3)
一.远程管理kvm虚拟机 (1)上一节我们通过 virt-manager 在本地主机上创建并管理 KVM 虚机.其实 virt-manager 也可以管理其他宿主机上的虚机.只需要简单的将宿主机添加进 ...
随机推荐
- R绘图 第四篇:绘制箱图(ggplot2)
箱线图通过绘制观测数据的五数总括,即最小值.下四分位数.中位数.上四分位数以及最大值,描述了变量值的分布情况.箱线图能够显示出离群点(outlier),离群点也叫做异常值,通过箱线图能够很容易识别出数 ...
- jqGrid 列内容超过一定长度省略表示
jqgrid初始化方法中的,对应列添加formatter方法 colNames : [ "描述" ], colModel : [ { name : 'description', i ...
- JavaScript快速入门-DOM对象
一.概述 1.什么是 DOM? DOM 是 W3C(万维网联盟)的标准.DOM 定义了访问 HTML 和 XML 文档的标准: "W3C 文档对象模型(DOM)是中立于平台和语言的接口,它允 ...
- mysql学习(3)10045错误,连接不上数据库
mysql8.0默认加密的方式是caching_sha2_password认证方式,当使用navicat 或者程序连接是连接不上, 好吧,那我们修改配置并重启服务可以解决此问题 找到mysql的配置文 ...
- Redis学习笔记之入门基础知识——其他特性
1.订阅(subscribe)与发布(publish) 用户订阅某一个频道,频道发布新的信息时,会将信息告知用户 2.数据安全 1) 快照持久化(时间点转储,实质是数据副本) 操作:SAVA. ...
- 第二阶段Sprint10
昨天:查看有关“共享平台”的资料,看如何实现上传下载功能,并尝试编码,没有成功 今天:集合三个人的代码,整合到一起,修复出现的Bug 遇到的问题:看Bug没有出现,但功能不是停止运行就是部分不能用,只 ...
- 带状态论文粗读(三)[引用openstate的相关论文阅读]
一 文章名称:FLOWGUARD: Building Robust Firewalls for Software-Defined Networks 发表时间:2014 期刊来源:--- 解决问题: 一 ...
- 以webService为客户端获取List泛型结果集
首先搭建好webService,添加XFire1.2Core Libraries 和XFire1.2HTTP Client Libraries,连接上数据库,下例以oracle为数据库. 连接Oral ...
- [知乎]关于WindowsXPx64SP2系统的说明
自己简单安装了下发现 winxpsp3x86的系统版本为: 然后windowsXPx64sp2的版本为: 作者:qpi667链接:https://www.zhihu.com/question/29 ...
- 消息队列1:RabbitMQ解析并基于Springboot实战
RabbitMQ简介 AMQP:Advanced Message Queue,高级消息队列协议.它是应用层协议的一个开放标准,为面向消息的中间件设计,基于此协议的客户端与消息中间件可传递消息,并不受产 ...