
2.0CNN
介绍
https://www.youtube.com/watch?v=jajksuQW4mc
https://www.youtube.com/watch?v=2-Ol7ZB0MmU
https://www.youtube.com/watch?v=H3ciJF2eCJI
卷积神经网络---图片识别,视频分析、语音识别
参考谷歌youtube上提供的CNN视频演示
数据组织形式
计算机识别的不是颜色本身,而是由颜色组成的矩阵
如果是黑色的话,矩阵的维度为2维
如果是彩色的话,矩阵的维度是3维度,还有一个RGB通道来表示颜色

卷积神经网络结构
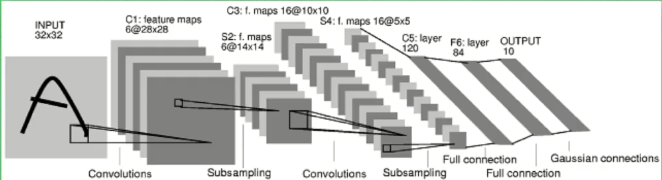

卷积的图示理解
用一个XYK的长方体矩阵去依次经过原始数据的每一块,这就是简单的卷积操作,也是一种对矩阵的操作
另:stride 表示一次跨几步


不断压缩长和宽,而增加厚度

跨度太长的话会丢掉一些信息
所以将跨度设置的小一些,通过pooling变成和上述跨度一样大的形状
一种maxpooling 一种averagepooling

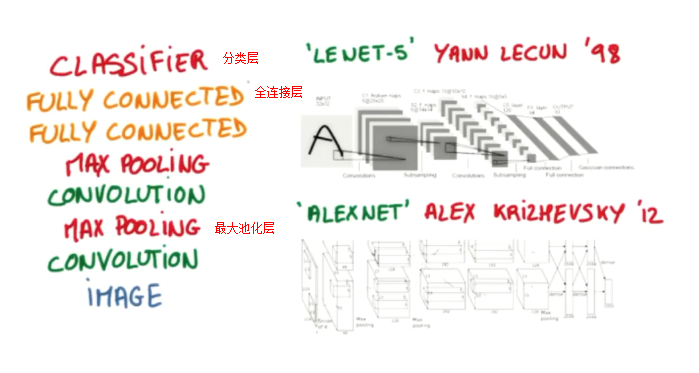
如何设计卷积神经网络?
给一张图片image
全连接层就类比于普通神经网络的隐层或隐藏层
CNN代码实战MNIST手写体识别数据集
python2和3均可执行
"""

Please note, this code is only for python 3+. If you are using python 2+, please modify the code accordingly.

"""

from __future__ import print_function

import tensorflow as tf

from tensorflow.examples.tutorials.mnist import input_data

# number 1 to 10 data

mnist = input_data.read_data_sets('MNIST_data', one_hot=True)

def compute_accuracy(v_xs, v_ys):

    global prediction

    y_pre = sess.run(prediction, feed_dict={xs: v_xs, keep_prob: 1})

    correct_prediction = tf.equal(tf.argmax(y_pre,1), tf.argmax(v_ys,1))

    accuracy = tf.reduce_mean(tf.cast(correct_prediction, tf.float32))

    result = sess.run(accuracy, feed_dict={xs: v_xs, ys: v_ys, keep_prob: 1})

    return result

def weight_variable(shape):

    initial = tf.truncated_normal(shape, stddev=0.1)

    return tf.Variable(initial)

def bias_variable(shape):

    initial = tf.constant(0.1, shape=shape)

    return tf.Variable(initial)

def conv2d(x, W):

    # stride [1, x_movement, y_movement, 1]

    # Must have strides[0] = strides[3] = 1

    return tf.nn.conv2d(x, W, strides=[1, 1, 1, 1], padding='SAME')

def max_pool_2x2(x):

    # stride [1, x_movement, y_movement, 1]

    return tf.nn.max_pool(x, ksize=[1,2,2,1], strides=[1,2,2,1], padding='SAME')

# define placeholder for inputs to network

xs = tf.placeholder(tf.float32, [None, 784])/255.   # 28x28

ys = tf.placeholder(tf.float32, [None, 10])

keep_prob = tf.placeholder(tf.float32)

x_image = tf.reshape(xs, [-1, 28, 28, 1])

# print(x_image.shape)  # [n_samples, 28,28,1]

## conv1 layer ##

W_conv1 = weight_variable([5,5, 1,32]) # patch 5x5, in size 1, out size 32

b_conv1 = bias_variable([32])

h_conv1 = tf.nn.relu(conv2d(x_image, W_conv1) + b_conv1) # output size 28x28x32

h_pool1 = max_pool_2x2(h_conv1)                         # output size 14x14x32

## conv2 layer ##

W_conv2 = weight_variable([5,5, 32, 64]) # patch 5x5, in size 32, out size 64

b_conv2 = bias_variable([64])

h_conv2 = tf.nn.relu(conv2d(h_pool1, W_conv2) + b_conv2) # output size 14x14x64

h_pool2 = max_pool_2x2(h_conv2)                          # output size 7x7x64

## fc1 layer ##

W_fc1 = weight_variable([7*7*64, 1024])

b_fc1 = bias_variable([1024])

# [n_samples, 7, 7, 64] ->> [n_samples, 7*7*64]

h_pool2_flat = tf.reshape(h_pool2, [-1, 7*7*64])

h_fc1 = tf.nn.relu(tf.matmul(h_pool2_flat, W_fc1) + b_fc1)

h_fc1_drop = tf.nn.dropout(h_fc1, keep_prob)

## fc2 layer ##

W_fc2 = weight_variable([1024, 10])

b_fc2 = bias_variable([10])

prediction = tf.nn.softmax(tf.matmul(h_fc1_drop, W_fc2) + b_fc2)

# the error between prediction and real data

cross_entropy = tf.reduce_mean(-tf.reduce_sum(ys * tf.log(prediction),

                                              reduction_indices=[1]))       # loss

train_step = tf.train.AdamOptimizer(1e-4).minimize(cross_entropy)

sess = tf.Session()

# important step

# tf.initialize_all_variables() no long valid from

# 2017-03-02 if using tensorflow >= 0.12

if int((tf.__version__).split('.')[1]) < 12 and int((tf.__version__).split('.')[0]) < 1:

    init = tf.initialize_all_variables()

else:

    init = tf.global_variables_initializer()

sess.run(init)

for i in range(1000):

    batch_xs, batch_ys = mnist.train.next_batch(100)

    sess.run(train_step, feed_dict={xs: batch_xs, ys: batch_ys, keep_prob: 0.5})

    if i % 50 == 0:

        print(compute_accuracy(mnist.test.images, mnist.test.labels))
结果显示:经过100步已经可以达到75%了,效果也很明显

2.0CNN的更多相关文章
随机推荐
- 5 -- Hibernate的基本用法 --4 4 数据库方言
Hibernate底层依然使用SQL语句来执行数据库操作,虽然所有关系数据库都支持使用标准SQL语句,但所有数据库都对标准SQL进行了一些扩展,所以在语法细节上存在一些差异.因此,Hibernate需 ...
- Ubuntu 14.04服务器安装及软件配置
1.安装操作系统,配置root账号,通过sudo设置root的密码 如果使用ubuntu server 14.04,开启root需额外配置 1.开启root远程登录权限 sudo vi /etc/ss ...
- HDOJ 4276 The Ghost Blows Light(树形DP)
Problem Description My name is Hu Bayi, robing an ancient tomb in Tibet. The tomb consists of N room ...
- swift开发之--代理协议的使用
swift代理的使用,和oc版本有区别,区别还是蛮大的,不过和oc一样都是用于反向传值: 实现如下: 1,声明两个类 2,实现流程,viewcontroller页面点击按钮进入firstVC页面,然后 ...
- iOS开发-- 如何让 UITableView 的 headerView跟随 cell一起滚动
在我们利用 UITableView 展示我们的内容的时候,我需要在顶部放一个不同于一般的cell的 界面,这个界面比较独特. 1. 所以我就把它 作为一个section的 headerView. 也就 ...
- Nginx 默认虚拟主机
一台服务器可以配置多个网站,每个网站都称为一个虚拟主机,默认的虚拟主机可以通过 default_server 来指定:: [root@localhost ~]$ cat /usr/local/ngin ...
- Kafka版本升级 ( 0.10.0 -> 0.10.2 )
升级Kafka集群的版本其实很简单,核心步骤只需要4步,但是我们需要在升级的过程中确保每一步操作都不会“打扰”到producer和consumer的正常运转.为此,笔者在本机搭了一个测试环境进行实际的 ...
- gitlab 使用现有 nginx 服务器
gitlab 安装自带 nginx,如果想利用原有 nginx,可按如下操作: 8.0 版本 socket 文件位置有变动,感谢评论区的同学. nginx 增加虚拟主机配置 # gitlab sock ...
- Java中遍历字符串toCharArray()和charAt()效率比较
public static void test() { String s = "a"; for(int i = 0; i < 100000; i++) { s += &quo ...
- Qt5 教程
序 Qt 前言 Hello, world! 信号槽 自定义信号槽 Qt 模块简介 MainWindow 简介 添加动作 资源文件 对象模型 布局管理器 菜单栏.工具栏和状态栏 对话框简介 对话框数据传 ...