
android studio 布局
1) 可见(visible)
XML文件:Android:visibility="visible"
Java代码:view.setVisibility(View.VISIBLE);
2) 不可见(invisible)
XML文件:android:visibility="invisible"
Java代码:view.setVisibility(View.INVISIBLE);
3) 隐藏(GONE)
XML文件:android:visibility="gone"
Java代码:view.setVisibility(View.GONE);
invisible 和gone 主要区别是:
当控件visibility属性为invisible时,界面保留了view控件所占有的空间;
而控件属性为gone时,界面则不保留view控件所占有的空间。
1.linerLayout 线性布局
注意事项
android:orientation="vertical"垂直线性布局,"horizontal"水平线性布局
android:gravity="top"(buttom、left、right、center_vertical、fill_vertical、center_horizontal、fill_horizontal、center、fill、clip_vertical、clip_horizontal)控制布局中控件的对齐方式。如果是没有子控件的控件设置此属性,表示其内容的对齐方式,比如说TextView里面文字的对齐方式;若是有子控件的控件设置此属性,则表示其子控件的对齐方式,gravity如果需要设置多个属性值,需要使用“|”进行组合
android:gravity 与 android:layout_gravity的区别
android:gravity 用于指定文字在控件中的对齐方式。
android:layout_gravity是指定空间在布局中的对齐方式。
android:layout_weight="1"通过设置控件的layout_weight属性以控制各个控件在布局中的相对大小,线性布局会根据该控件layout_weight值与其所处布局中所有控件layout_weight值之和的比值为该控件分配占用的区域。在水平布局的LinearLayout中有两个Button,这两个Button的layout_weight属性值都为1,那么这两个按钮都会被拉伸到整个屏幕宽度的一半。如果layout_weight指为0,控件会按原大小显示,不会被拉伸;对于其余layout_weight属性值大于0的控件,系统将会减去layout_weight属性值为0的控件的宽度或者高度,再用剩余的宽度或高度按相应的比例来分配每一个控件显示的宽度或高度。
<LinearLayout xmlns:android="http://schemas.android.com/apk/res/android"

    xmlns:tools="http://schemas.android.com/tools"

    android:layout_width="match_parent"

    android:layout_height="match_parent"

    android:orientation="vertical">

    <Button

        android:layout_width="159dp"

        android:layout_height="wrap_content"

        android:text="New Button 1"

        android:gravity="center_horizontal|center_vertical"

        android:background="#aa0000"

        android:id="@+id/button" />

    <Button

        android:layout_width="262dp"

        android:layout_height="wrap_content"

        android:text="New Button 2"

        android:background="#00aa00"

        android:gravity="center_horizontal"

        android:id="@+id/button2" />

    <Button

        android:layout_width="214dp"

        android:layout_height="wrap_content"

        android:text="New Button 3"

        android:background="#0000aa"

        android:gravity="center|bottom"

        android:id="@+id/button3" />

    <Button

        android:layout_width="333dp"

        android:layout_height="wrap_content"

        android:text="New Button 4"

        android:background="#aaaa00"

        android:gravity="bottom"

        android:id="@+id/button4" />

    <Button

        android:layout_width="175dp"

        android:layout_height="wrap_content"

        android:text="New Button 5"

        android:id="@+id/button5" />

</LinearLayout>
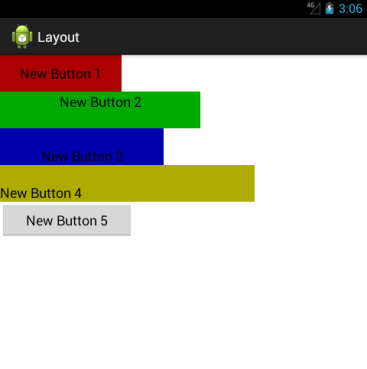
布局方式改成
android:orientation="horizontal" 效果图
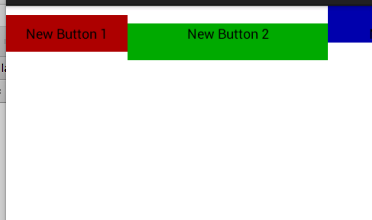
需要等分的时候可以使用layout_weight="1" 实现原理,就是吧线性布局下所有的layout_weight值相加,得到一个总值,这个属性允许我们使用比例的方式来控制大小,但是做好设置layout_width=0

2.RelativeLayout 相对布局
<RelativeLayout xmlns:android="http://schemas.android.com/apk/res/android"

    xmlns:tools="http://schemas.android.com/tools"

    android:layout_width="match_parent"

    android:layout_height="match_parent"

    tools:context=".MainActivity">

    <Button

        android:layout_alignParentLeft="true"

        android:layout_alignParentTop="true"

        android:layout_width="wrap_content"

        android:layout_height="wrap_content"

        android:text="New Button 1"

        android:background="#aa0000"

        android:id="@+id/button"/>

    <Button

        android:layout_alignParentRight="true"

        android:layout_alignParentTop="true"

        android:layout_height="wrap_content"

        android:layout_width="wrap_content"

        android:text="New Button 2"

        android:background="#00aa00"

        android:id="@+id/button2" />

    <Button

        android:layout_centerInParent="true"

        android:layout_width="wrap_content"

        android:layout_height="wrap_content"

        android:text="New Button 3"

        android:background="#0000aa"

        android:id="@+id/button3" />

    <Button

        android:layout_alignParentLeft="true"

        android:layout_alignParentBottom="true"

        android:layout_width="wrap_content"

        android:layout_height="wrap_content"

        android:text="New Button 4"

        android:background="#ff81aaa1"

        android:id="@+id/button4" />

    <Button

        android:layout_alignParentRight="true"

        android:layout_alignParentBottom="true"

        android:layout_width="wrap_content"

        android:layout_height="wrap_content"

        android:text="New Button 5"

        android:background="#ff9faa5d"

        android:id="@+id/button5" />

</RelativeLayout>
运行效果
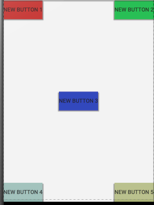
如果更改button1的xml代码,运行结果
 <Button

        android:layout_above="@id/button3"

        android:layout_toLeftOf="@id/button3"

        android:layout_width="wrap_content"

        android:layout_height="wrap_content"

        android:text="New Button 1"

        android:background="#aa0000"

        android:id="@+id/button"/>
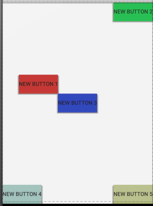
下面是常用的一些属性
RelativeLayout用到的一些重要的属性:
第一类:属性值为true或false
android:layout_centerHrizontal 水平居中
android:layout_centerVertical 垂直居中
android:layout_centerInparent 相对于父元素完全居中
android:layout_alignParentBottom 贴紧父元素的下边缘
android:layout_alignParentLeft 贴紧父元素的左边缘
android:layout_alignParentRight 贴紧父元素的右边缘
android:layout_alignParentTop 贴紧父元素的上边缘
android:layout_alignWithParentIfMissing 如果对应的兄弟元素找不到的话就以父元素做参照物
第二类:属性值必须为id的引用名“@id/id-name”
android:layout_below 在某元素的下方
android:layout_above 在某元素的的上方
android:layout_toLeftOf 在某元素的左边
android:layout_toRightOf 在某元素的右边
android:layout_alignTop 本元素的上边缘和某元素的的上边缘对齐
android:layout_alignLeft 本元素的左边缘和某元素的的左边缘对齐
android:layout_alignBottom 本元素的下边缘和某元素的的下边缘对齐
android:layout_alignRight 本元素的右边缘和某元素的的右边缘对齐
第三类:属性值为具体的像素值,如30dip,40px
android:layout_marginBottom 离某元素底边缘的距离
android:layout_marginLeft 离某元素左边缘的距离
android:layout_marginRight 离某元素右边缘的距离
android:layout_marginTop 离某元素上边缘的距离
EditText的android:hint
设置EditText为空时输入框内的提示信息。
android:gravity
android:gravity属性是对该view 内容的限定.比如一个button 上面的text. 你可以设置该text 在view的靠左,靠右等位置.以button为例,android:gravity="right"则button上面的文字靠右
android:layout_gravity
android:layout_gravity是用来设置该view相对与起父view 的位置.比如一个button 在linearlayout里,你想把该button放在靠左、靠右等位置就可以通过该属性设置.以button为例,android:layout_gravity="right"则button靠右
android:layout_alignParentRight
使当前控件的右端和父控件的右端对齐。这里属性值只能为true或false,默认false。
android:scaleType:
android:scaleType是控制图片如何resized/moved来匹对ImageView的size。ImageView.ScaleType / android:scaleType值的意义区别:
CENTER /center 按图片的原来size居中显示,当图片长/宽超过View的长/宽,则截取图片的居中部分显示
CENTER_CROP / centerCrop 按比例扩大图片的size居中显示,使得图片长(宽)等于或大于View的长(宽)
CENTER_INSIDE / centerInside 将图片的内容完整居中显示,通过按比例缩小或原来的size使得图片长/宽等于或小于View的长/宽
FIT_CENTER / fitCenter 把图片按比例扩大/缩小到View的宽度,居中显示
FIT_END / fitEnd 把图片按比例扩大/缩小到View的宽度,显示在View的下部分位置
FIT_START / fitStart 把图片按比例扩大/缩小到View的宽度,显示在View的上部分位置
FIT_XY / fitXY 把图片不按比例扩大/缩小到View的大小显示
MATRIX / matrix 用矩阵来绘制,动态缩小放大图片来显示。
** 要注意一点,Drawable文件夹里面的图片命名是不能大写的。
3.FrameLayout
<FrameLayout xmlns:android="http://schemas.android.com/apk/res/android"

    xmlns:tools="http://schemas.android.com/tools"

    android:layout_width="match_parent"

    android:layout_height="match_parent"

    tools:context=".MainActivity">

    <Button

        android:layout_width="wrap_content"

        android:layout_height="wrap_content"

        android:text="New Button 1"

        android:background="#aa0000"

        android:id="@+id/button"/>

    <ImageView

        android:layout_width="wrap_content"

        android:layout_height="wrap_content"

        android:src="@drawable/ic_launcher"/>

</FrameLayout>
运行效果
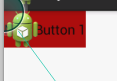
因为
ImageView比Button后添加,所以ImageView在Button的上方,这个布局用的不多

4.TableLayout
<TableLayout xmlns:android="http://schemas.android.com/apk/res/android"

    xmlns:tools="http://schemas.android.com/tools"

    android:layout_width="match_parent"

    android:layout_height="match_parent"

    tools:context=".MainActivity">

    <TableRow>

        <TextView

            android:layout_height="wrap_content"

            android:text="account:"

            />

        <EditText

            android:id="@+id/editText"

            android:layout_height="wrap_content"

            android:hint="032453676"

            />

    </TableRow>

    <TableRow>

        <TextView

            android:layout_height="wrap_content"

            android:text="password:"

            />

        <EditText

            android:id="@+id/passswrod"

            android:layout_height="wrap_content"

            android:inputType="textPassword"

            android:hint="密码"/>

    </TableRow>

    <TableRow>

        <Button

            android:id="@+id/login"

            android:layout_height="wrap_content"

            android:layout_span="2"

            android:text="login

            "

            />

    </TableRow>

</TableLayout>
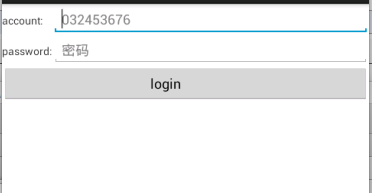
运行效果

因为TableLayout没有提供rowwidth所以可以通过android:stretchColumns="1"拉伸第二列的长度,运行效果
android studio 布局的更多相关文章
- android studio布局文件/XML怎么代码补全
android studio中的布局文件代码补全方式是打第一个字母就提示了,而java代码有时候要按快捷键. 布局文件的话呢,要写在标签开始处才提示,在标签闭合处有时候不提示,有时候在内容里也会有不提 ...
- Android Studio布局等XML文件怎么改都恢复原状的问题
编译时,XML布局文件报错,点击链接进去改,怎么改,一编译就恢复原状,这是什么原因,问题出在点击错误链接进的是中间生成XML文件,这个文件改动是没用的,需要改动原始layout文件才会生效.
- android学习——Android Studio下创建menu布局文件
一.问题: android studio项目中没有看到menu文件夹: 在android studio项目中想要添加menu布局文件,一开始我的做法是:直接在res文件夹右键选择xml文件来添加,如下 ...
- Android studio教程:[2]项目整体布局
上篇介绍了如何创建项目,这一次将介绍创建完的项目如何呈现在开发者的眼前,介绍android studio开发环境的整体布局,让大家知道各个模块的位置和功能. 工具/原料 Android studio ...
- Android Studio 实时显示布局文件Preview窗口
Android Studio的功能包含preview窗口, 可以查看布局(layout)的样式; 位置:app->src->main->res(资源)->layout(布局), ...
- 【Android Studio安装部署系列】二十八、Android Studio查看其它APP的布局结构
概述 日常使用别家的APP过程中,会遇到一些比较好看的布局,这时候我们就想学习一下别人的布局结构,以便参考. (1)手机连接电脑.设置手机为USB调试模式 参考<[Android Studio安 ...
- Android Studio 2.2新增布局——ConstraintLayout完全解析
,但是Button并没有紧贴到布局的最右侧,这是为什么呢?实际上,Android Studio给控件的每个方向上的约束都默认添加了一个16dp的间距,从Inspector上面也可以明显地看出来这些间距 ...
- Android Studio xml文件中的布局预览视图
操作系统:Windows 10 x64 IDE:Android Studio 3.3.1 更新了Android Studio之后,xml文件中的布局预览视图变得如此简洁! 原因是没有勾选Show La ...
- Android Studio下创建menu布局文件
一.问题: android studio项目中没有看到menu文件夹: 在android studio项目中想要添加menu布局文件,一开始我的做法是:直接在res文件夹右键选择xml文件来添加,如下 ...
随机推荐
- vue的首页渲染了两次的原因以及解决方法
现在在用vue做一些单页面应用的东西,遇到了些许问题啊,比如我再渲染首页的时候,会渲染两次,查看了一下原因,原来是在写路由的时候写的格式错了: 这样的时候,初始的时候就是加载的exam_list页面, ...
- 《Lua程序设计》第6章 深入函数 学习笔记
在Lua中,函数是一种“第一类值(First-Class Value)”,它们具有特定的词法域(Lexical Scoping).“词法域”:函数可以潜逃在另一个函数中,内部的函数可以访问外部函数中的 ...
- windows内核情景分析之—— KeRaiseIrql函数与KeLowerIrql()函数
windows内核情景分析之—— KeRaiseIrql函数与KeLowerIrql()函数 1.KeRaiseIrql函数 这个 KeRaiseIrql() 只是简单地调用 hal 模块的 KfRa ...
- Matlab 三维绘图与统计绘图
一. 三维绘图 p = : pi/: *pi; x = cos(p); y = sin(p); z = p; plot3(x,y,z) x = -:.:; %有-2为起点,2为递增步长,2为终止点 y ...
- OpenCV——轮廓面积及长度计算
计算轮廓面积: double contourArea(InputArray contour, bool oriented=false ) InputArray contour:输入的点,一般是图像的轮 ...
- 【MD5加密】MD5加密编码的坑
MD5 MD5即Message-Digest Algorithm (信息-摘要算法5),用于确保信息传输完整一致. 是计算机广泛使用的杂凑算法之一(又译摘要算法.哈希算法),主流编程语言普遍已有MD5 ...
- JS方法 - 字符串处理函数封装汇总 (更新中...)
一.计算一段字符串的字节长度 字符串的charCodeAt()方法, 可返回字符串固定位置的字符的Unicode编码,这个返回值是0-65535之间的整数,如果值<=255时为英文,反之为中文. ...
- vue经验 - 细节小知识点汇总(更新中...)
1. $refs 数据这么绑定的: 然后在created中抛出来,猜猜看看打印的是两个什么? 结果如下: 第一个跑出来了,第二个,却undefiend,没有东西?!... 后来去官网查看$refs的解 ...
- Android 验证APK是否已经签名或是否是Debug签名
https://source.android.google.cn/ http://www.android-doc.com/tools/publishing/app-signing.html Signi ...
- 从零开始学习Hadoop--第4章 序列化(转载)
作者对序列化的描述浅显易懂!(https://www.douban.com/note/313096752/) 1. 序列化从头说 在面向对象程序设计中,类是个很重要的概念.所谓“类”,可以将它想像成建 ...