OAuth2.0系列之授权码模式实践教程(二)
@
OAuth2.0系列博客:
- OAuth2.0系列之基本概念和运作流程(一)
- OAuth2.0系列之授权码模式实践教程(二)
- OAuth2.0系列之简化模式实践教程(三)
- OAuth2.0系列之密码模式实践教程(四)
- OAuth2.0系列之客户端模式实践教程(五)
- OAuth2.0系列之集成JWT实现单点登录
1、授权码模式简介
1.1 前言简介
在上一篇文章中我们学习了OAuth2的一些基本概念,对OAuth2有了基本的认识,接着学习OAuth2.0授权模式中的授权码模式
ps:OAuth2.0的授权模式可以分为:
- 授权码模式(authorization code)
- 简化模式(implicit)
- 密码模式(resource owner password credentials)
- 客户端模式(client credentials)
授权码(authorization code)方式,指的是第三方应用先申请一个授权码,然后再用该码获取令牌。授权码模式功能最完整、使用最广泛、流程最严密的授权模式
1.2 授权流程图
官网图片:
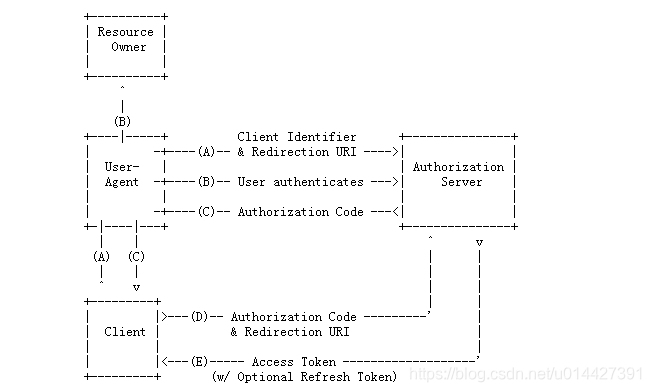
- (A):客户端携带client_id、redirect_uri,中间通过代理者访问授权服务器,如果已经登录过会直接返回redirect_uri,没有登录过就跳转到登录页面
- (B)授权服务器对客户端进行身份验证(通过用户代理,让用户输入用户名和密码)
- (C)授权通过,会重定向到redirect_uri并携带授权码code作为uri参数
- (D)客户端携带授权码访问授权服务器
- (E)验证授权码通过,返回acceptToken
从调接口方面,简单来说:
第一步:获取code:
eg:oauthServer+"/oauth/authorize?client_id="+clientId+"&response_type=code&redirect_uri="+redirectUrl+"&scope=all"
如果没有登录,则会跳转到统一身份认证登录页面。如果用户登录了,调用接口后,会重定向到redirect_uri,授权码会作为它的参数第二步:获取access_token
eg:oauthServer+"/oauth/token?code="+code+"&grant_type=authorization_code&client_secret="+clientSecret+"&redirect_uri="+redirectUri+"&client_id="+clientId
{

    "access_token": "eyJhbGciOiJIUzI1NiIsInR5cCI6IkpXVCJ9.eyJleHAiOjE1ODk1MzQ5NzMsInVzZXJfbmFtZSI6Im5pY2t5IiwiYXV0aG9yaXRpZXMiOlsiUk9MRV9hZG1pbiJdLCJqdGkiOiJmMjM0M2Q0NC1hODViLTQyOGYtOWE1ZS1iNTE4NTAwNTM5ODgiLCJjbGllbnRfaWQiOiJvYSIsInNjb3BlIjpbImFsbCJdfQ.LWkN2gC2dBrGTn5uSPzfdW6yRj7jhlX87EE8scY02hI",

    "token_type": "bearer",

    "expires_in": 59,

    "scope": "all",

    "user_name": "nicky",

    "jti": "f2343d44-a85b-428f-9a5e-b51850053988"

}
- 第三步:访问系统资源,此时统一认证服务会根据该认证客户端权限信息判断,决定是否返回信息。
访问:http://localhost:8084/api/userinfo?access_token=${accept_token}
2、例子实践
2.1 实验环境准备
- IntelliJ IDEA
- Maven3.+版本
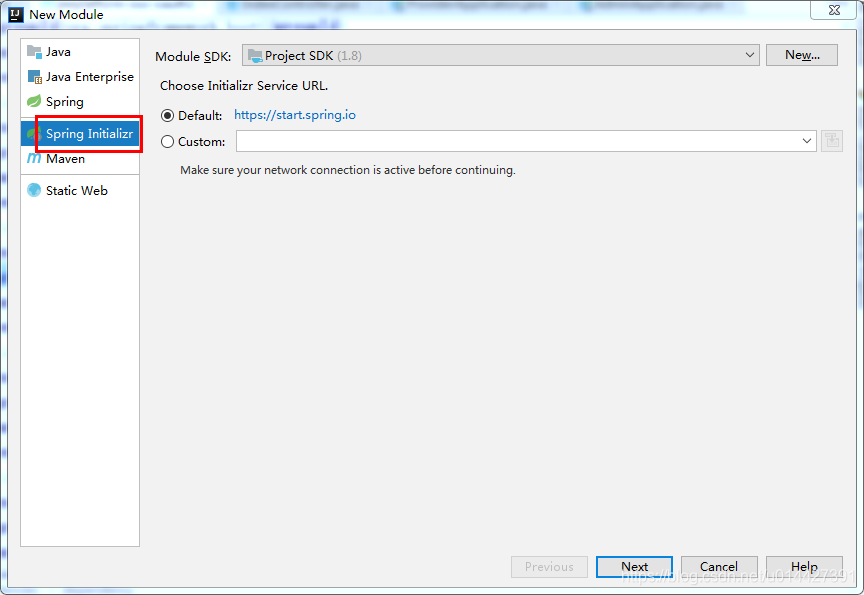
新建SpringBoot Initializer项目,可以命名authorization_code

主要是想引入:
 <dependency>

            <groupId>org.springframework.boot</groupId>

            <artifactId>spring-boot-starter-web</artifactId>

        </dependency>

 <!-- Spring Cloud Oauth2-->

        <dependency>

            <groupId>org.springframework.cloud</groupId>

            <artifactId>spring-cloud-starter-oauth2</artifactId>

        </dependency>

        <!-- Spring Cloud Security-->

        <dependency>

            <groupId>org.springframework.cloud</groupId>

            <artifactId>spring-cloud-starter-security</artifactId>

        </dependency>
2.2 OAuth2.0角色
前面的学习,我们知道了OAuth2.0主要包括如下角色,下面通过代码例子加深对理论的理解
- 资源所有者(Resource Owner)
- 用户代理(User Agent)
- 客户端(Client)
- 授权服务器(Authorization Server)
- 资源服务器(Resource Server)
生产环境、资源服务器和授权服务器一般是分开的,不过学习的可以放在一起
定义资源服务器,用注解@EnableResourceServer;
定义授权服务器,用注解@EnableAuthorizationServer;
2.3 OAuth2.0配置类
package com.example.springboot.authorizationcode.config;

import org.springframework.beans.factory.annotation.Autowired;

import org.springframework.context.annotation.Bean;

import org.springframework.context.annotation.Configuration;

import org.springframework.security.authentication.AuthenticationManager;import org.springframework.security.oauth2.config.annotation.configurers.ClientDetailsServiceConfigurer;

import org.springframework.security.oauth2.config.annotation.web.configuration.AuthorizationServerConfigurerAdapter;

import org.springframework.security.oauth2.config.annotation.web.configuration.EnableAuthorizationServer;

import org.springframework.security.oauth2.config.annotation.web.configurers.AuthorizationServerEndpointsConfigurer;

import org.springframework.security.oauth2.config.annotation.web.configurers.AuthorizationServerSecurityConfigurer;

import org.springframework.security.oauth2.provider.token.TokenStore;

import org.springframework.security.oauth2.provider.token.store.InMemoryTokenStore;

/**

 * <pre>

 *     OAuth2.0配置类

 * </pre>

 *

 * <pre>

 * @author mazq

 * 修改记录

 *    修改后版本:     修改人:  修改日期: 2020/06/11 11:00  修改内容:

 * </pre>

 */

@Configuration

//开启授权服务

@EnableAuthorizationServer

public class OAuth2Config extends AuthorizationServerConfigurerAdapter {

    @Autowired

    private AuthenticationManager authenticationManager;

    private static final String CLIENT_ID = "cms";

    private static final String SECRET_CHAR_SEQUENCE = "{noop}secret";

    private static final String SCOPE_READ = "read";

    private static final String SCOPE_WRITE = "write";

    private static final String TRUST = "trust";

    private static final String USER ="user";

    private static final String ALL = "all";

    private static final int ACCESS_TOKEN_VALIDITY_SECONDS = 2*60;

    private static final int FREFRESH_TOKEN_VALIDITY_SECONDS = 2*60;

    // 密码模式授权模式

    private static final String GRANT_TYPE_PASSWORD = "password";

    //授权码模式

    private static final String AUTHORIZATION_CODE = "authorization_code";

    //refresh token模式

    private static final String REFRESH_TOKEN = "refresh_token";

    //简化授权模式

    private static final String IMPLICIT = "implicit";

    //指定哪些资源是需要授权验证的

    private static final String RESOURCE_ID = "resource_id";

    @Override

    public void configure(ClientDetailsServiceConfigurer clients) throws Exception {

        clients

                // 使用内存存储

                .inMemory()

                //标记客户端id

                .withClient(CLIENT_ID)

                //客户端安全码

                .secret(SECRET_CHAR_SEQUENCE)

                //为true 直接自动授权成功返回code

                .autoApprove(true)

                .redirectUris("http://127.0.0.1:8084/cms/login") //重定向uri

                //允许授权范围

                .scopes(ALL)

                //token 时间秒

                .accessTokenValiditySeconds(ACCESS_TOKEN_VALIDITY_SECONDS)

                //刷新token 时间 秒

                .refreshTokenValiditySeconds(FREFRESH_TOKEN_VALIDITY_SECONDS)

                //允许授权类型

                .authorizedGrantTypes(AUTHORIZATION_CODE );

    }

    @Override

    public void configure(AuthorizationServerEndpointsConfigurer endpoints) throws Exception {

        // 使用内存保存生成的token

        endpoints.authenticationManager(authenticationManager).tokenStore(memoryTokenStore());

    }

    /**

     * 认证服务器的安全配置

     *

     * @param security

     * @throws Exception

     */

    @Override

    public void configure(AuthorizationServerSecurityConfigurer security) throws Exception {

        security

                //.realm(RESOURCE_ID)

                // 开启/oauth/token_key验证端口认证权限访问

                .tokenKeyAccess("isAuthenticated()")

                //  开启/oauth/check_token验证端口认证权限访问

                .checkTokenAccess("isAuthenticated()")

                //允许表单认证

                .allowFormAuthenticationForClients();

    }

    @Bean

    public TokenStore memoryTokenStore() {

        // 最基本的InMemoryTokenStore生成token

        return new InMemoryTokenStore();

    }

}
2.4 Security配置类
为了测试,可以进行简单的SpringSecurity
package com.example.springboot.authorizationcode.config;

import org.springframework.context.annotation.Bean;

import org.springframework.context.annotation.Configuration;

import org.springframework.core.annotation.Order;

import org.springframework.security.authentication.AuthenticationManager;

import org.springframework.security.config.annotation.authentication.builders.AuthenticationManagerBuilder;

import org.springframework.security.config.annotation.web.builders.HttpSecurity;

import org.springframework.security.config.annotation.web.builders.WebSecurity;

import org.springframework.security.config.annotation.web.configuration.EnableWebSecurity;

import org.springframework.security.config.annotation.web.configuration.WebSecurityConfigurerAdapter;

/**

 * <pre>

 *  SpringSecurity配置类

 * </pre>

 *

 * <pre>

 * @author mazq

 * 修改记录

 *    修改后版本:     修改人:  修改日期: 2020/06/11 11:23  修改内容:

 * </pre>

 */

@Configuration

@EnableWebSecurity

@Order(1)

public class SecurityConfig extends WebSecurityConfigurerAdapter {

    @Bean

    @Override

    public AuthenticationManager authenticationManagerBean() throws Exception {

        return super.authenticationManagerBean();

    }

    @Override

    protected void configure(AuthenticationManagerBuilder auth) throws Exception {    //auth.inMemoryAuthentication()

        auth.inMemoryAuthentication()

                .withUser("nicky")

                .password("{noop}123")

                .roles("admin");

    }

    @Override

    public void configure(WebSecurity web) throws Exception {

        //解决静态资源被拦截的问题

        web.ignoring().antMatchers("/asserts/**");

        web.ignoring().antMatchers("/favicon.ico");

    }

    @Override

    protected void configure(HttpSecurity http) throws Exception {

        http   // 配置登录页并允许访问

                .formLogin().permitAll()

                // 配置Basic登录

                //.and().httpBasic()

                // 配置登出页面

                .and().logout().logoutUrl("/logout").logoutSuccessUrl("/")

                .and().authorizeRequests().antMatchers("/oauth/**", "/login/**", "/logout/**").permitAll()

                // 其余所有请求全部需要鉴权认证

                .anyRequest().authenticated()

                // 关闭跨域保护;

                .and().csrf().disable();

    }

}
2.5 功能简单测试
访问授权链接,在浏览器访问就可以,授权码模式response_type参数传code:
http://localhost:8888/oauth/authorize?client_id=cms&client_secret=secret&response_type=code
因为没登录,所以会返回SpringSecurity的默认登录页面,具体代码是 http .formLogin().permitAll();,如果要弹窗登录的,可以配置http.httpBasic();,这种配置是没有登录页面的,自定义登录页面可以这样配置http.formLogin().loginPage("/login").permitAll()
如图,输入SpringSecurity配置的静态账号密码:nicky/123

登录成功,返回redirect_uri,拿到授权码
http://127.0.0.1:8084/cms/login?code=lA4EAJ
拿到授权码code去获取token

token:
{

    "access_token": "dcb626c2-e514-4a8c-8df1-90fe5b5baabf",

    "token_type": "bearer",

    "expires_in": 119,

    "scope": "all"

}
注意配置一下请求头的授权参数,username即client_id,password即client_secret

代码方式请求,可以进行如下封装,即进行base64加密
HttpHeaders headers = new HttpHeaders();

        byte[] key = (clientId+":"+clientSecret).getBytes();

        String authKey = new String(Base64.encodeBase64(key));

        LOG.info("Authorization:{}","Basic "+authKey);

        headers.add("Authorization","Basic "+authKey);
例子代码下载:code download
OAuth2.0系列之授权码模式实践教程(二)的更多相关文章
- IdentityServer4系列[6]授权码模式
授权码模式是一种混合模式,是目前功能最完整.流程最严密的授权模式.它主要分为两大步骤:认证和授权.其流程为: 用户访问客户端,客户端将用户导向Identity Server. 用户填写凭证信息向客户端 ...
- Oauth2.0认证---授权码模式
目录: 1.功能描述 2.客户端的授权模式 3.授权模式认证流程 4.代码实现 1.功能描述 OAuth在"客户端"与"服务提供商"之间,设置了一个授权层(au ...
- oauth2.0授权码模式详解
授权码模式原理 授权码模式(authorization code)是功能最完整.流程最严密的授权模式.它的特点就是通过客户端的后台服务器,与"服务提供商"的认证服务器进行互动. 它 ...
- Spring Cloud2.0之Oauth2环境搭建(授权码模式和密码授权模式)
oauth2 server 微服务授权中心, github源码 https://github.com/spring-cloud/spring-cloud-security 对微服务接口做一些权 ...
- OAuth2.0授权码模式
OAuth2.0简单说就是一种授权的协议,OAuth2.0在客户端与服务提供商之间,设置了一个授权层(authorization layer).客户端不能直接登录服务提供商,只能登录授权层,以此将用户 ...
- IdentityServer4实现OAuth2.0四种模式之授权码模式
接上一篇:IdentityServer4实现OAuth2.0四种模式之隐藏模式 授权码模式隐藏码模式最大不同是授权码模式不直接返回token,而是先返回一个授权码,然后再根据这个授权码去请求token ...
- OAuth2.0授权码模式实战
OAuth2.0是目前比较流行的一种开源授权协议,可以用来授权第三方应用,允许在不将用户名和密码提供给第三方应用的情况下获取一定的用户资源,目前很多网站或APP基于微信或QQ的第三方登录方式都是基于O ...
- 微信授权就是这个原理,Spring Cloud OAuth2 授权码模式
上一篇文章Spring Cloud OAuth2 实现单点登录介绍了使用 password 模式进行身份认证和单点登录.本篇介绍 Spring Cloud OAuth2 的另外一种授权模式-授权码模式 ...
- IdentityServer4系列 | 授权码模式
一.前言 在上一篇关于简化模式中,通过客户端以浏览器的形式请求IdentityServer服务获取访问令牌,从而请求获取受保护的资源,但由于token携带在url中,安全性方面不能保证.因此,我们可以 ...
- 基于OWIN WebAPI 使用OAUTH2授权服务【授权码模式(Authorization Code)】
之前已经简单实现了OAUTH2的授权码模式(Authorization Code),但是基于JAVA的,今天花了点时间调试了OWIN的实现,基本就把基于OWIN的OAUHT2的四种模式实现完了.官方推 ...
随机推荐
- 通过COM,用Python调用C#库
1.C#配置 (1)类库 (2)COM互操作打勾 (3)代码中类必须要有无参构造函数,否则不会注册成功!!! using System; using System.Runtime.InteropSer ...
- PyQt5高清屏幕自适应设置 QApplication.setAttribute(Qt.AA_EnableHighDpiScaling)
Qt Designer 设计界面: 在高清屏未设置AA_EnableHighDpiScaling的预览界面:布局字体控件尺寸上明显存在偏差. 设置了AA_EnableHighDpiScaling的预览 ...
- 一个 Bean 就这样走完了它的一生之 Bean 的出生
生命周期流程 Spring 中的一个 Bean 从被创建到被销毁,需要经历很多个阶段的生命周期,下图是一个 Bean 从创建到销毁的生命周期流程: 在 Bean 的各个生命周期流程点,Spring 都 ...
- Itex+freemarker 导出PDF文件时✓无法正常显示
在使用Itex+freemarker 导出PDF文件时✓无法正常显示 在网上看到了以下思路:经过实验后是靠谱的 1.首先打开一个word文件,输入这个特殊字符,然后在字体选择框里看见这个特殊字符所用的 ...
- 计算机组成原理 L02 指令集体系结构(ISA)复习-1
计算机组成原理 L02 指令集体系结构(ISA)复习-1 复习-1 用作例题/课后题整理 复习-2 用作理论知识点整理 如何使用大常数 由于大数值范围:[-2^31, 2^31-1],而I型指令常数字 ...
- Jenkins概述及Linux系统中安装
概述 官网:https://www.jenkins.io/ GitHub地址:https://github.com/jenkinsci/jenkins Jenkins是一个用Java编写的开源的持续集 ...
- Grafana监控指标、日志与链路追踪数据采集到GreptimeDB的完整实践指南
以下是将Grafana监控指标.日志与链路追踪数据采集到GreptimeDB的完整实践指南,涵盖部署.运维.安全及扩展的全流程: 一.整体架构 图表 二.数据采集配置 1. 指标采集(Promethe ...
- AI助手:Agent工作流程与应用场景详解
引言 智能体(Agent)是一种在特定环境中自主行动.感知环境.做出决策并与其他智能体或人类进行交互的计算机程序或实体.它们具备自主性.反应性.社交性和适应性等特点,能够根据环境的变化调整自己的行为, ...
- AI应用实战课学习总结(6)分类算法分析实战
大家好,我是Edison. 最近入坑黄佳老师的<AI应用实战课>,记录下我的学习之旅,也算是总结回顾. 今天是我们的第6站,一起了解下分类算法基本概念 以及 通过分类算法辅助疾病诊断的案例 ...
- Kong入门学习实践(6)HTTPS与TCP流代理
最近在学习Kong网关,因此根据老习惯,我会将我的学习过程记录下来,一来体系化整理,二来作为笔记供将来翻看.由于我司会直接使用Kong企业版,学习过程中我会使用Kong开源版. 本篇,我们学习快速配置 ...