Android学习Tabhost、gallery、listview、imageswitcher
Tabhost控件又称分页控件,在很多的开发语言中都存在。它可以拥有多个标签页,每个标签页可以拥有不同的内容。android中,一个标签页可以放 一个view或者一个activity。TabHost是标签控件类的核心类,也是标签的集合。
1.tabhost定义
android控件中有封装好的tab控件,直接拖一个到xml文件中。下面的代码都是tab控件自己生成的。
 <RelativeLayout xmlns:android="http://schemas.android.com/apk/res/android"

     xmlns:tools="http://schemas.android.com/tools"

     android:layout_width="fill_parent"

     android:layout_height="fill_parent"

     android:paddingBottom="@dimen/activity_vertical_margin"

     android:paddingLeft="@dimen/activity_horizontal_margin"

     android:paddingRight="@dimen/activity_horizontal_margin"

     android:paddingTop="@dimen/activity_vertical_margin"

     tools:context=".MainActivity" >

     <TabHost

         android:id="@android:id/tabhost"

         android:layout_width="fill_parent"

         android:layout_height="fill_parent"

         android:layout_alignParentLeft="true"

         android:layout_alignParentTop="true" >

         <LinearLayout

             android:layout_width="match_parent"

             android:layout_height="match_parent"

             android:orientation="vertical" >

             <TabWidget

                 android:id="@android:id/tabs"

                 android:layout_width="match_parent"

                 android:layout_height="wrap_content" >

             </TabWidget>

             <FrameLayout

                 android:id="@android:id/tabcontent"

                 android:layout_width="match_parent"

                 android:layout_height="match_parent" >

                 <LinearLayout

                     android:id="@+id/tab1"

                     android:layout_width="match_parent"

                     android:layout_height="match_parent"

                     android:orientation="vertical" >

                 </LinearLayout>

                 <LinearLayout

                     android:id="@+id/tab2"

                     android:layout_width="match_parent"

                     android:layout_height="match_parent"

                     android:orientation="vertical" >

                 </LinearLayout>

                 <LinearLayout

                     android:id="@+id/tab3"

                     android:layout_width="match_parent"

                     android:layout_height="match_parent"

                     android:orientation="vertical" >

                 </LinearLayout>

             </FrameLayout>

         </LinearLayout>

     </TabHost>

 </RelativeLayout>
main.xml
在后台,可以通过tabhost.addtab方法添加分页。本例添加了3个标签,并且为其中的两个绑定了不同的activity。
 TabHost tabhost=this.getTabHost();

         LayoutInflater.from(this).inflate(R.layout.activity_main,tabhost.getTabContentView(),true);

         tabhost.addTab(tabhost.newTabSpec("tab1").setIndicator("拨号").setContent(new Intent(this,MyGallery.class)));

         tabhost.addTab(tabhost.newTabSpec("tab2").setIndicator("记录").setContent(new Intent(this,RatingListActivity.class)));

         tabhost.addTab(tabhost.newTabSpec("tab3").setIndicator("联系人").setContent(R.id.tab3));
添加标签控件
2.MyGalleryxml
Gallery是相册控件,它可以水平或者垂直浏览多张图片。imgageswitcher控件可以用来以动画的方式切换图片。本例将imageswitcher和gallery控件相结合。gallery存放多张图片,而imageswitcher来显示图片。
首先来看xml文档的定义。
xml文档定义的很简单,只是包含一个布局控件、一个gallery和imageswitcher。
     Gallery gallery;

     ImageSwitcher imgwch;

     //设置图片资源的id

     private int[] imgIds={R.drawable.imgs1,R.drawable.imgs2,R.drawable.imgs3,R.drawable.imgs4,R.drawable.imgs5,R.drawable.imgs6,R.drawable.imgs7};

     public void onCreate(Bundle savebundle)

     {

         super.onCreate(savebundle);

         setContentView(R.layout.imgswitch);

          imgwch=(ImageSwitcher)findViewById(R.id.imgswitcher1);

         imgwch.setFactory(this);

         //设置imageswitcher的图片动画显示

         imgwch.setInAnimation(AnimationUtils.loadAnimation(this, android.R.anim.fade_in));

         imgwch.setOutAnimation(AnimationUtils.loadAnimation(this, android.R.anim.fade_out));

         gallery=(Gallery)findViewById(R.id.gallery);

         //定义相册资源的适配器

         ImageAdapter adapter=new ImageAdapter(this);

         gallery.setAdapter(adapter);

         gallery.setOnItemClickListener(new OnItemClickListener() {

             @Override

             public void onItemClick(AdapterView<?> arg0, View arg1, int arg2,

                     long arg3) {

                 // TODO Auto-generated method stub

                 //设置imageswitcher的资源id,这里的数组下标示经过处理的,目的是为了能够循环显示图像

                 imgwch.setBackgroundResource(imgIds[arg2%imgIds.length]);

             }

         });

     }

     //定义imageswitcher的显示对象

     public View makeView() {

         ImageView imageView = new ImageView(this);

         imageView.setBackgroundColor(Color.TRANSPARENT);

         imageView.setScaleType(ImageView.ScaleType.FIT_CENTER);

         imageView.setLayoutParams(new ImageSwitcher.LayoutParams(LayoutParams.FILL_PARENT,LayoutParams.FILL_PARENT));

         return imageView;

     }

     public class ImageAdapter extends BaseAdapter

     {

         int mgallerybackground;

         private Context context;

         public ImageAdapter(Context context)

         {

             this.context=context;

             //设置相册图像的显示风格

             TypedArray typed=obtainStyledAttributes(R.styleable.Gallery);

             mgallerybackground=typed.getResourceId(R.styleable.Gallery_android_galleryItemBackground, 0);

             typed.recycle();

         }

         @Override

         public int getCount() {

             // TODO Auto-generated method stub

             //可以循环浏览图像

             return Integer.MAX_VALUE;

         }

         @Override

         public Object getItem(int position) {

             // TODO Auto-generated method stub

             return null;

         }

         @Override

         public long getItemId(int position) {

             // TODO Auto-generated method stub

             return 0;

         }

         @Override

         public View getView(int position, View convertView, ViewGroup parent) {

             // TODO Auto-generated method stub

             //设置图像的显示风格和显示资源

             ImageView img1=new ImageView(context);

             img1.setScaleType(ImageView.ScaleType.FIT_XY);

             img1.setLayoutParams(new Gallery.LayoutParams(136,88));

             img1.setImageResource(imgIds[position%imgIds.length]);

             img1.setBackgroundResource(mgallerybackground);

             return img1;

         }
ImageSwitcher
这里为相册指定了资源,并设置了显示的风格。也为imageswitcher设置了显示的对象,以及动画的淡入和淡出。
通过以上的代码,我们可以单击“拨号”,即可显示gallery页,同时,imageswitcher可以随着gallery浏览对象的变化而变化。
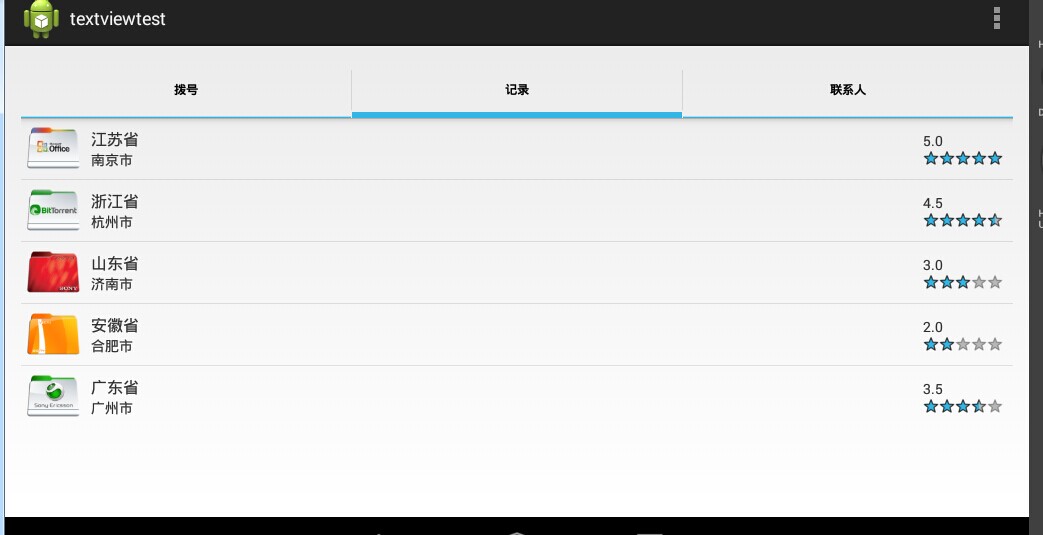
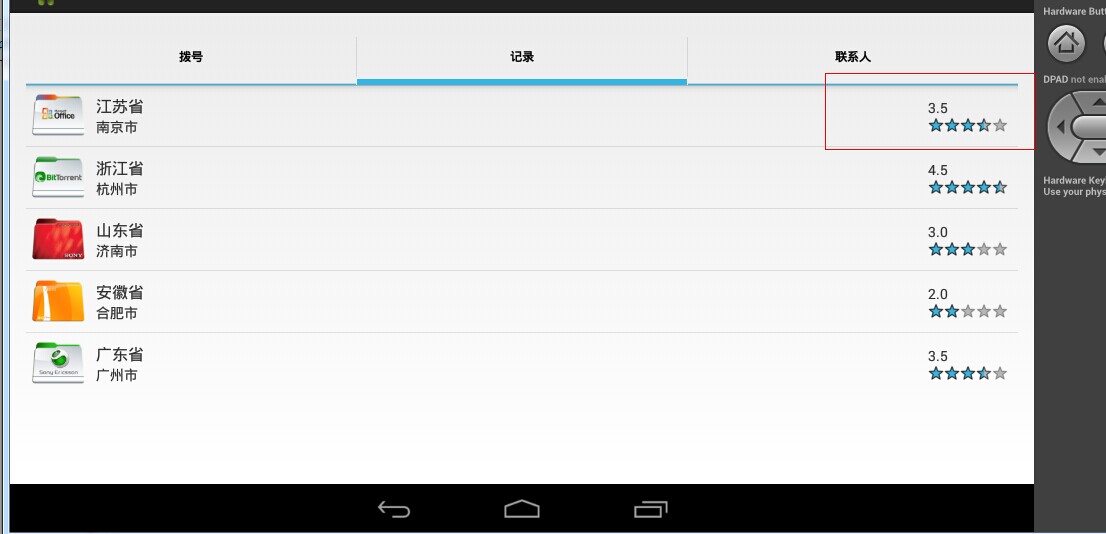
3.RatingList
本例是实现基于RatingBar和Listview的打分应用。
 <?xml version="1.0" encoding="utf-8"?>

 <LinearLayout xmlns:android="http://schemas.android.com/apk/res/android"

     android:layout_width="fill_parent"

     android:layout_height="fill_parent"

     android:orientation="vertical" >

 <ListView

     android:id="@+id/lvrating"

     android:layout_width="fill_parent"

     android:layout_height="wrap_content" >

 </ListView>

 </LinearLayout>
listlv
这个xml文档用来定义显示的列表,有listview构成。下面需要定义listview的item项。
 <?xml version="1.0" encoding="utf-8"?>

 <LinearLayout xmlns:android="http://schemas.android.com/apk/res/android"

     android:layout_width="fill_parent"

     android:layout_height="wrap_content"

     android:gravity="center_vertical"

     android:orientation="horizontal" >

 <ImageView

     android:id="@+id/ivLogo"

     android:layout_width="60dp"

     android:layout_height="60dp"

     android:paddingLeft="5dp"

     android:src="@drawable/ic_launcher" />

 <RelativeLayout

     android:layout_width="wrap_content"

     android:layout_height="wrap_content"

     android:layout_gravity="right"

     android:orientation="vertical"

     android:padding="10dp" >

 <TextView

     android:id="@+id/tvApplicationName"

     android:layout_width="wrap_content"

     android:layout_height="wrap_content"

     android:textSize="16dp" />

 <TextView

     android:id="@+id/tvAuthor"

     android:layout_width="wrap_content"

     android:layout_height="wrap_content"

     android:layout_below="@id/tvApplicationName"

     android:textSize="14dp" />

 </RelativeLayout>

 <RelativeLayout

     android:layout_width="fill_parent"

     android:layout_height="wrap_content"

     android:gravity="right"

     android:padding="10dp"

     android:orientation="vertical" >

     <TextView

         android:id="@+id/tvRating"

         android:layout_width="wrap_content"

         android:layout_height="wrap_content"

         android:text="5.0" />

     <RatingBar

         android:id="@+id/ratingbar"

         style="?android:attr/ratingBarStyleSmall"

         android:layout_width="wrap_content"

         android:layout_height="wrap_content"

         android:layout_below="@id/tvRating"

         android:numStars="5" />

 </RelativeLayout>

 </LinearLayout>
list_item
对于listview的使用方法,大家都应该很清楚的。一般定义复杂的列表显示,都需要通过listview以及item组成。在后台可以通过simpleadapter或者baseadapter来绑定数据。
public void onCreate(Bundle savedbundle)
{
super.onCreate(savedbundle);
setContentView(R.layout.listv);
ListView listview=(ListView)findViewById(R.id.lvrating);
final MyBaseadapter adapter=new MyBaseadapter(this); listview.setAdapter(adapter);
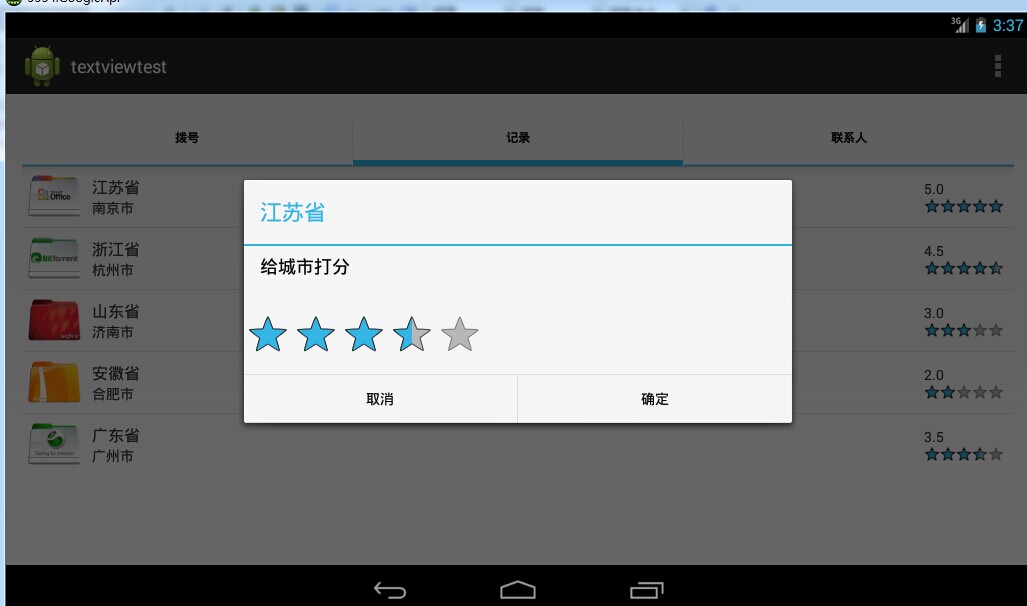
listview.setOnItemClickListener(new OnItemClickListener() { @Override
public void onItemClick(AdapterView<?> arg0, View arg1, final int arg2,
long arg3) {
// TODO Auto-generated method stub
View myView=getLayoutInflater().inflate(R.layout.rating, null);
final RatingBar ratingbar=(RatingBar)myView.findViewById(R.id.ratingBar1);
ratingbar.setRating(applicationrating[arg2]);
new AlertDialog.Builder(RatingListActivity.this).setTitle(applicationNames[arg2]).setMessage("给城市打分").setView(myView)
.setPositiveButton("确定", new OnClickListener() { @Override
public void onClick(DialogInterface dialog, int which) {
// TODO Auto-generated method stub
adapter.setRating(arg2, ratingbar.getRating());
}
}).setNegativeButton("取消", null).show();
}
});
}
oncreate
在oncreate方法中为listview绑定数据,并设置listview的监听事件。MyBaseadapter类继承BaseAdapter类。
 public class MyBaseadapter extends BaseAdapter

     {

         private Context context;

         public MyBaseadapter(Context context)

         {

             this.context=context;

         }

         @Override

         public int getCount() {

             // TODO Auto-generated method stub

             return resIds.length;

         }

         @Override

         public Object getItem(int position) {

             // TODO Auto-generated method stub

             return null;

         }

         @Override

         public long getItemId(int position) {

             // TODO Auto-generated method stub

             return 0;

         }

         @Override

         public View getView(int position, View convertView, ViewGroup parent) {

             // TODO Auto-generated method stub

             TextView tvapplicationname;

             if(convertView==null)

             {

 //对于这里的使用,真的有太多的方法,这里是为了要或者我们定义的那个item.xml。

                 convertView=LayoutInflater.from(context).inflate(R.layout.ratinglist, null);

             }

              tvapplicationname=(TextView)convertView.findViewById(R.id.tvApplicationName);

             tvapplicationname.setText(applicationNames[position]);

             ImageView ivlogo=(ImageView)convertView.findViewById(R.id.ivLogo);

             ivlogo.setImageResource(resIds[position]);

             TextView tvauthor=(TextView)convertView.findViewById(R.id.tvAuthor);

             tvauthor.setText(authors[position]);

             TextView tvrating=(TextView)convertView.findViewById(R.id.tvRating);

             tvrating.setText(String.valueOf(applicationrating[position]));

             RatingBar ratingbar=(RatingBar)convertView.findViewById(R.id.ratingbar);

             ratingbar.setRating(applicationrating[position]);

             return convertView;

         }

         public void setRating(int position,float rating)

         {

             applicationrating[position]=rating;

             notifyDataSetChanged();

         }

     }
MyBaseAdapter
BaseAdapter中getView方法使用容易出错,经常会出现获取不到xml文档的情况,主要是Layoutinflater.inflate的使用。这里在获取view对象后,然后为view中的每个控件赋值。最后将这个view返回。这里返回的是listview的每一个item。
上面的单击事件中,选择某一项后,可以对该项进行评分。
程序运行的界面,如下:

本例顺利实现了一系列的功能。下例将会带来arcgis中gp模型的建立以及发布。
Android学习Tabhost、gallery、listview、imageswitcher的更多相关文章
- Android学习笔记 Gallery图库组件的使用
activity_main.xml <LinearLayout xmlns:android="http://schemas.android.com/apk/res/android&qu ...
- android学习--TabHost选项卡组件
TabHost是一种非常有用的组件,TabHost能够非常方便地在窗体上放置多个标签页,每一个标签页获得了一个与外部容器同样大小的组件摆放区域.在手机系统的应用类似"未接电话".& ...
- Android学习之Gallery
在Android中,画廊控件Gallery用来显示图片列表,可以用手指直接拖动图片左右移动.Gallery只能水平显示一行,且Gallery列表中的图片会根据不同的拖动情况向左或向右移动,直到显示到最 ...
- Android学习笔记之ListView复用机制
PS:满打满算,差不多三个月没写博客了...前一阵忙的不可开交...总算是可以抽出时间研究研究其他事情了... 学习内容: 1.ListView的复用机制 2.ViewHolder的概念 1.List ...
- android学习笔记12——ListView、ListActivity
ListView.ListActivity ==> ListView以垂直列表的形式显示所有列表项. 创建ListView的方式: 1.直接使用ListView创建 2.Activity继承Li ...
- Android学习笔记:ListView简单应用--显示文字列表
在activity中的编写如下代码: final List<String> items = new ArrayList<String>(); //设置要显示的数据,这里因为是例 ...
- [Android学习笔记]使用ListView
简单使用ListView 关键在于Adatper Adatper用来连接UI与数据源.Adapter既负责提供数据,又负责创建Item视图. 一般步骤: 1.创建list_item.xml,用来创建L ...
- android学习8(ListView高级使用)
ListView在android更开放的,于是继续ListView说明使用. 首先创建一个android项目,项目名为ListViewTest. ListView的简单使用 改动布局文件,改动后代码例 ...
- Android学习——控件ListView的使用
一.ListView的简单用法 首先新建一个ListViewTest项目,并让Android Studio自动创建好活动.然后修改activity_main.xml中的代码,如下: <?xml ...
随机推荐
- 走进C++程序世界------继承和派生
继承和派生 继承是面向对象编程语言的最重要方面之一,正确的使用继承可编写出设计良好,容易于维护和扩展的应用程序.下面是在其他博客中的总结: ****************************** ...
- UVA 12232 - Exclusive-OR(带权并查集)
UVA 12232 - Exclusive-OR 题目链接 题意:有n个数字.一開始值都不知道,每次给定一个操作,I a v表示确认a值为v,I a b v,表示确认a^b = v,Q k a1 a2 ...
- SSH2配置事务的两种方式
<?xml version="1.0" encoding="UTF-8"?> <beans xmlns="http://www.sp ...
- .net 时间操作[摘抄]
.Net时间运算 - DateTime类,TimeSpan类http://www.cnblogs.com/kissdodog/archive/2013/03/02/2939927.html 时间戳转换 ...
- <runtime> 的 <assemblyBinding> 元素
一.<assemblyBinding> 元素 包含有关程序集版本重定向和程序集位置的信息. <assemblyBinding xmlns="urn:schemas-micr ...
- <httpRuntime>
1.在webconfig中httpconfig属性只能出现一次 配置httpRunTime也可以让FileUpload上传更大的文件,不过设置太大了会因用户将大量文件传递到该服务器而导致的拒绝服务攻击 ...
- HDU 5740 - Glorious Brilliance
题意: 给出已0 1染色的无向图(不一定联通),一次操作为一对相邻点颜色互换. 问使任意相邻点颜色不同,最少需要多少次操作 分析: 交换两点的代价即为两点间最短路. 故用BFS找出所有点到任意点的最短 ...
- ckeditor的使用与验证
1.使id=id的textArea变为富文本编辑框 function inittextarea(id) { CKEDITOR.replace(id,{ width:'600px', ...
- pat_1
2-0 2-1 #include <stdio.h> int main() { int inch,foot,cm; scanf("%d",&cm); foot= ...
- Python中yield深入理解
众所周知,python中的yield有这样的用法: def test(alist): for i in alist: yield i 这样,这个test函数就变成了一个生成器,当每次调用的时候,就会自 ...