折叠UITableView分组实现方法
做项目的时侯用到了折叠分组,最近就研究了一下,找了一些网上的项目,发现有一些缺点,研究了几天自己终于写出了一个。而且分组的数据源比较灵活,每组之间的状态没有什么影响。
实现的大体思路是每个分组用一个section来保存,row0用来保存分组的标题,后面的cell保存每个分组的数据。
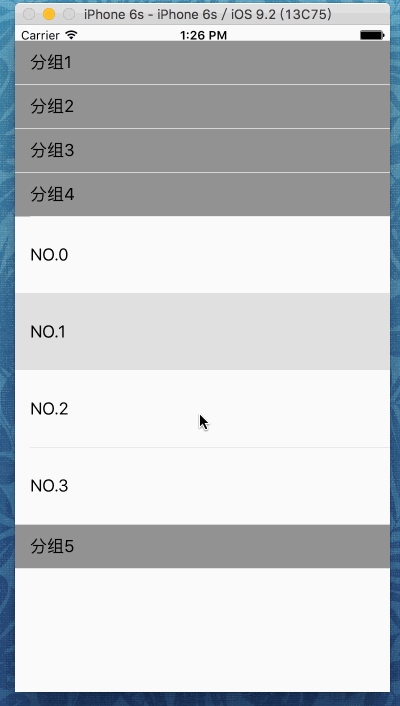
1.首先要创建一个保存每组的分组信息的model类,包括分组名,每组里面的cell,和当前组的开关状态。
//MySection.h

#import <Foundation/Foundation.h>

@interface MySection : NSObject

@property (nonatomic) BOOL isOpen;

@property (nonatomic) NSMutableArray *dataArray;

@property (nonatomic) NSString *name;

@end
//MySection.m

#import "MySection.h"

@interface MySection ()

@end

@implementation MySection

- (instancetype)init

{

    self = [super init];

    self.isOpen = false;

    self.name = @"分组";

    self.dataArray = [[NSMutableArray alloc]init];

    for (int i = ; i < ; i++) {

        NSString *string = [NSString stringWithFormat:@"NO.%i",i];

        [self.dataArray addObject:string];

    }

    return self;

}

@end
2.通过一个viewController来管理tableView。
//ViewController.h

#import <UIKit/UIKit.h>

@interface ViewController : UIViewController<UITableViewDataSource, UITableViewDelegate>

@end
//ViewController.m

#import "ViewController.h"

#import "MySection.h"

@interface ViewController ()

@property (nonatomic) UITableView *tableView;

@property (nonatomic) NSIndexPath *selectedIndexPath;

@property (nonatomic) NSMutableArray *sections;

@end

@implementation ViewController

- (void)viewDidLoad {

    [super viewDidLoad];

    self.tableView = [[UITableView alloc]initWithFrame:self.view.bounds style:UITableViewStyleGrouped];

    self.sections = [[NSMutableArray alloc]init];

    [self initData];

    self.tableView.delegate = self;

    self.tableView.dataSource = self;

    //设置每组之间的距离为0

    self.tableView.sectionFooterHeight = ;

    self.tableView.sectionHeaderHeight = ;

    [self.view addSubview:self.tableView];

}

//初始化数据

- (void)initData

{

    for (int i = ; i < ; i++) {

        MySection *section = [[MySection alloc]init];

        section.name = [NSString stringWithFormat:@"分组%i",i + ];

        [self.sections addObject:section];

    }

}

- (void)didReceiveMemoryWarning {

    [super didReceiveMemoryWarning];

}

- (NSInteger)tableView:(UITableView *)tableView numberOfRowsInSection:(NSInteger)section

{

    MySection *theSection = self.sections[section];

    //根据分组开关状态和数据源动态改变每组row的个数

    if (theSection.isOpen) {

        return [theSection.dataArray count];

    }else{

        return ;

    }

}

//分组数目

- (NSInteger)numberOfSectionsInTableView:(UITableView *)tableView

{

    return [self.sections count];

}

- (UITableViewCell *)tableView:(UITableView *)tableView cellForRowAtIndexPath:(NSIndexPath *)indexPath

{

    UITableViewCell *cell = [[UITableViewCell alloc]init];

    //从数据源数组中取出当前cell对应的对象

    MySection *section = self.sections[indexPath.section];

    //如果row为0,则为标题

    if (indexPath.row == ) {

        cell.textLabel.text = section.name;

        cell.backgroundColor = [UIColor grayColor];

    }else{

        //为每组中cell赋值

        cell.textLabel.text = section.dataArray[indexPath.row - ];

    }

    return cell;

}

- (void) tableView:(UITableView *)tableView didSelectRowAtIndexPath:(NSIndexPath *)indexPath

{

    MySection *section = self.sections[indexPath.section];

    //选中标题cell,且对应的组没有打开

    if (!section.isOpen) {

        NSLog(@"section:%@ open!",section.name);

        section.isOpen = YES;

        NSMutableArray *a = [[NSMutableArray alloc]init];

        for (int i = ; i < [section.dataArray count]; i++) {

            NSIndexPath *addIndexPath = [NSIndexPath indexPathForRow:i inSection:indexPath.section];

            [a addObject:addIndexPath];

        }

        [self.tableView beginUpdates];

        [self.tableView insertRowsAtIndexPaths:a withRowAnimation:UITableViewRowAnimationNone];

        [self.tableView endUpdates];

    }else if (indexPath.row == ){

        //选中的cell对应的组已经打开,且选中的是row0

        NSLog(@"section:%@ close!",section.name);

        section.isOpen = !section.isOpen;

        NSMutableArray *b = [[NSMutableArray alloc]init];

        for (int i = ; i < [section.dataArray count]; i++) {

            NSIndexPath *redIndexPath = [NSIndexPath indexPathForRow:i inSection:indexPath.section];

            [b addObject:redIndexPath];

        }

        [self.tableView beginUpdates];

        [self.tableView deleteRowsAtIndexPaths:b withRowAnimation:UITableViewRowAnimationTop];

        [self.tableView endUpdates];

    }

}

//判断是否为标题cell设置行高

- (CGFloat)tableView:(UITableView *)tableView heightForRowAtIndexPath:(NSIndexPath *)indexPath

{

    if (indexPath.row != ) {

        return ;

    }else{

        return ;

    }

}

@end
3.AppDelegate里面没什么特别的了,不过还是贴出来吧。
//AppDelegate.m

#import "AppDelegate.h"

#import "ViewController.h"

@interface AppDelegate ()

@end

@implementation AppDelegate

- (BOOL)application:(UIApplication *)application didFinishLaunchingWithOptions:(NSDictionary *)launchOptions {

    self.window = [[UIWindow alloc]initWithFrame:[UIScreen mainScreen].bounds];

    ViewController *vc = [[ViewController alloc]init];

    self.window.rootViewController = vc;

    self.window.backgroundColor = [UIColor whiteColor];

    [self.window makeKeyAndVisible];

    return YES;

}

@end
这样就大功告成了,可以根据情况获取数据源。不过博主也是刚学习了一段时间的菜鸟,有什么错误希望大家指正,共同进步。
折叠UITableView分组实现方法的更多相关文章
- [OC][转]UITableView属性及方法大全
Tip: UITableView属性及方法大全 (摘录地址) p.p1 { margin: 0.0px 0.0px 0.0px 0.0px; line-height: 14.0px; font: 1 ...
- vs 折叠跟展开所有方法。
Ctrl + M + O: 折叠所有方法 Ctrl + M + M: 折叠或者展开当前方法 Ctrl + M + L: 展开所有方法
- iOS开发UITableView基本使用方法总结1
UITableView基本使用方法 1.首先,Controller需要实现两个delegate ,分别是UITableViewDelegate 和UITableViewDataSource 2.然后 ...
- iOS开发UITableView基本使用方法总结
本文为大家呈现了iOS开发中UITableView基本使用方法总结.首先,Controller需要实现两个delegate ,分别是UITableViewDelegate 和UITableViewDa ...
- iOS开发UITableView基本使用方法总结 分类: ios技术 2015-04-03 17:51 68人阅读 评论(0) 收藏
本文为大家呈现了iOS开发中UITableView基本使用方法总结.首先,Controller需要实现两个delegate ,分别是UITableViewDelegate 和UITableViewDa ...
- UITableView 基本使用方法总结
1..首先,Controller需要实现两个 delegate ,分别是 UITableViewDelegate 和 UITableViewDataSource2.然后 UITableView对 ...
- CASE函数 sql server——分组查询(方法和思想) ref和out 一般处理程序结合反射技术统一执行客户端请求 遍历查询结果集,update数据 HBuilder设置APP状态栏
CASE函数 作用: 可以将查询结果集的某一列的字段值进行替换 它可以生成一个新列 相当于switch...case和 if..else 使用语法: case 表达式/字段 when 值 then ...
- day23_1-re模块之转义字符、分组、方法
#!/usr/bin/env python# -*- coding:utf-8 -*-# ------------------------------------------------------- ...
- python 将值相同的key分组的方法
方法一: 使用 itertools.groupby() rows = [ {'address': '5412 N CLARK ', 'date ': '07/12/2012 ’ }, {'addres ...
随机推荐
- rtmpdump代码分析 转
RTMPdump 源代码分析 1: main()函数 rtmpdump 是一个用来处理 RTMP 流媒体的工具包,支持 rtmp://, rtmpt://, rtmpe://, rtmpte://, ...
- UIScrollView 滚动停止的时候一次调用此方法
//拖动返回选中的索引 当滚动视图停止时的时候 - (void)scrollViewDidEndDecelerating:(UIScrollView *)scrollView{ CGFloat wid ...
- sql 当重复的数据有多条时,保留一条,删除其他重复
delete from proj_info where newcode in (select newcode from proj_info group by newcode hav ...
- MVC中修改报错
修改的时候有空值传入.
- mvc4 整合nhibernate3.0配置
鉴于大家都在解决问题或是学习新东西的时候,并不关注是谁又是谁帮你解决了问题,所有这里为自己做下宣传,我为自己代言. 首先介绍下我的开发环境是vs2010旗舰版,nhibernate采用的是3.0版本. ...
- LDMFD和STMFD个人理解
ARM里面的堆栈是满递减(FULL DESCENDING)的.SP指向最后一个入栈的数据,SP的地址由高向低生长.对于LDM和STM指令来说,编号小的寄存器对应堆栈中的低地址. STMFD的寻址方式是 ...
- js中()()问题
var aa=function(){}(); var bb=(function(){})(); 今天被问到这个问题,这段js有撒区别. 总结一下,两个函数都是立即执行的意思.但是不同之处是执行的顺序, ...
- c# 实现文件拖入和拖出(拖拽)
摘自:http://www.cnblogs.com/eaglet/archive/2009/01/06/1370149.html C# WinForm下一步一步实现文件的拖入和拖出 作者:Eaglet ...
- 关于apriori算法的一个简单的例子
apriori算法是关联规则挖掘中很基础也很经典的一个算法,我认为很多教程出现大堆的公式不是很适合一个初学者理解.因此,本文列举一个简单的例子来演示下apriori算法的整个步骤. 下面这个表格是代表 ...
- java与数据结构(8)---java实现链队列
链队列 实际上就是单链表,只是规定了删除在队头进行,添加在队尾进行. 链队列代码结构 package list.queue; public interface Queuable<T>; p ...