
【webpack】-- 入门与解析
1.初始化
npm init -y
这个命令会创建一个默认的package.json。它包含了项目的一些配置参数,通过它可以进行初始安装。详细参数:https://docs.npmjs.com/files/package.json。
不要y参数的话,会在命令框中设置各项参数,但觉得没啥必要。
2.安装webpack
npm install webpack --save-dev
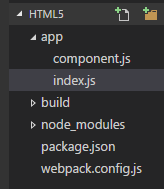
3.目录结构
export default function () {

  var element = document.createElement('h1');

  element.innerHTML = 'Hello world';

  return element;

}
component.js 是输出一个内容为h1元素。export default 是ES6语法,表示指定默认输出。import的时候不用带大括号。
import component from './component';

document.body.appendChild(component());
index.js 的作用就是引用Component模块,并在页面上输出一个h1元素。但完成这个还需要一个插件,因为目前我们还没有index.html文件。
npm install html-webpack-plugin --save-dev
4.设置 webpack 配置文件
const path = require('path');

const HtmlWebpackPlugin = require('html-webpack-plugin');

const PATHS = {

  app: path.join(__dirname, 'app'),

  build: path.join(__dirname, 'build'),

};

module.exports = {

  entry: {

    app: PATHS.app,

  },

  output: {

    path: PATHS.build,

    filename: '[name].js',

  },

  plugins: [

    new HtmlWebpackPlugin({

      title: 'Webpack demo',

    }),

  ],

};
第一次看到这个配置文件是有点懵,主要是exports,分三个部分,一个入口,一个输出,一个插件。入口指向了app文件夹。默认会把包含"index.js"的文件作为入口。输出指定了build地址和一个文件名;[name]这儿表示占位符,可以看成webpack提供的一个变量。这个具体后面再看。而HtmlWebpackPlugin会生成一个默认的html文件。
5.打包
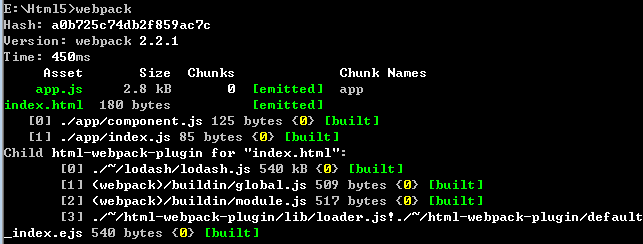
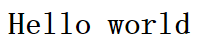
这个输出包含了Hash(每次打包值都不同),Version,Time(耗时)。以及输出的文件信息。 这时打开build文件夹,发现多了一个app.js和index.html文件,双击index.html:
{

  "name": "Html5",

  "version": "1.0.0",

  "description": "",

  "main": "index.js",

  "scripts": {

    "build": "webpack"

  },

  "keywords": [],

  "author": "",

  "license": "ISC",

  "devDependencies": {

    "html-webpack-plugin": "^2.28.0",

    "webpack": "^2.2.1"

  }

}
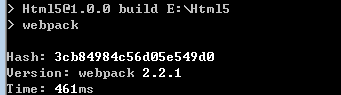
指定build。在cmd中执行npm run build 得到同样的结果
<!DOCTYPE html>

<html>

  <head>

    <meta charset="UTF-8">

    <title>Webpack demo</title>

  </head>

  <body>

  <script type="text/javascript" src="app.js"></script></body>

</html>
默认引用了app.js。
6、解析
app.js
/******/ (function(modules) { // webpackBootstrap

/******/     // The module cache

/******/     var installedModules = {};

/******/     // The require function

/******/     function __webpack_require__(moduleId) {

/******/         // Check if module is in cache

/******/         if(installedModules[moduleId])

/******/             return installedModules[moduleId].exports;

/******/         // Create a new module (and put it into the cache)

/******/         var module = installedModules[moduleId] = {

/******/             i: moduleId,

/******/             l: false,

/******/             exports: {}

/******/         };

/******/         // Execute the module function

/******/         modules[moduleId].call(module.exports, module, module.exports, __webpack_require__);

/******/         // Flag the module as loaded

/******/         module.l = true;

/******/         // Return the exports of the module

/******/         return module.exports;

/******/     }

/******/     // expose the modules object (__webpack_modules__)

/******/     __webpack_require__.m = modules;

/******/     // expose the module cache

/******/     __webpack_require__.c = installedModules;

/******/     // identity function for calling harmony imports with the correct context

/******/     __webpack_require__.i = function(value) { return value; };

/******/     // define getter function for harmony exports

/******/     __webpack_require__.d = function(exports, name, getter) {

/******/         if(!__webpack_require__.o(exports, name)) {

/******/             Object.defineProperty(exports, name, {

/******/                 configurable: false,

/******/                 enumerable: true,

/******/                 get: getter

/******/             });

/******/         }

/******/     };

/******/     // getDefaultExport function for compatibility with non-harmony modules

/******/     __webpack_require__.n = function(module) {

/******/         var getter = module && module.__esModule ?

/******/             function getDefault() { return module['default']; } :

/******/             function getModuleExports() { return module; };

/******/         __webpack_require__.d(getter, 'a', getter);

/******/         return getter;

/******/     };

/******/     // Object.prototype.hasOwnProperty.call

/******/     __webpack_require__.o = function(object, property) { return Object.prototype.hasOwnProperty.call(object, property); };

/******/     // __webpack_public_path__

/******/     __webpack_require__.p = "";

/******/     // Load entry module and return exports

/******/     return __webpack_require__(__webpack_require__.s = 1);

/******/ })

/************************************************************************/

/******/ ([

/* 0 */

/***/ (function(module, __webpack_exports__, __webpack_require__) {

"use strict";

/* harmony default export */ __webpack_exports__["a"] = function () {

  var element = document.createElement('h1');

  element.innerHTML = 'Hello world';

  return element;

};

/***/ }),

/* 1 */

/***/ (function(module, __webpack_exports__, __webpack_require__) {

"use strict";

Object.defineProperty(__webpack_exports__, "__esModule", { value: true });

/* harmony import */ var __WEBPACK_IMPORTED_MODULE_0__component__ = __webpack_require__(0);

document.body.appendChild(__webpack_require__.i(__WEBPACK_IMPORTED_MODULE_0__component__["a" /* default */])());

/***/ })

/******/ ]);
而app.js内容比较多了。整体是一个匿名函数。
(function(module) {

})([(function (){}), function() {}])
app文件夹中的两个js文件成了这儿的两个模块。函数最开始是从__webpack_require__开始
return __webpack_require__(__webpack_require__.s = 1);
这里指定从模块1执行(赋值语句的返回值为其值)。而模块1的调用是通过__webpack_require__的这句执行的。
modules[moduleId].call(module.exports, module, module.exports, __webpack_require__);
通过call调用模块的主要作用是为了把参数传过去。
(function(module, __webpack_exports__, __webpack_require__) {

"use strict";

Object.defineProperty(__webpack_exports__, "__esModule", { value: true });

/* harmony import */ var __WEBPACK_IMPORTED_MODULE_0__component__ = __webpack_require__(0);

document.body.appendChild(__webpack_require__.i(__WEBPACK_IMPORTED_MODULE_0__component__["a" /* default */])());

/***/ })
__webpack_require__ 每加载一个模块都会先去模块缓存中找,没有就新建一个module对象:
var module = installedModules[moduleId] = {

         i: moduleId,

         l: false,

         exports: {}

      };
模块1中加载了模块0,
var __WEBPACK_IMPORTED_MODULE_0__component__ = __webpack_require__(0);
__WEBPACK_IMPORTED_MODULE_0__component__ 返回的是这个模块0的exports部分。而之前Component.js的默认方法定义成了
__webpack_exports__["a"] = function () {

var element = document.createElement('h1');

element.innerHTML = 'Hello world';

return element;

}
所以再模块1的定义通过"a“来获取这个方法:
document.body.appendChild(__webpack_require__.i(__WEBPACK_IMPORTED_MODULE_0__component__["a" /* default */])());
这样就完整了,但这里使用了__webpack_require__.i 将原值返回。
/******/     // identity function for calling harmony imports with the correct context

/******/     __webpack_require__.i = function(value) { return value; };
不太明白这个i函数有什么作用。这个注释也不太明白,路过的大神希望可以指点下。
小结:
webpack通过一个立即执行的匿名函数将各个开发模块作为参数初始化,每个js文件(module)对应一个编号,每个js中export的方法或者对象有各自指定的关键字。通过这种方式将所有的模块和接口方法管理起来。然后先加载最后的一个模块(应该是引用别的模块的模块),这样进而去触发别的模块的加载,使整个js运行起来。到这基本了解了webpack的功能和部分原理,但略显复杂,且没有感受到有多大的好处。继续探索。
demo:http://files.cnblogs.com/files/stoneniqiu/webpack-ch1.zip 建议用最新的node安装,不然build后的结果可能出错。
参考:
【webpack】-- 入门与解析的更多相关文章
- webpack入门与解析(一)
每次学新东西总感觉自己是不是变笨了,看了几个博客,试着试着就跑不下去,无奈只有去看官方文档. webpack是基于node的.先安装最新的node. 1.初始化 安装node后,新建一个目录,比如ht ...
- webpack入门(1)
webpack入门(1) 源码戳这里 ps:每个案例对应相应的demo,例如"案例1"对应"demo1" 一.webpack基本功能及简单案例 安装webpac ...
- 【webpack2】-- 入门与解析
每次学新东西总感觉自己是不是变笨了,看了几个博客,试着试着就跑不下去,无奈只有去看官方文档. webpack是基于node的.先安装最新的node. 1.初始化 安装node后,新建一个目录,比如ht ...
- webpack入门教程之Hello webpack(一)
webpack入门教程系列为官网Tutorials的个人译文,旨在给予想要学习webpack的小伙伴一个另外的途径.如有不当之处,请大家指出. 看完入门教程系列后,你将会学习到如下内容: 1.如何安装 ...
- webpack入门——webpack的安装与使用
一.简介 1.什么是webpack webpack是近期最火的一款模块加载器兼打包工具,它能把各种资源,例如JS(含JSX).coffee.样式(含less/sass).图片等都作为模块来使用和处理. ...
- 一小时包教会 —— webpack 入门指南
什么是 webpack? webpack是近期最火的一款模块加载器兼打包工具,它能把各种资源,例如JS(含JSX).coffee.样式(含less/sass).图片等都作为模块来使用和处理. 我们可以 ...
- Webpack 入门指南 - 3. Hello, Angular2!
Webpack 入门指南 - 1.安装 Webpack 入门指南 - 2.模块 这一次,我们使用 Webpack 来打包 Angular 2 的应用. 与官方的 Hello, Angular 2 项目 ...
- Webpack 入门指南 - 2.模块
这一次我们谈谈模块问题. 通常我们希望这个项目可以分为多个独立的模块,比如,上一次提高的 hello 函数,如果我们定义为一个模块,其它模块引用之后,直接调用就好了.在前端怎么使用模块呢?这可说来话长 ...
- Webpack 入门指南 - 1.安装
Webpack 是目前流行的打包工具,如何安装它呢? 1. 安装 Node Js 首先,Webpack 是基于 NodeJs 的工具,你必须首先安装 NodeJs. NodeJs 仅仅只需要在你的系统 ...
- webpack入门和实战(一):webpack配置及技巧
一.全面理解webpack 1.什么是 webpack? webpack是近期最火的一款模块加载器兼打包工具,它能把各种资源,例如JS(含JSX).coffee.样式(含less/sass).图片等都 ...
随机推荐
- koa中间件
koa是Express的下一代基于node的web框架 目前有1.x和2.0两个版本 1. Express Express是第一代最流行的web框架 它对node.js的http进行了封装 Exp ...
- CSS定位网页中的元素
relative相对定位 偏移设置:left.right.top.bottom 值单位:px 元素的规律: 相对定位元素的规律 设置相对定位的盒子会相对它原来的位置通过指定偏移,到达新的位置. 设置相 ...
- P2880 [USACO07JAN]平衡的阵容Balanced Lineup(RMQ的倍增模板)
题面:P2880 [USACO07JAN]平衡的阵容Balanced Lineup RMQ问题:给定一个长度为N的区间,M个询问,每次询问Li到Ri这段区间元素的最大值/最小值. RMQ的高级写法一般 ...
- 安装mq的时候,计算机用户名是中文名的解决办法
在windows下安装rabbitMq ,如果使用用户名是中文的,则会出现启动失败的情况.关于这一点下边给出终极解决方案. 1. 假如你的中文用户名是 XXXXXX,为用户目录建立软链接,软连接名称为 ...
- Yarn的Linking dependencies特别慢的优化方法
通过以下方法,可以提升部分速度: 把项目文件夹添加进杀毒软件的白名单 把Yarn的缓存文件夹(yarn cache dir查看路径)添加进杀毒软件白名单 把Yarn的安装目录添加进杀毒软件白名单 把N ...
- Chapter4_控制执行流程
总结java中所有的与流程控制有关的知识 (1)表达式判断 Java中只允许true或者false来作为判断条件,不允许用0或者非0值作为判断条件. (2)if-else 与流程密切相关的语句,决定了 ...
- mysql sql mode
/usr/local/mysql/bin/mysqld --verbose --help | grep -A 1 'Default options' (1)关于配置文件路径 有时候,我发现虽然尝试修改 ...
- PostgreSQL时间段查询
1.今日 select * from "表名" where to_date("时间字段"::text,'yyyy-mm-dd')=current_date 2. ...
- 图解HTTP第四章
:返回结果的 HTTP 状态码 1>状态码告知从服务器端返回的请求结果 状态码如 200 OK,以 3 位数字和原因短语组成 数字中的第一位指定了响应类别,后两位无分类 2XX 成功常用的状态码 ...
- windows10系统安装Oralce11g时遇到INS-13001环境不满足最低要求
升级win10系统之后,需要重新安装Oracle,因为在安装Oralce11g时,使用64位的会出现各种不兼容问题,我每次安装都是使用32位的数据库. 在安装时点击setup.exe之后,出现了:[I ...