Laravel API Tutorial: How to Build and Test a RESTful API
With the rise of mobile development and JavaScript frameworks, using a RESTful API is the best option to build a single interface between your data and your client.
Laravel is a PHP framework developed with PHP developer productivity in mind. Written and maintained by Taylor Otwell, the framework is very opinionated and strives to save developer time by favoring convention over configuration. The framework also aims to evolve with the web and has already incorporated several new features and ideas in the web development world—such as job queues, API authentication out of the box, real-time communication, and much more.

In this tutorial, we’ll explore the ways you can build—and test—a robust API using Laravel with authentication. We’ll be using Laravel 5.4, and all of the code is available for reference on GitHub.
RESTful APIs
First, we need to understand what exactly is considered a RESTful API. REST stands for REpresentational State Transfer and is an architectural style for network communication between applications, which relies on a stateless protocol (usually HTTP) for interaction.
HTTP Verbs Represent Actions
In RESTful APIs, we use the HTTP verbs as actions, and the endpoints are the resources acted upon. We’ll be using the HTTP verbs for their semantic meaning:
GET: retrieve resourcesPOST: create resourcesPUT: update resourcesDELETE: delete resources

Update Action: PUT vs. POST
RESTful APIs are a matter of much debate and there are plenty of opinions out there on whether is best to update with POST, PATCH, or PUT, or if the create action is best left to the PUT verb. In this article we’ll be using PUT for the update action, as according to the HTTP RFC, PUT means to create/update a resource at a specific location. Another requirement for the PUT verb is idempotence, which in this case basically means you can send that request 1, 2 or 1000 times and the result will be the same: one updated resource in the database.
Resources
Resources will be the targets of the actions, in our case Articles and Users, and they have their own endpoints:
/articles/users
In this laravel api tutorial, the resources will have a 1:1 representation on our data models, but that is not a requirement. You can have resources represented in more than one data model (or not represented at all in the database) and models completely off limits for the user. In the end, you get to decide how to architect resources and models in a way that is fitting to your application.
A Note on Consistency
The greatest advantage of using a set of conventions such as REST is that your API will be much easier to consume and develop around. Some endpoints are pretty straightforward and, as a result, your API will be much more easier to use and maintain as opposed to having endpoints such as GET /get_article?id_article=12 and POST /delete_article?number=40. I’ve built terrible APIs like that in the past and I still hate myself for it.
However, there will be cases where it will be hard to map to a Create/Retrieve/Update/Delete schema. Remember that the URLs should not contain verbs and that resources are not necessarily rows in a table. Another thing to keep in mind is that you don’t have to implement every action for every resource.
Setting Up a Laravel Web Service Project
As with all modern PHP frameworks, we’ll need Composer to install and handle our dependencies. After you follow the download instructions (and add to your path environment variable), install Laravel using the command:
$ composer global require laravel/installer
After the installation finishes, you can scaffold a new application like this:
$ laravel new myapp
For the above command, you need to have ~/composer/vendor/bin in your $PATH. If you don’t want to deal with that, you can also create a new project using Composer:
$ composer create-project --prefer-dist laravel/laravel myapp
With Laravel installed, you should be able to start the server and test if everything is working:
$ php artisan serve

Laravel development server started: <http://127.0.0.1:8000>

localhost:8000 on your browser, you should see this sample page.Migrations and Models
Before actually writing your first migration, make sure you have a database created for this app and add its credentials to the .env file located in the root of the project.
DB_CONNECTION=mysql

DB_HOST=127.0.0.1

DB_PORT=3306

DB_DATABASE=homestead

DB_USERNAME=homestead

DB_PASSWORD=secret
You can also use Homestead, a Vagrant box specially crafted for Laravel, but that is a bit out of the scope of this article. If you’d like to know more, refer to the Homestead documentation.
Let’s get started with our first model and migration—the Article. The article should have a title and a body field, as well as a creation date. Laravel provides several commands through Artisan—Laravel’s command line tool—that help us by generating files and putting them in the correct folders. To create the Article model, we can run:
$ php artisan make:model Article -m
The -m option is short for --migration and it tells Artisan to create one for our model. Here’s the generated migration:
<?php

use Illuminate\Support\Facades\Schema;

use Illuminate\Database\Schema\Blueprint;

use Illuminate\Database\Migrations\Migration;

class CreateArticlesTable extends Migration

{

    /**

     * Run the migrations.

     *

     * @return void

     */

    public function up()

    {

        Schema::create('articles', function (Blueprint $table) {

            $table->increments('id');

            $table->timestamps();

        });

    }

    /**

     * Reverse the migrations.

     *

     * @return void

     */

    public function down()

    {

        Schema::dropIfExists('articles');

    }

}
Let’s dissect this for a second:
- The
up()anddown()methods will be run when we migrate and rollback respectively; $table->increments('id')sets up an auto incrementing integer with the nameid;$table->timestamps()will set up the timestamps for us—created_atandupdated_at, but don't worry about setting a default, Laravel takes care of updating these fields when needed.- And finally,
Schema::dropIfExists()will, of course, drop the table if it exists.
With that out of the way, let’s add two lines to our up() method:
public function up()

{

    Schema::create('articles', function (Blueprint $table) {

        $table->increments('id');

        $table->string('title');

        $table->text('body');

        $table->timestamps();

    });

}
The string() method creates a VARCHAR equivalent column while text() creates a TEXTequivalent. With that done, let’s go ahead and migrate:
$ php artisan migrate
You can also use the
--stepoption here, and it will separate each migration into its own batch so that you can roll them back individually if needed.
Laravel out of the box comes with two migrations, create_users_table and create_password_resets_table. We won’t be using the password_resets table, but having the users table ready for us will be helpful.
Now let’s go back to our model and add those attributes to the $fillable field so that we can use them in our Article::create and Article::update models:
class Article extends Model

{

    protected $fillable = ['title', 'body'];

}
Fields inside the
$fillableproperty can be mass assigned using Eloquent’screate()andupdate()methods. You can also use the$guardedproperty, to allow all but a few properties.
Database Seeding
Database seeding is the process of filling up our database with dummy data that we can use to test it. Laravel comes with Faker, a great library for generating just the correct format of dummy data for us. So let’s create our first seeder:
$ php artisan make:seeder ArticlesTableSeeder
The seeders will be located in the /database/seeds directory. Here’s how it looks like after we set it up to create a few articles:
class ArticlesTableSeeder extends Seeder

{

    public function run()

    {

        // Let's truncate our existing records to start from scratch.

        Article::truncate();

        $faker = \Faker\Factory::create();

        // And now, let's create a few articles in our database:

        for ($i = 0; $i < 50; $i++) {

            Article::create([

                'title' => $faker->sentence,

                'body' => $faker->paragraph,

            ]);

        }

    }

}
So let’s run the seed command:
$ php artisan db:seed --class=ArticlesTableSeeder
Let’s repeat the process to create a Users seeder:
class UsersTableSeeder extends Seeder

{

    public function run()

    {

        // Let's clear the users table first

        User::truncate();

        $faker = \Faker\Factory::create();

        // Let's make sure everyone has the same password and

        // let's hash it before the loop, or else our seeder

        // will be too slow.

        $password = Hash::make('toptal');

        User::create([

            'name' => 'Administrator',

            'email' => 'admin@test.com',

            'password' => $password,

        ]);

        // And now let's generate a few dozen users for our app:

        for ($i = 0; $i < 10; $i++) {

            User::create([

                'name' => $faker->name,

                'email' => $faker->email,

                'password' => $password,

            ]);

        }

    }

}
We can make it easier by adding our seeders to the main DatabaseSeeder class inside the database/seedsfolder:
class DatabaseSeeder extends Seeder

{

    public function run()

    {

        $this->call(ArticlesTableSeeder::class);

        $this->call(UsersTableSeeder::class);

    }

}
This way, we can simply run $ php artisan db:seed and it will run all the called classes in the run()method.
Routes and Controllers
Let’s create the basic endpoints for our application: create, retrieve the list, retrieve a single one, update, and delete. On the routes/api.php file, we can simply do this:
Use App\Article;

Route::get('articles', function() {

    // If the Content-Type and Accept headers are set to 'application/json',

    // this will return a JSON structure. This will be cleaned up later.

    return Article::all();

});

Route::get('articles/{id}', function($id) {

    return Article::find($id);

});

Route::post('articles', function(Request $request) {

    return Article::create($request->all);

});

Route::put('articles/{id}', function(Request $request, $id) {

    $article = Article::findOrFail($id);

    $article->update($request->all());

    return $article;

});

Route::delete('articles/{id}', function($id) {

    Article::find($id)->delete();

    return 204;

})
The routes inside api.php will be prefixed with /api/ and the API throttling middleware will be automatically applied to these routes (if you want to remove the prefix you can edit the RouteServiceProvider class on /app/Providers/RouteServiceProvider.php).
Now let’s move this code to its own Controller:
$ php artisan make:controller ArticleController
ArticleController.php:
use App\Article;

class ArticleController extends Controller

{

    public function index()

    {

        return Article::all();

    }

    public function show($id)

    {

        return Article::find($id);

    }

    public function store(Request $request)

    {

        return Article::create($request->all());

    }

    public function update(Request $request, $id)

    {

        $article = Article::findOrFail($id);

        $article->update($request->all());

        return $article;

    }

    public function delete(Request $request, $id)

    {

        $article = Article::findOrFail($id);

        $article->delete();

        return 204;

    }

}
The routes/api.php file:
Route::get('articles', 'ArticleController@index');

Route::get('articles/{id}', 'ArticleController@show');

Route::post('articles', 'ArticleController@store');

Route::put('articles/{id}', 'ArticleController@update');

Route::delete('articles/{id}', 'ArticleController@delete');
We can improve the endpoints by using implicit route model binding. This way, Laravel will inject the Articleinstance in our methods and automatically return a 404 if it isn’t found. We’ll have to make changes on the routes file and on the controller:
Route::get('articles', 'ArticleController@index');

Route::get('articles/{article}', 'ArticleController@show');

Route::post('articles', 'ArticleController@store');

Route::put('articles/{article}', 'ArticleController@update');

Route::delete('articles/{article}', 'ArticleController@delete');
class ArticleController extends Controller

{

    public function index()

    {

        return Article::all();

    }

    public function show(Article $article)

    {

        return $article;

    }

    public function store(Request $request)

    {

        $article = Article::create($request->all());

        return response()->json($article, 201);

    }

    public function update(Request $request, Article $article)

    {

        $article->update($request->all());

        return response()->json($article, 200);

    }

    public function delete(Article $article)

    {

        $article->delete();

        return response()->json(null, 204);

    }

}
A Note on HTTP Status Codes and the Response Format
We’ve also added the response()->json() call to our endpoints. This lets us explicitly return JSON data as well as send an HTTP code that can be parsed by the client. The most common codes you’ll be returning will be:
200: OK. The standard success code and default option.201: Object created. Useful for thestoreactions.204: No content. When an action was executed successfully, but there is no content to return.206: Partial content. Useful when you have to return a paginated list of resources.400: Bad request. The standard option for requests that fail to pass validation.401: Unauthorized. The user needs to be authenticated.403: Forbidden. The user is authenticated, but does not have the permissions to perform an action.404: Not found. This will be returned automatically by Laravel when the resource is not found.500: Internal server error. Ideally you're not going to be explicitly returning this, but if something unexpected breaks, this is what your user is going to receive.503: Service unavailable. Pretty self explanatory, but also another code that is not going to be returned explicitly by the application.
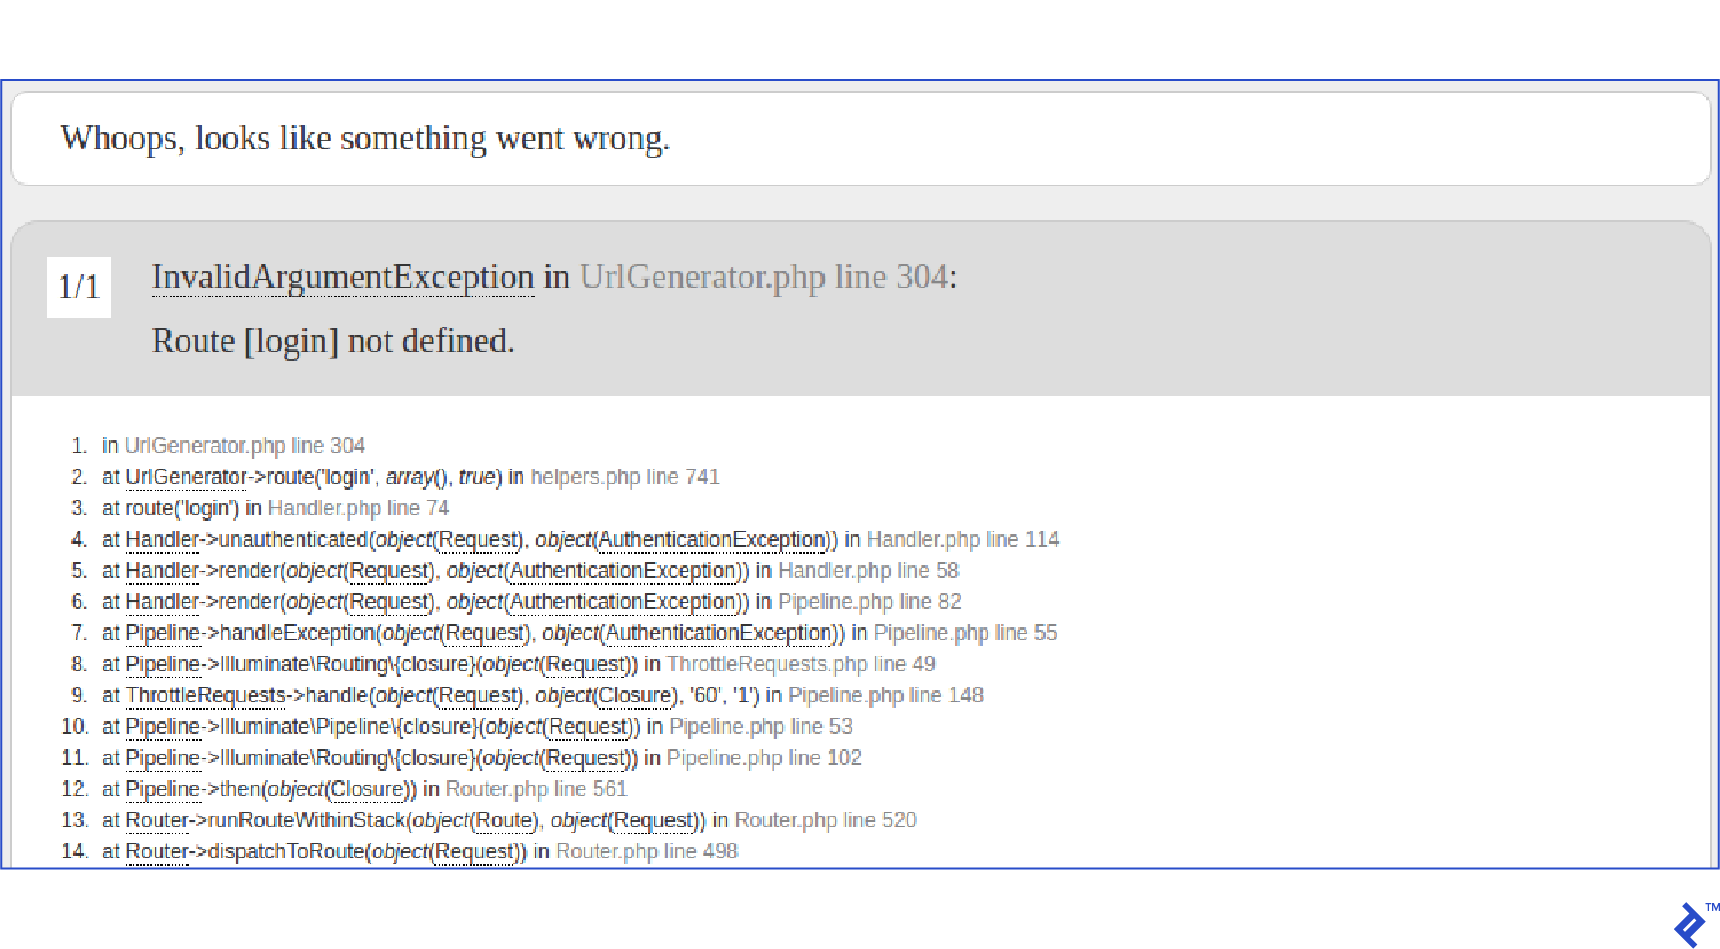
Sending a Correct 404 Response
If you tried to fetch a non-existent resource, you’ll be thrown an exception and you’ll receive the whole stacktrace, like this:

We can fix that by editing our exception handler class, located in app/Exceptions/Handler.php, to return a JSON response:
public function render($request, Exception $exception)

{

    // This will replace our 404 response with

    // a JSON response.

    if ($exception instanceof ModelNotFoundException) {

        return response()->json([

            'error' => 'Resource not found'

        ], 404);

    }

    return parent::render($request, $exception);

}
Here’s an example of the return:
{

    data: "Resource not found"

}
If you’re using Laravel to serve other pages, you have to edit the code to work with the Accept header, otherwise 404 errors from regular requests will return a JSON as well.
public function render($request, Exception $exception)

{

    // This will replace our 404 response with

    // a JSON response.

    if ($exception instanceof ModelNotFoundException &&

        $request->wantsJson())

    {

        return response()->json([

            'data' => 'Resource not found'

        ], 404);

    }

    return parent::render($request, $exception);

}
In this case, the API requests will need the header Accept: application/json.
Authentication
There are many ways to implement API Authentication in Laravel (one of them being Passport, a great way to implement OAuth2), but in this article, we’ll take a very simplified approach.
To get started, we’ll need to add an api_token field to the users table:
$ php artisan make:migration --table=users adds_api_token_to_users_table
And then implement the migration:
public function up()

{

    Schema::table('users', function (Blueprint $table) {

        $table->string('api_token', 60)->unique()->nullable();

    });

}

public function down()

{

    Schema::table('users', function (Blueprint $table) {

        $table->dropColumn(['api_token']);

    });

}
After that, just run the migration using:
$ php artisan migrate
Creating the Register Endpoint
We’ll make use of the RegisterController (in the Auth folder) to return the correct response upon registration. Laravel comes with authentication out of the box, but we still need to tweak it a bit to return the response we want.
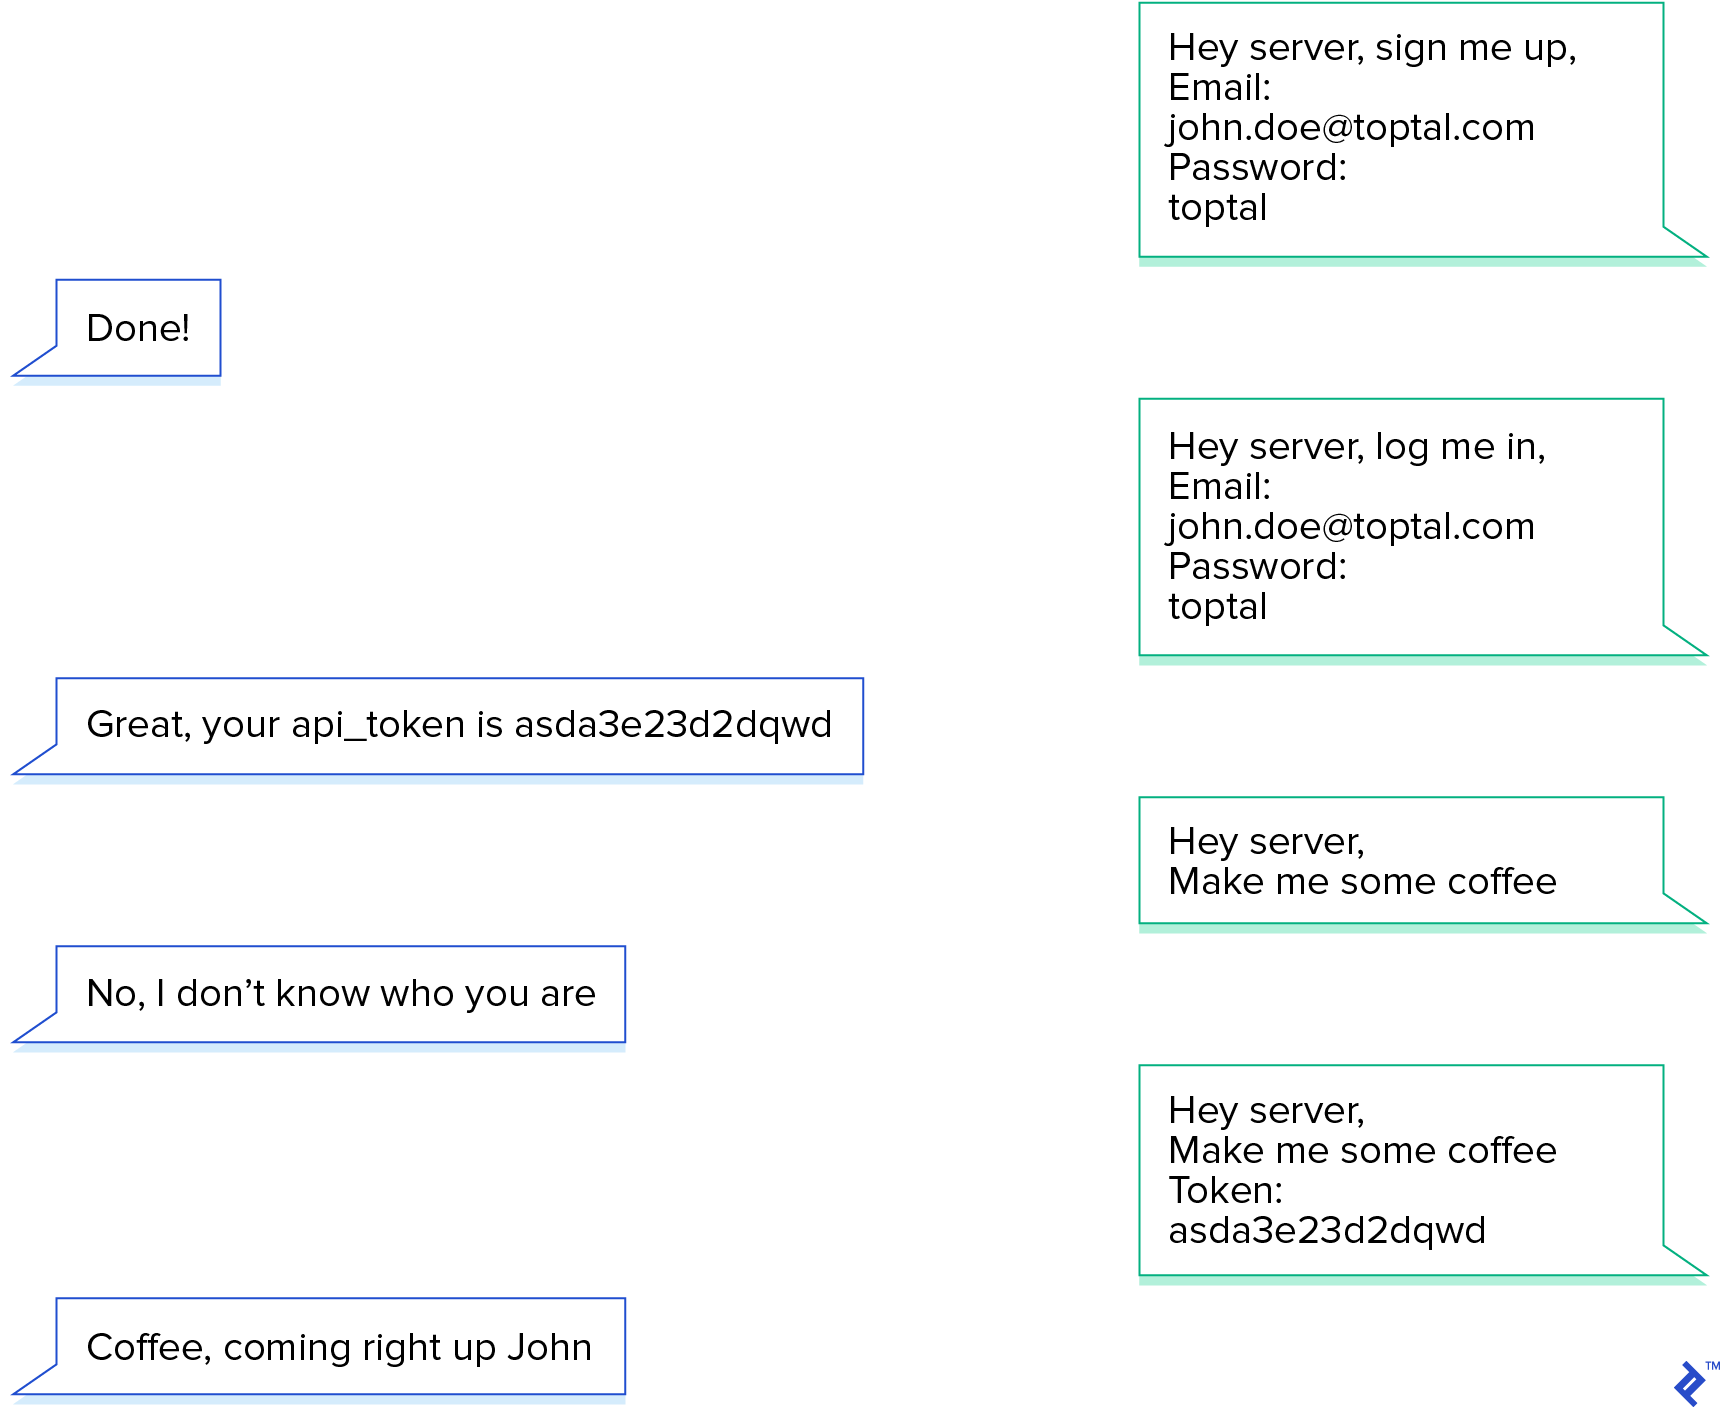
The controller makes use of the trait RegistersUsers to implement the registration. Here’s how it works:
public function register(Request $request)

{

    // Here the request is validated. The validator method is located

    // inside the RegisterController, and makes sure the name, email

    // password and password_confirmation fields are required.

    $this->validator($request->all())->validate();

    // A Registered event is created and will trigger any relevant

    // observers, such as sending a confirmation email or any

    // code that needs to be run as soon as the user is created.

    event(new Registered($user = $this->create($request->all())));

    // After the user is created, he's logged in.

    $this->guard()->login($user);

    // And finally this is the hook that we want. If there is no

    // registered() method or it returns null, redirect him to

    // some other URL. In our case, we just need to implement

    // that method to return the correct response.

    return $this->registered($request, $user)

                    ?: redirect($this->redirectPath());

}
We just need to implement the registered() method in our RegisterController. The method receives the $request and the $user, so that’s really all we want. Here’s how the method should look like inside the controller:
protected function registered(Request $request, $user)

{

    $user->generateToken();

    return response()->json(['data' => $user->toArray()], 201);

}
And we can link it on the routes file:
Route::post(register, 'Auth\RegisterController@register);
In the section above, we used a method on the User model to generate the token. This is useful so that we only have a single way of generating the tokens. Add the following method to your User model:
class User extends Authenticatable

{

    ...

    public function generateToken()

    {

        $this->api_token = str_random(60);

        $this->save();

        return $this->api_token;

    }

}
And that’s it. The user is now registered and thanks to Laravel’s validation and out of the box authentication, the name, email, password, and password_confirmation fields are required, and the feedback is handled automatically. Checkout the validator() method inside the RegisterController to see how the rules are implemented.
Here’s what we get when we hit that endpoint:
$ curl -X POST http://localhost:8000/api/register \

 -H "Accept: application/json" \

 -H "Content-Type: application/json" \

 -d '{"name": "John", "email": "john.doe@toptal.com", "password": "toptal123", "password_confirmation": "toptal123"}'
{

    "data": {

        "api_token":"0syHnl0Y9jOIfszq11EC2CBQwCfObmvscrZYo5o2ilZPnohvndH797nDNyAT",

        "created_at": "2017-06-20 21:17:15",

        "email": "john.doe@toptal.com",

        "id": 51,

        "name": "John",

        "updated_at": "2017-06-20 21:17:15"

    }

}


Creating a Login Endpoint
Just like the registration endpoint, we can edit the LoginController (in the Auth folder) to support our API authentication. The login method of the AuthenticatesUsers trait can be overridden to support our API:
public function login(Request $request)

{

    $this->validateLogin($request);

    if ($this->attemptLogin($request)) {

        $user = $this->guard()->user();

        $user->generateToken();

        return response()->json([

            'data' => $user->toArray(),

        ]);

    }

    return $this->sendFailedLoginResponse($request);

}
And we can link it on the routes file:
Route::post('login', 'Auth\LoginController@login');
Now, assuming the seeders have been run, here’s what we get when we send a POST request to that route:
$ curl -X POST localhost:8000/api/login \

  -H "Accept: application/json" \

  -H "Content-type: application/json" \

  -d "{\"email\": \"admin@test.com\", \"password\": \"toptal\" }"
{

    "data": {

        "id":1,

        "name":"Administrator",

        "email":"admin@test.com",

        "created_at":"2017-04-25 01:05:34",

        "updated_at":"2017-04-25 02:50:40",

        "api_token":"Jll7q0BSijLOrzaOSm5Dr5hW9cJRZAJKOzvDlxjKCXepwAeZ7JR6YP5zQqnw"

    }

}
To send the token in a request, you can do it by sending an attribute api_token in the payload or as a bearer token in the request headers in the form of Authorization: Bearer Jll7q0BSijLOrzaOSm5Dr5hW9cJRZAJKOzvDlxjKCXepwAeZ7JR6YP5zQqnw.
Logging Out
With our current strategy, if the token is wrong or missing, the user should receive an unauthenticated response (which we’ll implement in the next section). So for a simple logout endpoint, we’ll send in the token and it will be removed on the database.
routes/api.php:
Route::post('logout', 'Auth\LoginController@logout');
Auth\LoginController.php:
public function logout(Request $request)

{

    $user = Auth::guard('api')->user();

    if ($user) {

        $user->api_token = null;

        $user->save();

    }

    return response()->json(['data' => 'User logged out.'], 200);

}
Using this strategy, whatever token the user has will be invalid, and the API will deny access (using middlewares, as explained in the next section). This needs to be coordinated with the front-end to avoid the user remaining logged without having access to any content.
Using Middlewares to Restrict Access
With the api_token created, we can toggle the authentication middleware in the routes file:
Route::middleware('auth:api')

    ->get('/user', function (Request $request) {

        return $request->user();

    });
We can access the current user using the $request->user() method or through the Auth facade
Auth::guard('api')->user(); // instance of the logged user

Auth::guard('api')->check(); // if a user is authenticated

Auth::guard('api')->id(); // the id of the authenticated user
And we get a result like this:
This is because we need to edit the current unauthenticated method on our Handler class. The current version returns a JSON only if the request has the Accept: application/json header, so let’s change it:
protected function unauthenticated($request, AuthenticationException $exception)

{

    return response()->json(['error' => 'Unauthenticated'], 401);

}
With that fixed, we can go back to the article endpoints to wrap them in the auth:api middleware. We can do that by using route groups:
Route::group(['middleware' => 'auth:api'], function() {

    Route::get('articles', 'ArticleController@index');

    Route::get('articles/{article}', 'ArticleController@show');

    Route::post('articles', 'ArticleController@store');

    Route::put('articles/{article}', 'ArticleController@update');

    Route::delete('articles/{article}', 'ArticleController@delete');

});
This way we don’t have to set the middleware for each of the routes. It doesn’t save a lot of time right now, but as the project grows it helps to keep the routes DRY.
Testing Our Endpoints
Laravel includes integration with PHPUnit out of the box with a phpunit.xml already set up. The framework also provides us with several helpers and extra assertions that makes our lives much easier, especially for testing APIs.
There are a number of external tools you can use to test your API; however, testing inside Laravel is a much better alternative—we can have all the benefits of testing an API structure and results while retaining full control of the database. For the list endpoint, for example, we could run a couple of factories and assert the response contains those resources.
To get started, we’ll need to tweak a few settings to use an in-memory SQLite database. Using that will make our tests run lightning fast, but the trade-off is that some migration commands (constraints, for example) will not work properly in that particular setup. I advise moving away from SQLite in testing when you start getting migration errors or if you prefer a stronger set of tests instead of performant runs.
We’ll also run the migrations before each test. This setup will allow us to build the database for each test and then destroy it, avoiding any type of dependency between tests.
In our config/database.php file, we’ll need to set up the database field in the sqlite configuration to :memory::
...

'connections' => [

    'sqlite' => [

        'driver' => 'sqlite',

        'database' => ':memory:',

        'prefix' => '',

    ],

    ...

]
Then enable SQLite in phpunit.xml by adding the environment variable DB_CONNECTION:
    <php>

        <env name="APP_ENV" value="testing"/>

        <env name="CACHE_DRIVER" value="array"/>

        <env name="SESSION_DRIVER" value="array"/>

        <env name="QUEUE_DRIVER" value="sync"/>

        <env name="DB_CONNECTION" value="sqlite"/>

    </php>
With that out of the way, all that’s left is configuring our base TestCase class to use migrations and seed the database before each test. To do so, we need to add the DatabaseMigrations trait, and then add an Artisan call on our setUp() method. Here’s the class after the changes:
use Illuminate\Foundation\Testing\DatabaseMigrations;

use Illuminate\Foundation\Testing\TestCase as BaseTestCase;

use Illuminate\Support\Facades\Artisan;

abstract class TestCase extends BaseTestCase

{

    use CreatesApplication, DatabaseMigrations;

    public function setUp()

    {

        parent::setUp();

        Artisan::call('db:seed');

    }

}
One last thing that I like to do is to add the test command to composer.json:
    "scripts": {

        "test" : [

            "vendor/bin/phpunit"

        ],

    ...

    },
The test command will be available like this:
$ composer test
Setting Up Factories for Our Tests
Factories will allow us to quickly create objects with the right data for testing. They’re located in the database/factories folder. Laravel comes out of the box with a factory for the User class, so let’s add one for the Article class:
$factory->define(App\Article::class, function (Faker\Generator $faker) {

    return [

        'title' => $faker->sentence,

        'body' => $faker->paragraph,

    ];

});
The Faker library is already injected to help us create the correct format of random data for our models.
Our First Tests
We can use Laravel’s assert methods to easily hit an endpoint and evaluate its response. Let’s create our first test, the login test, using the following command:
$ php artisan make:test Feature/LoginTest
And here is our test:
class LoginTest extends TestCase

{

    public function testRequiresEmailAndLogin()

    {

        $this->json('POST', 'api/login')

            ->assertStatus(422)

            ->assertJson([

                'email' => ['The email field is required.'],

                'password' => ['The password field is required.'],

            ]);

    }

    public function testUserLoginsSuccessfully()

    {

        $user = factory(User::class)->create([

            'email' => 'testlogin@user.com',

            'password' => bcrypt('toptal123'),

        ]);

        $payload = ['email' => 'testlogin@user.com', 'password' => 'toptal123'];

        $this->json('POST', 'api/login', $payload)

            ->assertStatus(200)

            ->assertJsonStructure([

                'data' => [

                    'id',

                    'name',

                    'email',

                    'created_at',

                    'updated_at',

                    'api_token',

                ],

            ]);

    }

}
These methods test a couple of simple cases. The json() method hits the endpoint and the other asserts are pretty self explanatory. One detail about assertJson(): this method converts the response into an array searches for the argument, so the order is important. You can chain multiple assertJson() calls in that case.
Now, let’s create the register endpoint test and write a couple for that endpoint:
$ php artisan make:test RegisterTest
class RegisterTest extends TestCase

{

    public function testsRegistersSuccessfully()

    {

        $payload = [

            'name' => 'John',

            'email' => 'john@toptal.com',

            'password' => 'toptal123',

            'password_confirmation' => 'toptal123',

        ];

        $this->json('post', '/api/register', $payload)

            ->assertStatus(201)

            ->assertJsonStructure([

                'data' => [

                    'id',

                    'name',

                    'email',

                    'created_at',

                    'updated_at',

                    'api_token',

                ],

            ]);;

    }

    public function testsRequiresPasswordEmailAndName()

    {

        $this->json('post', '/api/register')

            ->assertStatus(422)

            ->assertJson([

                'name' => ['The name field is required.'],

                'email' => ['The email field is required.'],

                'password' => ['The password field is required.'],

            ]);

    }

    public function testsRequirePasswordConfirmation()

    {

        $payload = [

            'name' => 'John',

            'email' => 'john@toptal.com',

            'password' => 'toptal123',

        ];

        $this->json('post', '/api/register', $payload)

            ->assertStatus(422)

            ->assertJson([

                'password' => ['The password confirmation does not match.'],

            ]);

    }

}
And lastly, the logout endpoint:
$ php artisan make:test LogoutTest
class LogoutTest extends TestCase

{

    public function testUserIsLoggedOutProperly()

    {

        $user = factory(User::class)->create(['email' => 'user@test.com']);

        $token = $user->generateToken();

        $headers = ['Authorization' => "Bearer $token"];

        $this->json('get', '/api/articles', [], $headers)->assertStatus(200);

        $this->json('post', '/api/logout', [], $headers)->assertStatus(200);

        $user = User::find($user->id);

        $this->assertEquals(null, $user->api_token);

    }

    public function testUserWithNullToken()

    {

        // Simulating login

        $user = factory(User::class)->create(['email' => 'user@test.com']);

        $token = $user->generateToken();

        $headers = ['Authorization' => "Bearer $token"];

        // Simulating logout

        $user->api_token = null;

        $user->save();

        $this->json('get', '/api/articles', [], $headers)->assertStatus(401);

    }

}
It’s important to note that, during testing, the Laravel application is not instantiated again on a new request. Which means that when we hit the authentication middleware, it saves the current user inside the
TokenGuardinstance to avoid hitting the database again. A wise choice, however—in this case, it means we have to split the logout test into two, to avoid any issues with the previously cached user.
Testing the Article endpoints is straightforward as well:
class ArticleTest extends TestCase

{

    public function testsArticlesAreCreatedCorrectly()

    {

        $user = factory(User::class)->create();

        $token = $user->generateToken();

        $headers = ['Authorization' => "Bearer $token"];

        $payload = [

            'title' => 'Lorem',

            'body' => 'Ipsum',

        ];

        $this->json('POST', '/api/articles', $payload, $headers)

            ->assertStatus(200)

            ->assertJson(['id' => 1, 'title' => 'Lorem', 'body' => 'Ipsum']);

    }

    public function testsArticlesAreUpdatedCorrectly()

    {

        $user = factory(User::class)->create();

        $token = $user->generateToken();

        $headers = ['Authorization' => "Bearer $token"];

        $article = factory(Article::class)->create([

            'title' => 'First Article',

            'body' => 'First Body',

        ]);

        $payload = [

            'title' => 'Lorem',

            'body' => 'Ipsum',

        ];

        $response = $this->json('PUT', '/api/articles/' . $article->id, $payload, $headers)

            ->assertStatus(200)

            ->assertJson([

                'id' => 1,

                'title' => 'Lorem',

                'body' => 'Ipsum'

            ]);

    }

    public function testsArtilcesAreDeletedCorrectly()

    {

        $user = factory(User::class)->create();

        $token = $user->generateToken();

        $headers = ['Authorization' => "Bearer $token"];

        $article = factory(Article::class)->create([

            'title' => 'First Article',

            'body' => 'First Body',

        ]);

        $this->json('DELETE', '/api/articles/' . $article->id, [], $headers)

            ->assertStatus(204);

    }

    public function testArticlesAreListedCorrectly()

    {

        factory(Article::class)->create([

            'title' => 'First Article',

            'body' => 'First Body'

        ]);

        factory(Article::class)->create([

            'title' => 'Second Article',

            'body' => 'Second Body'

        ]);

        $user = factory(User::class)->create();

        $token = $user->generateToken();

        $headers = ['Authorization' => "Bearer $token"];

        $response = $this->json('GET', '/api/articles', [], $headers)

            ->assertStatus(200)

            ->assertJson([

                [ 'title' => 'First Article', 'body' => 'First Body' ],

                [ 'title' => 'Second Article', 'body' => 'Second Body' ]

            ])

            ->assertJsonStructure([

                '*' => ['id', 'body', 'title', 'created_at', 'updated_at'],

            ]);

    }

}
Next Steps
That’s all there is to it. There’s definitely room for improvement—you can implement OAuth2 with the Passportpackage, integrate a pagination and transformation layer (I recommend Fractal), the list goes on—but I wanted to go through the basics of creating and testing an API in Laravel with no external packages.
Laravel has certainly improved my experience with PHP and the ease of testing with it has solidified my interest in the framework. It’s not perfect, but it’s flexible enough to let you work around its issues.
If you’re designing a public API, check out 5 Golden Rules for Great Web API Design.
UNDERSTANDING THE BASICS
What is Laravel?
Laravel is an opinionated PHP framework. It abstracts away the minutiae of building a web application to facilitate productivity, maintenance, and forward compatibility.
What is REST?
What is the difference between JSON and XML?
What is Composer?
About the author

Laravel API Tutorial: How to Build and Test a RESTful API的更多相关文章
- 自动化API之一 生成开源ERP Odoo App 的RestFul API
1.在服务器上安装开源ERP Odoo 安装步骤请自行百度,本文重点不在于指导安装,以下是安装后PC端效果. Odoo: 2.在Uniconnector平台上注册Odoo App 移动端应用 3.配置 ...
- 【Tech】CAS RESTful API使用笔记
在被maven,cas,tomcat各种贱人就是矫情的虐了好几天之后,终于跑通了demo,哈哈哈哈哈哈哈~ 在这里详细记录一下,给和我一样连maven都不会的小白一点福利,同时欢迎大神指正. 首先上最 ...
- Swagger2在DBA Service中生成RESTful API的实践
目的与背景: 目的:对外暴露DBA Service必要的RESTful API,形成规整的API文档 背景:DBA Service后端采用Spring-boot,属于Spring家族,故生成API的工 ...
- RESTful API设计指南
网络应用程序,分为前端和后端两个部分.当前的发展趋势,就是前端设备层出不穷(手机.平板.桌面电脑.其他专用设备......). 因此,必须有一种统一的机制,方便不同的前端设备与后端进行通信.这导致AP ...
- SpringMVC Restful api接口实现
[前言] 面向资源的 Restful 风格的 api 接口本着简洁,资源,便于扩展,便于理解等等各项优势,在如今的系统服务中越来越受欢迎. .net平台有WebAPi项目是专门用来实现Restful ...
- 让SpringMVC Restful API优雅地支持多版本
好久没有更新博客,难得有空,记录一下今天写的一个小工具,供有需要的朋友参考. 在移动APP开发中,多版本接口同时存在的情况经常发生,通常接口支持多版本,有以下两种方式: 1.通过不同路径区分不同版本 ...
- 什么是RESTful API?
要弄清楚什么是RESTful API,首先要弄清楚什么是REST.REST -- REpresentational State Transfer,英语的直译就是"表现层状态转移". ...
- Restful API设计规范
理解RESTful架构 Restful API设计指南 理解RESTful架构 越来越多的人开始意识到,网站即软件,而且是一种新型的软件. 这种"互联网软件"采用客户端/服务器模式 ...
- Python自动化开发 - RESTful API
本节内容 1. RESTful 简介 2. RESTful 设计指南 3. Django REST Framework 最佳实践 4. 理论拓展与开放平台 5. API文档化与测试 一 R ...
随机推荐
- oracle增加记录谁在连接你的数据库
我们都知道在v$session 中记录着客户端的机器名称,但是没有IP , 如果记录clinet ip 呢? 有两种思路: ① 利用trigger,后面就是这种方式 ② 利用 DBMS_S ...
- ServletContextListener中的方法contextInitialized执行了两次
有一个web06项目是直接拷贝web05的,复制过后web06项目默认的web配置中的Context Root还是web05,导致tomcat在启动时还是会创建两个web应用,修改成web06后,cl ...
- SpringCloud系列四:Eureka 服务发现框架(定义 Eureka 服务端、Eureka 服务信息、Eureka 发现管理、Eureka 安全配置、Eureka-HA(高可用) 机制、Eureka 服务打包部署)
1.概念:Eureka 服务发现框架 2.具体内容 对于服务发现框架可以简单的理解为服务的注册以及使用操作步骤,例如:在 ZooKeeper 组件,这个组件里面已经明确的描述了一个服务的注册以及发现操 ...
- thinkphp5.1 判断是不是post提交
if(Request::isPost()){ }else{ } 这样就对了
- 42_redux_counter应用_redux异步版本
前言: redux默认不支持异步编程,需要下载redux插件(异步中间件) 如何下载: npm install --save redux-thunk 项目结构: 代码: import React, { ...
- 同时安装 Python 2 与Python 3 的方法及pip模块的下载安装
Python虽然功能强大,上手容易,但版本问题却是个烦人的问题. Python 2.x 和 Python 3.x 版本之间存在很大的不兼容. 同时安装Python2.x和Python3.x 1. 在P ...
- errors collectiions
c/c++中出现“undefined reference to”的解决 如果提示未定义的函数是某个库的函数.检查库时候已经安装,并在编译命令中采用-l和-L参数导入库. 如果提示未定义的函数是程序中的 ...
- Reactive Programming
Reactive的表现 Reactive 规范是 JVM Reactive 扩展规范 Reactive Streams JVM,而 Reactive 实现框架则是最典型的实现: Reactive St ...
- 初识TCP协议
一.引言 发送一段TCP数据大致需要经过:用户封装 –> TCP封装 –> IP封装 –>帧封装 Note:用户封装没啥好说的,都是客户自己决定的,在一些简单的应用情况下,这个步骤可 ...
- LVS负载均衡
1.LVS负载均衡 实现LVS负载均衡转发方式有三种,分别为NAT.DR.TUN模式,LVS均衡算法包括:RR(round-robin).LC(least_connection).W(weight)R ...