FragmentTabHost用法
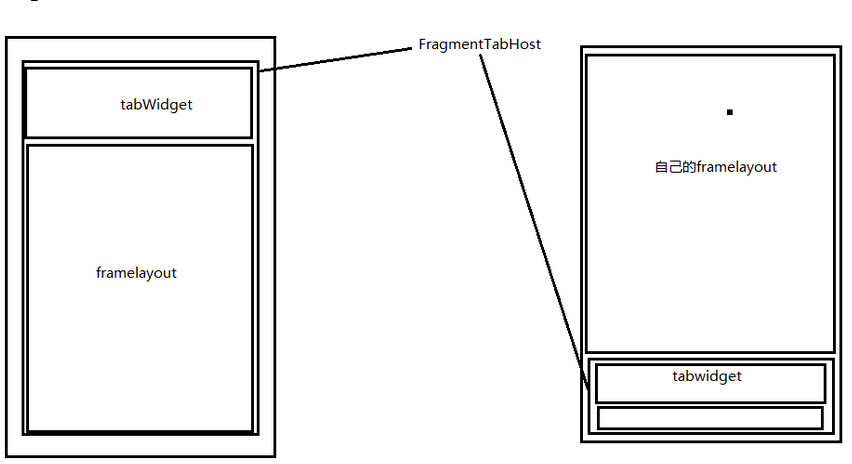
FragmentTabHost组成
- Tabhost,TabWidget,切换的内容容器FrameLayout
层级关系
----FragmentTabHost

    |-----TabWidget

    |-----FrameLayout
布局实现
- 实现tabhost采用android.support.v4.app.FragmentTabHost
注意 id:@android:id/tabhost
- 实现tabWidget
注意 id:@android:id/tabs
实现FrameLayout
注意
1. id: @android:id/tabcontent
2. 此容器已经被废除,但在布局中必须有
实现自定义的内容容器区域(FrameLayout)
注意 :
1. 整体需采用线性布局
2. 将自定义展示的区域放到TabHost之上
3. 自定义的内容需要给权重
代码实现
- 初始化TabHost
调用setup(Context,FragmentManager,int);
最后一个参数 指的是 Fragment的容器id 用来切换fragment的
- 新建TabSpec
调用setIndicator(View view)//实现自定义的tab
- 添加TabSpec
调用addTab(TabSpec,Class,Bundle)的方法添加TabSpec
Class 指的是 tab对应的 Fragment
Bundle 指的是 Fragment 初始化的参数
组合式控件的实现(下面的Tab一般都自定义)
- 新建布局
- 将布局和代码进行关联
新建的View 必须继承 和 布局容器一样的容器类
通过View.inflate(context,LayoutId, this)将View和xml进行绑定
- 功能进行封装
根据当前View需要的功能进行封装
<LinearLayout xmlns:android="http://schemas.android.com/apk/res/android"

    xmlns:tools="http://schemas.android.com/tools"

    android:layout_width="match_parent"

    android:layout_height="match_parent"

    android:orientation="vertical" >

    <FrameLayout

        android:id="@+id/activity_home_container"

        android:layout_width="fill_parent"

        android:layout_height="0dp"

        android:layout_weight="1" >

    </FrameLayout>

    <android.support.v4.app.FragmentTabHost

        android:id="@android:id/tabhost"

        android:layout_width="match_parent"

        android:layout_height="wrap_content" >

        <TabWidget

            android:id="@android:id/tabs"

            android:layout_width="match_parent"

            android:layout_height="wrap_content"

            android:layout_alignParentBottom="true"

            android:background="#FFF1F1F1" >

        </TabWidget>

        <FrameLayout

            android:id="@android:id/tabcontent"

            android:layout_width="0dp"

            android:layout_height="0dp" >

        </FrameLayout>

    </android.support.v4.app.FragmentTabHost>

</LinearLayout>
代码:
public class HomeActivity extends BaseActivity implements OnTabChangeListener {

	private static final String TAB_CHAT = "chat";

	private static final String TAB_CONTACT = "contact";

	private static final String TAB_DISCOVER = "discover";

	private static final String TAB_ME = "me";

	private FragmentTabHost tabhost;

	private TabIndicatorView chatIndicator;

	private TabIndicatorView contactIndicator;

	private TabIndicatorView discoverIndicator;

	private TabIndicatorView meIndicator;

	@Override

	protected void onCreate(Bundle savedInstanceState) {

		super.onCreate(savedInstanceState);

		setContentView(R.layout.act_home);

		// 1. 初始化TabHost

		tabhost = (FragmentTabHost) findViewById(android.R.id.tabhost);

		tabhost.setup(this, getSupportFragmentManager(),

				R.id.activity_home_container);//上面的fargment

		// 2. 新建TabSpec

		TabSpec spec = tabhost.newTabSpec(TAB_CHAT);//需要自定义常量

		chatIndicator = new TabIndicatorView(this);

		chatIndicator.setTabTitle("消息");

		chatIndicator.setTabIcon(R.drawable.tab_icon_chat_normal,

				R.drawable.tab_icon_chat_focus);//选中和默认的图标

		spec.setIndicator(chatIndicator);

		// 3. 添加TabSpec

		tabhost.addTab(spec, ChatFra.class, null);//添加上面的fargment

		// 2. 新建TabSpec

		spec = tabhost.newTabSpec(TAB_CONTACT);

		contactIndicator = new TabIndicatorView(this);

		contactIndicator.setTabIcon(R.drawable.tab_icon_contact_normal,

				R.drawable.tab_icon_contact_focus);

		contactIndicator.setTabTitle("通讯录");

		contactIndicator.setTabUnreadCount(10);

		spec.setIndicator(contactIndicator);

		// 3. 添加TabSpec

		tabhost.addTab(spec, ContactFra.class, null);

		// 2. 新建TabSpec

		spec = tabhost.newTabSpec(TAB_DISCOVER);

		discoverIndicator = new TabIndicatorView(this);

		discoverIndicator.setTabIcon(R.drawable.tab_icon_discover_normal,

				R.drawable.tab_icon_discover_focus);

		discoverIndicator.setTabTitle("发现");

		discoverIndicator.setTabUnreadCount(10);

		spec.setIndicator(discoverIndicator);

		// 3. 添加TabSpec

		tabhost.addTab(spec, DiscoverFra.class, null);

		// 2. 新建TabSpec

		spec = tabhost.newTabSpec(TAB_ME);

		meIndicator = new TabIndicatorView(this);

		meIndicator.setTabIcon(R.drawable.tab_icon_me_normal,

				R.drawable.tab_icon_me_focus);

		meIndicator.setTabTitle("我");

		meIndicator.setTabUnreadCount(10);

		spec.setIndicator(meIndicator);

		// 3. 添加TabSpec

		tabhost.addTab(spec, MeFra.class, null);

		// 去掉分割线

		tabhost.getTabWidget().setDividerDrawable(android.R.color.white);

		// 初始化 tab选中

		tabhost.setCurrentTabByTag(TAB_CHAT);

		chatIndicator.setTabSelected(true);

		// 设置tab切换的监听

		tabhost.setOnTabChangedListener(this);

	}

	@Override

	public void onTabChanged(String tag) {

		chatIndicator.setTabSelected(false);

		contactIndicator.setTabSelected(false);

		discoverIndicator.setTabSelected(false);

		meIndicator.setTabSelected(false);

		if (TAB_CHAT.equals(tag)) {

			chatIndicator.setTabSelected(true);

		} else if (TAB_CONTACT.equals(tag)) {

			contactIndicator.setTabSelected(true);

		} else if (TAB_DISCOVER.equals(tag)) {

			discoverIndicator.setTabSelected(true);

		} else if (TAB_ME.equals(tag)) {

			meIndicator.setTabSelected(true);

		}

	}

}


下面的自定义,动态的去添加信息
public class TabIndicatorView extends RelativeLayout {

	private ImageView ivTabIcon;

	private TextView tvTabHint;

	private TextView tvTabUnRead;

	private int normalIconId;

	private int focusIconId;

	public TabIndicatorView(Context context) {

		this(context, null);//这个实现这个构造函数就可以了

	}

	public TabIndicatorView(Context context, AttributeSet attrs) {

		super(context, attrs);

		// 将布局文件和 代码进行绑定

		View.inflate(context, R.layout.tab_indicator, this);

		ivTabIcon = (ImageView) findViewById(R.id.tab_indicator_icon);

		tvTabHint = (TextView) findViewById(R.id.tab_indicator_hint);

		tvTabUnRead = (TextView) findViewById(R.id.tab_indicator_unread);

		setTabUnreadCount(0);

	}

	// 设置tab的title

	public void setTabTitle(String title) {

		tvTabHint.setText(title);

	}

	public void setTabTitle(int titleId) {

		tvTabHint.setText(titleId);

	}

	// 初始化图标

	public void setTabIcon(int normalIconId, int focusIconId) {

		this.normalIconId = normalIconId;

		this.focusIconId = focusIconId;

		ivTabIcon.setImageResource(normalIconId);

	}

	// 设置未读数

	public void setTabUnreadCount(int unreadCount) {

		if (unreadCount <= 0) {

			tvTabUnRead.setVisibility(View.GONE);

		} else {

			if (unreadCount <= 99) {

				tvTabUnRead.setText(unreadCount + "");

			} else {

				tvTabUnRead.setText("99+");

			}

			tvTabUnRead.setVisibility(View.VISIBLE);

		}

	}

	// 设置选中

	public void setTabSelected(boolean selected) {

		if (selected) {

			ivTabIcon.setImageResource(focusIconId);

		} else {

			ivTabIcon.setImageResource(normalIconId);

		}

	}

}
FragmentTabHost用法的更多相关文章
- FragmentTabHost的基本用法
开通博客以来已经约莫1个月了.几次想提笔写写东西,但总是由于各种各样的原因并没有开始.现在,年假刚结束,项目也还没有开始,但最终促使我写这篇博客的是,看了一篇博友写的新年计划,说是要在新的一年中写50 ...
- 【Android Widget】FragmentTabHost
android.support.v4包里面提供了FragmentTabHost用来替代TabHost,FragmentTabHost内容页面支持Fragment,下面我们就通过示例来看他的用法 效果图 ...
- FragmentTabHost的应用
原创)FragmentTabHost的应用(fragment学习系列文章之二) 时间 2014-04-14 00:11:46 CSDN博客 原文 http://blog.csdn.net/flyi ...
- EditText 基本用法
title: EditText 基本用法 tags: EditText,编辑框,输入框 --- EditText介绍: EditText 在开发中也是经常用到的控件,也是一个比较必要的组件,可以说它是 ...
- jquery插件的用法之cookie 插件
一.使用cookie 插件 插件官方网站下载地址:http://plugins.jquery.com/cookie/ cookie 插件的用法比较简单,直接粘贴下面代码示例: //生成一个cookie ...
- Java中的Socket的用法
Java中的Socket的用法 Java中的Socket分为普通的Socket和NioSocket. 普通Socket的用法 Java中的 ...
- [转载]C#中MessageBox.Show用法以及VB.NET中MsgBox用法
一.C#中MessageBox.Show用法 MessageBox.Show (String) 显示具有指定文本的消息框. 由 .NET Compact Framework 支持. MessageBo ...
- python enumerate 用法
A new built-in function, enumerate() , will make certain loops a bit clearer. enumerate(thing) , whe ...
- [转载]Jquery中$.get(),$.post(),$.ajax(),$.getJSON()的用法总结
本文对Jquery中$.get(),$.post(),$.ajax(),$.getJSON()的用法进行了详细的总结,需要的朋友可以参考下,希望对大家有所帮助. 详细解读Jquery各Ajax函数: ...
随机推荐
- go语言学习逻辑运算符if判断,iota的理解
第一天学习go语言,首先吐槽一下,配置go语言浪费了我两个小时的时间 不是在百度,就是在百度的路上,这里介绍一下我的go语言的版本和开发平台 go语言1.12版本,之前没有用过在早的版本了首先记录一下 ...
- 201771010134杨其菊《面向对象程序设计java》第九周学习总结
第九周学习总结 第一部分:理论知识 异常.断言和调试.日志 1.捕获 ...
- laravel-debugbar安装
第一步:找到debugbar扩展包 扩展包的链接:https://packagist.org/packages/barryvdh/laravel-debugbar 第二步:安装 我测试的环境larav ...
- STS中springmvc.xml配置文件
<?xml version="1.0" encoding="UTF-8"?> <beans xmlns="http://www.sp ...
- ACM(数学问题)——UVa202:输入整数a和b(0≤a≤3000,1≤b≤3000),输出a/b的循环小数表示以及循环节长度。
主要思路: 通过模拟除法运算过程,来判断循环节结束的位置,不断将余数*10再对除数取余得到新的余数,并记录下来,知道出现的余数之前出现过,此时小数开始循环. 例如: 假设 -> a ...
- Vmware Workstation添加centos 7系统网络问题(无IP情况)
简单配置 命令行输入ip addr 查询不到IP的情况,如下: 解决办法: 1. vi /etc/sysconfig/network-scripts/ifcfg-ens33 2. 最后一行,ONBO ...
- python作业练习
#1.猜字游戏 用if分支完成猜数字游戏 -- 先通过键盘输入一个数字算作出题 -- 在键盘输入答案 -- 正确:猜对 | 误差3以内:接近了 | 误差外小值:太小 | 误差外大值:太大 queste ...
- P1081 开车旅行(Not Finish)
https://www.luogu.org/problemnew/show/P1081
- 记录mysql安装过程遇到问题
1. 远程连接授权 登陆mysql数据库 (如果安装在系统盘可以直接命令, 否则要切换到安装目录..bin/) mysql -u root -p mysql> use mysql; - ...
- 小白的CTF学习之路8——节约内存的编程方式
今天第二更,废话不说上干货 上一章我们学习了内存和cpu间的互动方式,了解到内存的空间非常有限,所以这样就需要我们在编程的时候尽可能的节省内存空间,用最少的空间发挥最大的效果,以下是几种节约内存的方法 ...