.net Core 调用微信Jsapi接口,H5解析二维码
项目里需要用到扫描二维码,自己实现,不会。
找到了两种解决方案:
- 通过reqrcode.js,这是一个前端解析二维码内容的js库。如果二维码比较清晰,用这种效果也不错
- 调用微信扫一扫功能,这种效果很好。但是调试接口超级麻烦。
具体实现:前端代码(vue)(前端用到 vux)
<template>

<div class="main">

  <group title="打印机参数" label-width="5.5em">

      <x-input title="名称" placeholder="输入打印机名称" v-model="model.name" :required="true" @on-change="check" ref="name"></x-input>

      <x-input title="MAC地址" placeholder="输入MAC地址" v-model="model.mac"  @on-change="check" ref="mac">

        <a slot="right-full-height" class="scan" @click="scan()" title="扫码"><x-icon type="android-expand" size="32"></x-icon></a>

      </x-input>

      <cell title="城市" :value="city"></cell>

      <cell title="经纬度" :value="location"></cell>

  </group>

  <iframe id="geoPage" width=0 height=0 frameborder=0  style="display:none;" scrolling="no"  src="https://apis.map.qq.com/tools/geolocation?key=212121U3F2Q&referer=3Dprint"></iframe>

  <x-button type="primary" @click.native="add()" :disabled.sync="disabled"> 添加打印机</x-button>

  <input type="file" accept="image/*" capture="camera" @change="show($event)" v-show="false" ref="file">

</div>

</template>

<script>

import {Group, XInput, XButton, Alert, Range, XSwitch, Cell, InlineXSwitch, ChinaAddressV4Data} from 'vux'

export default {

  components: {Group, XInput, XButton, Alert, Range, XSwitch, Cell, InlineXSwitch, ChinaAddressV4Data},

  data () {

    return {

      addressData: ChinaAddressV4Data,

      disabled: true,

      city: '',

      location: '',

      sys: false, // 扫一扫调用

      model: {

        name: '',

        mac: '',

        status: false,

        citys: [],

        city: '',

        address: '',

        memory: '',

        temperature: 0,

        modelName: '',

        location: '',

        ver: '',

        step: 0,

        plantTemperature: '',

        userId: 0

      }

    }

  },

  mounted () {

    // this.getLocation()

    let that = this

    window.addEventListener('message', function (event) {

      var loc = event.data

      if (loc) {

        that.city = loc.nation + ' ' + loc.province + ' ' + loc.city

        that.location = loc.lat + ' , ' + loc.lng

        that.model.address = that.city

        that.model.location = that.location

      }

      console.log('location', loc)

    }, false)

    this.initConifig()

  },

  methods: {

    add () {

      let that = this

      this.model.userId = sessionStorage["userId"]

      this.model.status = this.model.status ? 1 : 0

      this.model.city = this.model.citys.join()

     // console.log(this.model.city)

      console.log(this.$store.state.user)

      this.Ajax.post('/api/services/app/Print/Create', this.model).then(function (result) {

        // console.log(that.model)

        if (result.success) {

          that.go('/user/prints')

        } else {

          that.$vux.toast.show({text: result.error.message, type: 'cancel'})

        }

      })

    },

    check () {

      this.disabled = !(this.model.name !== '' && this.model.mac !== '')

    },

    initConifig () {

      let that = this

      /* global wx */

      this.Ajax.get('/WX/GetConfig?url=' + location.href).then((r) => {

        let data = r.result

        console.log(data)

        wx.config({

          debug: false, // 开启调试模式,调用的所有api的返回值会在客户端alert出看传入的参数,可以在pc端打开,参数信息会通过log打出,仅在pc端时才会打印。

          appId: data.appId, // 必填,公众号的唯一标识

          timestamp: data.timestamp, // 必填,生成签名的时间戳

          nonceStr: data.noncestr, // 必填,生成签名的随机串

          signature: data.signature, // 必填,签名,见附录1

          jsApiList: ['scanQRCode'] // 必填,需要使用的JS接口列表,所有JS接口2

        })

        that.sys = true

        wx.error((r) => {

          console.log(r)

          that.sys = false

          alert('微信调用异常:' + r.errMsg)

        })

      })

    },

    wxScan () {

      let that = this

       /* global wx */

      wx.scanQRCode({

        needResult: 1,

        desc: 'scanQRCode desc',

        success: (r) => {

          console.log(r)

          let msg = r.resultStr

          if (msg.length === 29) {

            let mac = msg.substring(17, 29)

            let arrs = []

            console.log(mac)

            for (let i = 0; i < 6; i++) {

              arrs.push(mac.substring(i * 2, i * 2 + 2))

            }

            that.model.mac = arrs.join(':')

            console.log(msg, that.model.mac)

          } else {

            that.$vux.toast.show({text: 'mac解析失败:' + msg, type: 'cancel'})

          }

        }

      })

    },

    scan () {

      if (this.sys) {

        this.wxScan()

      } else {

        this.$refs.file.click()

      }

    },

    go (link) {

      this.$router.push({path: link})

    },

    show (send) {

      // var file = console.log(send)

      /* global qrcode */

      let file = send.target.files[0]

      qrcode.decode(this.getUrl(file))

      var that = this

      qrcode.callback = function (msg) {

        if (msg.length === 29) {

          let mac = msg.substring(17, 29)

          let arrs = []

          console.log(mac)

          for (let i = 0; i < 6; i++) {

            arrs.push(mac.substring(i * 2, i * 2 + 2))

          }

          that.model.mac = arrs.join(':')

          console.log(msg, that.model.mac)

        } else {

          that.$vux.toast.show({text: 'mac解析失败:' + msg, type: 'cancel'})

        }

      }

    },

    getUrl (file) {

      let url = null

      if (window.createObjectURL !== undefined) {

        url = window.createObjectURL(file)

      } else if (window.URL !== undefined) {

        url = window.URL.createObjectURL(file)

      } else if (window.webkitURL !== undefined) {

        url = window.webkitURL.createObjectURL(file)

      }

      return url

    },

    getLocation () {

      if (navigator.geolocation) {

        navigator.geolocation.getCurrentPosition(function (p) {

          console.log(p)

        })

      } else {

        alert('不支持定位')

      }

    }

  }

}

</script>

<style  scoped>

.ptitle{ background: #efeff4;padding: 10px 20px; font-size: 16px; font-weight: bold; border-bottom: #d8d8dd;}

a.add:hover{ color: #4086ff;fill: #4086ff;cursor: pointer;}

.main{padding: 0 10px;}

a.scan{ fill: #4086ff; cursor: pointer;}

</style>
通用.net core 微信授权获取方法。
using System;

using System.Net.Http;

using System.Security.Cryptography;

using System.Text;

using Newtonsoft.Json;

namespace PrintServe.Web.Host.Core

{

    public static class WXApi

    {

        /// <summary>

        /// 过期时间

        /// </summary>

        public static DateTime OutDateTime { get; set; }

        /// <summary>

        /// 凭据

        /// </summary>

        public static string Token { get; set; }

        /// <summary>

        /// 船票

        /// </summary>

        public static string Ticket { get; set; }

        /// <summary>

        /// 获取微信api接口船票

        /// </summary>

        /// <param name="url">请求页面地址</param>

        /// <param name="appId">开发者Id</param>

        /// <param name="secret">开发者密码</param>

        /// <returns></returns>

        public static dynamic  GetConfig(string url,string appId,string secret)

        {

            var timestamp = CreatenTimestamp();

            var noncestr = CreatenNonce_str();

            var ticket = Ticket;

            if (DateTime.Now > OutDateTime)

            {

                var token = GetToken(appId, secret);

                if (!string.IsNullOrEmpty(token))

                {

                    OutDateTime = DateTime.Now.AddMinutes();

                    Token = token;

                    Ticket = GetTickect(Token);

                    ticket = Ticket;

                }

            }

            var signature = GetSignature(ticket, noncestr, timestamp, url, out var str);

            return new

            {

                ticket,

                appId,

                url,

                timestamp,

                noncestr,

                signature,

                str

            };

        }

        /// <summary>

        /// 获取凭据

        /// </summary>

        /// <param name="appid"></param>

        /// <param name="secret"></param>

        /// <returns></returns>

        public static string GetToken(string appid,string secret)

        {

            var url = string.Format("https://api.weixin.qq.com/cgi-bin/token?grant_type=client_credential&appid={0}&secret={1}",appid,secret);

            var client = new HttpClient();

            var result = client.GetAsync(url).Result;

            if (!result.IsSuccessStatusCode) return string.Empty;

            var jsTicket = result.Content.ReadAsStringAsync().Result;

            var v = JsonConvert.DeserializeObject<dynamic>(jsTicket);

            return v.access_token.ToString();

        }

        /// <summary>

        /// 获取船票

        /// </summary>

        /// <param name="token"></param>

        /// <returns></returns>

        public static string GetTickect(string token)

        {

            var url = string.Format("https://api.weixin.qq.com/cgi-bin/ticket/getticket?access_token={0}&type=jsapi", token);

            var client = new HttpClient();

            var result = client.GetAsync(url).Result;

            if (!result.IsSuccessStatusCode) return string.Empty;

            var jsTicket = result.Content.ReadAsStringAsync().Result;

            var v = JsonConvert.DeserializeObject<dynamic>(jsTicket);

            return v.ticket.ToString();

        }

        /// <summary>

        /// 获取时间戳

        /// </summary>

        /// <returns></returns>

        public static long CreatenTimestamp()

        {

            return (DateTime.Now.ToUniversalTime().Ticks - ) / ;

        }

        ///  <summary>

        ///  签名算法

        /// 本代码来自开源微信SDK项目:https://github.com/night-king/weixinSDK

        ///  </summary>

        ///  <param name="jsapi_ticket">jsapi_ticket</param>

        ///  <param name="noncestr">随机字符串(必须与wx.config中的nonceStr相同)</param>

        ///  <param name="timestamp">时间戳(必须与wx.config中的timestamp相同)</param>

        ///  <param name="url">当前网页的URL,不包含#及其后面部分(必须是调用JS接口页面的完整URL)</param>

        /// <param name="string1"></param>

        /// <returns></returns>

        public static string GetSignature(string jsapi_ticket, string noncestr, long timestamp, string url, out string string1)

        {

            url = url.Split('#')[];

            var string1Builder = new StringBuilder();

            string1Builder.Append("jsapi_ticket=").Append(jsapi_ticket).Append("&")

                .Append("noncestr=").Append(noncestr).Append("&")

                .Append("timestamp=").Append(timestamp).Append("&")

                .Append("url=").Append(url);

            string1 = string1Builder.ToString();

            return Sha1(string1);

        }

        /// <summary>

        /// 创建随机字符串

        ///本代码来自开源微信SDK项目:https://github.com/night-king/weixinSDK

        /// </summary>

        /// <returns></returns>

        public static string CreatenNonce_str()

        {

            var strs = "0123456789abcdefghijklmnopqrstuvwxyzABCDEFGHIJKLMNOPQRSTUVWXYZ".ToCharArray();

            Random r = new Random();

            var sb = new StringBuilder();

            var length = strs.Length;

            for (int i = ; i < ; i++)

            {

                sb.Append(strs[r.Next(length - )]);

            }

            return sb.ToString();

        }

        /// <summary>

        /// HMAC-SHA1加密算法

        /// </summary>

        /// <param name="str">加密字符串</param>

        /// <returns></returns>

        public static string Sha1(string str)

        {

            var sha1 = SHA1.Create();

            var hash = sha1.ComputeHash(Encoding.UTF8.GetBytes(str));

            string byte2String = string.Empty;

            foreach (var t in hash)

            {

                byte2String += t.ToString("x2");

            }

            return byte2String;

        }

    }

}
controller调用
using System;

using Abp.AspNetCore.Mvc.Controllers;

using Microsoft.AspNetCore.Hosting;

using Microsoft.AspNetCore.Mvc;

using Microsoft.Extensions.Configuration;

using PrintServe.Configuration;

using PrintServe.Web.Host.Core;

namespace PrintServe.Web.Host.Controllers

{

    public class WXController : AbpController

    {

        private readonly IConfigurationRoot _configuration;

        public WXController(IHostingEnvironment env)

        {

            _configuration = env.GetAppConfiguration();

        }

        public dynamic GetConfig(string url)

        {

            var appId = _configuration["wx:appid"];

            var secret = _configuration["wx:secret"];

//            Logger.Error("出现异常");

            return WXApi.GetConfig(url,appId,secret);

        }

        [HttpGet]

        public string Test(string input)

        {

            return WXApi.Sha1(input);

        }

    }

}
在主页面要添加微信接口js调用
<!DOCTYPE html>

<html>

  <head>

    <meta charset="utf-8">

    <meta name="viewport" content="width=device-width,initial-scale=1,user-scalable=0">

    <title>3D打印</title>

    <script src="./static/js/reqrcode.js"></script>

    <!-- <script src="./static/js/vconsole.min.js"></script> -->

    <!-- <script src="http://res.wx.qq.com/open/js/jweixin-1.4.0.js"></script> -->

    <script src="http://res.wx.qq.com/open/js/jweixin-1.1.0.js"></script>

  </head>

  <body>

    <div id="app-box"></div>

    <!-- built files will be auto injected -->

  </body>

</html>
调用微信api接口:
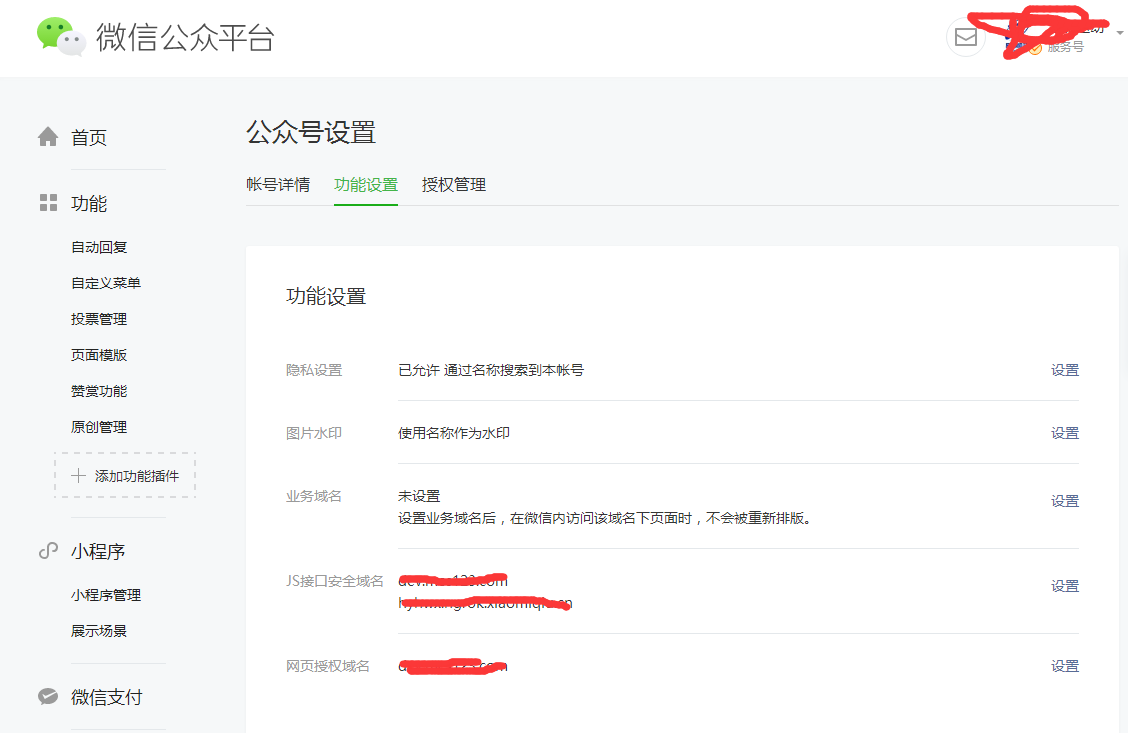
1:Ip,和域名都要加到微信公众平台里,缺一不可,在这里被坑了很久。
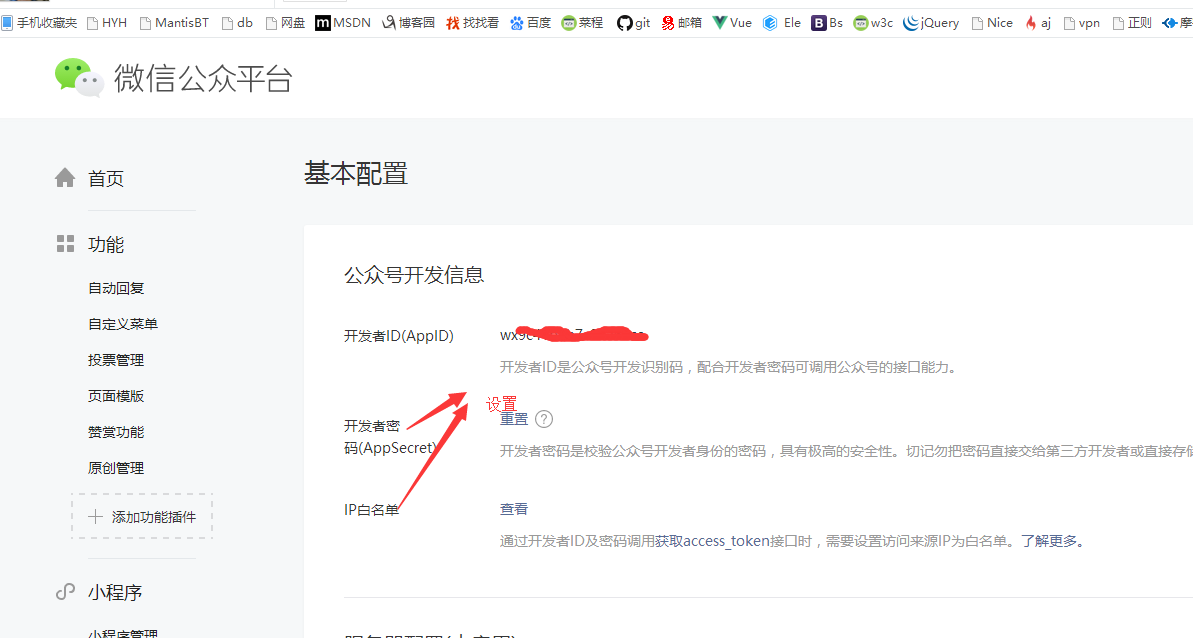
设置域名,一个月只能设置3次,要慎重。
2:调试时候,最好在开发机器上用花生壳绑定个域名,以便开发。本地没有域名,不能调试。可以下载微信开发者工具,进行调试,错误提示比较清晰。
微信开发者工具地址:地址
参考文章:
微信公众号开发之调起微信扫一扫接口
微信公众号开发:调用微信扫一扫功能
qrcode.js的识别解析二维码图片和生成二维码图片
.net Core 调用微信Jsapi接口,H5解析二维码的更多相关文章
- 使用Google提供的ZXing Core,Java生成、解析二维码
1.maven项目中,pom.xml中引入ZXing Core工具包: <!-- https://mvnrepository.com/artifact/com.google.zxing/core ...
- Java生成与解析二维码
1.下载支持二维码的jar包qrcode.jar和qrcode_swetake.jar, 其中qrcode_swetake.jar用于生成二维码,rcode.jar用于解析二维码,jar包下载地址(免 ...
- Asp.Net微信登录-电脑版扫描二维码登录
像京东,一号店等网站都实现了用微信来登录的功能,就是用手机上的微信扫一扫网站上的二维码,微信上确认后,即可自动用微信的帐号登录网站. 一.创建网站应用 在微信开放平台创建一个网站应用 https:// ...
- C#微信登录-电脑版扫描二维码登录
像京东,一号店等网站都实现了用微信来登录的功能,就是用手机上的微信扫一扫网站上的二维码,微信上确认后,即可自动用微信的帐号登录网站. 一.创建网站应用 在微信开放平台创建一个网站应用 https:// ...
- php微信开发之带参数二维码的使用
最近做微信PC端网页微信相关功能的开发,从一个新手的角度来说,微信公众号的文档还是不好理解的,网上找的帖子大都也都基本上是复制微信公众平台上给的文档,开发微信带参数二维码过程中还是遇到不少坑的,在此把 ...
- Zxing和QR Code生成和解析二维码
本文是学习慕课网课程<Java生成二维码>(http://www.imooc.com/learn/531)的笔记. 一.二维码的分类 线性堆叠式二维码.矩阵式二维码.邮政码. 二.二维码的 ...
- ZXing 生成、解析二维码图片的小示例
概述 ZXing 是一个开源 Java 类库用于解析多种格式的 1D/2D 条形码.目标是能够对QR编码.Data Matrix.UPC的1D条形码进行解码. 其提供了多种平台下的客户端包括:J2ME ...
- Java生成、解析二维码
今天遇到需求,使用Java生成二维码图片,网搜之后,大神们早就做过,个人总结一下. 目标:借助Google提供的ZXing Core工具包,使用Java语言实现二维码的生成和解析. 步骤如下: 1.m ...
- (转)ZXing解析二维码
1 ZXing解析二维码 上一篇文件已经说过如何用ZXing进行生成二维码和带图片的二维码,下面说下如何解析二维码 二维码的解析和生成类似,也可以参考google的一个操作类 BufferedImag ...
随机推荐
- 关于在ROS kinetic下arbotix报错的问题
最近在学习ros过程中 出现了一个包错误 ERROR:cannot launch node of type [arbotix_python/arbotix_driver]:arbotix_pytho ...
- html常见标签和属性
主体 body中常见属性 属性 表格 列表 表单 其他 input字段属性 form字段属性
- Linux系统中Redis和Tomcat的PID文件路径设置
Tomcat: /bin/catalina.sh 文件头注释下面添加一行:CATALINA_PID=/var/run/tomcat.pid Redis: redis.conf配置文件里面搜索pidfi ...
- java使用elasticsearch实现集群管理
本篇博客主要是查看集群中的相关信息,具体请看代码和注释 @Test public void test45() throws UnknownHostException{ //1.指定es集群 clust ...
- mysql 数据备份与数据导入到出
一.数据备份 #1. 物理备份: 直接复制数据库文件,适用于大型数据库环境.但不能恢复到异构系统中如Windows. #2. 逻辑备份: 备份的是建表.建库.插入等操作所执行SQL语句,适用于中小型数 ...
- [CQOI2017]老C的键盘
[CQOI2017]老C的键盘 题目描述 额,网上题解好像都是用的一大堆组合数,然而我懒得推公式. 设\(f[i][j]\)表示以\(i\)为根,且\(i\)的权值为\(j\)的方案数. 转移: \[ ...
- 启动线程用start方法
启动线程用start方法而不是用run方法 public static void main(String[] args) { Thread t=new Thread("Thread-TEST ...
- P2068 统计和(树状数组模板)
这是一道树状数组题 #include<iostream> using namespace std; ; int tree[maxn], n, m; char h; int x, y; vo ...
- sqlachemy 查询当日数据,
Tokens.query.filter(Tokens.user_id == user_id, db.cast(Tokens.create_time, db.DATE) == db.cast(curre ...
- Python框架学习之Flask中的Jinja2模板
前面也提到过在Flask中最核心的两个组件是Werkzeug和Jinja2模板.其中Werkzeug在前一节已经详细说明了.现在这一节主要是来谈谈Jinja2模板. 一.为什么需要引入模板: 在进行软 ...