使用Docker快速搭建Nginx+PHP-FPM+MySQL+phpMyAdmin环境
一、概述
环境介绍
操作系统:centos 7.6
docker版本:19.03.8
ip地址:192.168.31.34
本文将介绍如何使用单机部署Nginx+PHP-FPM环境
二、Nginx+PHP-FPM
拉取镜像
docker pull gaciaga/nginx-vts:latest

docker pull crunchgeek/php-fpm:7.3-r7
说明:
nginx镜像已经加装了vts模块,php镜像是最新版本。
php-fpm安装的模块如下:
apc

apcu

bcmath

bz2

calendar

Core

ctype

curl

date

dba

dom

ds

enchant

exif

fileinfo

filter

ftp

gd

gettext

gmp

hash

iconv

igbinary

imagick

imap

interbase

intl

json

ldap

libxml

mbstring

memcache

memcached

mongodb

msgpack

mysqli

mysqlnd

newrelic

openssl

pcntl

pcre

PDO

pdo_dblib

pdo_mysql

pdo_pgsql

pdo_sqlite

pdo_sqlsrv

pgsql

Phar

posix

pspell

readline

recode

redis

Reflection

session

shmop

SimpleXML

soap

sockets

sodium

SPL

sqlite3

ssh2

standard

sysvmsg

sysvsem

sysvshm

test

tidy

tokenizer

wddx

xdebug

xml

xmlreader

xmlrpc

xmlwriter

xsl

Zend OPcache

zip

zlib
运行镜像
docker run -d -it --restart=always --name nginx-vts -p 80:80 gaciaga/nginx-vts:latest

docker run -d -it --restart=always --name php-fpm -p 9000:9000 crunchgeek/php-fpm:7.3-r7
修改nginx配置文件
复制配置文件,这里先临时放到/opt目录
cd /opt/

docker cp nginx-vts:/etc/nginx/conf.d/default.conf .
修改配置文件
vi default.conf
内容如下:
server {

    listen       80;

    server_name  localhost;

    #charset koi8-r;

    location / {

        root   /usr/share/nginx/html;

        index  index.html index.htm;

    }

    location /status {

        vhost_traffic_status_display;

        vhost_traffic_status_display_format html;

    }

    #error_page  404              /404.html;

    # redirect server error pages to the static page /50x.html

    #

    error_page   500 502 503 504  /50x.html;

    location = /50x.html {

        root   /usr/share/nginx/html;

    }

    # proxy the PHP scripts to Apache listening on 127.0.0.1:80

    #

    #location ~ \.php$ {

    #    proxy_pass   http://127.0.0.1;

    #}

    # pass the PHP scripts to FastCGI server listening on 127.0.0.1:9000

    #

    location ~ \.php$ {

        fastcgi_pass   192.168.31.34:9000;

        fastcgi_index  index.php;

        fastcgi_param  SCRIPT_FILENAME  /var/www/html/$fastcgi_script_name;

        include        fastcgi_params;

    }

    location ~ ^/(fpm_status|health)$ {

        fastcgi_pass 192.168.31.34:9000;

        fastcgi_param SCRIPT_FILENAME $document_root$fastcgi_script_name;

        include fastcgi_params;

    }

    # deny access to .htaccess files, if Apache's document root

    # concurs with nginx's one

    #

    #location ~ /\.ht {

    #    deny  all;

    #}

}
说明:
    location ~ \.php$ {

        fastcgi_pass   192.168.31.34:9000;

        fastcgi_index  index.php;

        fastcgi_param  SCRIPT_FILENAME  /var/www/html/$fastcgi_script_name;

        include        fastcgi_params;

    }
这段配置是用来设置php文件访问的。
注意:
fastcgi_pass 地址为:主机ip+9000。因为在上面的步骤中,我已经把端口映射出来了。
fastcgi_param 表示php脚本运行的目录,这里的路径,是php-fpm里面的路径,不是nginx容器路径。因为nginx和php-fpm在2个不同的容器中。
php-fpm容器,默认已经创建了/var/www/html/目录。此目录时空的,稍后我会将test.php放入此目录。
    location ~ ^/(fpm_status|health)$ {

        fastcgi_pass 192.168.31.34:9000;

        fastcgi_param SCRIPT_FILENAME $document_root$fastcgi_script_name;

        include fastcgi_params;

    }
这里是用来查看php-fpm的状态页面的。
这里定义的fpm_status和health,表示访问php-fpm对应的路径。在php-fpm里面的www.conf中,路径必须一致,后面会介绍修改www.conf文件。
fastcgi_param 这里就不需要写绝对路径了,它会自动找到对应的脚本。
覆盖容器配置文件,并重载nginx
docker cp default.conf nginx-vts:/etc/nginx/conf.d/default.conf

docker exec -it nginx-vts nginx -s reload
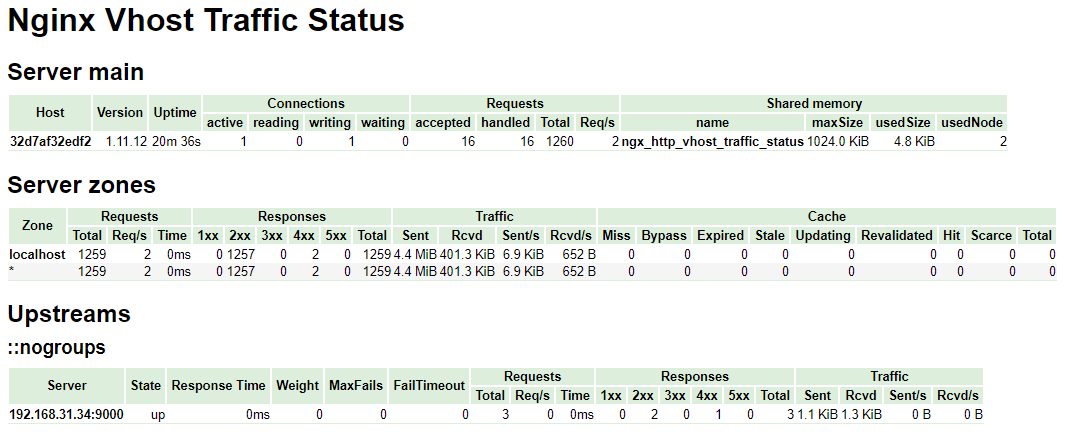
访问页面
http://192.168.31.34/status
效果如下:
修改php-fpm配置文件
复制www.conf,并修改status路径。注意:这里必须和nginx设置的保持一致。
docker cp php-fpm:/usr/local/etc/php-fpm.d/www.conf .

sed -i '238c pm.status_path = /fpm_status' www.conf

docker cp www.conf php-fpm:/usr/local/etc/php-fpm.d/www.conf
注意:这里的sed命令表示覆盖238行的内容。
查看php-fpm进程
# docker exec -it  php-fpm ps -aux

USER       PID %CPU %MEM    VSZ   RSS TTY      STAT START   TIME COMMAND

root         1  0.0  1.9 299256 37132 pts/0    Ss+  09:25   0:00 php-fpm: master

www-data    14  0.0  0.6 299416 12236 pts/0    S+   09:25   0:00 php-fpm: pool w

www-data    15  0.0  0.6 299416 12236 pts/0    S+   09:25   0:00 php-fpm: pool w

root        23  0.0  0.0  10620  1416 pts/1    Rs+  09:38   0:00 ps -aux
php-fpm 重启
docker exec -it php-fpm kill -USR2 1
php 5.3.3 以后的php-fpm 不再支持 php-fpm 以前具有的 /Data/apps/php7/sbin/php-fpm(start|stop|reload)等命令,所以不要再看这种老掉牙的命令了,需要使用信号控制:master进程可以理解以下信号
访问php-fpm状态页面
http://192.168.31.34/fpm_status
效果如下:

测试php文件
在/opt目录新建一个test.php
vi /opt/test.php
内容如下
<?php

   phpinfo();

?>
拷贝test.php到容器目录
docker cp test.php php-fpm:/var/www/html/test.php
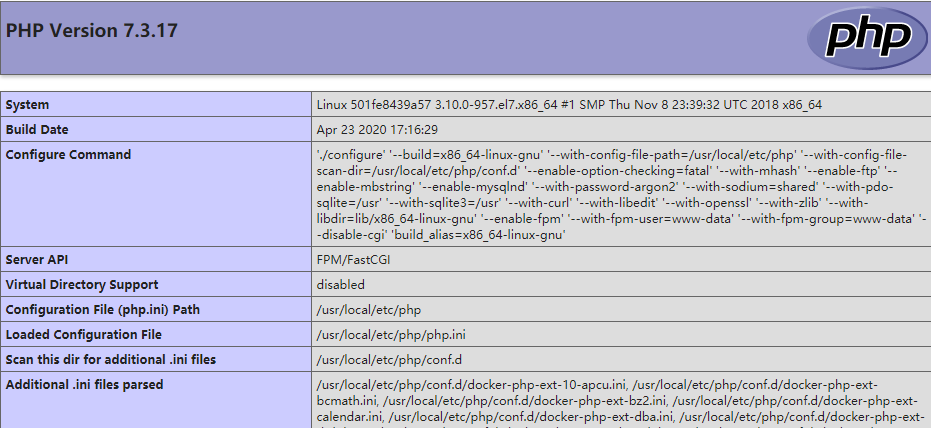
访问页面
http://192.168.31.34/test.php
效果如下;
三、MySQL
直接运行dockerhub里面的mysql5.7镜像
mkdir -p /data/mysql/data

docker run -d --name mysql5.7 --restart=always -e MYSQL_ROOT_PASSWORD=abcd@1234  -p 3306:3306 -v /data/mysql/data:/var/lib/mysql mysql:5.7 --character-set-server=utf8mb4 --collation-server=utf8mb4_unicode_ci
四、phpMyAdmin
为了验证LNMP环境,使用phpMyAdmin来演示一下,它是用php开发的。
下载代码
cd /opt/

wget https://files.phpmyadmin.net/phpMyAdmin/5.0.2/phpMyAdmin-5.0.2-all-languages.zip

unzip phpMyAdmin-5.0.2-all-languages.zip
修改配置
cd /opt/phpMyAdmin-5.0.2-all-languages

cp config.sample.inc.php config.inc.php

vi config.inc.php
将
$cfg['Servers'][$i]['host'] = 'localhost';
改为
$cfg['Servers'][$i]['host'] = '192.168.31.34';
拷贝phpMyAdmin到容器中
这里需要在nginx容器里面开放一个81端口,用来访问phpmyadmin,需要删除nginx容器,重新运行。
docker rm -f nginx-vts

docker run -d -it --restart=always --name nginx-vts -p 80:80 -p 81:81 gaciaga/nginx-vts:latest
复制代码到nginx容器中
为了和php容器目录一致,先创建目录,再copy
docker exec -it nginx-vts mkdir -p /var/www/html
复制代码到php容器中
docker cp phpMyAdmin-5.0.2-all-languages nginx-vts:/var/www/html/
编辑nginx配置
cd /opt/

vi phpmyadmin.conf
内容如下:
server {

    listen       81;

    server_name  localhost;

    root   /var/www/html/phpMyAdmin-5.0.2-all-languages;

    index  index.php index.html index.htm;

    location ~ \.php$ {

        fastcgi_pass   192.168.31.34:9000;

        fastcgi_index  index.php;

        fastcgi_param  SCRIPT_FILENAME  /var/www/html/phpMyAdmin-5.0.2-all-languages/$fastcgi_script_name;

        include        fastcgi_params;

    }

}
复制配置文件到nginx容器,并重新加载
docker cp default.conf nginx-vts:/etc/nginx/conf.d/

docker cp phpmyadmin.conf nginx-vts:/etc/nginx/conf.d/

docker exec -it nginx-vts nginx -s reload
访问phpMyAdmin
http://192.168.31.34:81
效果如下:
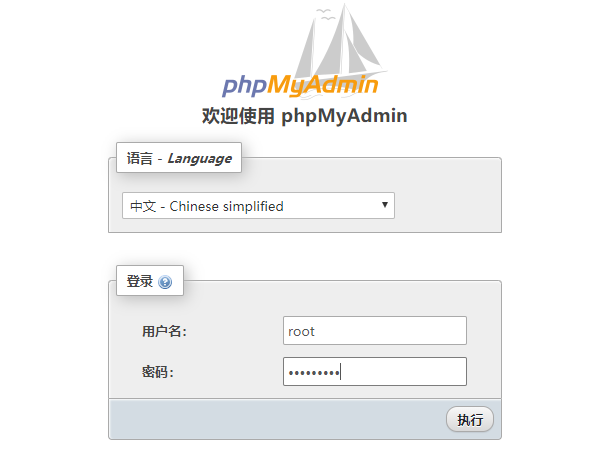
输入用户名:root
密码:abcd@1234
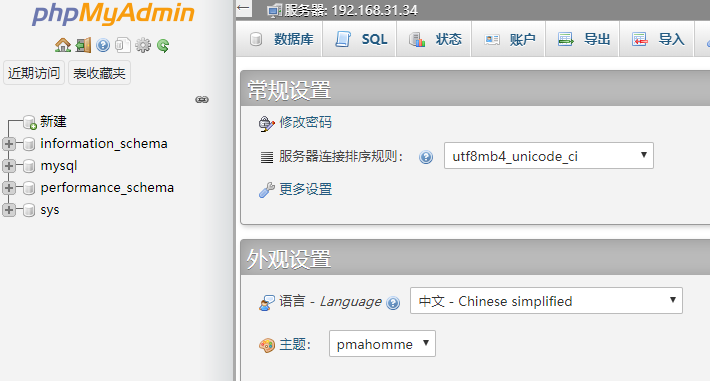
登录之后,效果如下:
总结
nginx和php都是独立运行的docker容器。因此,对于php代码,必须在php容器中映射才行。至于nginx容器,也最好做一下映射。
但是一般php项目,除了php代码之外,还有一些静态资源,比如:html,css,js,jpeg,png等等。
所以,最好是2个容器都做一下映射。nginx负责处理静态资源,php容器用了解析php代码。
注意:nginx配置中的fastcgi_param 必须写绝对路径。
最后补充一点,php-fpm有一个进程池的概念。类型有2种,分别是static和dynamic。
虽然dynamic可以节约服务器资源,但是对于pv流量比较大的情况下,需要频繁的回收php-fpm进程池,特别耗费CPU
因此,在大并发情况下,使用static。
如果将php项目运行在k8s中,可以将php容器运行多个副本,nginx通过k8s的cluster ip转发到php容器。
使用Docker快速搭建Nginx+PHP-FPM+MySQL+phpMyAdmin环境的更多相关文章
- 使用docker快速搭建nginx+php环境
在朋友的强烈推荐下,走上了docker之路.经过了繁琐的docker环境安装,看了下镜像/容器的简单使用,开始进行nginx+php环境的搭建,本文记录一下在安装过程中的笔记. 原文地址:代码汇个人博 ...
- 使用Docker快速搭建Nginx+PHP-FPM环境
下载nginx官方镜像和php-fpm镜像 docker pull nginx docker pull bitnami/php-fpm 使用php-fpm镜像开启php-fpm应用容器 docker ...
- linux下搭建nginx+php(FastCGI)+mysql运行环境
一.安装环境 1.CentOS5.5 2.php5.4 3.MySQL5.5.19 二.安装程序依赖库和开发环境 为了省事把所需要的库文件全都安装上,可以使用rpm包安装,也可以用yum命令安装, 1 ...
- ubuntu13.04 搭建 Nginx + PHP + PHP-FPM + Mysql (lnmp) 环境
Nginx 是一个轻量级,以占用系统资源少,运行效率而成为web服务器的后起之秀,国内现在很多大型网站都以使用nginx,包括腾讯.新浪等大型信息网站,还有淘宝网站使用的是nginx二次开发的web服 ...
- 五分钟用Docker快速搭建Go开发环境
挺早以前在我写过一篇用 `Docker`搭建LNMP开发环境的文章:[用Docker搭建Laravel开发环境](http://mp.weixin.qq.com/s?__biz=MzUzNTY5MzU ...
- 一文教您如何通过 Docker 快速搭建各种测试环境(Mysql, Redis, Elasticsearch, MongoDB) | 建议收藏
欢迎关注个人微信公众号: 小哈学Java, 文末分享阿里 P8 高级架构师吐血总结的 <Java 核心知识整理&面试.pdf>资源链接!! 个人网站: https://www.ex ...
- Docker 快速搭建 MySQL 5.6 开发环境
使用 Docker 快速搭建一个 MySQL 5.6 开发环境 步骤 获取镜像 docker pull mysql:5.6 启动容器,密码 123456,映射 3306 端口 docker run - ...
- spring boot / cloud (十八) 使用docker快速搭建本地环境
spring boot / cloud (十八) 使用docker快速搭建本地环境 在平时的开发中工作中,环境的搭建其实一直都是一个很麻烦的事情 特别是现在,系统越来越复杂,所需要连接的一些中间件也越 ...
- Docker Data Center系列(一)- 快速搭建云原生架构的实践环境
本系列文章演示如何快速搭建一个简单的云原生架构的实践环境. 基于这个基础架构,可以持续部署微服务架构的应用栈,演练敏捷开发过程,提升DevOps实践能力. 1 整体规划 1.1 拓扑架构 1.2 基础 ...
随机推荐
- B - B Saruman's Army(贪心)
在一条直线上,有n个点.从这n个点中选择若干个,给他们加上标记.对于每一个点,其距离为R以内的区域里必须有一个被标记的点.问至少要有多少点被加上标记 Saruman the White must le ...
- 51Nod - 1632
B国拥有n个城市,其交通系统呈树状结构,即任意两个城市存在且仅存在一条交通线将其连接.A国是B国的敌国企图秘密发射导弹打击B国的交通线,现假设每条交通线都有50%的概率被炸毁,B国希望知道在被炸毁之后 ...
- Ancient Printer HDU - 3460 贪心+字典树
The contest is beginning! While preparing the contest, iSea wanted to print the teams' names separat ...
- 洛谷P2241-统计方形-矩形内计算长方形和正方形的数量
洛谷P2241-统计方形 题目描述: 有一个 \(n \times m\) 方格的棋盘,求其方格包含多少正方形.长方形(不包含正方形). 思路: 所有方形的个数=正方形的个数+长方形的个数.对于任意一 ...
- Go - 实现项目内链路追踪(二)
上篇文章 Go - 实现项目内链路追踪 分享了,通过 链路 ID 可以将 请求信息.响应信息.调用第三方接口的信息.调试信息.执行的 SQL 信息.执行的 Redis 信息 串起来,记录的具体参数在文 ...
- [Golang]-1 Slice与数组的区别
目录 数组 1.创建数组: 2.数组是值拷贝传递: 切片(slice) 1.首先看看slice的源码结构: 2.slice的创建: 3.slice使用make创建 4.切片作为参数传递 5.Golan ...
- LOJ6285 数列分块入门9(分块 区间众数)题解
题意:给出区间内的最小众数 思路:分块,离散化每个数,开vector记录每个数p出现的位置,这样就能二分出L,R以内p的个数了.众数有一个性质,用mode(a)表示集合a的众数,那么mode(a∪b) ...
- LWIP再探----内存堆管理
LWIP的内存管理主要三种:内存池Pool,内存堆,和C库方式.三种方式中C库因为是直接从系统堆中分配内存空间且易产生碎片因此,基本不会使用,其他两种是LWIP默认全部采用的方式,也是综合效率和空间的 ...
- NGINX configure auto generator
NGINX configure auto generator The easiest way to configure a performant, secure, and stable NGINX s ...
- how to publish a UMD module
how to publish a UMD module 如何发布UMD模块 npm https://github.com/xgqfrms/umd-npm-package https://www.npm ...