SVNKit学习——基于Repository的操作之print repository tree、file content、repository history(四)
此篇文章同样是参考SVNKit在wiki的官方文档做的demo,每个类都可以单独运行。具体的细节都写到注释里了~
开发背景:
SVNKit版本:1.7.14 附上官网下载链接:https://www.svnkit.com/org.tmatesoft.svn_1.7.14.standalone.zip
jdk版本要求:我试了1.6版本是不行的,1.7版本的jdk没有问题。
操作:①.在官网下载SVNKit1.7.14后将lib/*.jar全部复制到工程中 ②.导入google的Gson的包,这里我用的是gson-2.2.4.jar
仓库目录结构:

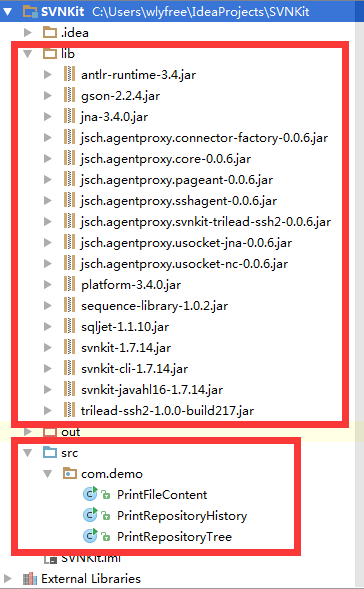
工程结构图:
具体代码:
一、显示svn仓库的树结构

package com.demo;

import org.tmatesoft.svn.core.SVNDirEntry;

import org.tmatesoft.svn.core.SVNNodeKind;

import org.tmatesoft.svn.core.SVNURL;

import org.tmatesoft.svn.core.auth.ISVNAuthenticationManager;

import org.tmatesoft.svn.core.internal.io.dav.DAVRepositoryFactory;

import org.tmatesoft.svn.core.io.SVNRepository;

import org.tmatesoft.svn.core.io.SVNRepositoryFactory;

import org.tmatesoft.svn.core.wc.SVNWCUtil;

import java.io.File;

import java.util.Collection;

import java.util.Iterator;

/**

 * 显示svn仓库的树结构

 */

public class PrintRepositoryTree {

    public static void main(String[] args) throws Exception{

        //1.根据访问协议初始化工厂

        DAVRepositoryFactory.setup();;

        //2.初始化仓库

        String url = "https://wlyfree-PC:8443/svn/svnkitRepository1/trunk";

        SVNRepository svnRepository = SVNRepositoryFactory.create(SVNURL.parseURIEncoded(url));

        //3.创建一个访问的权限

        String username = "wly";

        String password = "wly";

        char[] pwd = password.toCharArray();

        ISVNAuthenticationManager authenticationManager = SVNWCUtil.createDefaultAuthenticationManager(username,pwd);

        svnRepository.setAuthenticationManager(authenticationManager);

        /*输出仓库的根目录和UUID*/

        System.out.println("Repository Root:" + svnRepository.getRepositoryRoot(true));

        System.out.println("Repository UUID:" + svnRepository.getRepositoryUUID(true));

        /**

         * 检验某个URL(可以是文件、目录)是否在仓库历史的修订版本中存在,参数:被检验的URL,修订版本,这里我们想要打印出目录树,所以要求必须是目录

         * SVNNodeKind的枚举值有以下四种:

         *  SVNNodeKind.NONE    这个node已经丢失(可能是已被删除)

         *  SVNNodeKind.FILE    文件

         *  SVNNodeKind.DIR     目录

         *  SVNNodeKind.UNKNOW  未知,无法解析

         * */

        /*

         *  被检验的URL,本例有两种等价的写法。

         *  1.不是以"/"开头的是相对于仓库驱动目录的相对目录,即svnRepository的url,在本例中是:空字符串(url目录是:https://wlyfree-PC:8443/svn/svnkitRepository1/trunk)

         *  2.以"/"开头的是相对于svnRepository root目录的相对目录,即svnRepository的rootUrl,在本例中是:/trunk(root目录是https://wlyfree-pc:8443/svn/svnkitRepository1)

         */

        String checkUrl = "";

        //修订版本号,-1代表一个无效的修订版本号,代表必须是最新的修订版

        long revisionNum = -1;

        SVNNodeKind svnNodeKind = svnRepository.checkPath(checkUrl,revisionNum);

        if(svnNodeKind == SVNNodeKind.NONE){

            System.err.println("This is no entry at " + checkUrl);

            System.exit(1);

        }else if(svnNodeKind == SVNNodeKind.FILE){

            System.err.println("The entry at '" + checkUrl + "' is a file while a directory was expected.");

            System.exit(1);

        }else{

            System.err.println("SVNNodeKind的值:" + svnNodeKind);

        }

        //打印出目录树结构

        listEntries(svnRepository,checkUrl);

        //打印最新修订版的版本号

        System.err.println("最新修订版版本号:" + svnRepository.getLatestRevision());

    }

    private static void listEntries(SVNRepository svnRepository,String path) throws Exception{

        System.err.println("path:" + path);

        Collection entry =  svnRepository.getDir(path, -1 ,null,(Collection)null);

        Iterator iterator = entry.iterator();

        while(iterator.hasNext()){

            SVNDirEntry svnDirEntry = (SVNDirEntry)iterator.next();

            System.out.println("path:" + "/" + (path.equals("") ? "" : path + "/") + svnDirEntry.getName() + ",(author:" + svnDirEntry.getAuthor() + ",revision:" + svnDirEntry.getRevision() + ",date:" + svnDirEntry.getDate() + ")");

            if(svnDirEntry.getKind() == SVNNodeKind.DIR){

                String tempPath = (path.equals("") ? svnDirEntry.getName() : path + "/" + svnDirEntry.getName()) ;

                listEntries(svnRepository,tempPath);

            }

        }

    }

}
运行效果:
Repository Root:https://wlyfree-pc:8443/svn/svnkitRepository1

Repository UUID:62e76a57-4b9a-d34b-92c0-4551f8669da5

SVNNodeKind的值:dir

path:

path:test

path:/init1.txt,(author:wly,revision:8,date:Tue Nov 29 15:36:47 CST 2016)

path:/init2.txt,(author:wly,revision:8,date:Tue Nov 29 15:36:47 CST 2016)

path:/test,(author:wly,revision:10,date:Tue Dec 06 13:50:53 CST 2016)

path:/test/init11.txt,(author:wly,revision:10,date:Tue Dec 06 13:50:53 CST 2016)

path:/test/init22.txt,(author:wly,revision:9,date:Tue Dec 06 12:13:42 CST 2016)

path:/test/test2,(author:wly,revision:9,date:Tue Dec 06 12:13:42 CST 2016)

path:test/test2

path:/test/test2/init111.txt,(author:wly,revision:9,date:Tue Dec 06 12:13:42 CST 2016)

path:/test/test2/init222.txt,(author:wly,revision:9,date:Tue Dec 06 12:13:42 CST 2016)

最新修订版版本号:10

Process finished with exit code 0
二、打印文件内容
获取文件的类型,如果文件是二进制文件,则只输出文件属性;如果文件是一个文本文件,输出文件属性和文件内容
package com.demo;

import com.google.gson.Gson;

import org.tmatesoft.svn.core.*;

import org.tmatesoft.svn.core.auth.ISVNAuthenticationManager;

import org.tmatesoft.svn.core.internal.io.dav.DAVRepositoryFactory;

import org.tmatesoft.svn.core.io.SVNRepository;

import org.tmatesoft.svn.core.io.SVNRepositoryFactory;

import org.tmatesoft.svn.core.wc.SVNWCUtil;

import java.io.ByteArrayOutputStream;

import java.util.Iterator;

import java.util.Map;

/**

 *  获取文件的类型,如果文件是二进制文件,则只输出文件属性;如果文件是一个文本文件,输出文件属性和文件内容

 */

public class PrintFileContent {

    public static void main(String[] args) throws Exception {

        //===========================前面几步和打印树是一样的START===================================

        //1.根据访问协议初始化工厂

        DAVRepositoryFactory.setup();;

        //2.初始化仓库

        String url = "https://wlyfree-PC:8443/svn/svnkitRepository1/trunk";

        SVNRepository svnRepository = SVNRepositoryFactory.create(SVNURL.parseURIEncoded(url));

        //3.创建一个访问的权限

        String username = "wly";

        String password = "wly";

        char[] pwd = password.toCharArray();

        ISVNAuthenticationManager authenticationManager = SVNWCUtil.createDefaultAuthenticationManager(username,pwd);

        svnRepository.setAuthenticationManager(authenticationManager);

        //===========================前面几步和打印树是一样的END===================================

        //这里我们要读取的是其中的一个文件

        String filePath = "test/init11.txt";

        //修订版本号,-1代表一个无效的修订版本号,代表必须是最新的修订版

        long revisionNum = -1;

        SVNNodeKind svnNodeKind = svnRepository.checkPath(filePath,revisionNum);

        if(svnNodeKind == SVNNodeKind.NONE){

            System.err.println("This is no entry at " + filePath);

            System.exit(1);

        }else if(svnNodeKind == SVNNodeKind.DIR){

            System.err.println("The entry at '" + filePath + "' is a directory while a file was expected.");

            System.exit(1);

        }else{

            System.err.println("SVNNodeKind的值:" + svnNodeKind);

        }

        ByteArrayOutputStream byteArrayOutputStream = new ByteArrayOutputStream();

        SVNProperties svnProperties = new SVNProperties();

        //若svnProperties对象非空,使用vnProperties属性接收文件的属性

        svnRepository.getFile(filePath,-1,svnProperties ,byteArrayOutputStream);

        /*

         * 输出文件属性

         */

        System.err.println("文件属性:");

        Map<String,SVNPropertyValue> svnPropertiesMap = svnProperties.asMap();

        Iterator<String> it = svnPropertiesMap.keySet().iterator();

        while(it.hasNext()){

            String key = it.next();

            System.err.println(key + " : " + svnPropertiesMap.get(key));

        }

        //序列化看下svnProperrties中的数据

        Gson gson = new Gson();

        System.err.println(gson.toJson(svnProperties));

        /*

         *  文件是否是文本类型的文件,文本类型文件输出文件内容

         */

        System.err.println("文件内容:");

        String mimeType = svnProperties.getStringValue(SVNProperty.MIME_TYPE);

        System.err.println("mimeType is :" + mimeType);

        boolean isTextType = SVNProperty.isTextMimeType(mimeType);

        if(isTextType){

            System.err.println("The file is a text file,this is contents:");

            byteArrayOutputStream.writeTo(System.err);

        }else{

            System.err.println("The file is not a text file,we can't read content of it.");

        }

    }

}
运行效果:
SVNNodeKind的值:file

文件属性:

svn:entry:uuid : 62e76a57-4b9a-d34b-92c0-4551f8669da5

svn:entry:revision : 10

svn:entry:committed-date : 2016-12-06T05:50:53.160008Z

svn:wc:ra_dav:version-url : /svn/svnkitRepository1/!svn/ver/10/trunk/test/init11.txt

svn:entry:checksum : 8217e71c38f5c42e3fd4e8ac8dc75c4f

svn:entry:committed-rev : 10

svn:entry:last-author : wly

{"myProperties":{"svn:entry:uuid":{"myValue":"62e76a57-4b9a-d34b-92c0-4551f8669da5"},"svn:entry:revision":{"myValue":"10"},"svn:entry:committed-date":{"myValue":"2016-12-06T05:50:53.160008Z"},"svn:wc:ra_dav:version-url":{"myValue":"/svn/svnkitRepository1/!svn/ver/10/trunk/test/init11.txt"},"svn:entry:checksum":{"myValue":"8217e71c38f5c42e3fd4e8ac8dc75c4f"},"svn:entry:committed-rev":{"myValue":"10"},"svn:entry:last-author":{"myValue":"wly"}}}

文件内容:

mimeType is :null

The file is a text file,this is contents:

init

aa

bb

cc

dd

11

22

33

44

Process finished with exit code 0
三、打印历史记录
package com.demo;

import com.google.gson.Gson;

import org.tmatesoft.svn.core.SVNLogEntry;

import org.tmatesoft.svn.core.SVNLogEntryPath;

import org.tmatesoft.svn.core.SVNURL;

import org.tmatesoft.svn.core.auth.ISVNAuthenticationManager;

import org.tmatesoft.svn.core.internal.io.dav.DAVRepositoryFactory;

import org.tmatesoft.svn.core.io.SVNRepository;

import org.tmatesoft.svn.core.io.SVNRepositoryFactory;

import org.tmatesoft.svn.core.wc.SVNWCUtil;

import java.util.Collection;

import java.util.Iterator;

import java.util.Set;

/**

 * 打印历史记录

 */

public class PrintRepositoryHistory {

    public static void main(String[] args) throws Exception{

        //===========================前面几步和打印树是一样的START===================================

        //1.根据访问协议初始化工厂

        DAVRepositoryFactory.setup();;

        //2.初始化仓库

        String url = "https://wlyfree-PC:8443/svn/svnkitRepository1/trunk";

        SVNRepository svnRepository = SVNRepositoryFactory.create(SVNURL.parseURIEncoded(url));

        //3.创建一个访问的权限

        String username = "wly";

        String password = "wly";

        char[] pwd = password.toCharArray();

        ISVNAuthenticationManager authenticationManager = SVNWCUtil.createDefaultAuthenticationManager(username,pwd);

        svnRepository.setAuthenticationManager(authenticationManager);

        //===========================前面几步和打印树是一样的END===================================

        long startVersion = 10;

        long endVersion = 8;

        /*

         *  参数:

         *  1.接收日志

         *  2.接收history对象,每个修订版的信息都代表一个SVNLogEntry对象。如果我们不需要传入一个已经存在的history对象,就传入null值

         *  3.开始修订版本号,0、-1代表最新版本

         *  4.结束修订版本号,0、-1代表最新版本

         *  5.如果需要打印改变路径的信息,则设置为true。会使用每个SVNLogEntry对象记录改变路径的信息getchangedpaths()会返回一个Map<String改变路径,SVNLogEntryPath> 对象

         *  6.strictNode设置为true,复制history的时候不会跳过每个path的修订版日志

         */

        Collection logEntries = svnRepository.log(new String[]{""}, null,8,8,true,true);

        Gson gson = new Gson();

        if(logEntries != null){

            Iterator it = logEntries.iterator();

            while (it.hasNext()){

                SVNLogEntry svnLogEntry = (SVNLogEntry)it.next();

                System.err.println("序列化数据:" + gson.toJson(svnLogEntry));

                if(svnLogEntry.getChangedPaths().size() > 0){

                    System.err.println("Change path:");

                    Set changePathSet = svnLogEntry.getChangedPaths().keySet();

                    if(changePathSet != null && changePathSet.size() > 0){

                        for(Iterator changePaths = changePathSet.iterator();changePaths.hasNext();){

                            SVNLogEntryPath svnLogEntryPath = svnLogEntry.getChangedPaths().get(changePaths.next());

                            System.err.println(gson.toJson(svnLogEntryPath));

                        }

                    }

                }

            }

        }

    }

}
运行效果:
序列化数据:{"myRevision":8,"myChangedPaths":{"/trunk/init1.txt":{"myPath":"/trunk/init1.txt","myType":"A","myCopyRevision":-1,"myNodeKind":{"myID":1}},"/trunk/init2.txt":{"myPath":"/trunk/init2.txt","myType":"A","myCopyRevision":-1,"myNodeKind":{"myID":1}}},"myRevisionProperties":{"myProperties":{"svn:log":{"myValue":"初始化导入目录-myRepository1"},"svn:author":{"myValue":"wly"},"svn:date":{"myValue":"2016-11-29T07:36:47.737654Z"}}},"myHasChildren":false,"myIsSubtractiveMerge":false,"myIsNonInheritable":false}

Change path:

{"myPath":"/trunk/init1.txt","myType":"A","myCopyRevision":-1,"myNodeKind":{"myID":1}}

{"myPath":"/trunk/init2.txt","myType":"A","myCopyRevision":-1,"myNodeKind":{"myID":1}}

Process finished with exit code 0
SVNKit学习——基于Repository的操作之print repository tree、file content、repository history(四)的更多相关文章
- SVNKit学习——Setting Up A Subversion Repository 创建仓库(三)
所谓Setting Up A Subversion Repository,就是在Subversion所在的服务器上创建一个仓库,说白了就是在磁盘上建一个特殊的目录,这里我以windows举例. 1.使 ...
- SVNKit学习——wiki+简介(二)
这篇文章是参考SVNKit官网在wiki的文档,做了个人的理解~ 首先抛出一个疑问,Subversion是做什么的,SVNKit又是用来干什么的? 相信一般工作过的同学都用过或了解过svn,不了解的同 ...
- tensorflow学习笔记——使用TensorFlow操作MNIST数据(2)
tensorflow学习笔记——使用TensorFlow操作MNIST数据(1) 一:神经网络知识点整理 1.1,多层:使用多层权重,例如多层全连接方式 以下定义了三个隐藏层的全连接方式的神经网络样例 ...
- IOS学习笔记25—HTTP操作之ASIHTTPRequest
IOS学习笔记25—HTTP操作之ASIHTTPRequest 分类: iOS2012-08-12 10:04 7734人阅读 评论(3) 收藏 举报 iosios5网络wrapper框架新浪微博 A ...
- 从零学习基于Python的RobotFramework自动化
从零学习基于Python的RobotFramework自动化 一. Python基础 1) 版本差异 版本 编码 语法 其他 2.X ASCII try: raise Type ...
- 《如何学习基于ARM嵌入式系统》笔记整理
author:Peong time:20190603 如何学习基于ARM嵌入式系统 一.嵌入式系统的概念 从硬件上讲,将外围器件,与CPU集成在一起. 从操作系统上讲,定制符合要求的系统内核 从应用上 ...
- tensorflow学习笔记——使用TensorFlow操作MNIST数据(1)
续集请点击我:tensorflow学习笔记——使用TensorFlow操作MNIST数据(2) 本节开始学习使用tensorflow教程,当然从最简单的MNIST开始.这怎么说呢,就好比编程入门有He ...
- python类,魔术方法等学习&&部分ssti常见操作知识点复习加深
python类学习&&部分ssti常见操作知识点复习加深 在做ssti的模块注入的时候经常觉得自己python基础的薄弱,来学习一下,其实还是要多练习多背. 在python中所有类默认 ...
- 深度学习|基于LSTM网络的黄金期货价格预测--转载
深度学习|基于LSTM网络的黄金期货价格预测 前些天看到一位大佬的深度学习的推文,内容很适用于实战,争得原作者转载同意后,转发给大家.之后会介绍LSTM的理论知识. 我把code先放在我github上 ...
随机推荐
- Python学习 day11
一.装饰器 装饰器是在不改变函数调用方式的情况下,需要在函数前后新增功能.有些类似aop,不知道原理是否相同,表现是一样的. 装饰器严格遵守了“开放封闭原则” 1.基本装饰器 def wrapper( ...
- js控制a标签点击事件 触发下载
问题背景,动态获取data把url赋值到a标签的url中,让a标签自动下载 首先想到的应该是$('xxx').click(), 查资料明白:js中的$(...).click()事件只能触发绑定的onC ...
- (转)python collections模块详解
python collections模块详解 原文:http://www.cnblogs.com/dahu-daqing/p/7040490.html 1.模块简介 collections包含了一些特 ...
- java里面如何提升编写速度
一般情况下,编写程序,是在规定的时间内,并且在一段时间内很好的按成,那么就必须要套用现成的东西.在一个新的功能中,如何调用现成的东西呢,那么就是使用第三方包或者是使用自己总结的代码库.接来下是自己看到 ...
- C# Unix时间戳转换[转载]
原文地址: C# Unix时间戳转换 遇到Unix时间戳转换的问题,遂记录下来. Unix时间戳转DateTime string UnixTime = "1474449764"; ...
- Swift编程权威指南第2版 读后收获
自从参加工作一直在用OC做iOS开发.在2015年的时候苹果刚推出swift1.0不久,当时毕竟是新推出的语言,大家也都很有激情的学习.不过在学完后发现很难在实际项目中使用,再加上当时公司项目都是基于 ...
- imx6. android6.0经常修改或者用到的目录(未完)
系统应用apk存放的文件: out/target/product/sabresd_6dq/system/app 系统配置存放目录:(我自己的,也许不对) out/target/product/sabr ...
- Golang教程:函数、变参函数
函数是完成一个特定任务的代码块.一个函数接受输入,对输入进行一些运算并产生输出. 函数声明 在 Go 中声明一个函数的语法为: func functionname(parametername type ...
- 企业为什么需要实施BPM?
背景:众所周知,近几年企业信息化发展迅速,业务管理系统从大到小,数量众多,如ERP,SCM,PLM,CRM,EHR,OA,BI…… 等,企业的管理人员进行管理的主要手段是通过各个业务系统获得各种管理报 ...
- .Net Core GB2312编码问题
1.今天抓取了一个网页的源代码.发现中文是乱码的,马上第一反应是编码问题..... 2.仔细一看基于WebClient写的代码,还真的是没有设置编码... /// <summary> // ...