
angularJS前端分页插件
首先在项目中引入 分页插件的 js 和 css:
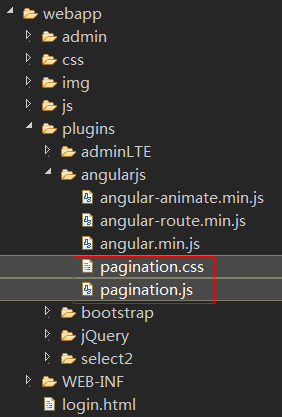
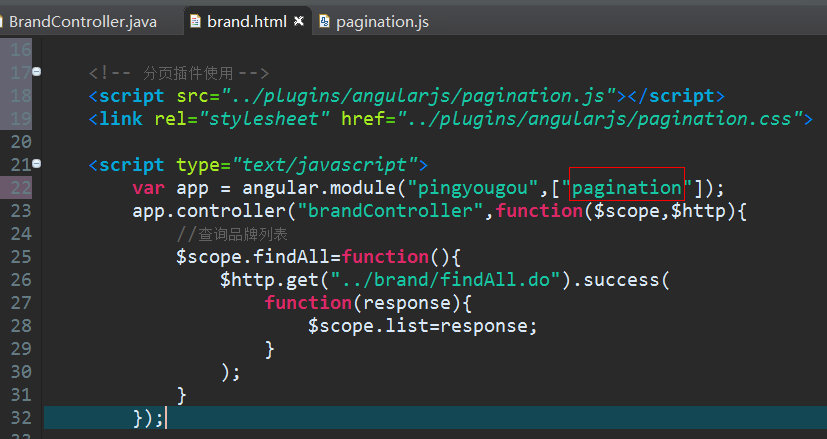
在html页面引入 相关js 和 css;

在控制器中引入分页插件中定义的 module【可以打开pagination.js查看,可以看到
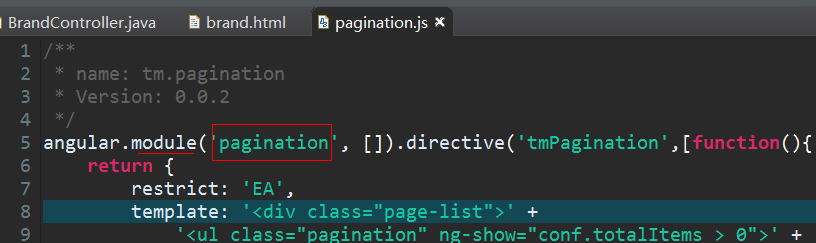
其实,在插件里面,它定义了一个单独的 module,所以我们在控制器中使用分页插件时,要先注入 这个 module
】
然后我们就可以在想要出现分页控件的位置,加上一个标签:
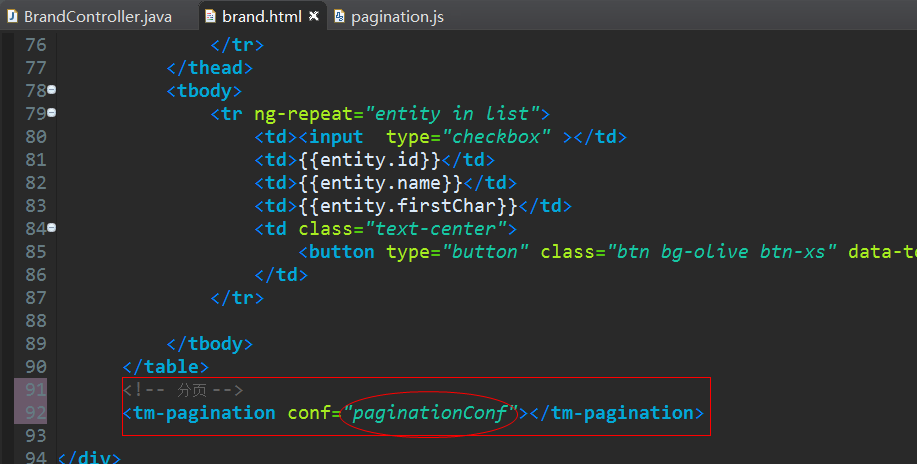
加上这个标签,就会在这里出现分页,注意,它有个属性 conf 这里定义的名字是 paginationConf,这个属性是个对象,它可以定义分页插件在页面上要显示的东西的详细配置(比如:每页显示多少条记录啥的)。
我们可以把这个conf的值定义在控制器中,然后定义请求方法,并调用
   <!-- 分页插件使用 -->

    <script src="../plugins/angularjs/pagination.js"></script>

    <link rel="stylesheet" href="../plugins/angularjs/pagination.css">

    <script type="text/javascript">

        var app = angular.module("pingyougou",["pagination"]);

        app.controller("brandController",function($scope,$http){

            //分页查询品牌列表

            //【其实在这个分页插件内部就有当页面一加载就执行一遍paginationConf中的onChange方法,
//所以我们在这块代码中不用再显示的写一遍$scope.reloadList(),只需配置好分页插件配置文件即可】

            //分页控件配置

            /*

             currentPage: 当前页

             totalItems: 总记录数

             itemsPerPage: 每页记录数

             perPageOptions: [10, 20, 30, 40, 50], 分页选项【就是每页显示几条记录的备选下拉】

             onChange: 当页面变更后自动触发的方法

            */

            $scope.paginationConf = {

                     currentPage: 1,

                     totalItems: 10,

                     itemsPerPage: 10,

                     perPageOptions: [10, 20, 30, 40, 50],

                     onChange: function(){

                        $scope.reloadList();//重新加载

                     }

            };

            //刷新列表【因为要频繁使用,避免写很长代码,这里封装成一个方法】

            $scope.reloadList=function(){

                //调用分页请求方法

                $scope.findPage(

                        $scope.paginationConf.currentPage,

                        $scope.paginationConf.itemsPerPage

                );

            }

            //分页请求方法

            $scope.findPage=function(page,size){

                $http.get("../brand/findPage.do?page="+page+"&size="+size).success(

                    function(response){

                        $scope.list = response.rows; //显示当前页数据

                        $scope.paginationConf.totalItems = response.total;//更新总记录数

                    }

                );

            }

        });

    </script>
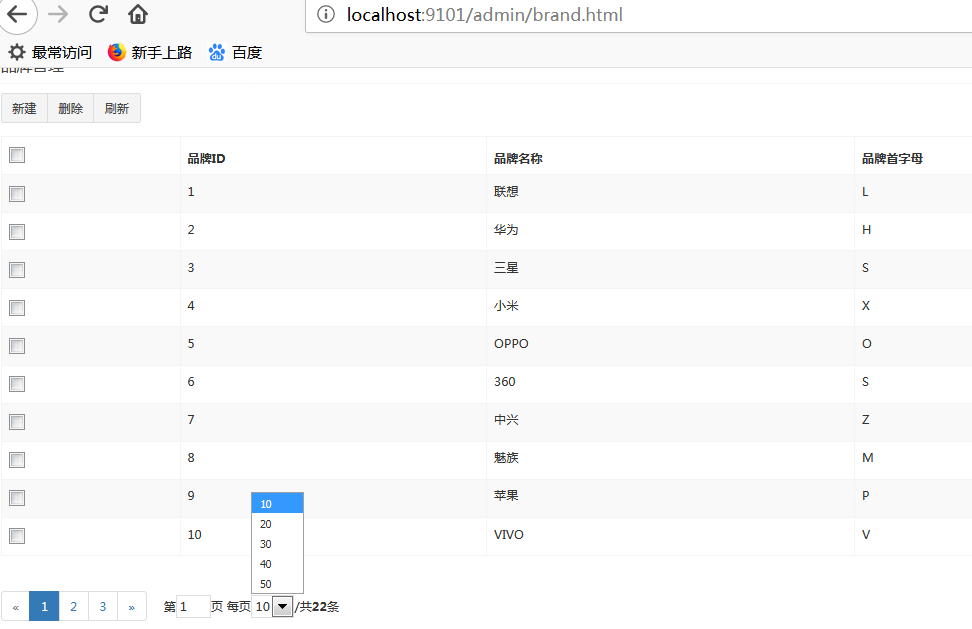
前台效果:
=====
附件:
完整前台代码:
<!DOCTYPE html>

<html>

<head>

    <meta charset="utf-8">

    <meta http-equiv="X-UA-Compatible" content="IE=edge">

    <title>品牌管理</title>

    <meta content="width=device-width,initial-scale=1,maximum-scale=1,user-scalable=no" name="viewport">

    <link rel="stylesheet" href="../plugins/bootstrap/css/bootstrap.min.css">

    <link rel="stylesheet" href="../plugins/adminLTE/css/AdminLTE.css">

    <link rel="stylesheet" href="../plugins/adminLTE/css/skins/_all-skins.min.css">

    <link rel="stylesheet" href="../css/style.css">

    <script src="../plugins/jQuery/jquery-2.2.3.min.js"></script>

    <script src="../plugins/bootstrap/js/bootstrap.min.js"></script>

    <!-- 引入angularJS -->

    <script src="../plugins/angularjs/angular.min.js"></script>

    <!-- 分页插件使用 -->

    <script src="../plugins/angularjs/pagination.js"></script>

    <link rel="stylesheet" href="../plugins/angularjs/pagination.css">

    <script type="text/javascript">

        var app = angular.module("pingyougou",["pagination"]);

        app.controller("brandController",function($scope,$http){

            //分页查询品牌列表

            //【其实在分页插件内部就有当页面一加载就执行一遍请求的方法调用,所以我们在这块代码中不用再显示的写一遍$scope.reloadList()】

            //分页控件配置

            /*

             currentPage: 当前页

             totalItems: 总记录数

             itemsPerPage: 每页记录数

             perPageOptions: [10, 20, 30, 40, 50], 分页选项【就是每页显示几条记录的备选下拉】

             onChange: 当页面变更后自动触发的方法

            */

            $scope.paginationConf = {

                     currentPage: 1,

                     totalItems: 10,

                     itemsPerPage: 10,

                     perPageOptions: [10, 20, 30, 40, 50],

                     onChange: function(){

                        $scope.reloadList();//重新加载

                     }

            };

            //刷新列表【因为要频繁使用,避免写很长代码,这里封装成一个方法】

            $scope.reloadList=function(){

                //调用分页请求方法

                $scope.findPage(

                        $scope.paginationConf.currentPage,

                        $scope.paginationConf.itemsPerPage

                );

            }

            //分页请求方法

            $scope.findPage=function(page,size){

                $http.get("../brand/findPage.do?page="+page+"&size="+size).success(

                    function(response){

                        $scope.list = response.rows; //显示当前页数据

                        $scope.paginationConf.totalItems = response.total;//更新总记录数

                    }

                );

            }

        });

    </script>

</head>

<body class="hold-transition skin-red sidebar-mini" ng-app="pingyougou" ng-controller="brandController" >

  <!-- .box-body -->

                    <div class="box-header with-border">

                        <h3 class="box-title">品牌管理</h3>

                    </div>

                    <div class="box-body">

                        <!-- 数据表格 -->

                        <div class="table-box">

                            <!--工具栏-->

                            <div class="pull-left">

                                <div class="form-group form-inline">

                                    <div class="btn-group">

                                        <button type="button" class="btn btn-default" title="新建" data-toggle="modal" data-target="#editModal" ><i class="fa fa-file-o"></i> 新建</button>

                                        <button type="button" class="btn btn-default" title="删除" ><i class="fa fa-trash-o"></i> 删除</button>

                                        <button type="button" class="btn btn-default" title="刷新" onclick="window.location.reload();"><i class="fa fa-refresh"></i> 刷新</button>

                                    </div>

                                </div>

                            </div>

                            <div class="box-tools pull-right">

                                <div class="has-feedback">

                                </div>

                            </div>

                            <!--工具栏/-->

                              <!--数据列表-->

                              <table id="dataList" class="table table-bordered table-striped table-hover dataTable">

                                  <thead>

                                      <tr>

                                          <th class="" style="padding-right:0px">

                                              <input id="selall" type="checkbox" class="icheckbox_square-blue">

                                          </th>

                                          <th class="sorting_asc">品牌ID</th>

                                          <th class="sorting">品牌名称</th>

                                          <th class="sorting">品牌首字母</th>

                                          <th class="text-center">操作</th>

                                      </tr>

                                  </thead>

                                  <tbody>

                                      <tr ng-repeat="entity in list">

                                          <td><input  type="checkbox" ></td>

                                          <td>{{entity.id}}</td>

                                          <td>{{entity.name}}</td>

                                          <td>{{entity.firstChar}}</td>

                                          <td class="text-center">

                                               <button type="button" class="btn bg-olive btn-xs" data-toggle="modal" data-target="#editModal"  >修改</button>

                                          </td>

                                      </tr>

                                  </tbody>

                              </table>

                              <!-- 分页 -->

                              <tm-pagination conf="paginationConf"></tm-pagination>

                        </div>

                        <!-- 数据表格 /-->

                     </div>

                    <!-- /.box-body -->

<!-- 编辑窗口 -->

<div class="modal fade" id="editModal" tabindex="-1" role="dialog" aria-labelledby="myModalLabel" aria-hidden="true">

  <div class="modal-dialog" >

    <div class="modal-content">

        <div class="modal-header">

            <button type="button" class="close" data-dismiss="modal" aria-hidden="true">×</button>

            <h3 id="myModalLabel">品牌编辑</h3>

        </div>

        <div class="modal-body">

            <table class="table table-bordered table-striped"  width="800px">

                  <tr>

                      <td>品牌名称</td>

                      <td><input  class="form-control" placeholder="品牌名称" >  </td>

                  </tr>

                  <tr>

                      <td>首字母</td>

                      <td><input  class="form-control" placeholder="首字母">  </td>

                  </tr>

             </table>

        </div>

        <div class="modal-footer">

            <button class="btn btn-success" data-dismiss="modal" aria-hidden="true">保存</button>

            <button class="btn btn-default" data-dismiss="modal" aria-hidden="true">关闭</button>

        </div>

      </div>

    </div>

</div>

</body>

</html>
后台Controller代码:
package com.pinyougou.manager.controller;

import java.io.BufferedInputStream;

import java.io.BufferedOutputStream;

import java.io.File;

import java.io.FileInputStream;

import java.io.FileOutputStream;

import java.io.IOException;

import java.io.OutputStream;

import java.util.ArrayList;

import java.util.List;

import java.util.UUID;

import javax.servlet.ServletException;

import javax.servlet.http.HttpServletRequest;

import javax.servlet.http.HttpServletResponse;

import org.apache.tools.zip.ZipEntry;

import org.apache.tools.zip.ZipOutputStream;

import org.springframework.web.bind.annotation.RequestMapping;

import org.springframework.web.bind.annotation.RestController;

import com.alibaba.dubbo.config.annotation.Reference;

import com.pinyougou.pojo.TbBrand;

import com.pinyougou.sellergoods.service.BrandService;

import entity.PageResult;

@RestController

@RequestMapping("/brand")

public class BrandController {

    @Reference

    private BrandService brandService;

    @RequestMapping("/findAll")

    public List<TbBrand> findAll() {

        return brandService.findAll();

    }

    /**

     *<p>Description: 分页查询<p>

     * @date 2018年11月19日

     * @param page 当前页码

     * @param size    每页记录条数

     * @return

     */

    @RequestMapping("/findPage")

    public PageResult findPage(int page,int size) {

        return brandService.findPage(page,size);

    }

}
angularJS前端分页插件的更多相关文章
- Jquery前端分页插件pagination同步加载和异步加载
上一篇文章介绍了Jquery前端分页插件pagination的基本使用方法和使用案例,大致原理就是一次性加载所有的数据再分页.https://www.jianshu.com/p/a1b8b1db025 ...
- 前端分页插件pagination
摘要: 最近在开发项目中又用到了前端分页,以前也做过,为了方便以后使用所以将他封装成第三方插件,不依赖任何库.网上已经有很多插件,问什么还要自己造轮子? 自己写的扩展性高 不依赖任何库 作为一次技术沉 ...
- Jquery前端分页插件pagination使用
插件描述:JqueryPagination是一个轻量级的jquery分页插件.只需几个简单的配置就可以生成分页控件.并且支持ajax获取数据,自定义请求参数,提供多种方法,事件和回调函数,功能全面的分 ...
- 前端分页插件bootstrapPaginator的使用
引入bootstrap-paginator.js <table class="table table-striped table-bordered table-hover dataT ...
- angular分页插件tm.pagination二次触发问题解决歪方案
今天在学习angularjs的分页插件时遇到了一个前端的问题,谷歌浏览器开发者模式调试的时候发现每次点击分页刷新按钮会触发两次后台请求,ajax向后台发送了两次请求,这对于强迫症患者来说是一个比较恶心 ...
- AngularJS入门 & 分页 & CRUD示例
一.AngularJS 简介 AngularJS 诞生于2009年,由Misko Hevery 等人创建,后为Google所收购.是一款优秀的前端JS框架,已经被用于Google的多款产品当中. ...
- 品优购商城项目(二)mybatis分页插件
品优购商城项目第二天,使用mybatis分页插件实现分页.主要实现的是 SSM整合mybatis分页. 一.引用mybatis分页插件 SqlMapConfig.xml <?xml versio ...
- 前端分页神器,jquery grid的使用(前后端联调),让分页变得更简单。
jquery grid 是一款非常好用的前端分页插件,下面来讲讲怎么使用. 首先需要引入jquery grid 的CSS和JS (我们使用的是bootstrap的样式) 下面我们通过一个例子来讲解,需 ...
- 浅谈Django的Q查询以及AngularJS的Datatables分页插件
使用Q查询,首先要导入Q模块: from django.db.models import Q 可以组合使用&,|操作符用于多个Q的对象,产生一个新的Q对象,Q对象也可以用~操作符放在前面表示否 ...
随机推荐
- 第三模块:面向对象&网络编程基础 第3章 选课系统作业讲解
01-选课系统作业讲解1 02--选课系统作业讲解2 03-选课系统作业讲解3 04--选课系统作业讲解4 01-选课系统作业讲解1 02--选课系统作业讲解2 03-选课系统作业讲解3 04--选课 ...
- Python序列及其操作(常见)
python序列及函数入门认识: 0. 我们根据列表.元组和字符串的共同特点,把它们三统称为什么? 序列,因为他们有以下共同点: 1)都可以通过索引得到每一个元素 2)默认索引值总是从0开始(当 ...
- C 计算数字的位数循环
#include <stdio.h> int main(int argc, char **argv) { // int x; int n=0; scanf("%d",& ...
- leetcode-最长无重复字符的子串
参考他的人代码:https://blog.csdn.net/littlebai07/article/details/79100081 给定一个字符串,找出不含有重复字符的最长子串的长度. 示例 1: ...
- 爬虫1.6-selenium+HeadlessChrome
目录 爬虫-selenium+HeadlessChrome 1. 浏览器处理步骤 2. headless-chrome初体验 3. 实战爬取淘宝镇.街道信息 爬虫-selenium+HeadlessC ...
- spark集群安装部署
通过Ambari(HDP)或者Cloudera Management (CDH)等集群管理服务安装和部署在此不多介绍,只需要在界面直接操作和配置即可,本文主要通过原生安装,熟悉安装配置流程. 1.选取 ...
- Java中二进制数与整型之间的转换
import java.io.*; public class Test{ /** * 二进制与整型之间的转换 * @param args * @throws IOException */ public ...
- Machine Learning笔记整理 ------ (二)训练集与测试集的划分
在实际应用中,一般会选择将数据集划分为训练集(training set).验证集(validation set)和测试集(testing set).其中,训练集用于训练模型,验证集用于调参.算法选择等 ...
- POJ 3308 Paratroopers(最大流最小割の最小点权覆盖)
Description It is year 2500 A.D. and there is a terrible war between the forces of the Earth and the ...
- "Hello world!"团队第八次会议
Scrum会议 今天是我们"Hello world!"团队第八次召开会议,博客内容是: 1.会议时间 2.会议成员 3.会议地点 4.会议内容 5.todo list 6.会议照片 ...