
elementUI表格合并单元格
相信你肯定看了 ElementUI 官方文档了,没看的话先去看下表格各个属性的意义,方便下文阅读:传送门
但你会发现此例过于简单,死数据,但我们开发的时候往往都是后台传递过来的数据,导致我们 rowspan 的参数需要自己做判断,根据数据的相同行(或列)进行合并;
我们先看下结果:
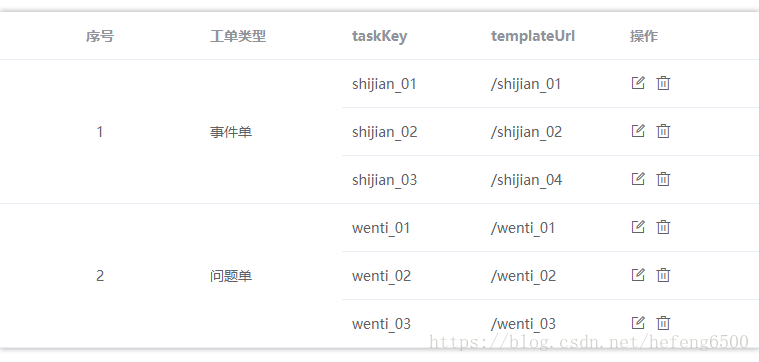
代码附上:
 <template>

   <div class="">

     <el-table

         :data="listData"

         :span-method="objectSpanMethod"

         class="tableArea"

         style="width: 100%">

         <el-table-column

           prop="type"

           label="序号"

           align="center"

           width="200"/>

         <el-table-column

           prop="sheetType"

           label="工单类型"

           />

         <el-table-column

           prop="taskKey"

           label="taskKey"

           />

         <el-table-column

           prop="templateUrl"

           label="templateUrl"

           />

         <el-table-column

           label="操作"

           >

           <template slot-scope="scope">

               <el-tooltip class="item" effect="dark" content="修改" placement="top-start">

                       <i class="el-icon-edit-outline"  @click="modify(scope)" />

                     </el-tooltip>

                     <el-tooltip class="item" effect="dark" content="删除" placement="top-start">

             <i class="el-icon-delete" @click="deleteData(scope)" />

                     </el-tooltip>

           </template>

         </el-table-column >

       </el-table>

   </div>

 </template>

 <script>

 export default {

   name: 'myNeedDeal',

   data() {

     return {

       rowList: [],

       spanArr: [],

       position: 0,

       listData: []

     }

   },

   methods: {

       queryData(){//查询操作

           this.listData = [

               {

             id:1,

           type:1,

           sheetType: "事件单",

           taskKey: "shijian_01",

           templateUrl: "/shijian_01"

         },

         {

             id:2,

           type:1,

           sheetType: "事件单",

           taskKey: "shijian_02",

           templateUrl: "/shijian_02"

         },

         {

             id:3,

           type:1,

           sheetType: "事件单",

           taskKey: "shijian_03",

           templateUrl: "/shijian_04"

         },

         {

             id:4,

           type:2,

           sheetType: "问题单",

           taskKey: "wenti_01",

           templateUrl: "/wenti_01"

         },

         {

             id:5,

           type:2,

           sheetType: "问题单",

           taskKey: "wenti_02",

           templateUrl: "/wenti_02"

         },

         {

             id:6,

           type:2,

           sheetType: "问题单",

           taskKey: "wenti_03",

           templateUrl: "/wenti_03"

         }

           ];

           this.rowspan()

       },

       rowspan() {

           this.listData.forEach((item,index) => {

             if( index === 0){

                 this.spanArr.push(1);

                 this.position = 0;

             }else{

                 if(this.listData[index].type === this.listData[index-1].type ){

                     this.spanArr[this.position] += 1;

                     this.spanArr.push(0);

                 }else{

                     this.spanArr.push(1);

                     this.position = index;

                 }

             }

         })

       },

     objectSpanMethod({ row, column, rowIndex, columnIndex }) {  //表格合并行

         if (columnIndex === 0) {

             const _row = this.spanArr[rowIndex];

             const _col = _row>0 ? 1 : 0;

             return {

                 rowspan: _row,

                 colspan: _col

             }

         }

         if(columnIndex === 1){

             const _row = this.spanArr[rowIndex];

             const _col = _row>0 ? 1 : 0;

             return {

                 rowspan: _row,

                 colspan: _col

             }

         }

     }

   },

   mounted() {

     this.queryData();

   }

 }

 </script>

 <style lang="scss" scoped>

 .el-select {

   margin-right: 15px;

 }

 .el-input {

   margin-right: 15px;

   width: 200px;

 }

 .tableArea {

   margin-top: 20px;

   box-shadow: 0 0 8px 0 #aaa;

 }

 i[class^="el-icon"] {

   margin-right: 5px;

   font-size: 16px;

   cursor: pointer;

 }

 .modify_table{

     td{

         padding: 10px ;

     }

 }

 .item_title{

     text-align: right;

 }

 </style>
详细说明:
:span-method="objectSpanMethod"
这个是官方给定的绑定属性和对应的方法,objectSpanMethod 传入了 { row, column, rowIndex, columnIndex }
row: 当前行
column: 当前列
rowIndex:当前行号
columnIndex :当前列号
该函数可以返回一个包含两个元素的数组,第一个元素代表rowspan,第二个元素代表colspan。 也可以返回一个键名为rowspan和colspan的对象。
this.spanArr 数组 ,返回的是相对应的行合并行数
这个示例打印出的this.spanArr为 [3, 0, 0, 3, 0, 0],比如,第一个元素为3,表示第一行应该向下合并3行(即第一行的rowspan为3),第二个元素的rowspan为0,就让它“消失”。
rowspan()这个函数就是用来返回 this.spanArr 数组的,定义每一行的 rowspan
rowspan()函数,if( index === 0),第一行,直接先给数组push进一个1,表示自己先占一行,this.position是数组元素的位置(此时是从数组元素的第一个开始,所以this.position为0), this.position为0意思表示的就是数组的第一个元素。
当到了index为2的时候,if(this.listData[index].type === this.listData[index-1].type ),让第二行与第一行作比较,
如果第二行与第一行相等的话,this.position就+1,当有n行第一行相同,this.position就为n,表示向下合并n行;第二行自己就this.spanArr.push(0),表示第二行“消失”,因为第一行和第二行合并了啊。
如果第二行与第一行不相等的话,那么this.spanArr.push(1);就让第二行自己独占一行;this.position = index意思就是把指针拿到index这行来,表示设置数组this.spanArr[this.position]的元素值,然后定义从此行开始向下合并几行(可能这句话我表述的不是很清楚你可以根据我这个示例研究下,当index为3时,this.position为3,当index为4时,第四行与第三行需要合并,那么在数组的this.position元素就要+1了,也就是this.spanArr[this.position] += 1)
还有最后一句话
const _col = _row>0 ? 1 : 0;
定义的这一个单元格列的合并,我们项目只合并行,不合并列;
_row:代表合并行的行数,_row的值要么是1,或者更大的自然正整数,要么是0。
1代表:独占一行
更大的自然数:代表合并了若干行
0:代表“消失”的哪那一个单元格,后面的单元格向前推一格
elementUI表格合并单元格的更多相关文章
- jquery操作表格 合并单元格
jquery操作table,合并单元格,合并相同的行 合并的方法 $("#tableid").mergeCell({ cols:[X,X] ///参数为要合并的列}) /** * ...
- 使用POI创建word表格合并单元格兼容wps
poi创建word表格合并单元格代码如下: /** * @Description: 跨列合并 */ public void mergeCellsHorizontal(XWPFTable table, ...
- js 表格合并单元格
5列 根据需要可添加 或 删除 strOneTemp strTwoTemp strThreeTemp strFourTemp strFiveTemp //合并单元格 this.mergeC ...
- elementUI el-table合并单元格
合并单元格,如果id列值一致,则合并. <el-table :data="tableData6" :span-method="objectSpanMethod&qu ...
- display:table表格合并单元格
直接上代码: <%@ page language="java" contentType="text/html; charset=UTF-8" pageEn ...
- html表格合并单元格的运用实例
效果图: 实现代码: <!DOCTYPE html><html><head><meta charset="UTF-8"><ti ...
- html表格合并单元格
th标签 合并列 colspan="k" 合并行 rowspan="k" 例子<th colspan="2", rowspan=& ...
- 表格合并单元格【c#】
gridBranchInfo.DataSource = dtBranchViewList; gridBranchInfo.DataBind(); Random random = new Random( ...
- layui:数据表格如何合并单元格
layui.use('table', function () { var table = layui.table; table.render({ elem: '#applyTab' , url: '$ ...
随机推荐
- java生成jar包
Java编写的application程序是否可以终于形成一个类似于exe一样的可执行文件.难道就仅仅能用命令行执行? 通常有两种.一种是制作一个可运行的JAR文件包.然后就能够像.chm文档一样双击运 ...
- What are the top 10 things that we should be informed about in life
1.Realize that nobody cares, and if they do, you shouldn't care that they care. Got a new car? Nobod ...
- windows下的Mysql安装与基本使用(zip)
一.安装过程 Mysql社区版下载地址:http://dev.mysql.com/downloads/mysql/ --注意,已管理员身份运行cmd.exe,很重要!!目录在,c:\windows\s ...
- Linux学习笔记—Linux磁盘与文件系统管理(转载)
认识EXT2文件系统 文件的系统特性 Linux的正规文件系统为Ext2 文件数据除了文件实际内容外,还包括其他属性(文件权限.文件属性). 文件系统将这两部分数据分别存放在不同的块,权限和属性放在i ...
- JFinal项目搭建
1.Myeclipse中 新建 Dynamic Web Project 导入jar包 2.配置web.xml <?xml version="1.0" encoding=& ...
- Rare But Powerful Vim Commands.
@1: We all know about :wq, but we usually ignore :x. :x和:wq都是保存当前文件并退出. 这两个命令实际上并不完全等价,当文件被修改时两个命令时相 ...
- beego——原生SQL查询
使用Raw SQL查询,无需使用ORM表定义. 多数据库,都可直接使用占位符号?,自动转换. 查询时的参数,支持使用Model Struct和Slice,Array ids := []int{1, 2 ...
- python处理时间相关的方法
记录python处理时间的模块:time模块.datetime模块和calendar模块. python版本:2.7 https://blog.csdn.net/songfreeman/article ...
- zoj2432
/* 首先,dp的最开始是定义状态 dp[i][j] 表示A串的前i个,与B串的前j个,并以B[j]为结尾的LCIS 的长度. 状态转移方程: if(A[i]==B[j]) dp[i][j]=max( ...
- 20145109 《Java程序设计》第六周学习总结
Chapter 10 I/O 10.1 InputStream & OutputStream a new 'try' edition: try (InputStream input = src ...