33、Flask实战第33天:sweetalert提示框
这节我们继续优化,接收到返回值,我们在前端做一些处理,如:密码修改成功,弹出一个成功的提示框。这个提示框我们采用sweetalert
其中xtalert.js是对上面两个文件的一个封装,使得我们用sweetalert变得更简单,需要素材的同学点击右侧的二维码打赏10元,截图发送到邮箱463951510@qq.com吧,之前打赏过本论坛实战的就不用再打赏了哈!
<!DOCTYPE html>

<html lang="en">

    <head>

        <meta charset="utf-8">

        <link rel="stylesheet" href="sweetalert/sweetalert.css">

        <script src="sweetalert/sweetalert.min.js"></script>

        <script src="sweetalert/xtalert.js"></script>

        <style>

            button{

                display: block;

                margin-bottom: 10px;

            }

        </style>

    </head>

    <body>

        <button onclick="xtalert.alertError('不能删除文章!')">错误提示</button>

        <button onclick="xtalert.alertInfo('您没有权限,请联系管理员!')">信息提示</button>

        <button onclick="xtalert.alertSuccess('恭喜您!操作成功!')">成功提示</button>

        <button id='confirm-btn'>确认提示</button>

        <script>

            var confirmBtn = document.getElementById('confirm-btn');

            confirmBtn.onclick = function(event){

                xtalert.alertConfirm({

                    'msg': '恭喜!文章发表成功!是否再发一篇?',

                    'confirmText': '再发一篇',

                    'cancelText': '回到首页',

                    'confirmCallback': function(){

                        alert('点击了确认按钮');

                    },

                    'cancelCallback': function(){

                        alert('点击了取消按钮');

                    }

                });

            }

        </script>

        <button id='input-btn'>输入框提示</button>

        <script>

            var inputBtn = document.getElementById('input-btn');

            inputBtn.onclick = function(event){

                xtalert.alertOneInput({

                    'text': '请输入板块名称',

                    'confirmCallback': function(text){

                        alert(text);

                        xtalert.close();

                    }

                });

            }

        </script>

        <button onclick="xtalert.alertNetworkError()">网络错误</button>

        <button onclick="xtalert.alertInfoToast('权限受限,请联系管理员!')">信息toast</button>

        <button onclick="xtalert.alertErrorToast('权限受限,请联系管理员!')">错误toast</button>

        <button onclick="xtalert.alertSuccessToast('恭喜!操作成功!')">成功toast</button>

    </body>

</html>
sweetalert提示框使用demo
在 static/common/下创建目录sweetalert,并把以上3个文件放进去,因为不仅仅修改密码会用到提示框,项目其他地方也会用到,所以把它放到common里面。
在父模板cms_base.html引入此3个文件
<head>

...

    <link href="{{ url_for('static', filename='common/sweetalert/sweetalert.css')}}" rel="stylesheet">

    <script src="{{ url_for('static', filename='common/sweetalert/sweetalert.min.js') }}"></script>

    <script src="{{ url_for('static', filename='common/sweetalert/xtalert.js') }}"></script>

</head>
现在就可以修改resetpwd.js,对返回值做处理了
/**
* Created by user on 2018/8/7.
*/ $(function () {
$('#submit').click(function (event) {
//阻止按钮默认的提交表单行为
event.preventDefault();
var oldpwdE = $('input[name=oldpwd]');
var newpwdE = $('input[name=newpwd]');
var newpwd2E = $('input[name=newpwd2]'); var oldpwd = oldpwdE.val();
var newpwd = newpwdE.val();
var newpwd2 = newpwd2E.val(); //这里使用我们自己封装好的bbsajax,它具有了csrf
bbsajax.post({
'url': '/cms/resetpwd/',
'data': {
'oldpwd': oldpwd,
'newpwd': newpwd,
'newpwd2': newpwd2
},
'success': function (data) {
//根据状态码判断
if (data['code'] === 200){
//弹出成功的提示框,提示语是从后台传过来的message
xtalert.alertSuccessToast(data['message']);
oldpwdE.val(''); //完成请求后把表单输入的值清空
newpwdE.val('');
newpwd2E.val('');
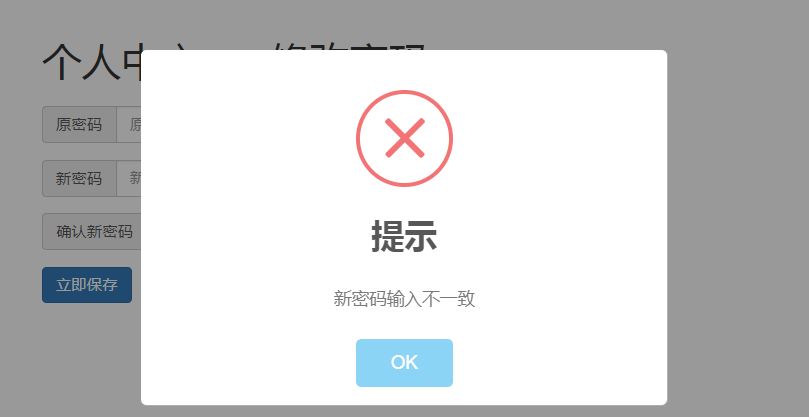
}else{
xtalert.alertError(data['message']);
oldpwdE.val('');
newpwdE.val('');
newpwd2E.val('');
}
},
'fail': function (error) {
xtalert.alertNetworkError('网络错误');
}
});
});
})
33、Flask实战第33天:sweetalert提示框的更多相关文章
- sweetalert提示框
文档 sweetalert Api:http://t4t5.github.io/sweetalert/ 开源项目源码:https://github.com/t4t5/sweetalert 在文件中首先 ...
- 「小程序JAVA实战」小程序 loading 提示框与页面跳转(37)
转自:https://idig8.com/2018/09/02/xiaochengxujavashizhanxiaochengxu-loading-tishikuangyuyemiantiaozhua ...
- 一百零二:CMS系统之sweetalert提示框和使用
实现效果 css body.stop-scrolling { height: 100%; overflow: hidden; } .sweet-overlay { background-color: ...
- 一百零三:CMS系统之使用sweetalert提示框优化返回结果
在base模板中引用 在修改密码的js中使用 $(function () { $('#submit').click(function (evnet) { evnet.preventDefault(); ...
- 提示框插件SweetAlert
SweetAlert可以替代Javascript原生的alert和confirm等函数呈现的弹出提示框, 它将提示框进行了美化,并且允许自定义, 支持设置提示框标题.提示类型.内容展示图片.确认取消按 ...
- The authenticity of host '172.16.33.53 (172.16.33.53)' can't be established的问题(日志六)
用ssh登录一个机器(换过ip地址)会出现如下错误 weiguohui@weiguohui1-virtual-machine:~/.ssh$ ssh 172.16.33.53The authentic ...
- 漂亮的提示框SweetAlert使用教程
一.简介 所使用过的弹出框插件,SweetAlert是最好用的.发展至今,已经有两个版本,一个是原版 t4t5/sweetalert , 一个是分支版 limonte/sweetalert2 ,更新相 ...
- Flask实战-留言板-安装虚拟环境、使用包组织代码
Flask实战 留言板 创建项目目录messageboard,从GreyLi的代码中把Pipfile和Pipfile.lock文件拷贝过来,这两个文件中定义了虚拟环境中需要安装的包的信息和位置,进入m ...
- JS组件Bootstrap实现弹出框和提示框效果代码
这篇文章主要介绍了JS组件Bootstrap实现弹出框和提示框效果代码,对弹出框和提示框感兴趣的小伙伴们可以参考一下 前言:对于Web开发人员,弹出框和提示框的使用肯定不会陌生,比如常见的表格新增和编 ...
随机推荐
- nginx 安装 lua-nginx-module
nginx增加lua模块 yum install -y gcc g++ gcc-c++ zlib zlib-devel openssl openssl-devel pcre pcre-devel wg ...
- Chrome 扩展开发资料
中文文档(翻译自官方文档):https://crxdoc-zh.appspot.com/apps/tut_debugging 官方英文: https://developer.chrome.com/ex ...
- 【bzoj1594-猜数游戏】线段树
题解: 矛盾只有两种情况: 一.先前确定了x在区间(l,r),但是现在发现x在区间(l1,r1),并且两个区间不相交. 二.一个区间的最小值是x,这个区间中有一个子区间的最小值比x更小. 首先可以明确 ...
- [bzoj4567][Scoi2016]背单词-Trie+贪心+模型转化
Brief Description 给你N个互不相同的字符串,记\(S_i\)为第i个字符串,现在要求你指定N个串的出现顺序,我们用\(V_i\)表示第i个字符串是第几个出现的,则V为1到N的一个排列 ...
- Spring Boot:定制自己的starter
在学习Spring Boot的过程中,接触最多的就是starter.可以认为starter是一种服务——使得使用某个功能的开发者不需要关注各种依赖库的处理,不需要具体的配置信息,由Spring Boo ...
- Python爬虫—破解JS加密的Cookie
前言 在GitHub上维护了一个代理池的项目,代理来源是抓取一些免费的代理发布网站.上午有个小哥告诉我说有个代理抓取接口不能用了,返回状态521.抱着帮人解决问题的心态去跑了一遍代码.发现果真是这样. ...
- Revison
- Linux的SMP,UMA,NUMA
SMP 是Symmetric Multi-Processing的意思,对称多处理器,一种多核结构,认为这些核是完全同构的,任务可以随便在任一个核上跑. UMA是Uniform Memory Acces ...
- Oracle 内存管理
--内存分配建库时可以先分配系统内存的50%-80%给Oracle,后期根据业务再进行调整.SGA.PGA分配比例:OLTP:SGA %80 , PGA %20OLAP:SGA %50 , PGA % ...
- 利用python对WiderFace数据解析及画框
#注:此代码稍作修改也可以用于WFLW人脸数据集的标注文件解析,#参见其README.md文件了解其每一行的信息,从中解析出相应字#段即可. import os import cv2 def draw ...