
005-shiro认证
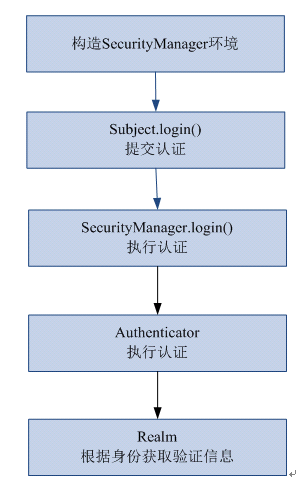
一、shiro认证流程
二、入门程序
1、代码:
2、配置shiro-first.ini
通过此配置文件创建securityManager工厂。
需要修改eclipse的ini的编辑器:

配置数据:
#对用户信息进行配置

[users]

#用户账户和密码

zhangsan=

lisi=
用户登录和退出
    // 用户登陆和退出

    @Test

    public void testLoginAndLogout() {

        // 创建securityManager工厂,通过ini配置文件创建securityManager工厂

        Factory<SecurityManager> factory = new IniSecurityManagerFactory(

                "classpath:shiro-first.ini");

        // 创建SecurityManager

        SecurityManager securityManager = factory.getInstance();

        // 将securityManager设置当前的运行环境中

        SecurityUtils.setSecurityManager(securityManager);

        // 从SecurityUtils里边创建一个subject

        Subject subject = SecurityUtils.getSubject();

        // 在认证提交前准备token(令牌)

        // 这里的账号和密码 将来是由用户输入进去

        UsernamePasswordToken token = new UsernamePasswordToken("zhangsan",

                "111111");

        try {

            // 执行认证提交

            subject.login(token);

        } catch (AuthenticationException e) {

            // TODO Auto-generated catch block

            e.printStackTrace();

        }

        // 是否认证通过

        boolean isAuthenticated = subject.isAuthenticated();

        System.out.println("是否认证通过:" + isAuthenticated);

        // 退出操作

        subject.logout();

        // 是否认证通过

        isAuthenticated = subject.isAuthenticated();

        System.out.println("是否认证通过:" + isAuthenticated);

    }
3、执行流程
1、通过ini配置文件创建securityManager
2、调用subject.login方法主体提交认证,提交的token
3、securityManager进行认证,securityManager最终由ModularRealmAuthenticator进行认证。
4、ModularRealmAuthenticator调用IniRealm(给realm传入token) 去ini配置文件中查询用户信息
5、IniRealm根据输入的token(UsernamePasswordToken)从 shiro-first.ini查询用户信息,根据账号查询用户信息(账号和密码)
如果查询到用户信息,就给ModularRealmAuthenticator返回用户信息(账号和密码)
如果查询不到,就给ModularRealmAuthenticator返回null
6、ModularRealmAuthenticator接收IniRealm返回Authentication认证信息
如果返回的认证信息是null,ModularRealmAuthenticator抛出异常(org.apache.shiro.authc.UnknownAccountException)
如果返回的认证信息不是null(说明inirealm找到了用户),对IniRealm返回用户密码 (在ini文件中存在)和 token中的密码 进行对比,如果不一致抛出异常(org.apache.shiro.authc.IncorrectCredentialsException)
4、小结
ModularRealmAuthenticator作用进行认证,需要调用realm查询用户信息(在数据库中存在用户信息)
ModularRealmAuthenticator进行密码对比(认证过程)。
realm:需要根据token中的身份信息去查询数据库(入门程序使用ini配置文件),如果查到用户返回认证信息,如果查询不到返回null。
三、自定义realm
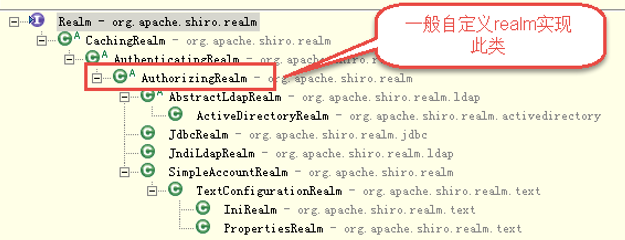
实际开发需要realm从数据库中查询用户信息。
1、realm接口
2、自定义realm
com.lhx.shiro.realm.CustomRealm
package com.lhx.shiro.realm;

import org.apache.shiro.authc.AuthenticationException;

import org.apache.shiro.authc.AuthenticationInfo;

import org.apache.shiro.authc.AuthenticationToken;

import org.apache.shiro.authc.SimpleAuthenticationInfo;

import org.apache.shiro.authz.AuthorizationInfo;

import org.apache.shiro.realm.AuthorizingRealm;

import org.apache.shiro.subject.PrincipalCollection;

/**

 *

 * <p>

 * Title: CustomRealm

 * </p>

 * <p>

 * Description:自定义realm

 * </p>

 * @version 1.0

 */

public class CustomRealm extends AuthorizingRealm {

    // 设置realm的名称

    @Override

    public void setName(String name) {

        super.setName("customRealm");

    }

    // 用于认证

    @Override

    protected AuthenticationInfo doGetAuthenticationInfo(

            AuthenticationToken token) throws AuthenticationException {

        // token是用户输入的

        // 第一步从token中取出身份信息

        String userCode = (String) token.getPrincipal();

        // 第二步:根据用户输入的userCode从数据库查询

        // ....

        // 如果查询不到返回null

        //数据库中用户账号是zhangsansan

        /*if(!userCode.equals("zhangsansan")){//

            return null;

        }*/

        // 模拟从数据库查询到密码

        String password = "111112";

        // 如果查询到返回认证信息AuthenticationInfo

        SimpleAuthenticationInfo simpleAuthenticationInfo = new SimpleAuthenticationInfo(

                userCode, password, this.getName());

        return simpleAuthenticationInfo;

    }

    // 用于授权

    @Override

    protected AuthorizationInfo doGetAuthorizationInfo(

            PrincipalCollection principals) {

        // TODO Auto-generated method stub

        return null;

    }

}
3、配置realm
需要在shiro-realm.ini配置realm注入到securityManager中。
[main]

#自定义 realm

customRealm=com.lhx.shiro.realm.CustomRealm

#\将realm设置到securityManager相当于spring中注入

securityManager.realms=$customRealm
4、测试
// 自定义realm

    @Test

    public void testCustomRealm() {

        // 创建securityManager工厂,通过ini配置文件创建securityManager工厂

        Factory<SecurityManager> factory = new IniSecurityManagerFactory(

                "classpath:shiro-realm.ini");

        // 创建SecurityManager

        SecurityManager securityManager = factory.getInstance();

        // 将securityManager设置当前的运行环境中

        SecurityUtils.setSecurityManager(securityManager);

        // 从SecurityUtils里边创建一个subject

        Subject subject = SecurityUtils.getSubject();

        // 在认证提交前准备token(令牌)

        // 这里的账号和密码 将来是由用户输入进去

        UsernamePasswordToken token = new UsernamePasswordToken("zhangsan",

                "111111");

        try {

            // 执行认证提交

            subject.login(token);

        } catch (AuthenticationException e) {

            // TODO Auto-generated catch block

            e.printStackTrace();

        }

        // 是否认证通过

        boolean isAuthenticated = subject.isAuthenticated();

        System.out.println("是否认证通过:" + isAuthenticated);

    }
四、散列算法
通常需要对密码 进行散列,常用的有md5、sha
MD5
对密码md5,如果知道散列后的值可以通过穷举算法,得到md5密码对应的明文。
建议对md5进行散列时加salt(盐),进行加密相当 于对原始密码+盐进行散列
正常使用时散列方法:
在程序中对原始密码+盐进行散列,将散列值存储到数据库中,并且还要将盐也要存储在数据库中。
如果进行密码对比时,使用相同 方法,将原始密码+盐进行散列,进行比对。
1、MD5消息摘要测试程序
package com.lhx.shiro.authentication;

import org.apache.shiro.crypto.hash.Md5Hash;

import org.apache.shiro.crypto.hash.SimpleHash;

/**

 *

 * <p>Title: MD5Test</p>

 * <p>Description: </p>

 * @version 1.0

 */

public class MD5Test {

    public static void main(String[] args) {

        //原始 密码

        String source = "111111";

        //盐

        String salt = "qwerty";

        //散列次数

        int hashIterations = 2;

        //上边散列1次:f3694f162729b7d0254c6e40260bf15c

        //上边散列2次:36f2dfa24d0a9fa97276abbe13e596fc

        //构造方法中:

        //第一个参数:明文,原始密码

        //第二个参数:盐,通过使用随机数

        //第三个参数:散列的次数,比如散列两次,相当 于md5(md5(''))

        Md5Hash md5Hash = new Md5Hash(source, salt, hashIterations);

        String password_md5 =  md5Hash.toString();

        System.out.println(password_md5);

        //同上面一样,只是多了一个参数名

        //第一个参数:散列算法

        SimpleHash simpleHash = new SimpleHash("md5", source, salt, hashIterations);

        System.out.println(simpleHash.toString());

    }

}
2、自定义realm支持散列算法
需求:实际开发时realm要进行md5值(明文散列后的值)的对比。
2.1、新建realm(CustomRealmMd5)
package com.lhx.shiro.realm;

import org.apache.shiro.authc.AuthenticationException;

import org.apache.shiro.authc.AuthenticationInfo;

import org.apache.shiro.authc.AuthenticationToken;

import org.apache.shiro.authc.SimpleAuthenticationInfo;

import org.apache.shiro.authz.AuthorizationInfo;

import org.apache.shiro.realm.AuthorizingRealm;

import org.apache.shiro.subject.PrincipalCollection;

import org.apache.shiro.util.ByteSource;

/**

 *

 * <p>

 * Title: CustomRealm

 * </p>

 * <p>

 * Description:自定义realm

 * </p>

 *

 * @version 1.0

 */

public class CustomRealmMd5 extends AuthorizingRealm {

    // 设置realm的名称

    @Override

    public void setName(String name) {

        super.setName("customRealmMd5");

    }

    // 用于认证

    @Override

    protected AuthenticationInfo doGetAuthenticationInfo(AuthenticationToken token) throws AuthenticationException {

        // token是用户输入的

        // 第一步从token中取出身份信息

        String userCode = (String) token.getPrincipal();

        // 第二步:根据用户输入的userCode从数据库查询

        // ....

        // 如果查询不到返回null

        // 数据库中用户账号是zhangsansan

        /*

         * if(!userCode.equals("zhangsansan")){// return null; }

         */

        // 模拟从数据库查询到密码,散列值

        String password = "f3694f162729b7d0254c6e40260bf15c";

        // 从数据库获取salt

        String salt = "qwerty";

        // 上边散列值和盐对应的明文:111111

        // 如果查询到返回认证信息AuthenticationInfo

        SimpleAuthenticationInfo simpleAuthenticationInfo = new SimpleAuthenticationInfo(userCode, password,

                ByteSource.Util.bytes(salt), this.getName());

        return simpleAuthenticationInfo;

    }

    // 用于授权

    @Override

    protected AuthorizationInfo doGetAuthorizationInfo(PrincipalCollection principals) {

        // TODO Auto-generated method stub

        return null;

    }

}
2.2、在realm中配置凭证匹配器
[main]

#定义凭证匹配器

credentialsMatcher=org.apache.shiro.authc.credential.HashedCredentialsMatcher

#散列算法

credentialsMatcher.hashAlgorithmName=md5

#散列次数

credentialsMatcher.hashIterations=

#将凭证匹配器设置到realm

customRealm=cn.itcast.shiro.realm.CustomRealmMd5

customRealm.credentialsMatcher=$credentialsMatcher

securityManager.realms=$customRealm
2.3、代码中测试即可
    // 自定义realm实现散列值匹配

    @Test

    public void testCustomRealmMd5() {

        // 创建securityManager工厂,通过ini配置文件创建securityManager工厂

        Factory<SecurityManager> factory = new IniSecurityManagerFactory(

                "classpath:shiro-realm-md5.ini");

        // 创建SecurityManager

        SecurityManager securityManager = factory.getInstance();

        // 将securityManager设置当前的运行环境中

        SecurityUtils.setSecurityManager(securityManager);

        // 从SecurityUtils里边创建一个subject

        Subject subject = SecurityUtils.getSubject();

        // 在认证提交前准备token(令牌)

        // 这里的账号和密码 将来是由用户输入进去

        UsernamePasswordToken token = new UsernamePasswordToken("zhangsan",

                "222222");

        try {

            // 执行认证提交

            subject.login(token);

        } catch (AuthenticationException e) {

            // TODO Auto-generated catch block

            e.printStackTrace();

        }

        // 是否认证通过

        boolean isAuthenticated = subject.isAuthenticated();

        System.out.println("是否认证通过:" + isAuthenticated);

    }
005-shiro认证的更多相关文章
- Apache Shiro 使用手册(二)Shiro 认证
认证就是验证用户身份的过程.在认证过程中,用户需要提交实体信息(Principals)和凭据信息(Credentials)以检验用户是否合法.最常见的"实体/凭证"组合便是&quo ...
- Apache Shiro 认证过程
3.1.1 示例 Shiro验证Subjects 的过程中,可以分解成三个不同的步骤: 1. 收集Subjects 提交的Principals(身份)和Credentials(凭证): 2. 提 ...
- shiro认证登录实现
准备工作: 在web.xml中配置shiro核心过滤器 在spring配置文件中提供核心过滤器运行所需要的辅助bean对象,在对象内注入安全管理器 拦截认证 配置三个url 拦截除了登录页面以及认证a ...
- 【shiro】(4)---Shiro认证、授权案例讲解
Shiro认证.授权案例讲解 一.认证 1. 认证流程 2.用户密码已经加密.加盐的用户认证 (1)测试类 // 用户登陆和退出,这里我自定了一个realm(开发肯定需要自定义realm获取 ...
- 无状态shiro认证组件(禁用默认session)
准备内容 简单的shiro无状态认证 无状态认证拦截器 import com.hjzgg.stateless.shiroSimpleWeb.Constants; import com.hjzgg.st ...
- 转:JAVAWEB开发之权限管理(二)——shiro入门详解以及使用方法、shiro认证与shiro授权
原文地址:JAVAWEB开发之权限管理(二)——shiro入门详解以及使用方法.shiro认证与shiro授权 以下是部分内容,具体见原文. shiro介绍 什么是shiro shiro是Apache ...
- frame shiro 认证示例及原理简述
shiro 认证流程 1.创建一个 javaSE 的maven项目(quickstart),并添加依赖 <dependency> <groupId>junit</grou ...
- Shiro认证的另一种方式
今天在学习shiro的时候使用另一种shiro验证的方式. 总体的思路是: (1)先在自己的方法中进行身份的验证以及给出提示信息.(前提是将自己的验证方法设为匿名可访问) (2)当验证成功之后到Shi ...
- 将 Shiro 作为应用的权限基础 二:shiro 认证
认证就是验证用户身份的过程.在认证过程中,用户需要提交实体信息(Principals)和凭据信息(Credentials)以检验用户是否合法.最常见的“实体/凭证”组合便是“用户名/密码”组合. 一. ...
- springmvc+shiro认证框架配置
1,在web.xml中配置fiter,如下所示 <!-- shiro的filter --> <!-- shiro过虑器,DelegatingFilterProxy通过代理模式将spr ...
随机推荐
- mybatis expected at least 1 bean which qualifies as autowire candidate for this dependency
错误原因:没有引入相应mapper接口,导致spring没有找到依赖 解决方法一:使用注解的方法: 首先在spring配置文件中添加 <bean class="org.mybatis. ...
- linux 查找文件并移动
find . -name '10-*.dat' -exec mv {} ../ \; 这里: => -exec mv {} /mnt/mp3 \; - 运行mv命令. => {} ...
- Centos6.5 --配置 vsftp server
事实上我这么懒得人是不想配置什么ftpserver的(毕竟动起来都认为麻烦).可是因为本菜鸟才刚開始步入linux的大坑.尽管有装Centos7的真机,可是因为一时还是脱离不了Windows平台,所以 ...
- PHP——上传头像(2)
<!DOCTYPE html PUBLIC "-//W3C//DTD XHTML 1.0 Transitional//EN" "http://www.w3.org/ ...
- Codeforces839D Winter is here 容斥
/** 题目:Codeforces839D Winter is here 链接:http://codeforces.com/contest/839/problem/D 题意:给定n个数,求所有的最大公 ...
- hdu6007 Mr. Panda and Crystal 最短路+完全背包
/** 题目:hdu6007 Mr. Panda and Crystal 链接:http://acm.hdu.edu.cn/showproblem.php?pid=6007 题意:魔法师有m能量,有n ...
- flask 邮箱配置
http://blog.csdn.net/stan_pcf/article/details/51098126 先进入邮箱设置 POP3/SMTP/IMAP 下面代码来自知乎 https://www.z ...
- 利用多态,实现一般处理程序(ashx)中的AOP(切面编程)
本文是对工作中的项目进行代码优化(完善登陆验证的AOP切面编程)时,所遇到的各种解决方案思考过程. 项目背景:由ashx+nvelocity构建的简单B/S问卷系统,现需要优化登录验证环节(时隔若干个 ...
- Centos 下面安装 docker
试过了虚拟机VM ,今天尝试在虚拟机centos 中安装 docker ,入门是看的阮一峰的http://www.ruanyifeng.com/blog/2018/02/docker-tutorial ...
- tcpdf
将文档整为pdf格式文档 网址:http://www.tcpdf.org/examples.php