Spring MVC 的xml一些配置
1.可以自动加载注解驱动,通过注解找到对应Controller
    <!-- spring MVC 注解驱动 -->

    <mvc:annotation-driven></mvc:annotation-driven>

    <!-- 配置自动扫描包 -->

    <context:component-scan base-package="com.cc8w.Controller"></context:component-scan>

     <!-- 配置视图解析器 -->

    <bean

        class="org.springframework.web.servlet.view.InternalResourceViewResolver">

        <property name="prefix" value="/WEB-INF/view/"></property>

        <property name="suffix" value=".jsp"></property>

    </bean>
package com.cc8w.Controller;

import org.springframework.stereotype.Controller;

import org.springframework.ui.Model;

import org.springframework.web.bind.annotation.RequestMapping;

@Controller

@RequestMapping("/HelloWorld")

public class HelloWorld {

    @RequestMapping("/hi.do")

    public String hi(String names,Model model)

    {

        System.out.println("hi.dodo");

        model.addAttribute("hi", "hi123456");

        return "hi";

    }

}
显示结果正确.
2.配置HandlerMapping,根据beanName找到对应Controller
web.xml配置
<?xml version="1.0" encoding="UTF-8"?>

<web-app xmlns:xsi="http://www.w3.org/2001/XMLSchema-instance" xmlns="http://xmlns.jcp.org/xml/ns/javaee" xsi:schemaLocation="http://xmlns.jcp.org/xml/ns/javaee http://xmlns.jcp.org/xml/ns/javaee/web-app_3_1.xsd" id="WebApp_ID" version="3.1">

  <display-name>Spring-web02</display-name>

  <welcome-file-list>

    <welcome-file>index.html</welcome-file>

    <welcome-file>index.htm</welcome-file>

    <welcome-file>index.jsp</welcome-file>

    <welcome-file>default.html</welcome-file>

    <welcome-file>default.htm</welcome-file>

    <welcome-file>default.jsp</welcome-file>

  </welcome-file-list>

  <!-- The front controller of this Spring Web application, responsible for handling all application requests -->

    <servlet>

        <servlet-name>springDispatcherServlet</servlet-name>

        <servlet-class>org.springframework.web.servlet.DispatcherServlet</servlet-class>

        <init-param>

            <param-name>contextConfigLocation</param-name>

            <param-value>classpath:applicationContext.xml</param-value>

        </init-param>

        <load-on-startup>1</load-on-startup>

    </servlet>

    <!-- Map all requests to the DispatcherServlet for handling -->

    <servlet-mapping>

        <servlet-name>springDispatcherServlet</servlet-name>

        <url-pattern>/</url-pattern>

    </servlet-mapping>

</web-app>
applicationContext.xml
<?xml version="1.0" encoding="UTF-8"?>

<beans xmlns="http://www.springframework.org/schema/beans"

    xmlns:xsi="http://www.w3.org/2001/XMLSchema-instance"

    xmlns:aop="http://www.springframework.org/schema/aop"

    xmlns:context="http://www.springframework.org/schema/context"

    xmlns:mvc="http://www.springframework.org/schema/mvc"

    xsi:schemaLocation="http://www.springframework.org/schema/mvc http://www.springframework.org/schema/mvc/spring-mvc-4.3.xsd

        http://www.springframework.org/schema/beans http://www.springframework.org/schema/beans/spring-beans.xsd

        http://www.springframework.org/schema/context http://www.springframework.org/schema/context/spring-context-4.3.xsd

        http://www.springframework.org/schema/aop http://www.springframework.org/schema/aop/spring-aop-4.3.xsd">

    <!-- 配置HandlerMapping 根据beanname找到对应Controller -->

     <bean class="org.springframework.web.servlet.mvc.support.ControllerBeanNameHandlerMapping"></bean>

     <!--配置beanname找到对应的Controller -->

     <bean name = "/dogcontrollerdog" class = "com.cc8w.Controller.Dog"></bean>

     <!-- 配置视图解析器 -->

    <bean

        class="org.springframework.web.servlet.view.InternalResourceViewResolver">

        <property name="prefix" value="/WEB-INF/view/"></property>

        <property name="suffix" value=".jsp"></property>

    </bean>

</beans>
测试类(这里一定要继承org.springframework.web.servlet.mvc.AbstractController接口)
package com.cc8w.Controller; import javax.servlet.http.HttpServletRequest;
import javax.servlet.http.HttpServletResponse; import org.springframework.web.servlet.ModelAndView;
import org.springframework.web.servlet.mvc.AbstractController; public class Dog extends AbstractController {
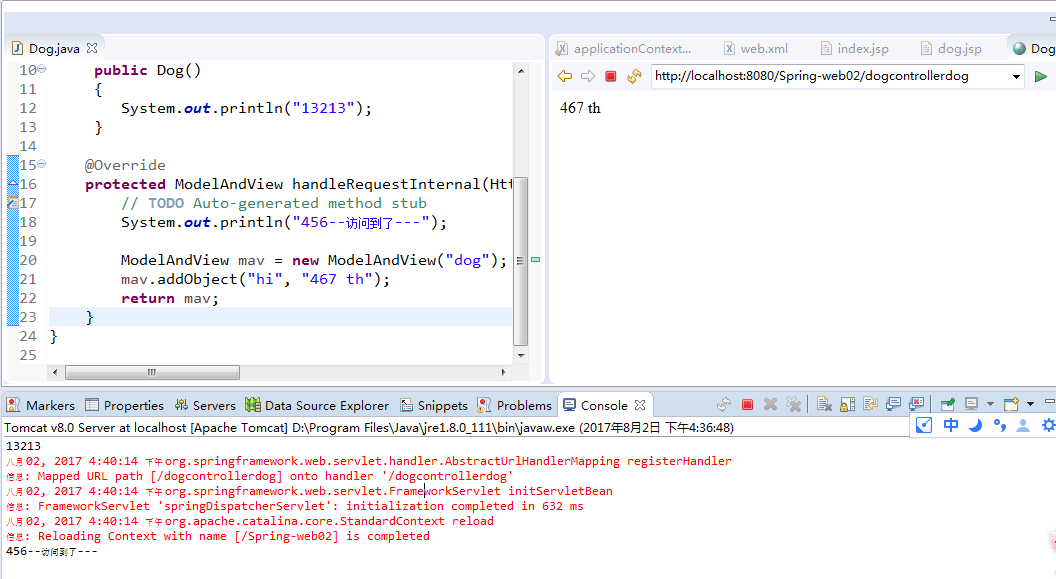
public Dog()
{
System.out.println("13213");
} @Override
protected ModelAndView handleRequestInternal(HttpServletRequest request, HttpServletResponse response) throws Exception {
// TODO Auto-generated method stub
System.out.println("456--访问到了---"); ModelAndView mav = new ModelAndView("dog");
mav.addObject("hi", "467 th");
return mav;
}
}
模版目录和结果

3.配置HandlerMapping,根据URL找到对应Controller(主要是applicationContext.xml或<bean-name>-Servlet.xml的区别)
<?xml version="1.0" encoding="UTF-8"?>

<beans xmlns="http://www.springframework.org/schema/beans"

    xmlns:xsi="http://www.w3.org/2001/XMLSchema-instance"

    xmlns:aop="http://www.springframework.org/schema/aop"

    xmlns:context="http://www.springframework.org/schema/context"

    xmlns:mvc="http://www.springframework.org/schema/mvc"

    xsi:schemaLocation="http://www.springframework.org/schema/mvc http://www.springframework.org/schema/mvc/spring-mvc-4.3.xsd

        http://www.springframework.org/schema/beans http://www.springframework.org/schema/beans/spring-beans.xsd

        http://www.springframework.org/schema/context http://www.springframework.org/schema/context/spring-context-4.3.xsd

        http://www.springframework.org/schema/aop http://www.springframework.org/schema/aop/spring-aop-4.3.xsd">

    <!-- 配置HandlerMapping 根据简单URL找到对应Controller -->

     <bean class = "org.springframework.web.servlet.handler.SimpleUrlHandlerMapping">

         <property name="mappings">

             <props>

                 <prop key="/dogcontroller">dog</prop>

             </props>

         </property>

     </bean>

     <!--bean类 -->

     <bean id = "dog"  class = "com.cc8w.Controller.Dog"></bean>

     <!-- 配置视图解析器 -->

    <bean

        class="org.springframework.web.servlet.view.InternalResourceViewResolver">

        <property name="prefix" value="/WEB-INF/view/"></property>

        <property name="suffix" value=".jsp"></property>

    </bean>

</beans>
上面的类,这个spring MVC配置文件,可以找到控制器,就不截 结果了.
4.配置HandlerMapping,通过控制器类名访问Controller,访问时类名首字母小写 小写
<?xml version="1.0" encoding="UTF-8"?>

<beans xmlns="http://www.springframework.org/schema/beans"

    xmlns:xsi="http://www.w3.org/2001/XMLSchema-instance"

    xmlns:aop="http://www.springframework.org/schema/aop"

    xmlns:context="http://www.springframework.org/schema/context"

    xmlns:mvc="http://www.springframework.org/schema/mvc"

    xsi:schemaLocation="http://www.springframework.org/schema/mvc http://www.springframework.org/schema/mvc/spring-mvc-4.3.xsd

        http://www.springframework.org/schema/beans http://www.springframework.org/schema/beans/spring-beans.xsd

        http://www.springframework.org/schema/context http://www.springframework.org/schema/context/spring-context-4.3.xsd

        http://www.springframework.org/schema/aop http://www.springframework.org/schema/aop/spring-aop-4.3.xsd">

    <!-- 配置HandlerMapping 通过控制器类名访问Controller,访问时类名首字母小写 -->

    <bean class = "org.springframework.web.servlet.mvc.support.ControllerClassNameHandlerMapping"></bean>

     <!--bean类 -->

     <bean  class = "com.cc8w.Controller.Dog"></bean>

     <!-- 配置视图解析器 -->

    <bean

        class="org.springframework.web.servlet.view.InternalResourceViewResolver">

        <property name="prefix" value="/WEB-INF/view/"></property>

        <property name="suffix" value=".jsp"></property>

    </bean>

</beans>
http://localhost:8080/Spring-web02/dog 这样访问...
注意, 还呀配置下日志.
https://www.cnblogs.com/fps2tao/p/12809867.html
Spring MVC 的xml一些配置的更多相关文章
- Spring MVC 的 XML 配置方式
索引: 开源Spring解决方案--lm.solution 参看代码 GitHub: solution/pom.xml solution/webapi/pom.xml solution/mapper/ ...
- Spring MVC Web.xml配置
Web.xml spring&spring mvc 在web.xml中定义contextConfigLocation参数,Spring会使用这个参数去加载所有逗号分隔的xml文件,如果没有这个 ...
- Spring MVC 返回 xml json pdf 数据的配置方法
<!-- Spring MVC 返回 xml 数据的配置方法 --> <bean class="org.springframework.web.servlet.vi ...
- Spring MVC 使用tomcat中配置的数据源
Spring MVC 使用tomcat中配置的数据源 配置tomcat数据源 打开tomcat目录下的conf目录,编辑sever.xml目录.在<GlobalNamingResources&g ...
- Spring mvc web.xml中 urlpatten的配置问题
在使用spring mvc 是我们会配置spring 的DispatcherServlet作为请求的转发器. <servlet> <servlet-name>spring< ...
- Spring配置文件beans.xml头部配置解释
Spring配置文件beans.xml头部配置解释 - EasonJim - 博客园https://www.cnblogs.com/EasonJim/p/6880329.html
- 跟着刚哥学习Spring框架--通过XML方式配置Bean(三)
Spring配置Bean有两种形式(XML和注解) 今天我们学习通过XML方式配置Bean 1. Bean的配置方式 通过全类名(反射)的方式 √ id:标识容器中的bean.id唯一. √ cl ...
- Spring MVC 3.x 基本配置
WEB-INF/web.xml 例1 <?xml version="1.0" encoding="UTF-8"?> <web-app xmln ...
- 使用高性能xml序列化框架jibx作为spring mvc的xml view
package org.springframework.web.servlet.view.xml; import java.io.ByteArrayOutputStream; import java. ...
随机推荐
- Unity3d---> IEnumerator
Unity3d---> IEnumerator 2013-04-18 10:24 2162人阅读 评论(0) 收藏 举报 Unity3dc# using UnityEngine; using S ...
- MySQL 的实时性能监控利器
操作系统及MySQL数据库的实时性能状态数据尤为重要,特别是在有性能抖动的时候,这些实时的性能数据可以快速帮助你定位系统或MySQL数据库的性能瓶颈,就像你在Linux系统上使用「top,sar,io ...
- Oracle 与 SqlServer 的区别浅析总结
我主要用过的数据库为Oracle10g和SqlServer2008,通过实际运用和查阅资料整理如下: 主题 Oracle 10g SQLServer 2008 存储过程格式 Create Or Rep ...
- jedis操作redis的几种常见方式总结
Redis是一个著名的key-value存储系统,也是nosql中的最常见的一种,这篇文章主要给大家总结了关于在java中jedis操作redis的几种常见方式,文中给出了详细的示例代码供大家参考学习 ...
- redis 安装 命令
安装: http://redis.io/download 在线操作命令:http://try.redis.io/ 命令查询:https://redis.readthedocs.org/en/lates ...
- Field.setAccessible()方法
http://blog.csdn.net/kjfcpua/article/details/8496911 java代码中,常常将一个类的成员变量置为private 在类的外面获取此类的私有成员变量的v ...
- MySQL主从常见的架构
Master-Slave 级联 双Master互为主备
- spring-tool-suite(STS) 创建 spring boot项目
1.创建一个Spring Starter Project工程(new --> Spring Starter Project) 2.选择自己需要的依赖,因为想要通过REST方式来验证是否成功创建, ...
- 解决 只能通过chrome网上应用商店安装该程序
第一种方法: 右击 Chrome 桌面快捷方式,选择-”属性”-”快捷方式”,然后在”目标”一栏尾部添加参数 -enable-easy-off-store-extension-install 第二种方 ...
- Linux下设置和查看环境变量(转)
Linux的变量种类 按变量的生存周期来划分,Linux变量可分为两类: 1 永久的:需要修改配置文件,变量永久生效. 2 临时的:使用export命令声明即可,变量在关闭shell时失效. 设置变量 ...