Nginx反向代理负载均衡配置
1.反向代理概述
反向代理(Reverse Proxy)方式是指以代理服务器来接受internet上的连接请求,然后将请求转发给内部网络上的服务器,并将从服务器上得到的结果返回给internet上请求连接的客户端,此时代理服务器对外就表现为一个反向代理服务器。
环境准备:
| 主机名 | IP地址 | 角色 | 系统 |
|---|---|---|---|
| web-node1.com | eth0:192.168.90.201 | web-node1节点 | CentOS7.2 |
| web-node2.com | eth0:192.168.90.202 | web-node2节点 | CentOS7.2 |
| lb-node1.com | eth0:192.168.90.203 | Nginx反向代理 | CentOS7.2 |
2.Node节点部署
在两台web-node节点中均使用Yum安装一个Apache用于做真实机,监听8080端口
web-node1.com部署
[root@web-node1 ~]# rpm -ivh \
http://mirrors.aliyun.com/epel/epel-release-latest-7.noarch.rpm
[root@web-node1 ~]# yum install -y gcc glibc gcc-c++ make screen tree lrzsz
##部署web-node1 httpd服务
[root@web-node1 ~]# yum install -y httpd
[root@web-node1 ~]# sed -i 's/Listen 80/Listen 8080/g' /etc/httpd/conf/httpd.conf
[root@web-node1 ~]# systemctl start httpd
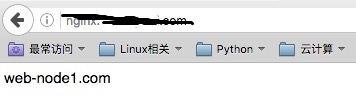
[root@web-node1 ~]# echo "web-node1.com" > /var/www/html/index.html
[root@web-node1 ~]# curl http://192.168.90.201:8080/
web-node1.com
web-node2.com部署
[root@web-node1 ~]# rpm -ivh \
http://mirrors.aliyun.com/epel/epel-release-latest-7.noarch.rpm
[root@web-node1 ~]# yum install -y gcc glibc gcc-c++ make screen tree lrzsz
##部署web-node2 httpd服务
[root@web-node2 ~]# yum install -y httpd
[root@web-node2 ~]# sed -i 's/Listen 80/Listen 8080/g' /etc/httpd/conf/httpd.conf
[root@web-node2 ~]# systemctl start httpd
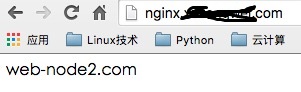
[root@web-node2 ~]# echo "web-node2.com" > /var/www/html/index.html
[root@web-node2 ~]# curl http://192.168.90.202:8080/
web-node2.com
3.反向代理部署
Nginx 源码编译安装,使其支持4层,并监听80端口
[root@lb-node1 ~]# useradd -s /sbin/nologin -M www

[root@lb-node1 ~]# cd /usr/local/src/

[root@lb-node1 src]# wget http://nginx.org/download/nginx-1.15.8.tar.gz

[root@lb-node1 src]# tar xf nginx-1.15..tar.gz

[root@lb-node1 src]# cd nginx-1.15.

[root@lb-node1 nginx-1.10.]# ./configure --prefix=/usr/local/nginx-1.15. \

--user=www --group=www --with-http_ssl_module \

--with-http_stub_status_module --with-http_sub_module --with-file-aio --with-stream

[root@lb-node1 nginx-1.10.]# make && make install

[root@web-node1 ~]# ln -s /usr/local/nginx-1.15./ /usr/local/nginx

## 测试配置并启动Nginx

[root@lb-node1 ~]# /usr/local/nginx/sbin/nginx -t

nginx: the configuration file /usr/local/nginx-1.15./conf/nginx.conf syntax is ok

nginx: configuration file /usr/local/nginx-1.15./conf/nginx.conf test is successful

[root@lb-node1 ~]# /usr/local/nginx/sbin/nginx
3.1配置Nginx7层反向代理
1.配置Nginx反向代理
##http段配置

    upstream web-cluster {

        # ip_hash; #会话保持,如果有登录认证的网站需要开启

        server 192.168.90.201: weight= max_fails= fail_timeout=;

        server 192.168.90.202: weight= max_fails= fail_timeout=;

    }

    server {

        listen ;

        server_name 192.168.90.203;

    location / {

        proxy_pass http://web-cluster;

        include proxy.conf;

        }

    }
测试代理
[root@lb-node1 ~]# curl http://192.168.90.203/

web-node1.com

[root@lb-node1 ~]# curl http://192.168.90.203/

web-node2.com

[root@lb-node1 ~]# curl http://192.168.90.203/

web-node1.com

[root@lb-node1 ~]# curl http://192.168.90.203/

web-node2.com
2.通过分组方式,以及User-agent实现不同代理
#http段配置

         upstream static-cluster {

                server 192.168.90.201: weight= max_fails= fail_timeout=;

        }

         upstream dynamic-cluster {

                server 192.168.90.202: weight= max_fails= fail_timeout=;

        }

         upstream default-cluster {

                server 192.168.90.202: weight= max_fails= fail_timeout=;

        }

#需要配置本地host解析测试

        server {

                listen ;

                server_name nginx.domain.com;

        location / {

        if ($http_user_agent ~* "Firefox"){

                    proxy_pass http://static-cluster;

                    }

        if ($http_user_agent ~* "Chrome") {

            proxy_pass http://dynamic-cluster;

            }

        proxy_pass http://default-cluster;

            }

    }
测试分组
##默认浏览器交给default处理

[root@lb-node1 ~]# curl http://nginx.domain.com

web-node2.com
火狐浏览器交给static-cluster处理
谷歌浏览器交给dynamic-cluster处理
3.2配置Nginx4层反向代理
配置ssh以及msql反向代理
stream {

        upstream ssh_proxy {

        hash $remote_addr consistent;

        server 192.168.90.201:;

    }

        upstream mysql_proxy {

        hash $remote_addr consistent;

        server 192.168.90.202:;

        }

    server {

    listen ;

    proxy_connect_timeout 1s;

        proxy_timeout 300s;

        proxy_pass ssh_proxy;

    }

        server {

        listen ;

        proxy_connect_timeout 1s;

        proxy_timeout 300s;

        proxy_pass mysql_proxy;

        }

  }
2222端口代理至于node1的SSH、3333端口代理至于node2的MYSQL
## 测试连接ssh

[root@lb-node1 ~]# ssh -p2222 root@192.168.90.203

root@192.168.90.203's password:

Last login: Wed Oct  ::  from 192.168.80.143

[root@web-node1 ~]#

## 测试连接mysql

[root@lb-node1 ~]# mysql -h192.168.90. -uroot -p1 -P3333

Welcome to the MariaDB monitor.  Commands end with ; or \g.

Your MariaDB connection id is

Server version: 5.5.-MariaDB MariaDB Server

Copyright (c) , , Oracle, MariaDB Corporation Ab and others.

Type 'help;' or '\h' for help. Type '\c' to clear the current input statement.

MariaDB [(none)]>
Nginx反向代理负载均衡配置的更多相关文章
- Centos7.4 Nginx反向代理+负载均衡配置
Ningx是一款高性能的HTTP和反向代理服务器,配置起来也比较简单. 测试环境: 172.16.65.190 Nginx-反向代理 172.16.65.191 Ningx-Web 172.16.65 ...
- Linux 下 Nginx 反向代理 负载均衡配置
转载请注明出处:http://blog.csdn.net/smartbetter/article/details/52036350 上一篇分享了 Nginx + JDK + Tomcat + MySQ ...
- Nginx 反向代理 负载均衡 虚拟主机配置
Nginx 反向代理 负载均衡 虚拟主机配置 通过本章你将学会利用Nginx配置多台虚拟主机,清楚代理服务器的作用,区分正向代理和反向代理的区别,搭建使用Nginx反向搭理和负载均衡,了解Nginx常 ...
- 【转】Nginx 反向代理 负载均衡 虚拟主机配置
原文:http://www.cnblogs.com/itdragon/p/8059000.html Nginx 反向代理 负载均衡 虚拟主机配置 通过本章你将学会利用Nginx配置多台虚拟主机,清楚代 ...
- Nginx 反向代理 负载均衡 虚拟主机
Nginx 反向代理 负载均衡 虚拟主机配置 通过本章你将学会利用Nginx配置多台虚拟主机,清楚代理服务器的作用,区分正向代理和反向代理的区别,搭建使用Nginx反向搭理和负载均衡,了解Nginx常 ...
- 十.nginx反向代理负载均衡服务实践部署
期中集群架构-第十章-nginx反向代理负载均衡章节章节====================================================================== 0 ...
- Centos 7.6配置nginx反向代理负载均衡集群
一,实验介绍 利用三台centos7虚拟机搭建简单的nginx反向代理负载集群, 三台虚拟机地址及功能介绍 192.168.2.76 nginx负载均衡器 192.168.2.82 web ...
- Centos 7配置nginx反向代理负载均衡集群
一,实验介绍 利用三台centos7虚拟机搭建简单的nginx反向代理负载集群, 三台虚拟机地址及功能介绍 192.168.2.76 nginx负载均衡器 192.168.2.82 web ...
- 如何使用Weave以及Docker搭建Nginx反向代理/负载均衡服务器
Hi, 今天我们将会学习如何使用 Weave 和 Docker 搭建 Nginx 的反向代理/负载均衡服务器.Weave 可以创建一个虚拟网络将 Docker 容器彼此连接在一起,支持跨主机部署及自动 ...
随机推荐
- 【bzoj 4710】 [Jsoi2011]分特产
题目 容斥加组合计数 显然答案是 \[\sum_{i=0}^n(-1)^i\binom{n}{i}f_{n-i}\] \(f_i\)表示至多有\(i\)个人没有拿到特产 考虑求\(f\) 发现\(m\ ...
- 【转】彻底理解android中的内部存储与外部存储
我们先来考虑这样一个问题: 打开手机设置,选择应用管理,选择任意一个App,然后你会看到两个按钮,一个是清除缓存,另一个是清除数据,那么当我们点击清除缓存的时候清除的是哪里的数据?当我们点击清除数据的 ...
- php魔术变量
__LINE__ 文件中的当前行号 __FILE__ 文件的完整路径和文件名 __DIR__ 文件所在的目录 __FUNCTION__ 自 PHP 5 起本常量返回该函数被定义时的名字 __C ...
- package.xml
package.xml 也是一个catkin的package必备文件, 它是这个软件包的描述文件, 在较早的ROS版本(rosbuild编译系统)中, 这个文件叫做 manifest.xml , 用于 ...
- java xml文件
xml: 是可扩展的标签语言.其中标签可以自定义. 作用是存储数据,即配置文件. 书写规范: 1:区分大小写,html不区分. 2:应该有根标签(类似html的<html>标签) 3:标签 ...
- JVM(三)调优工具
前言 给一个系统定位问题的时候,知识.经验是关键基础,数据是依据,工具是运用知识处理数据的手段.这里说的数据包括:运行日志.异常堆栈.GC日志.线程快照(threaddump/javacore文件). ...
- Spring源码分析(十)注册解析的BeanDefinition
摘要:本文结合<Spring源码深度解析>来分析Spring 5.0.6版本的源代码.若有描述错误之处,欢迎指正. 对配置文件解析完成后,获取的beanDefiniton已经可以进行使用了 ...
- 如何解决安卓(系统版本低) CSS3 动画问题---高性能动画
目前对提升移动端CSS3动画体验的主要方法有几点: 尽可能多的利用硬件能力,如使用3D变形来开启GPU加速 -webkit-transform: translate3d(0, 0, 0); -moz- ...
- CSU 1547: Rectangle (思维题加一点01背包)
1547: Rectangle Submit Page Summary Time Limit: 1 Sec Memory Limit: 256 Mb Submitted: ...
- 【LeetCode2】Add Two Numbers★★
题目描述: 解题思路: 给定两个链表(代表两个非负数),数字的各位以倒序存储,将两个代表数字的链表想加获得一个新的链表(代表两数之和). 如(2->4->3)(342) + (5-> ...