SpringBoot + Spring MVC国际化使用示例
项目中需要显示中英文两种语言,所以需要对显示的内容进行国际化,如下是一个示例程序。
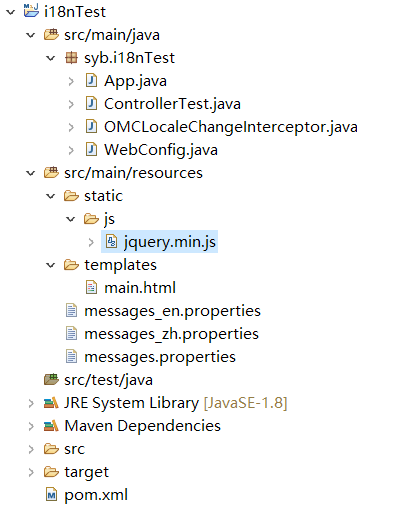
程序文件结构,如下图,后面详细列出各文件的代码。
1. 编写maven的pom.xml文件,如下:
<project xmlns="http://maven.apache.org/POM/4.0.0"

    xmlns:xsi="http://www.w3.org/2001/XMLSchema-instance"

    xsi:schemaLocation="http://maven.apache.org/POM/4.0.0 http://maven.apache.org/xsd/maven-4.0.0.xsd">

    <modelVersion>4.0.0</modelVersion>

    <groupId>syb</groupId>

    <artifactId>i18nTest</artifactId>

    <version>0.0.1-SNAPSHOT</version>

    <packaging>jar</packaging>

    <name>i18nTest</name>

    <url>http://maven.apache.org</url>

    <properties>

        <project.build.sourceEncoding>UTF-8</project.build.sourceEncoding>

    </properties>

    <parent>

        <groupId>org.springframework.boot</groupId>

        <artifactId>spring-boot-starter-parent</artifactId>

        <version>2.1.1.RELEASE</version>

    </parent>

    <dependencies>

        <dependency>

            <groupId>org.springframework.boot</groupId>

            <artifactId>spring-boot-starter-web</artifactId>

        </dependency>

        <dependency>

            <groupId>org.springframework.boot</groupId>

            <artifactId>spring-boot-starter-thymeleaf</artifactId>

        </dependency>

    </dependencies>

    <build>

        <plugins>

            <plugin>

                <groupId>org.springframework.boot</groupId>

                <artifactId>spring-boot-maven-plugin</artifactId>

            </plugin>

        </plugins>

    </build>

</project>
2. 启动类如下,重点是声明了localeResolver,这是国际化功能必须的,注意name属性不要改。
package syb.i18nTest;

import org.springframework.boot.SpringApplication;

import org.springframework.boot.autoconfigure.SpringBootApplication;

import org.springframework.context.annotation.Bean;

import org.springframework.web.servlet.LocaleResolver;

import org.springframework.web.servlet.i18n.SessionLocaleResolver;

@SpringBootApplication

public class App {

    /**

     * 国际化功能需要

     */

    @Bean(name = "localeResolver")

    public LocaleResolver getLocaleResolver() {

        LocaleResolver localeResolver = new SessionLocaleResolver();

        return localeResolver;

    }

    public static void main(String[] args) {

        SpringApplication.run(App.class, args);

    }

}
3. 项目中需要方便的控制语言的切换,所以对LocaleChangeInterceptor进行了一下重写,改为使用session中的locale属性,控制显示的语言。并且,默认语言设为了英文。代码如下。这个修改不是必须的,如果想使用官方默认的方式,请查阅文档。
package syb.i18nTest;

import javax.servlet.http.HttpServletRequest;

import javax.servlet.http.HttpServletResponse;

import org.springframework.web.servlet.LocaleResolver;

import org.springframework.web.servlet.i18n.LocaleChangeInterceptor;

import org.springframework.web.servlet.support.RequestContextUtils;

/**

 * 继承LocaleChangeInterceptor,重写其preHandler方法,即在请求处理前,进行的操作。

 * 重写的preHandler方法,基本上和原方法一致,只是改为使用session中的locale属性,控制使用的语言。

 * 要使此拦截器生效,需要添加此拦截器,见{@link WebConfig.java}

 */

public class OMCLocaleChangeInterceptor extends LocaleChangeInterceptor {

    @Override

    public boolean preHandle(HttpServletRequest request, HttpServletResponse response, Object handler) {

        // 获取语言,en表示为英文,zh表示为中文

        String newLocale = (String) request.getSession().getAttribute("locale");

        if (newLocale == null || newLocale.length() == 0) {

            newLocale = "en";// 默认语言,设为英文

        }

        if (newLocale != null) {

            // 获取语言转换对象

            LocaleResolver localeResolver = RequestContextUtils.getLocaleResolver(request);

            if (localeResolver == null) {

                throw new IllegalStateException("No LocaleResolver found: not in a DispatcherServlet request?");

            }

            try {

                // 执行语言转换操作

                localeResolver.setLocale(request, response, parseLocaleValue(newLocale));

            } catch (IllegalArgumentException ex) {

                if (isIgnoreInvalidLocale()) {

                    logger.debug("Ignoring invalid locale value [" + newLocale + "]: " + ex.getMessage());

                } else {

                    throw ex;

                }

            }

        }

        return true;

    }

}
4. 添加拦截器,也就是上述步骤中编写的类,代码如下。
package syb.i18nTest;

import org.springframework.context.annotation.Configuration;

import org.springframework.web.servlet.config.annotation.InterceptorRegistry;

import org.springframework.web.servlet.config.annotation.WebMvcConfigurer;

/**

 * WEB 配置类,添加国际化的拦截器

 */

@Configuration

public class WebConfig implements WebMvcConfigurer {

    @Override

    public void addInterceptors(InterceptorRegistry registry) {

        // 添加用于国际化语言转换的拦截器

        registry.addInterceptor(new OMCLocaleChangeInterceptor());

    }

}
5. 编写Controller,主要演示的内容:(1)切换语言方法;(2)从后端获取国际化数据的方法;(3)提供了一个进入页面的接口,页面中演示了在前端获取国际化数据的方法。
package syb.i18nTest;

import java.util.HashMap;

import java.util.Map;

import javax.servlet.http.HttpServletRequest;

import org.slf4j.Logger;

import org.slf4j.LoggerFactory;

import org.springframework.beans.factory.annotation.Autowired;

import org.springframework.context.MessageSource;

import org.springframework.context.i18n.LocaleContextHolder;

import org.springframework.stereotype.Controller;

import org.springframework.ui.Model;

import org.springframework.web.bind.annotation.PathVariable;

import org.springframework.web.bind.annotation.RequestMapping;

import org.springframework.web.bind.annotation.ResponseBody;

/**

 * 一个Controller示例,相当于web模块的Action

 */

@Controller

public class ControllerTest {

    private Logger logger = LoggerFactory.getLogger(getClass());

    @Autowired

    private HttpServletRequest request;

    /**

     * 用于获取国际化数据

     */

    @Autowired

    private MessageSource messageSource;

    /**

     * 切换语言的方法

     */

    @RequestMapping("/setLocale/{locale}")

    @ResponseBody

    public Map<String, String> setLocale(@PathVariable String locale) {

        logger.info("set locale to " + locale);

        // 通过session中的locale属性,控制使用的语言

        request.getSession().setAttribute("locale", locale);

        Map<String, String> msgMap = new HashMap<>();

        msgMap.put("type", "Info");

        msgMap.put("msg", "OK, To " + locale);

        return msgMap;

    }

    /**

     * 进入页面,并演示如何在后端获取国际化数据

     */

    @RequestMapping("/main")

    public String toMain(Model model) {

        // 后端获取国际化数据,并打印

        String projectName = messageSource.getMessage("projectName", null, LocaleContextHolder.getLocale());

        logger.info("projectName: " + projectName);

        return "main";

    }

}
6. jquery.min.js即是jquery的js库文件,不必说明了。
7. main.html即为页面文件,演示了:(1)前端如何获取国际化数据,并赋值到js变量中,或者显示到页面中;(2)前端发起请求,切换显示的语言。具体代码如下:
<!DOCTYPE html>

<html xmlns:th="http://www.thymeleaf.org">

<head>

<meta charset="UTF-8"></meta>

<title>Spring Boot Web</title>

<script type="text/javascript" th:src="@{js/jquery.min.js}"></script>

<script type="text/javascript">

    var projectNameValue = "[[#{projectName}]]";// 取国际化数据,并赋值到js变量

    $(function() {

        // 将获取到的国际化数据,打印到控制台

        console.info(projectNameValue);

    });

    // 转换成英文,并刷新页面

    function toEn() {

        $.post("/setLocale/en", {}, function(result) {

            window.location.reload();

        });

    }

    // 转换成中文,并刷新页面

    function toZh() {

        $.post("/setLocale/zh", {}, function(result) {

            window.location.reload()

        });

    }

</script>

</head>

<body>

    <!-- 取国际化数据,并通过span标签,显示到页面上 -->

    <div>

        国际化字符串:<span th:text="#{projectName}"></span>

    </div>

    <!-- 语言切换按钮 -->

    <div>

        <button onclick="toEn()">To En</button>

        <button onclick="toZh()">To Zh</button>

    </div>

</body>

</html>
8. messages*.properties,是具体的国际化项的配置,三个文件代码分别为:
# messages.properties

projectName=Spring Boot Hello World
# messages_zh.properties

projectName=Spring Boot\u5C0F\u7A0B\u5E8F
# messages_en.properties

projectName=Spring Boot Hello World
9. 启动程序,浏览器中输入地址:http://localhost:8080/main。
后端日志中打印:projectName: Spring Boot Hello World,说明后端获取国际化数据没有问题。
页面中显示如图:
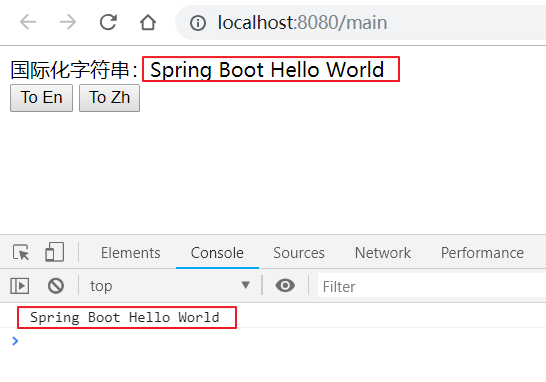
可以看到页面中显示了国际化数据,浏览器控制台中也正确打印国际化数据。
10. 可以点击页面上的两个按钮,观察语言的切换功能。
SpringBoot + Spring MVC国际化使用示例的更多相关文章
- spring mvc 国际化
spring mvc 国际化 使用CookieLocaleResolver实现国际化的步骤:1.注册 messageSource,localeResolver 两个bean2.调用localeReso ...
- Spring MVC国际化配置
Spring MVC国际化配置 前言 项目开发中要考虑支持国际化,框架选用的是Spring MVC框架,那么问题来了Spring MVC如何配置并实现国际化. 实现过程(Maven项目) 对于Spri ...
- Spring MVC(十六)--Spring MVC国际化实例
上一篇文章总结了一下Spring MVC中实现国际化所需的配置,本文继上一文举一个完整的例子,我选择用XML的方式.我的场景是这样的: 访问一个页面时,这个页面有个表格,对表头中的列名实现国际化. 第 ...
- spring mvc 国际化的几种方案
spring mvc 国际化的几种方案 首先配置我们项目的service-servlet.xml文件添加的内容如下: <bean id="messageSource" cla ...
- Spring MVC 入门教程示例 (一)
今天和大家分享下 Spring MVC 入门教程 首先还是从 HelloWorld web 工程开始 -------------------------- 1.首先创建一个Maven Web工程 ...
- Spring MVC国际化
本文基于Spring MVC 注解-让Spring跑起来.本文提到的国际化是Spring实现国际化的方案之一. (1) 在applicationContext.xml中添加以下配置信息: <!- ...
- Spring MVC - Hello World示例
以下示例演示如何使用Spring MVC框架编写一个简单的基于Web的Hello World应用程序.首先使用Eclipse IDE,并按照以下步骤使用Spring Web Framework开发一个 ...
- spring mvc 注解入门示例
web.xml <?xml version="1.0" encoding="UTF-8"?> <web-app xmlns:xsi=" ...
- MogliFS与spring mvc结合简单示例
一.MogliFS 与Spring结合配置请参照上文 二.上传页面 <%@ page language="java" contentType="text/html; ...
随机推荐
- 敏捷开发之XP
敏捷方法论有一个共同的特点,那就是都将矛头指向了“文档”,它们认为传统的软件工程方法文档量太“重”了,称为“重量级”方法,而相应的敏捷方法则是“轻量级”方法.正是因为“轻量级”感觉没有什么力量,不但不 ...
- ettercap dns_spoof
首先编辑网页,打开apache2服务器,编辑好etter.dns 然后开始ettercap -G 的操作 sniff选择好自己使用的网卡 scan hosts ,扫描完将目标和网关添加到目标一目标二 ...
- .NET基础 (02).NET运行机制
.NET运行机制1 .NET程序被编译成什么形式的代码2 JIT是如何工作的3 简述程序集的加载机制4 如何配置程序集的版本策略 1 .NET程序被编译成什么形式的代码 .NET程序在编写完成后,会经 ...
- linux 分区 文件系统
操作系统通过文件系统管理文件及数据,磁盘或分区需要创建文件系统之后才能为操作系统使用,创建文件系统的过程又称之为格式化. 没有文件系统的设备称之为裸设备(raw); 常见的文件系统有fat32,NTF ...
- Exception has been thrown by the target of an invocation
I'd suggest checking for an inner exception. If there isn't one, check your logs for the exception t ...
- Backup--完整备份会打破现有的日志备份链么?
--问题描述: --对数据库有一个周期性数据库备份和事务日志备份的维护计划,在维护计划外有工作人员对数据库进行完整备份,该备份会打乱现有的日志备份链么? --===================== ...
- centos 7 安装mysql5.6rpm格式
1查看是否安装了mysql rpm -qa|grep -i mysql 如果安装了请卸载:rpm -e --nodeps MySQL... 2.没有安装则进行如下操作 下载mysql rpm ta ...
- Android 开发怎样做代码加密或混淆?
欢迎访问网易云社区,了解更多网易技术产品运营经验. 在大公司怎么做android代码混淆的?发现他们的软件用apktool反编译居然没看到classes.dex文件和当前安卓APP加固到底该如何做到防 ...
- Centos7.6下使用docker方法安装stf
使用Docker镜像安装 一,在centos上安装Docker 很简单,直接 yum install docker 即可开启docker服务 在centos中开启服务可以使用systemctl sta ...
- 四、Centos linux系统优化
1. 无论是哪个版本的linux,都会提供32位和64位的两个版本的镜像. i386为32位 x86_64为64位 两者的区别: 1)目标:需要大量的内存需求的行业为64位,普通用户的需求为3 ...