springMVC注解的参数传递
1、web.xml
 <?xml version="1.0" encoding="UTF-8"?>

 <web-app xmlns:xsi="http://www.w3.org/2001/XMLSchema-instance" xmlns="http://java.sun.com/xml/ns/javaee" xsi:schemaLocation="http://java.sun.com/xml/ns/javaee http://java.sun.com/xml/ns/javaee/web-app_2_5.xsd" id="WebApp_ID" version="2.5">

   <display-name>springmvc1</display-name>

   <filter>

     <filter-name>characterEncoding</filter-name>

     <filter-class>org.springframework.web.filter.CharacterEncodingFilter</filter-class>

     <init-param>

       <param-name>encoding</param-name>

       <param-value>UTF-8</param-value>

     </init-param>

   </filter>

   <filter-mapping>

     <filter-name>characterEncoding</filter-name>

     <url-pattern>/*</url-pattern>

   </filter-mapping>

   <servlet>

     <servlet-name>springmvc</servlet-name>

     <servlet-class>org.springframework.web.servlet.DispatcherServlet</servlet-class>

     <init-param>

       <param-name>contextConfigLocation</param-name>

       <param-value>classpath:springmvc.xml</param-value>

     </init-param>

   </servlet>

   <servlet-mapping>

     <servlet-name>springmvc</servlet-name>

     <url-pattern>*.do</url-pattern>

   </servlet-mapping>

   <welcome-file-list>

     <welcome-file>index.html</welcome-file>

     <welcome-file>index.htm</welcome-file>

     <welcome-file>index.jsp</welcome-file>

     <welcome-file>default.html</welcome-file>

     <welcome-file>default.htm</welcome-file>

     <welcome-file>default.jsp</welcome-file>

   </welcome-file-list>

 </web-app>
2、springmvc.xml
 <?xml version="1.0" encoding="UTF-8"?>

 <beans xmlns="http://www.springframework.org/schema/beans"

     xmlns:mvc="http://www.springframework.org/schema/mvc"

     xmlns:aop="http://www.springframework.org/schema/aop"

     xmlns:tx="http://www.springframework.org/schema/tx"

     xmlns:context="http://www.springframework.org/schema/context"

     xmlns:xsi="http://www.w3.org/2001/XMLSchema-instance"

     xsi:schemaLocation="http://www.springframework.org/schema/beans

                         http://www.springframework.org/schema/beans/spring-beans-3.2.xsd

                         http://www.springframework.org/schema/mvc

                         http://www.springframework.org/schema/mvc/spring-mvc-3.2.xsd

                         http://www.springframework.org/schema/context

                         http://www.springframework.org/schema/context/spring-context-3.2.xsd

                         http://www.springframework.org/schema/aop

                         http://www.springframework.org/schema/aop/spring-aop-3.2.xsd

                         http://www.springframework.org/schema/tx

                         http://www.springframework.org/schema/tx/spring-tx-3.2.xsd">

         <!-- 把Controller交给spring管理 -->

         <context:component-scan base-package="com.xiaostudy"/>

         <!-- 配置注解处理器映射器 功能:寻找执行类Controller -->

         <bean class="org.springframework.web.servlet.mvc.method.annotation.RequestMappingHandlerMapping"/>

         <!-- 配置注解处理器适配器 功能:调用controller方法,执行controller -->

         <bean class="org.springframework.web.servlet.mvc.method.annotation.RequestMappingHandlerAdapter"/>

         <!-- 配置sprigmvc视图解析器:解析逻辑试图

              后台返回逻辑试图:index

             视图解析器解析出真正物理视图:前缀+逻辑试图+后缀====/WEB-INF/index.jsp -->

         <bean class="org.springframework.web.servlet.view.InternalResourceViewResolver">

             <property name="prefix" value="/WEB-INF/"/>

             <property name="suffix" value=".jsp"/>

         </bean>

 </beans>
3、domain类
 package com.xiaostudy.domain;

 public class User {

     private int id;

     private String username;

     private String password;

     private int age;

     public int getId() {

         return id;

     }

     public void setId(int id) {

         this.id = id;

     }

     public String getUsername() {

         return username;

     }

     public void setUsername(String username) {

         this.username = username;

     }

     public String getPassword() {

         return password;

     }

     public void setPassword(String password) {

         this.password = password;

     }

     public int getAge() {

         return age;

     }

     public void setAge(int age) {

         this.age = age;

     }

     @Override

     public String toString() {

         return "User [id=" + id + ", username=" + username + ", password=" + password + ", age=" + age + "]";

     }

 }
4、封装domain类
 package com.xiaostudy.controller;

 import com.xiaostudy.domain.User;

 public class CustomUser {

     private User user;

     public User getUser() {

         return user;

     }

     public void setUser(User user) {

         this.user = user;

     }

     @Override

     public String toString() {

         return "CustomUser [user=" + user + "]";

     }

 }
5、注解类
 package com.xiaostudy.controller;

 import org.springframework.stereotype.Controller;

 import org.springframework.web.bind.annotation.RequestMapping;

 import org.springframework.web.bind.annotation.RequestMethod;

 import com.xiaostudy.domain.User;

 @Controller//<bean class="com.xiaostudy.controller.MyController"/>

 @RequestMapping(value="/myController")//访问该类的方法时,前面多这样一个路径

 public class MyController {

 //    @RequestMapping("hello")//http://localhost:8080/demo2/hello.do

 //    @RequestMapping("/hello")//http://localhost:8080/demo2/hello.do

 //    @RequestMapping(value="/hello.do")//http://localhost:8080/demo2/hello.do

 //    @RequestMapping(value="/hello.do",method=RequestMethod.GET)//http://localhost:8080/demo2/hello.do

 //    @RequestMapping(value="/hello.do",method= {RequestMethod.GET,RequestMethod.POST})//http://localhost:8080/demo2/hello.do

     public String print() {

         return "index";

     }

     @RequestMapping("hi")//http://localhost:8080/demo2/myController/hi.do

     public String hello() {

         return "index";

     }

     @RequestMapping("requestint")//http://localhost:8080/demo2/myController/requestint.do

     public String requestint(int id) {

         System.out.println(id);

         return "index";

     }

     @RequestMapping("requestint2")//http://localhost:8080/demo2/myController/requestint2.do

     public String requestint2(int id, int i) {

         System.out.println(id + "   " + i);

         return "index";

     }

     @RequestMapping("requestint3")//http://localhost:8080/demo2/myController/requestint3.do

     public String requestint3(User user) {

         System.out.println(user);

         return "index";

     }

     @RequestMapping("requestint4")//http://localhost:8080/demo2/myController/requestint4.do

     public String requestint4(CustomUser customUser) {

         System.out.println(customUser);

         return "index";

     }

     @RequestMapping("xiaostudy")//http://localhost:8080/demo2/myController/hi.do

     public String add() {

         return "xiaostudy";

     }

 }
6、填写表单数据的xiaostudy.jsp
 <%@ page language="java" contentType="text/html; charset=UTF-8" pageEncoding="UTF-8"%>

 <!DOCTYPE html PUBLIC "-//W3C//DTD HTML 4.01 Transitional//EN"

             "http://www.w3.org/TR/html4/loose.dtd">

 <html>

 <head>

     <meta http-equiv="Content-Type" content="text/html; charset=UTF-8">

     <title>springMVC_demo</title>

 </head>

 <body>

     <form action="${pageContext.request.contextPath }/myController/requestint.do">

         <fieldset>

             <legend>单独一个参数</legend>

             <input type="text" name="id" id="id"/>

             <input type="submit" value="提交">

         </fieldset>

     </form>

     <form action="${pageContext.request.contextPath }/myController/requestint2.do">

         <fieldset>

             <legend>两个参数</legend>

             <input type="text" name="i" id="i"/>

             <input type="text" name="id" id="id"/>

             <input type="submit" value="提交">

         </fieldset>

     </form>

     <form action="${pageContext.request.contextPath }/myController/requestint3.do">

         <fieldset>

             <legend>参数为一个对象</legend>

             <input type="text" name="id" id="id"/>

             <input type="text" name="username" id="username"/>

             <input type="password" name="password" id="password"/>

             <input type="text" name="age" id="age"/>

             <input type="submit" value="提交">

         </fieldset>

     </form>

     <form action="${pageContext.request.contextPath }/myController/requestint4.do">

         <fieldset>

             <legend>参数为一个封装对象</legend>

             <input type="text" name="user.id" id="id"/>

             <input type="text" name="user.username" id="username"/>

             <input type="password" name="user.password" id="password"/>

             <input type="text" name="user.age" id="age"/>

             <input type="submit" value="提交">

         </fieldset>

     </form>

 </body>

 </html>
7、跳转的index.jsp
 <%@ page language="java" contentType="text/html; charset=UTF-8" pageEncoding="UTF-8"%>

 <!DOCTYPE html PUBLIC "-//W3C//DTD HTML 4.01 Transitional//EN"

             "http://www.w3.org/TR/html4/loose.dtd">

 <html>

 <head>

     <meta http-equiv="Content-Type" content="text/html; charset=UTF-8">

     <title>springMVC_demo</title>

 </head>

 <body>

     xiaostudy

 </body>

 </html>
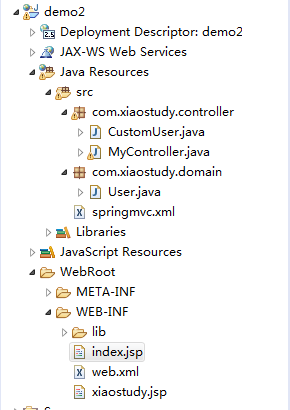
项目文件结构
springMVC注解的参数传递的更多相关文章
- springmvc注解和参数传递
一.SpringMVC注解入门 1. 创建web项目2. 在springmvc的配置文件中指定注解驱动,配置扫描器 <!-- mvc的注解驱动 --> <mvc:annotation ...
- springmvc入门基础之注解和参数传递
一.SpringMVC注解入门 1. 创建web项目2. 在springmvc的配置文件中指定注解驱动,配置扫描器 <!-- mvc的注解驱动 --> <mvc:annotation ...
- springMVC 注解版
http://blog.csdn.net/liuxiit/article/details/5756115 http://blog.csdn.net/hantiannan/article/categor ...
- springMVC注解初步
一.(补充)视图解析器---XmlViewResolver 作用:分离配置信息. 在视图解析器---BeanNameViewResolver的基础之上进行扩充,新建一个myView.xml分离信息 在 ...
- SpringMVC注解开发初步
一.(补充)视图解析器---XmlViewResolver 作用:分离配置信息. 在视图解析器---BeanNameViewResolver的基础之上进行扩充,新建一个myView.xml分离信息 在 ...
- SpringMVC注解汇总(二)-请求映射规则
接上一节SpringMVC注解汇总-定义 讲到Httpy请求信息 URL路径映射 1)普通URL路径映射 @RequestMapping(value={"/test1", &quo ...
- springMVC注解启用及优化
使用注解的原因 最方便的还是启用注解 注解方便,而且项目中很流行. 配置文件尽量减少,主要使用注解方式. Springmvc的注解是在2.5版本后有了注解,如何开启注解配置文件 Web.xml文件中不 ...
- 6.SpringMVC注解启用
SpringMVC注解可以帮助我们快速地注入 属性和参数 提高开发效率. 由于 有相当一部分人讨厌xml配置方式 注解可以覆盖 xml则不能 使用注解比xml规范化,因为很多注解都是java的规范的范 ...
- springMVC(注解版笔记)
springMVC(注解版) 较之于非注解版本,发生一下变化: 1.配置文件需要配置的标签有: <!-- 包的扫描,此包下面的所有包都启用注解 --> <context:compon ...
随机推荐
- php和jsCOOKIE实现前端交互
w如何精简? <script> document.cookie = 'wjs_cookie=' + 'amz_reviews'; function w(id) { document.coo ...
- 如何实现手游app瘦身?
手游服务商来说,手游包体大一直是个很困扰的问题.一款手游产品而言,包体大小和更新方式对于有效用户的转化率往往起到非常关键的作用,话说手游安装包越小,用户转化率越高,那该如何实现app瘦身呢? 工具/原 ...
- oracle入门(7)——存储过程
[本文介绍] 熟悉了PL/SQL语法后,实现java调用oracle存储过程才是主要目的.本文将介绍如何写存储过程,java如何调用存储过程. [存储过程介绍] 抛开专业的描述,存储过程就是在数据库里 ...
- zabbix详解(一)
zabbix简介 zabbix是一个基于WEB界面的提供分布式系统监视以及网络监视功能的企业级的开源解决方案. zabbix能监视各种网络参数,保证服务器系统的安全运营:并提供柔软的通知机制以让系统管 ...
- nodejs实战《一起学 Node.js》 使用 Express + MongoDB 搭建多人博客
GitHub: https://github.com/nswbmw/N-blog N-blog 使用 Express + MongoDB 搭建多人博客 开发环境 Node.js: 6.9.1 Mong ...
- sql 区分大小写
sql server默认是不区分大小写的. 要查看sqlserver数据库是否区分大小写,我么可以查看系统存储过程sys.sp_server_info exec sys.sp_server_info ...
- C#中获取音频文件时长
1.在项目中添加引入:COM组件的Microsoft Shell Controls And Automation 2.在引用中找到Shell32,点击右键,在属性中将“嵌入互操作类型”的值改为“fal ...
- let 与 var
前言let与var最大的区别就是var会变量提升.var会被覆盖.var变量没有块级作用域,而let都将弥补这些bug.传统语言都不会有‘变量提升.重复声明被覆盖.变量没有块级作用’这些问题,这是js ...
- MyBatisPartA
(正在补充) 1.从第一个程序开始,通过mybatis实现数据库表内容的增删改查 (源码zip包) 1.0准备工作 建数据库mybatis,在其中创建表sql语句如下: ; -- ---------- ...
- Divide by Zero 2017 and Codeforces Round #399 (Div. 1 + Div. 2, combined) B. Code For 1
地址:http://codeforces.com/contest/768/problem/B 题目: B. Code For 1 time limit per test 2 seconds memor ...