
spring-boot整合Mybatis案例
1.运行环境
开发工具:intellij idea
JDK版本:1.8
项目管理工具:Maven 3.2.5
2.Maven Plugin管理
 <?xml version="1.0" encoding="UTF-8"?>

 <project xmlns="http://maven.apache.org/POM/4.0.0"

          xmlns:xsi="http://www.w3.org/2001/XMLSchema-instance"

          xsi:schemaLocation="http://maven.apache.org/POM/4.0.0 http://maven.apache.org/xsd/maven-4.0.0.xsd">

     <modelVersion>4.0.0</modelVersion>

     <groupId>spring-boot-mybaits-xml</groupId>

     <artifactId>spring-boot-mybaits-xml</artifactId>

     <version>1.0-SNAPSHOT</version>

     <parent>

         <groupId>org.springframework.boot</groupId>

         <artifactId>spring-boot-starter-parent</artifactId>

         <version>1.5.6.RELEASE</version>

     </parent>

     <dependencies>

         <!-- spring-boot的web启动的jar包 -->

         <dependency>

             <groupId>org.springframework.boot</groupId>

             <artifactId>spring-boot-starter-web</artifactId>

         </dependency>

         <dependency>

             <groupId>org.springframework.boot</groupId>

             <artifactId>spring-boot-starter-test</artifactId>

         </dependency>

         <!-- Spring Boot 集成MyBatis -->

         <dependency>

             <groupId>org.mybatis.spring.boot</groupId>

             <artifactId>mybatis-spring-boot-starter</artifactId>

             <version>1.3.1</version>

         </dependency>

         <!-- 数据库驱动 -->

         <dependency>

             <groupId>mysql</groupId>

             <artifactId>mysql-connector-java</artifactId>

             <version>5.1.35</version>

         </dependency>

         <!-- druid-->

         <dependency>

             <groupId>com.alibaba</groupId>

             <artifactId>druid</artifactId>

             <version>1.0.27</version>

         </dependency>

     </dependencies>

     <build>

         <plugins>

             <plugin>

                 <groupId>org.mybatis.generator</groupId>

                 <artifactId>mybatis-generator-maven-plugin</artifactId>

                 <version>1.3.5</version>

                 <executions>

                     <execution>

                         <id>Generate MyBatis Artifacts</id>

                         <goals>

                             <goal>generate</goal>

                         </goals>

                     </execution>

                 </executions>

             </plugin>

             <plugin>

                 <groupId>org.apache.maven.plugins</groupId>

                 <artifactId>maven-compiler-plugin</artifactId>

                 <configuration>

                     <source>1.7</source>

                     <target>1.7</target>

                 </configuration>

             </plugin>

         </plugins>

     </build>

 </project>
3.application.properties编写
 # 驱动配置信息

 spring.datasource.type=com.alibaba.druid.pool.DruidDataSource

 spring.datasource.url = jdbc:mysql://127.0.0.1:3306/springbootdb

 spring.datasource.username = root

 spring.datasource.password = root

 spring.datasource.driverClassName = com.mysql.jdbc.Driver

 # mybatis

 mybatis.type-aliases-package=com.goku.demo.model

 mybatis.mapper-locations=classpath:mapping/**/*.xml
4.mybatis.generator代码生成器
generatorConfig.xml修改具体表内容
         <!-- !!!! Table Configurations !!!! -->

         <table tableName="user_" domainObjectName="User" enableCountByExample="false" enableDeleteByExample="false" enableSelectByExample="false"

                enableUpdateByExample="false"/>
执行代码生成

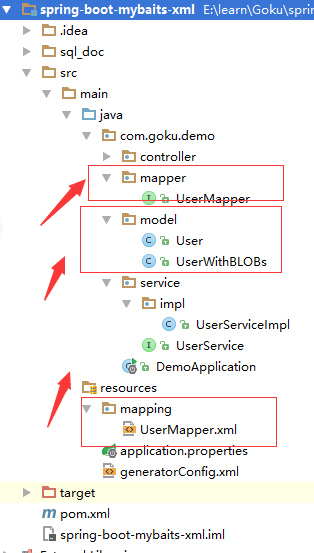
查看生成代码 model,mapper,mapping
5.service层
UserService接口类编写
 package com.goku.demo.service;

 import com.goku.demo.model.UserWithBLOBs;

 /**

  * Created by nbfujx on 2017-12-01.

  */

 public interface UserService {

     UserWithBLOBs selectByPrimaryKey(String id);

 }
UserServiceImpl接口实现类编写
 package com.goku.demo.service.impl;

 import com.goku.demo.mapper.UserMapper;

 import com.goku.demo.model.UserWithBLOBs;

 import com.goku.demo.service.UserService;

 import org.springframework.beans.factory.annotation.Autowired;

 import org.springframework.stereotype.Service;

 /**

  * Created by nbfujx on 2017-12-01.

  */

 @Service("UserService_one")

 public class UserServiceImpl implements UserService {

     @Autowired

     UserMapper userMapper;

     @Override

     public UserWithBLOBs selectByPrimaryKey(String id) {

         return userMapper.selectByPrimaryKey(id);

     }

 }
6.controller层
UserController接口类编写
 package com.goku.demo.controller;

 import com.goku.demo.model.UserWithBLOBs;

 /**

  * Created by nbfujx on 2017-12-01.

  */

 public interface UserController {

     UserWithBLOBs selectByPrimaryKey(String id);

 }
UserControllerImpl接口实现类编写
 package com.goku.demo.controller.impl;

 import com.goku.demo.controller.UserController;

 import com.goku.demo.model.UserWithBLOBs;

 import com.goku.demo.service.UserService;

 import org.springframework.beans.factory.annotation.Autowired;

 import org.springframework.beans.factory.annotation.Qualifier;

 import org.springframework.web.bind.annotation.PathVariable;

 import org.springframework.web.bind.annotation.RequestMapping;

 import org.springframework.web.bind.annotation.RequestParam;

 import org.springframework.web.bind.annotation.RestController;

 /**

  * Created by nbfujx on 2017-12-01.

  */

 @RestController

 @RequestMapping("/User")

 public class UserControllerImpl implements UserController {

     @Autowired

     @Qualifier("UserService_one")

     UserService userservice;

     @Override

     @RequestMapping("/{id}")

     public UserWithBLOBs selectByPrimaryKey(@PathVariable String id) {

         return userservice.selectByPrimaryKey(id);

     }

 }
7.Application启动类编写
 package com.goku.demo;

 import org.mybatis.spring.annotation.MapperScan;

 import org.springframework.boot.SpringApplication;

 import org.springframework.boot.autoconfigure.SpringBootApplication;

 import org.springframework.boot.autoconfigure.jdbc.DataSourceAutoConfiguration;

 import org.springframework.boot.web.servlet.ServletComponentScan;

 /**

  * Created by nbfujx on 2017/11/20.

  */

 // Spring Boot 应用的标识

 @SpringBootApplication

 @ServletComponentScan

 @MapperScan(basePackages="com.goku.demo.mapper")

 public class DemoApplication {

     public static void main(String[] args) {

         // 程序启动入口

         // 启动嵌入式的 Tomcat 并初始化 Spring 环境及其各 Spring 组件

         SpringApplication.run(DemoApplication.class,args);

     }

 }
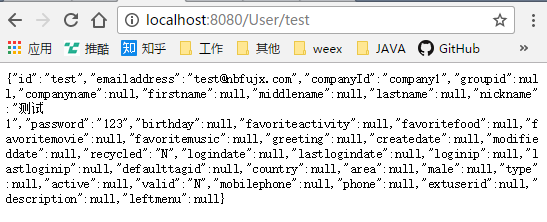
8.在页面上运行
http://localhost:8080/User/test
9.GITHUB地址
https://github.com/nbfujx/springBoot-learn-demo/tree/master/spring-boot-mybaits-xml
spring-boot整合Mybatis案例的更多相关文章
- Spring Boot整合Mybatis并完成CRUD操作
MyBatis 是一款优秀的持久层框架,被各大互联网公司使用,本文使用Spring Boot整合Mybatis,并完成CRUD操作. 为什么要使用Mybatis?我们需要掌握Mybatis吗? 说的官 ...
- spring boot 整合 mybatis 以及原理
同上一篇文章一样,spring boot 整合 mybatis过程中没有看见SqlSessionFactory,sqlsession(sqlsessionTemplate),就连在spring框架整合 ...
- Spring Boot 整合mybatis时遇到的mapper接口不能注入的问题
现实情况是这样的,因为在练习spring boot整合mybatis,所以自己新建了个项目做测试,可是在idea里面mapper接口注入报错,后来百度查询了下,把idea的注入等级设置为了warnin ...
- Spring Boot整合Mybatis报错InstantiationException: tk.mybatis.mapper.provider.base.BaseSelectProvider
Spring Boot整合Mybatis时一直报错 后来发现原来主配置类上的MapperScan导错了包 由于我使用了通用Mapper,所以应该导入通用mapper这个包
- Spring Boot整合MyBatis(非注解版)
Spring Boot整合MyBatis(非注解版),开发时采用的时IDEA,JDK1.8 直接上图: 文件夹不存在,创建一个新的路径文件夹 创建完成目录结构如下: 本人第一步习惯先把需要的包结构创建 ...
- Spring Boot整合Mybatis完成级联一对多CRUD操作
在关系型数据库中,随处可见表之间的连接,对级联的表进行增删改查也是程序员必备的基础技能.关于Spring Boot整合Mybatis在之前已经详细写过,不熟悉的可以回顾Spring Boot整合Myb ...
- Spring Boot系列(三):Spring Boot整合Mybatis源码解析
一.Mybatis回顾 1.MyBatis介绍 Mybatis是一个半ORM框架,它使用简单的 XML 或注解用于配置和原始映射,将接口和Java的POJOs(普通的Java 对象)映射成数据库中的记 ...
- 太妙了!Spring boot 整合 Mybatis Druid,还能配置监控?
Spring boot 整合 Mybatis Druid并配置监控 添加依赖 <!--druid--> <dependency> <groupId>com.alib ...
- Spring Boot 整合 Mybatis 实现 Druid 多数据源详解
摘要: 原创出处:www.bysocket.com 泥瓦匠BYSocket 希望转载,保留摘要,谢谢! “清醒时做事,糊涂时跑步,大怒时睡觉,独处时思考” 本文提纲一.多数据源的应用场景二.运行 sp ...
- Spring boot整合Mybatis
时隔两个月的再来写博客的感觉怎么样呢,只能用“棒”来形容了.闲话少说,直接入正题,之前的博客中有说过,将spring与mybatis整个后开发会更爽,基于现在springboot已经成为整个业界开发主 ...
随机推荐
- content is not supported outside 'script" or asp content' region
https://stackoverflow.com/questions/48915080/asp-net-content-is-not-supported-outside-the-script-or- ...
- random——伪随机数生成模块
random——伪随机数生成模块 转自:https://blog.csdn.net/zhtysw/article/details/79978197 该模块包含构造伪随机数生成器的多个方法.对于整数,伪 ...
- hadoop分布式环境安装
1. 下载hadoop和jdk安装包到指定目录,并安装java环境. 2.解压hadoop到指定目录,配置环境变量.vim /etc/profile export JAVA_HOME=/home/xi ...
- 模拟赛毒瘤状压DP题:Kronican
Kronican 内存限制:32 MiB 时间限制:2000 ms 标准输入输出 题目类型:传统 评测方式:文本比较 上传者: cqbzgm 题目描述 Mislav有N个无限体积的杯子,每一个杯子中都 ...
- [LeetCode] 287. Find the Duplicate Number(Floyd判圈算法)
传送门 Description Given an array nums containing n + 1 integers where each integer is between 1 and n ...
- Django 安装、创建第一个项目
一.版本 Django 版本对应的 Python 版本: Django 版本 Python 版本 1.8 2.7, 3.2 , 3.3, 3.4, 3.5 1.9, 1.10 2.7, 3.4, ...
- pandas基础(第一章(一))
摘要:通过简单例子,了解功能.以此作为基点,在工作中不断深入 1.设置需要显示的行列宽度(显示的最大列数和最大行数,其余部分用.....表示) 设置显示多少行多少列 import pandas as ...
- C#面试 笔试题 二
1.using关键字有什么用?什么是IDisposable? using可以声明namespace的引入,还可以实现非托管资源的释放,实现了IDisposiable的类在using中创建,using结 ...
- 实现combobox模糊查询的时候报错 InvalidArgument=“0”的值对于“index”无效
因为要对combobox实现模糊查询,因为系统实现的匹配只能从左到右进行匹配,所以利用两个list来进行模糊匹配,主要代码如下: List<string> listOnit = new L ...
- 在css里如何控制表单中文本的value内的文字的位置,比方说让它向右移动2px
方法1:比较简单的方法是将文本放到一个容器中(div,span,a等等)然后给容器设置样式,通过控制容器的位置来达到控制字体位置.(margin-left:10px; margin-top:15px; ...