
linux运维、架构之路-cobbler无人值守
一、cobbler介绍
Cobbler是一个Linux服务器安装的服务,可以通过网络启动(PXE)的方式来快速安装、重装物理服务器和虚拟机,同时还可以管理DHCP,DNS等
1、主要功能:
①Cobbler可以使用命令行方式管理,也提供了基于Web的界面管理工具(cobbler-web),还提供了API接口,可以方便二次开发使用
②Cobbler是较早前的kickstart的升级版,优点是比较容易配置,还自带web界面比较易于管理
③Cobbler内置了一个轻量级配置管理系统,但它也支持和其它配置管理系统集成,如Puppet,暂时不支持SaltStack
2、Cobbler可管理的服务
PXE服务支持
DHCP服务管理
DNS服务管理(可选bind,dnsmasq)
电源管理
Kickstart服务支持
YUM仓库管理
TFTP(PXE启动时需要)
Apache(提供kickstart的安装源,并提供定制化的kickstart配置)
二、Cobbler部署配置
1、环境
[root@cobbler ~]# cat /etc/redhat-release

CentOS release 6.9 (Final)

[root@cobbler ~]# uname -r

2.6.-.el6.x86_64

[root@cobbler ~]# /etc/init.d/iptables status

iptables: Firewall is not running.

[root@cobbler ~]# getenforce

Disabled

[root@cobbler ~]# hostname -I

10.0.0.121 172.16.1.121
2、安装Cobbler
CentOS6安装

yum localinstall Django14-1.4.-.el6.noarch.rpm -y

yum -y install cobbler cobbler-web dhcp tftp-server pykickstart httpd

#说明:yum源里已经去除了Diango的下载源

CentOS7安装

yum -y install cobbler cobbler-web dhcp tftp-server pykickstart httpd
#CentOS7安装cobbler文档#

https://github.com/congto/cobbler-1
3、启动Cobbler服务
[root@cobbler ~]# /etc/init.d/httpd restart

Stopping httpd:                                            [  OK  ]

Starting httpd:                                            [  OK  ]

[root@cobbler ~]# /etc/init.d/cobblerd start

Starting cobbler daemon:                                   [  OK  ]
4、检查Cobbler配置
[root@cobbler tools]# cobbler check

The following are potential configuration items that you may want to fix:

 : The 'server' field in /etc/cobbler/settings must be set to something other than localhost, or kickstarting features will not work.  This should be a resolvable hostname or IP for the boot server as reachable by all machines that will use it.

 : For PXE to be functional, the 'next_server' field in /etc/cobbler/settings must be set to something other than 127.0.0.1, and should match the IP of the boot server on the PXE network.

 : change 'disable' to 'no' in /etc/xinetd.d/tftp

 : some network boot-loaders are missing from /var/lib/cobbler/loaders, you may run 'cobbler get-loaders' to download them, or, if you only want to handle x86/x86_64 netbooting, you may ensure that you have installed a *recent* version of the syslinux package installed and can ignore this message entirely.  Files in this directory, should you want to support all architectures, should include pxelinux., menu.c32, elilo.efi, and yaboot. The 'cobbler get-loaders' command is the easiest way to resolve these requirements.

 : change 'disable' to 'no' in /etc/xinetd.d/rsync

 : file /etc/xinetd.d/rsync does not exist

 : debmirror package is not installed, it will be required to manage debian deployments and repositories

 : The default password used by the sample templates for newly installed machines (default_password_crypted in /etc/cobbler/settings) is still set to 'cobbler' and should be changed, try: "openssl passwd -1 -salt 'random-phrase-here' 'your-password-here'" to generate new one

 : fencing tools were not found, and are required to use the (optional) power management features. install cman or fence-agents to use them

Restart cobblerd and then run 'cobbler sync' to apply changes.

#只需一步一步解决上面出现的问题即可,然后重启Cobbler
5、解决Cobbler问题
cp /etc/cobbler/settings{,.bak} #备份Cobbler主配置文件

sed -i 's/server: 127.0.0.1/server: 172.16.1.121/' /etc/cobbler/settings

sed -i 's/next_server: 127.0.0.1/next_server: 172.16.1.121/' /etc/cobbler/settings

sed -i 's/manage_dhcp: 0/manage_dhcp: 1/' /etc/cobbler/settings #使用cobbler管理dhcp

sed -i 's/pxe_just_once: 0/pxe_just_once: 1/' /etc/cobbler/settings #防止有些机子第一启动是pxe循环重装系统,此处设置为只能装一次

sed -ri "/default_password_crypted/s#(.*: ).*#\1\"`openssl passwd -1 -salt 'cobbler' '123456'`\"#" /etc/cobbler/settings #设置系统的默认密码为123456

sed -i 's#yes#no#' /etc/xinetd.d/rsync

sed -i 's#yes#no#' /etc/xinetd.d/tftp
6、配置Cobbler的dhcp模板
sed -i 's#192.168.1#172.16.1#g;22d;23d' /etc/cobbler/dhcp.template

#修改过后内容如下:

……

subnet 172.16.1.0 netmask 255.255.255.0 {

     option subnet-mask         255.255.255.0;

     range dynamic-bootp        172.16.1.100 172.16.1.254;

     default-lease-time         ;

     max-lease-time             ;

     next-server                $next_server;

……

[root@cobbler tools]# /etc/init.d/xinetd restart

Stopping xinetd:                                           [  OK  ]

Starting xinetd:                                           [  OK  ]

[root@cobbler tools]# /etc/init.d/cobblerd restart

Stopping cobbler daemon:                                   [  OK  ]

Starting cobbler daemon:                                   [  OK  ]

[root@cobbler tools]# /etc/init.d/httpd restart

Stopping httpd:                                            [  OK  ]

Starting httpd:                                            [  OK  ]
7、同步Cobbler配置
[root@cobbler tools]# cobbler sync

task started: --07_145244_sync

task started (id=Sync, time=Tue Nov   :: )

running pre-sync triggers

cleaning trees

removing: /var/lib/tftpboot/pxelinux.cfg/default

removing: /var/lib/tftpboot/grub/efidefault

removing: /var/lib/tftpboot/grub/images

removing: /var/lib/tftpboot/s390x/profile_list

copying bootloaders

copying distros to tftpboot

copying images

generating PXE configuration files

#再次检查cobbler

[root@cobbler tools]# cobbler check

The following are potential configuration items that you may want to fix:

 : some network boot-loaders are missing from /var/lib/cobbler/loaders, you may run 'cobbler get-loaders' to download them, or, if you only want to handle x86/x86_64 netbooting, you may ensure that you have installed a *recent* version of the syslinux package installed and can ignore this message entirely.  Files in this directory, should you want to support all architectures, should include pxelinux., menu.c32, elilo.efi, and yaboot. The 'cobbler get-loaders' command is the easiest way to resolve these requirements.

 : debmirror package is not installed, it will be required to manage debian deployments and repositories

 : fencing tools were not found, and are required to use the (optional) power management features. install cman or fence-agents to use them

Restart cobblerd and then run 'cobbler sync' to apply changes. #问题解决完毕
8、此时打开浏览器输入
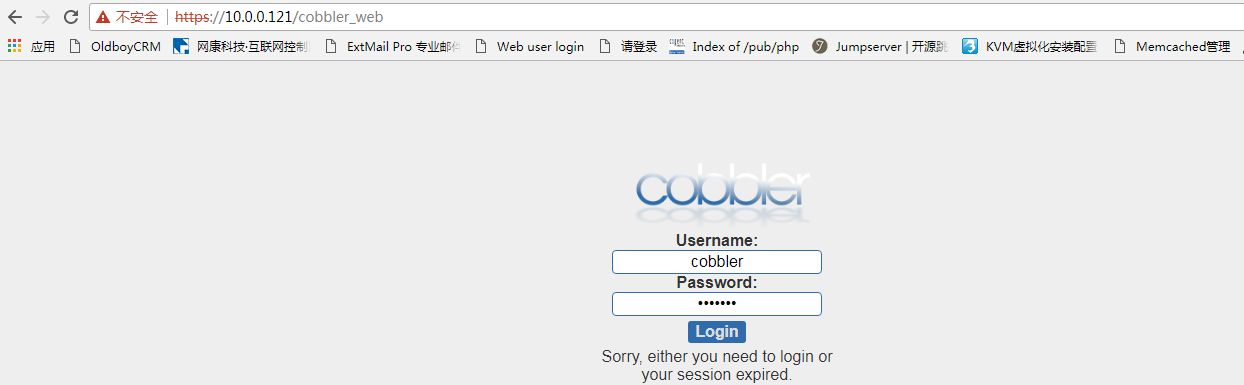

三、使用Cobbler的web页面实现自动化安装系统
1、导入镜像
[root@cobbler ~]# mount /dev/cdrom /mnt/

mount: block device /dev/sr0 is write-protected, mounting read-only

[root@cobbler ~]# df -h

Filesystem      Size  Used Avail Use% Mounted on

/dev/sda2        19G  .6G   16G   % /

tmpfs           931M       931M   % /dev/shm

/dev/sda1       190M   35M  146M  % /boot

/dev/sr0        .7G  .7G      % /mnt
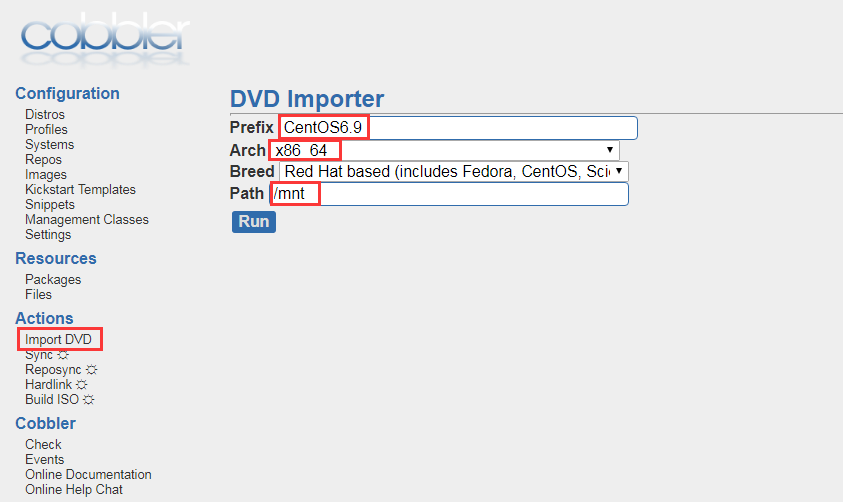
通过rsync导入镜像
[root@cobbler ~]# ps -ef|grep rsync

root       2087   1599 18 16:57 ?        00:00:05 rsync -a /mnt/ /var/www/cobbler/ks_mirror/CentOS6.9-x86_64 --progress

root       2088   2087  0 16:57 ?        00:00:00 rsync -a /mnt/ /var/www/cobbler/ks_mirror/CentOS6.9-x86_64 --progress

root       2089   2088 13 16:57 ?        00:00:03 rsync -a /mnt/ /var/www/cobbler/ks_mirror/CentOS6.9-x86_64 --progress

root       2106   1256  0 16:58 pts/1    00:00:00 grep rsync
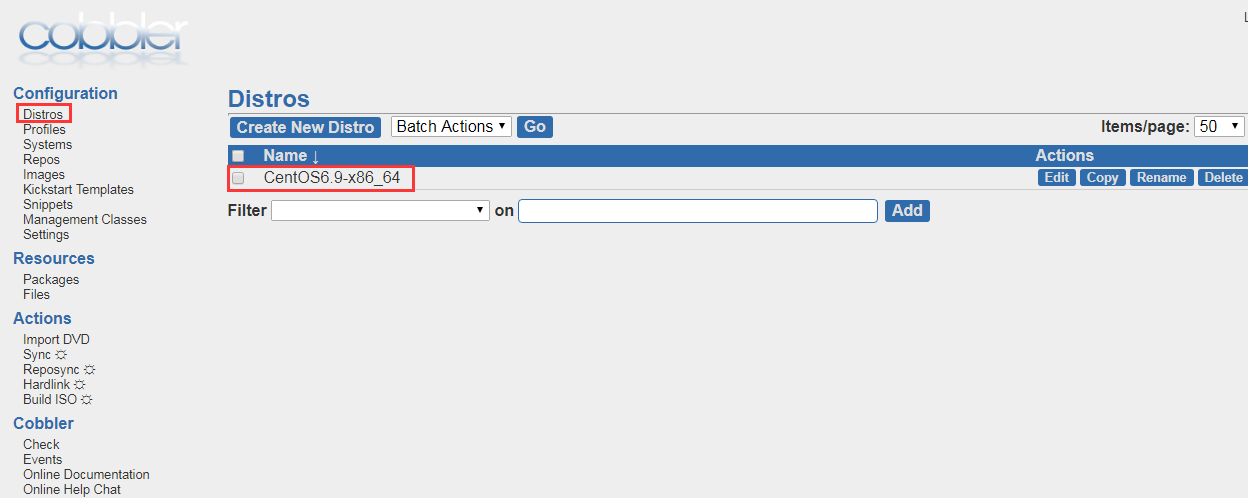
导入完成之后
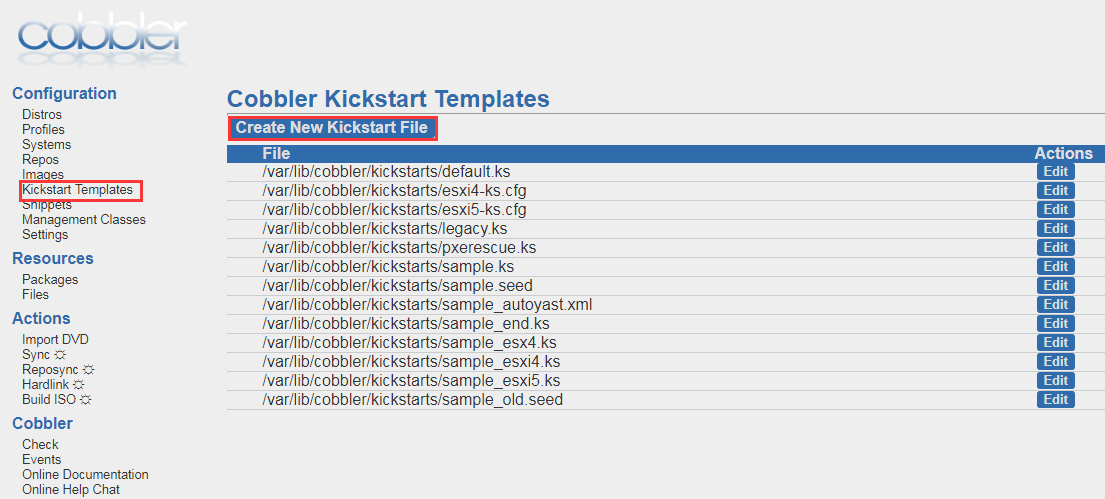
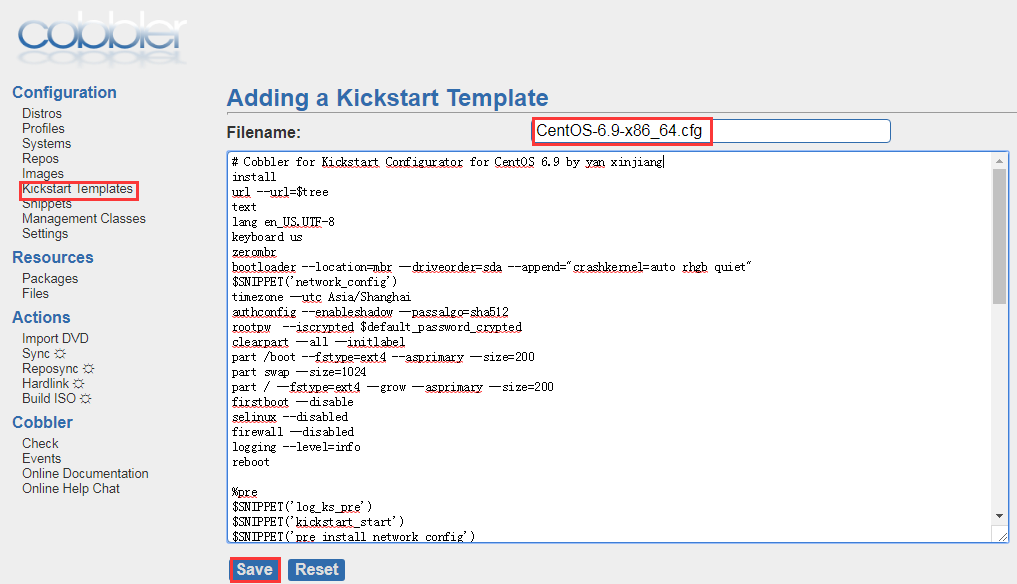
2、创建ks文件
3、定制系统
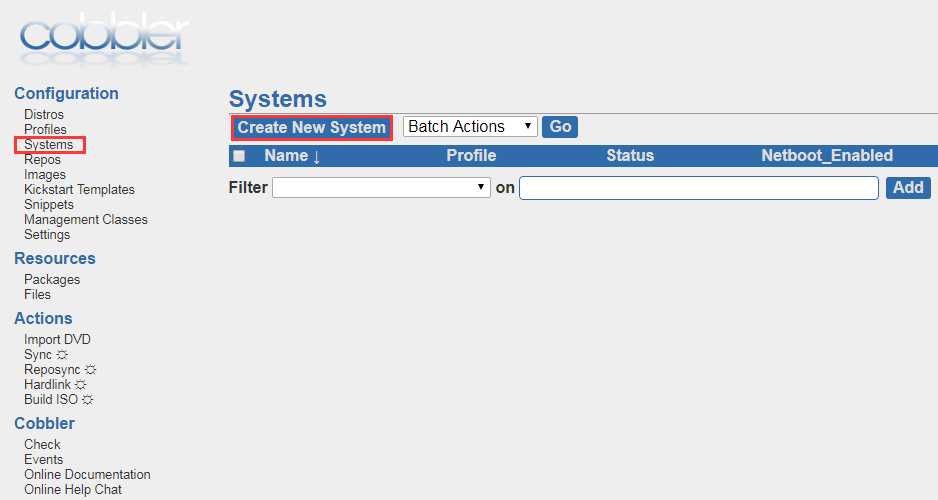
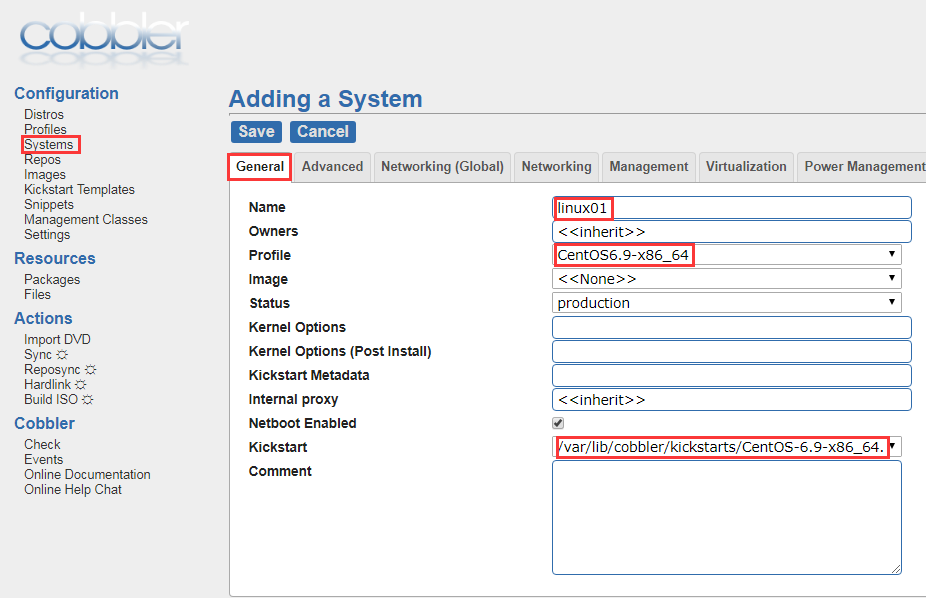
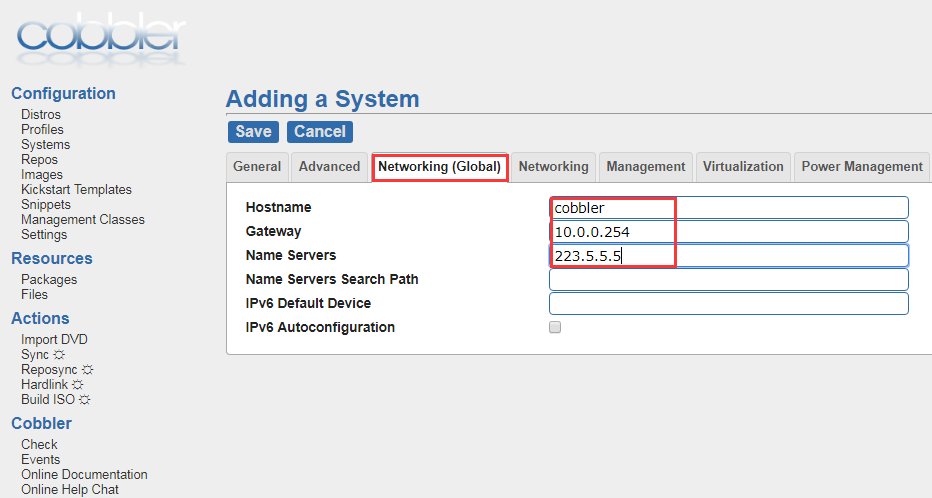
根据机器的mac地址固定ip地址
eth1

eth0
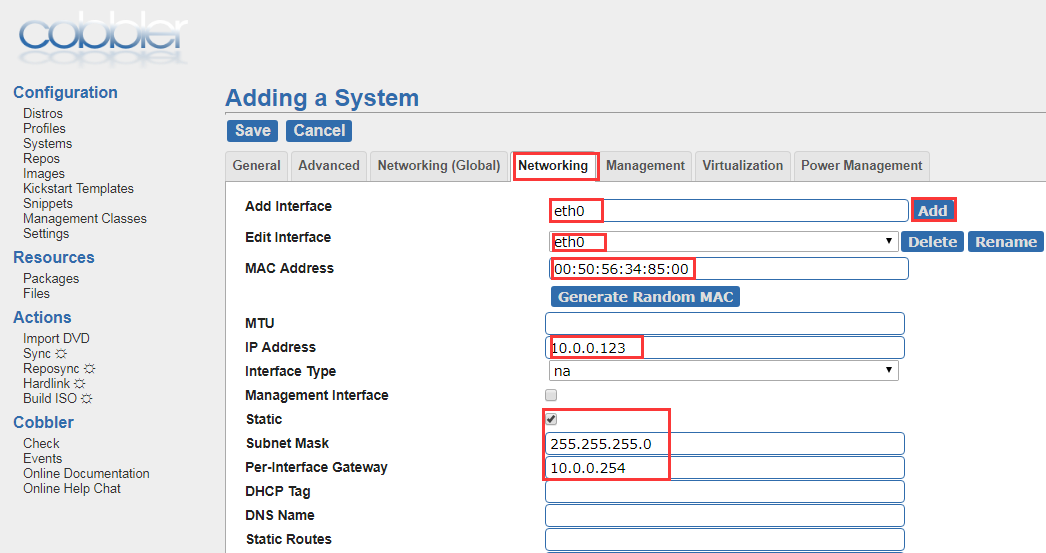
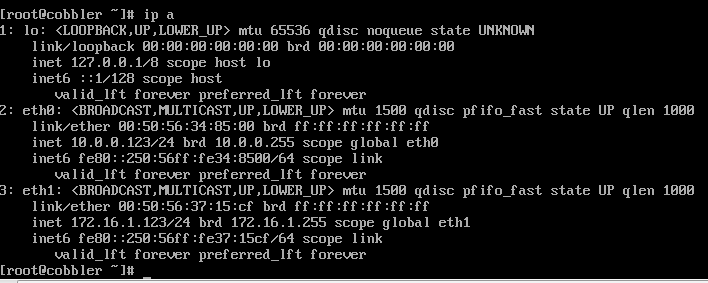
CentOS7,修改网卡名
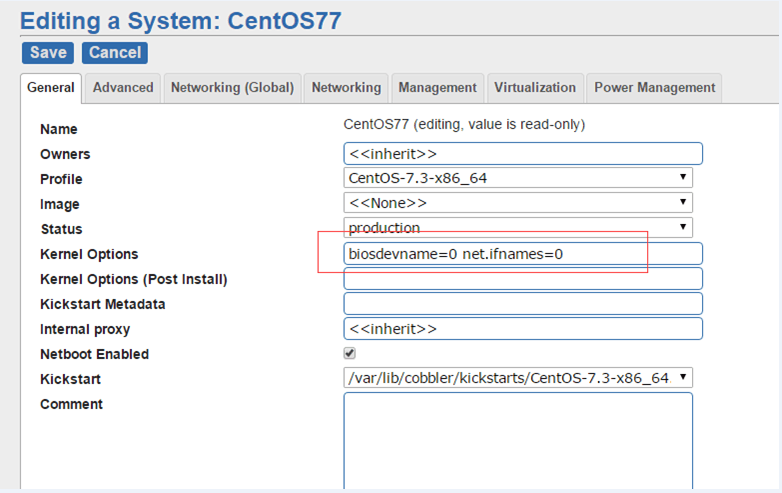
保存

4、新建空白虚拟机测试
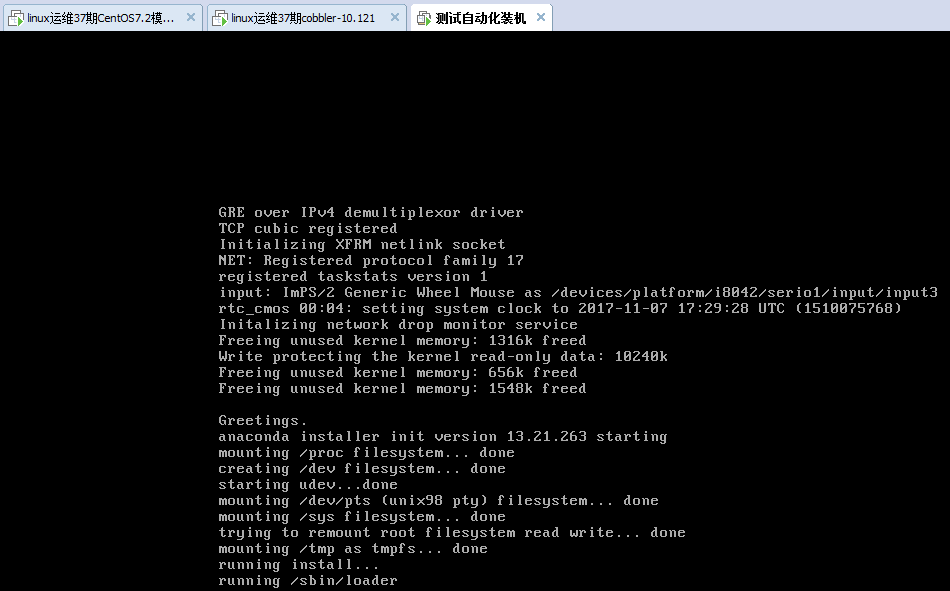
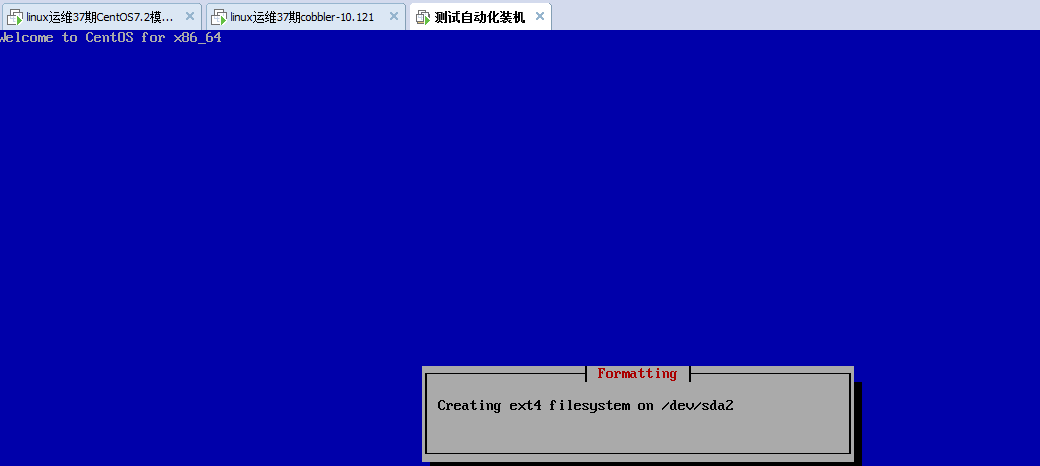
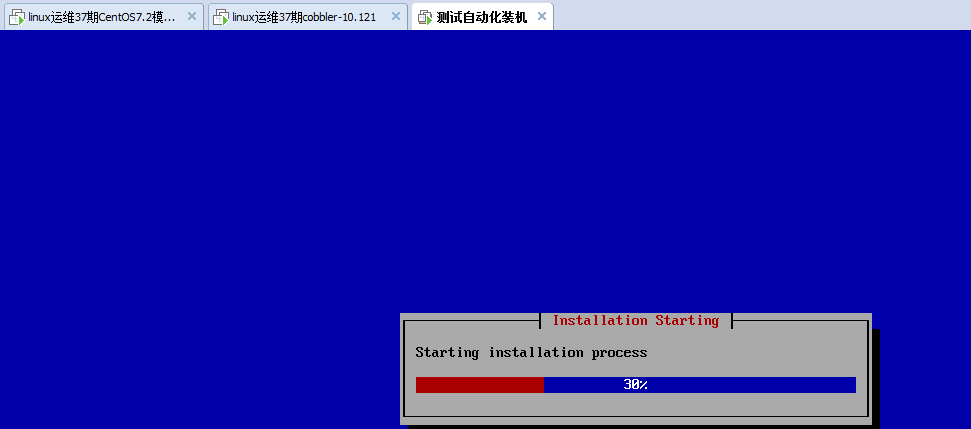
休息片刻,一会儿回来查看结果
4、CentOS6与CentOS7的ks.cfg文件
CentOS6.9
# Cobbler for Kickstart Configurator for CentOS 6.9 by yan xinjiang

install

url --url=$tree

text

lang en_US.UTF-

keyboard us

zerombr

bootloader --location=mbr --driveorder=sda --append="crashkernel=auto rhgb quiet"

$SNIPPET('network_config')

timezone --utc Asia/Shanghai

authconfig --enableshadow --passalgo=sha512

rootpw  --iscrypted $default_password_crypted

clearpart --all --initlabel

part /boot --fstype=ext4 --asprimary --size=

part swap --size=

part / --fstype=ext4 --grow --asprimary --size=

firstboot --disable

selinux --disabled

firewall --disabled

logging --level=info

reboot

%pre

$SNIPPET('log_ks_pre')

$SNIPPET('kickstart_start')

$SNIPPET('pre_install_network_config')

# Enable installation monitoring

$SNIPPET('pre_anamon')

%end

%packages

@base

@compat-libraries

@debugging

@development

tree

nmap

sysstat

lrzsz

dos2unix

telnet

%end

%post --nochroot

$SNIPPET('log_ks_post_nochroot')

%end

%post

$SNIPPET('log_ks_post')

# Start yum configuration

$yum_config_stanza

# End yum configuration

$SNIPPET('post_install_kernel_options')

$SNIPPET('post_install_network_config')

$SNIPPET('func_register_if_enabled')

$SNIPPET('download_config_files')

$SNIPPET('koan_environment')

$SNIPPET('redhat_register')

$SNIPPET('cobbler_register')

# Enable post-install boot notification

$SNIPPET('post_anamon')

# Start final steps

$SNIPPET('kickstart_done')

# End final steps

%end
CentOS7.2
# Cobbler for Kickstart Configurator for CentOS 7.2 by yan xinjiang

install

url --url=$tree

text

lang en_US.UTF-

keyboard us

zerombr

bootloader --location=mbr --driveorder=sda --append="crashkernel=auto rhgb quiet"

# Network information

$SNIPPET('network_config')

timezone --utc Asia/Shanghai

authconfig --enableshadow --passalgo=sha512

rootpw  --iscrypted $default_password_crypted

clearpart --all --initlabel

part /boot --fstype xfs --size

part swap --size

part / --fstype xfs --size  --grow

firstboot --disable

selinux --disabled

firewall --disabled

logging --level=info

reboot

%pre

$SNIPPET('log_ks_pre')

$SNIPPET('kickstart_start')

$SNIPPET('pre_install_network_config')

# Enable installation monitoring

$SNIPPET('pre_anamon')

%end

%packages

@base

@compat-libraries

@debugging

@development

tree

nmap

sysstat

lrzsz

dos2unix

telnet

htop

wget

vim

bash-completion

net-tools

iptraf

ncurses-devel

openssl-devel

zlib-devel

OpenIPMI-tools

screen

%end

%post

systemctl disable postfix.service

curl -o /etc/yum.repos.d/CentOS-Base.repo http://mirrors.aliyun.com/repo/Centos-7.repo

curl -o  /etc/yum.repos.d/epel.repo http://mirrors.aliyun.com/repo/epel-7.repo

%end
linux运维、架构之路-cobbler无人值守的更多相关文章
- linux运维架构师职业规划
1.假如你从来未接触过Linux的话,首先要做的就找一本指导书来学习.现在公认的Linux的入门书籍是“鸟哥的私房菜”,讲的很全面,鸟哥的私房菜一共分为两部,一部是基础篇,一部是服务器篇.“鸟哥的私房 ...
- 从苦逼到牛逼,详解Linux运维工程师的打怪升级之路
做运维也快四年多了,就像游戏打怪升级,升级后知识体系和运维体系也相对变化挺大,学习了很多新的知识点. 运维工程师是从一个呆逼进化为苦逼再成长为牛逼的过程,前提在于你要能忍能干能拼,还要具有敏锐的嗅觉感 ...
- Nginx+Lua+Redis整合实现高性能API接口 - 网站服务器 - LinuxTone | 运维专家网论坛 - 最棒的Linux运维与开源架构技术交流社区! - Powered by Discuz!
Nginx+Lua+Redis整合实现高性能API接口 - 网站服务器 - LinuxTone | 运维专家网论坛 - 最棒的Linux运维与开源架构技术交流社区! - Powered by Disc ...
- Linux运维企业架构实战系列
Linux运维企业架构项目实战系列 项目实战1-LNMP的搭建.nginx的ssl加密.权限控制的实现 项目实战2-LVS.nginx实现负载均衡系列 2.1 项目实战2.1-实现基于LVS负载均衡集 ...
- Linux运维企业架构项目实战系列
Linux运维企业架构项目实战系列 项目实战1—LNMP的搭建.nginx的ssl加密.权限控制的实现 项目实战2—LVS.nginx实现负载均衡系列2.1 项目实战2.1—实现基于LVS负载均衡集群 ...
- Linux 运维入门到跑路书单推荐
一.基础入门 <鸟哥的Linux私房菜基础学习篇>:最具知名度的Linux入门书<鸟哥的Linux私房菜基础学习篇>,全面而详细地介绍了Linux操作系统. https://b ...
- 从零起步做到Linux运维经理, 你必须管好的23个细节
“不想成为将军的士兵,不是好士兵”-拿破仑 如何成为运维经理? 一般来说,运维经理大概有两种出身:一种是从底层最基础的维护做起,通过出色的维护工作,让公司领导对这个人非常认可,同时对Linux运维工作 ...
- 从零起步做到Linux运维经理,你必须管好的23个细节
不想成为将军的士兵,不是好士兵-拿破仑 如何成为运维经理?成为运维经理需要什么样的能力?我想很多运维工程师都会有这样的思考和问题. 如何成为运维经理.一般来说,运维经理大概有两种出身,一种是从底层最基 ...
- linux 运维知识体系
这里将会介绍一下,LINUX运维工程师的知识体系. 只能说是个人理解吧.并不是必要或者充分的,仅供网友参考. 大部分本博客都有涉及,并不完整. 1.LINUX运维基础 1.1.LINUX系统的简介,分 ...
随机推荐
- 递归算法输出数列的前N个数
数列1,1,1,3,5,9,17,31,57,105……N大于3时,第N个数为前三个数之和. ; i < ; i++) { listint.Add(); } test3(); test3(); ...
- java基础/java调用shell命令和脚本
一.项目需求: 从某一机构获取证书,证书机构提供小工具,执行.sh脚本即可启动服务,本地调用该服务即可获取证书. 问题:linux服务器启动该服务,不能关闭.一旦关闭,服务即停止. 解决方案:java ...
- call 和 apply的定义和区别?
1.方法定义 call方法: 语法:call([thisObj[,arg1[, arg2[, [,.argN]]]]]) 定义:调用一个对象的一个方法,以另一个对象替换当前对象. 说明: call ...
- xmake新增对WDK驱动编译环境支持
xmake v2.2.1新版本现已支持WDK驱动编译环境,我们可以直接在系统原生cmd终端下,执行xmake进行驱动编译,甚至配合vscode, sublime text, IDEA等编辑器+xmak ...
- js while循环
<!DOCTYPE html><html lang="en"><head> <meta charset="UTF-8" ...
- Java——HashMap底层源码分析
1.简介 HashMap 根据键的 hashCode 值存储数据,大多数情况下可以直接定位到它的值,因而具有很快的访问速度,但遍历顺序却是不确定的. HashMap 最多只允许一条记录的key为 nu ...
- 【Python】循环结构中的else
else在循环结构中,只有循环正常结束后才执行else,如果使用break跳出了循环,不会执行else for i in range(0,10): print(i)else: print(" ...
- redis学习之旅-初识Redis
定义: redis是一种支持Key-Value等多种数据结构的存储系统.可用于缓存,事件发布或订阅,高速队列等场景.该数据库使用ANSI C语言编写,支持网络,提供字符串,哈希,列表,队列,集合结构直 ...
- 洛谷 - P1462 - 通往奥格瑞玛的道路 - 二分 - Dijkstra
https://www.luogu.org/problem/P1462 感觉,要二分最大收费权的城市,把小于等于它的全部插进去,Dijkstra一下求出最小的血量.这样感觉太暴力了. 考虑只有1000 ...
- Laravel 学习笔记之文件上传
自定义添加磁盘——upload 位置:config/filesystems.php 'disks' => [ 'local' => [ 'driver' => 'local', 'r ...