Spring源码 04 IOC XML方式
参考源
https://www.bilibili.com/video/BV1tR4y1F75R?spm_id_from=333.337.search-card.all.click
https://www.bilibili.com/video/BV12Z4y197MU?spm_id_from=333.999.0.0
《Spring源码深度解析(第2版)》
版本
本文章基于 Spring 5.3.15
Spring IOC 主要有两种实现方式:XML 和注解。
这里分析 XML 方式。
ClassPathXmlApplicationContext("applicationContext.xml")
配置文件
首先看解析的对象:配置文件。
<?xml version="1.0" encoding="UTF-8"?>

<beans xmlns="http://www.springframework.org/schema/beans"

	   xmlns:xsi="http://www.w3.org/2001/XMLSchema-instance"

	   xsi:schemaLocation="http://www.springframework.org/schema/beans http://www.springframework.org/schema/beans/spring-beans.xsd">

	<bean id="userDao" class="cn.sail.ioc.dao.UserDao"/>

</beans>
Spring 的配置文件是一个典型的 XML 文件,其中的标签名称和标签属性都是约定好的,在没有自定义前只能按照约定的格式编写。
约束方式
这里先介绍 XML 文件的两种约束方式:DTD 和 XSD。
DTD
DTD(Document Type Definition)文档类型定义
一种 XML 约束模式语言,是 XML 文件的验证机制,属于 XML 文件组成的一部分
一种保证 XML 文档格式正确的有效方法,可以通过比较 XML 文档和 DTD 文件来看文档是否符合规范,元素和标签使用是否正确。
DTD 文档内容
- 元素的定义规则
- 元素间关系的定义规则
- 元素可使用的属性
- 可使用的实体或符号规则
要使用 DTD 验证模式的时候需要在 XML 文件的头部声明,例如在 Spring 中使用 DTD 声明方式
<?xml version="1.0" encoding="UTF-8"?>

<!DOCTYPE beans PUBLIC "-//Sping//DTD BEAN 2.0//EN" "http://www.Spingframework.org/dtd/ Spring-beans-2.O.dtd">

<beans>

</beans>
老版本的 Spring 使用 DTD,新版本的 Spring 都使用 XSD 了。
XSD
XSD(XML Schemas Definition)XML描述定义
描述 XML 文档的结构,验证 XML 文档是否符合其要求。
指定 XML 文档所允许的结构和内容,检查 XML 文档是否有效。
本身是 XML 文档,符合 XML 语法结构,可以用通用的 XML 解析器解析。
对 XML 文档进行检验,需要声明名称空间(xmlns)和文档存储位置(xsi:schemaLocation)。
<?xml version="1.0" encoding="UTF-8"?>

<beans xmlns="http://www.springframework.org/schema/beans"

	   xmlns:xsi="http://www.w3.org/2001/XMLSchema-instance"

	   xsi:schemaLocation="http://www.springframework.org/schema/beans http://www.springframework.org/schema/beans/spring-beans.xsd">

</beans>
其中
xsi:schemaLocation指向一个网络地址
由于网络不可靠,且经常会脱网开发,Spring 会通过 resources/META-INF/spring.schemas 定义本地路径。
比如上面的配置文件映射的本地路径:
http\://www.springframework.org/schema/beans/spring-beans.xsd=org/springframework/beans/factory/xml/spring-beans.xsd
两个路径下的内容是完全一致的。
接下来开始分析
ClassPathXmlApplicationContext("applicationContext.xml")由于 Spring 源码层级十分复杂,约定如下规则
- 数字 类名:数字代表该类出现的顺序。
- 类数字-数字 方法注释:数字代表该方法在类中执行的层级。
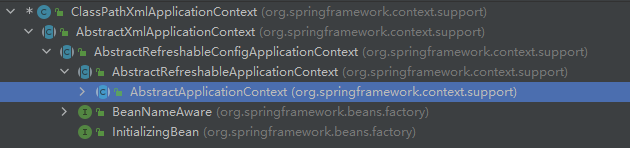
1 ClassPathXmlApplicationContext
由于其父类 AbstractApplicationContext 存在静态代码块,先进入父类的静态代码块。
2 AbstractApplicationContext
2-1 静态代码块
进入
ClassPathXmlApplicationContext的构造方法,会先进入AbstractApplicationContext的静态代码块。
static {

    /**

     * 优先加载上下文关闭事件来防止奇怪的类加载问题

     * WebLogic 8.1 在应用程序关闭的时候出现的 BUG

     */

    ContextClosedEvent.class.getName();

}
这里是针对 WebLogic 8.1 的特殊处理,与主体逻辑不关,不用过于关注。
1 ClassPathXmlApplicationContext
public  ClassPathXmlApplicationContext(String configLocation) throws BeansException {

   this(new String[] {configLocation}, true, null);

}
public ClassPathXmlApplicationContext(String[] configLocations, boolean refresh, @Nullable ApplicationContext parent) throws BeansException {

    // 调用父类构造方法,进行相关的对象创建等操作,包含属性的赋值操作

    super(parent);

    // 设置配置文件路径

    setConfigLocations(configLocations);

    if (refresh) {

        // 刷新

        refresh();

    }

}
1-1 父类构造方法
super(parent)
public AbstractXmlApplicationContext(@Nullable ApplicationContext parent) {

    super(parent);

}
public AbstractRefreshableConfigApplicationContext(@Nullable ApplicationContext parent) {

    super(parent);

}
public AbstractRefreshableApplicationContext(@Nullable ApplicationContext parent) {

    super(parent);

}
public AbstractApplicationContext(@Nullable ApplicationContext parent) {

    this();

    // 设置父容器

    setParent(parent);

}
2 AbstractApplicationContext
this()
public AbstractApplicationContext() {

    // 创建资源模式处理器

    this.resourcePatternResolver = getResourcePatternResolver();

}
2-2 创建资源模式处理器
protected ResourcePatternResolver getResourcePatternResolver() {

    // 创建一个资源模式解析器,用来解析 XML 配置文件

    return new PathMatchingResourcePatternResolver(this);

}
3 PathMatchingResourcePatternResolver
PathMatchingResourcePatternResolver(this)
public PathMatchingResourcePatternResolver(ResourceLoader resourceLoader) {

    Assert.notNull(resourceLoader, "ResourceLoader must not be null");

    this.resourceLoader = resourceLoader;

}
2 AbstractApplicationContext
2-1 设置父容器
setParent(parent)
public void setParent(@Nullable ApplicationContext parent) {

    this.parent = parent;

    if (parent != null) {

        Environment parentEnvironment = parent.getEnvironment();

        if (parentEnvironment instanceof ConfigurableEnvironment) {

            getEnvironment().merge((ConfigurableEnvironment) parentEnvironment);

        }

    }

}
if (parent != null)由于parent没有传,执行结束。
1 ClassPathXmlApplicationContext
1-1 设置配置文件路径
setConfigLocations(configLocations)
由于该类没有定义该方法,调用其父类
AbstractRefreshableConfigApplicationContext的该方法。

4 AbstractRefreshableConfigApplicationContext
public void setConfigLocations(@Nullable String... locations) {

    if (locations != null) {

        Assert.noNullElements(locations, "Config locations must not be null");

        this.configLocations = new String[locations.length];

        for (int i = 0; i < locations.length; i++) {

            // 解析给定路径

            this.configLocations[i] = resolvePath(locations[i]).trim();

        }

    }

    else {

        this.configLocations = null;

    }

}
4-1 解析给定路径
resolvePath(locations[i])
protected String resolvePath(String path) {

    // 获取环境信息

    // 解析所需的占位符

    return getEnvironment().resolveRequiredPlaceholders(path);

}
4-2 获取环境信息
getEnvironment()
public ConfigurableEnvironment getEnvironment() {

    if (this.environment == null) {

        // 创建环境对象

        this.environment = createEnvironment();

    }

    return this.environment;

}
4-3 创建环境对象
createEnvironment()
protected ConfigurableEnvironment createEnvironment() {

    return new StandardEnvironment();

}
5 StandardEnvironment
public StandardEnvironment() {

}
由于继承关系,再调用 AbstractEnvironment 的构造方法。

6 AbstractEnvironment
public AbstractEnvironment() {

    this(new MutablePropertySources());

}
protected AbstractEnvironment(MutablePropertySources propertySources) {

    this.propertySources = propertySources;

    // 创建属性解析器

    this.propertyResolver = createPropertyResolver(propertySources);

    // 定制化属性资源

    customizePropertySources(propertySources);

}
6-1 创建属性解析器
createPropertyResolver(propertySources)
protected ConfigurablePropertyResolver createPropertyResolver(MutablePropertySources propertySources) {

    return new PropertySourcesPropertyResolver(propertySources);

}
7 PropertySourcesPropertyResolver
public PropertySourcesPropertyResolver(@Nullable PropertySources propertySources) {

    this.propertySources = propertySources;

}
6 AbstractEnvironment
6-1 定制化属性资源
customizePropertySources(propertySources)
由于子类重写了该方法,会调用子类方法。

5 StandardEnvironment
protected void customizePropertySources(MutablePropertySources propertySources) {

    // 获取系统属性

    propertySources.addLast(new PropertiesPropertySource(SYSTEM_PROPERTIES_PROPERTY_SOURCE_NAME, getSystemProperties()));

    // 获取系统环境

    propertySources.addLast(new SystemEnvironmentPropertySource(SYSTEM_ENVIRONMENT_PROPERTY_SOURCE_NAME, getSystemEnvironment()));

}
5-1 获取系统属性
getSystemProperties()
public Map<String, Object> getSystemProperties() {

    try {

        return (Map) System.getProperties();

    } catch (AccessControlException ex) {

        return (Map) new ReadOnlySystemAttributesMap() {

            @Override

            @Nullable

            protected String getSystemAttribute(String attributeName) {

                try {

                    return System.getProperty(attributeName);

                } catch (AccessControlException ex) {

                    if (logger.isInfoEnabled()) {

                        logger.info("Caught AccessControlException when accessing system property '" + attributeName + "'; its value will be returned [null]. Reason: " + ex.getMessage());

                    }

                    return null;

                }

            }

        };

    }

}
5-1 获取系统环境
getSystemEnvironment()
public Map<String, Object> getSystemEnvironment() {

    if (suppressGetenvAccess()) {

        return Collections.emptyMap();

    }

    try {

        return (Map) System.getenv();

    } catch (AccessControlException ex) {

        return (Map) new ReadOnlySystemAttributesMap() {

            @Override

            @Nullable

            protected String getSystemAttribute(String attributeName) {

                try {

                    return System.getenv(attributeName);

                } catch (AccessControlException ex) {

                    if (logger.isInfoEnabled()) {

                        logger.info("Caught AccessControlException when accessing system environment variable '" + attributeName + "'; its value will be returned [null]. Reason: " + ex.getMessage());

                    }

                    return null;

                }

            }

        };

    }

}
4 AbstractRefreshableConfigApplicationContext
4-2 解析所需的占位符
resolveRequiredPlaceholders(path)
由于前面的 getEnvironment() 返回值为 ConfigurableEnvironment 接口,AbstractEnvironment 实现了该接口,所以跳转。

6 AbstractEnvironment
public String resolveRequiredPlaceholders(String text) throws IllegalArgumentException {

    // 解析所需的占位符

    return this.propertyResolver.resolveRequiredPlaceholders(text);

}
由于 this.propertyResolver 的对象为 ConfigurablePropertyResolver,其由 AbstractPropertyResolver 实现,所以跳转。

7 AbstractPropertyResolver
public String resolveRequiredPlaceholders(String text) throws IllegalArgumentException {

    if (this.strictHelper == null) {

        // 创建占位符

        this.strictHelper = createPlaceholderHelper(false);

    }

    // 解决占位符

    return doResolvePlaceholders(text, this.strictHelper);

}
7-1 创建占位符
createPlaceholderHelper(false)
private PropertyPlaceholderHelper createPlaceholderHelper(boolean ignoreUnresolvablePlaceholders) {

   	return new PropertyPlaceholderHelper(this.placeholderPrefix, this.placeholderSuffix, this.valueSeparator, ignoreUnresolvablePlaceholders);

}
8 PropertyPlaceholderHelper
public PropertyPlaceholderHelper(String placeholderPrefix, String placeholderSuffix, @Nullable String valueSeparator, boolean ignoreUnresolvablePlaceholders) {

    Assert.notNull(placeholderPrefix, "'placeholderPrefix' must not be null");

    Assert.notNull(placeholderSuffix, "'placeholderSuffix' must not be null");

    this.placeholderPrefix = placeholderPrefix;

    this.placeholderSuffix = placeholderSuffix;

    String simplePrefixForSuffix = wellKnownSimplePrefixes.get(this.placeholderSuffix);

    if (simplePrefixForSuffix != null && this.placeholderPrefix.endsWith(simplePrefixForSuffix)) {

        this.simplePrefix = simplePrefixForSuffix;

    } else {

        this.simplePrefix = this.placeholderPrefix;

    }

    this.valueSeparator = valueSeparator;

    this.ignoreUnresolvablePlaceholders = ignoreUnresolvablePlaceholders;

}
7 AbstractPropertyResolver
7-1 解决占位符
doResolvePlaceholders(text, this.strictHelper)
private String doResolvePlaceholders(String text, PropertyPlaceholderHelper helper) {

   	// 替换占位符

    return helper.replacePlaceholders(text, this::getPropertyAsRawString);

}
7-2 替换占位符
replacePlaceholders(text, this::getPropertyAsRawString)
public String replacePlaceholders(String value, PlaceholderResolver placeholderResolver) {

	Assert.notNull(value, "'value' must not be null");

   	// 解析字符串值

    return parseStringValue(value, placeholderResolver, null);

}
7-3 解析字符串值
protected String parseStringValue(String value, PlaceholderResolver placeholderResolver, @Nullable Set<String> visitedPlaceholders) {

    // 获取前缀符所在位置

    int startIndex = value.indexOf(this.placeholderPrefix);

    if (startIndex == -1) {

        return value;

    }

    StringBuilder result = new StringBuilder(value);

    while (startIndex != -1) {

        // 获取后缀符所在位置

        int endIndex = findPlaceholderEndIndex(result, startIndex);

        if (endIndex != -1) {

            // 获取前缀符和后缀符中间的值

            String placeholder = result.substring(startIndex + this.placeholderPrefix.length(), endIndex);

            String originalPlaceholder = placeholder;

            if (visitedPlaceholders == null) {

                visitedPlaceholders = new HashSet<>(4);

            }

            if (!visitedPlaceholders.add(originalPlaceholder)) {

                throw new IllegalArgumentException("Circular placeholder reference '" + originalPlaceholder + "' in property definitions");

            }

            // 递归调用,解析占位符键中包含的占位符

            placeholder = parseStringValue(placeholder, placeholderResolver, visitedPlaceholders);

            // 获取完全解析后的值

            String propVal = placeholderResolver.resolvePlaceholder(placeholder);

            if (propVal == null && this.valueSeparator != null) {

                int separatorIndex = placeholder.indexOf(this.valueSeparator);

                if (separatorIndex != -1) {

                    String actualPlaceholder = placeholder.substring(0, separatorIndex);

                    String defaultValue = placeholder.substring(separatorIndex + this.valueSeparator.length());

                    propVal = placeholderResolver.resolvePlaceholder(actualPlaceholder);

                    if (propVal == null) {

                        propVal = defaultValue;

                    }

                }

            }

            if (propVal != null) {

                // 递归调用,处理全部的占位符

                propVal = parseStringValue(propVal, placeholderResolver, visitedPlaceholders);

                result.replace(startIndex, endIndex + this.placeholderSuffix.length(), propVal);

                if (logger.isTraceEnabled()) {

                    logger.trace("Resolved placeholder '" + placeholder + "'");

                }

                startIndex = result.indexOf(this.placeholderPrefix, startIndex + propVal.length());

            }

            else if (this.ignoreUnresolvablePlaceholders) {

                // 继续处理剩余的值

                startIndex = result.indexOf(this.placeholderPrefix, endIndex + this.placeholderSuffix.length());

            }

            else {

                throw new IllegalArgumentException("Could not resolve placeholder '" +  placeholder + "'" + " in value \"" + value + "\"");

            }

            visitedPlaceholders.remove(originalPlaceholder);

        }

        else {

            startIndex = -1;

        }

    }

    return result.toString();

}
if (startIndex == -1) {

    return value;

}
由于配置文件名称没有前缀符,执行结束。
1 ClassPathXmlApplicationContext
1-1 刷新
2 AbstractApplicationContext
refresh()
public void refresh() throws BeansException, IllegalStateException {

   // 同步监视器

   synchronized (this.startupShutdownMonitor) {

      StartupStep contextRefresh = this.applicationStartup.start("spring.context.refresh");

      /*

      1 准备刷新的上下文环境。例如对系统属性或者环境变量进行准备及验证

      设置容器的启动时间

      设置关闭状态为 false

      设置活跃状态为 true

      获取 Environment 对象,并加载当前系统的属性值到 Environment 对象中并进行验证

      准备监听器和事件的集合对象,默认为空的集合

       */

      prepareRefresh();

      /*

      2 初始化 BeanFactory,并进行 XML 文件读取

      创建容器对象:DefaultListableBeanFactory

      加载 XML 配置文件的属性值到当前工厂中,最重要的就是 BeanDefinition

       */

      ConfigurableListableBeanFactory beanFactory = obtainFreshBeanFactory();

      /*

      3 对 BeanFactory 进行各种功能填充

      比如 @Qualifier 与 @Autowired 就是在这一步骤中增加的支持

       */

      prepareBeanFactory(beanFactory);

      try {

         /*

         4 定义 Bean 工厂的增强器,子类覆盖方法做额外的处理(此处我们自己一般不做任何扩展工作,但是可以查看 web 中的代码是有具体实现的)

          */

         postProcessBeanFactory(beanFactory);

         StartupStep beanPostProcess = this.applicationStartup.start("spring.context.beans.post-process");

         /*

         5 执行 Bean 工厂的增强器,激活各种 beanFactory 处理器

          */

         invokeBeanFactoryPostProcessors(beanFactory);

         /*

         6 注册 Bean 增强器。注册拦截 Bean 创建的 Bean 处理器,这里只是注册,真正的调用是在 getBean 时候

          */

         registerBeanPostProcessors(beanFactory);

         beanPostProcess.end();

         /*

         7 为上下文初始化 message 源,即不同语言的消息体,国际化处理

          */

         initMessageSource();

         /*

         8 初始化应用消息广播器,并放入 "applicationEventMulticaster" bean 中

          */

         initApplicationEventMulticaster();

         /*

         9 特定刷新。初始化其他的 bean,留给子类扩展

          */

         onRefresh();

         /*

         10 注册监听器。在所有注册的 bean 中查找 listen bean,注册到消息广播器中

          */

         registerListeners();

         /*

         11 初始化剩下的单实例(非懒加载的)

          */

         finishBeanFactoryInitialization(beanFactory);

         /*

         12 完成刷新过程,通知生命周期处理器 lifecycleProcessor 刷新过程,同时发出 ContextRefreshEvent 通知别人

          */

         finishRefresh();

      } catch (BeansException ex) {

         if (logger.isWarnEnabled()) {

            logger.warn("Exception encountered during context initialization - " + "cancelling refresh attempt: " + ex);

         }

         // 为防止bean资源占用,在异常处理中,销毁已经在前面过程中生成的单件bean

         destroyBeans();

         // 重置active标志

         cancelRefresh(ex);

         throw ex;

      } finally {

         /*

         13 清空缓存

          */

         resetCommonCaches();

         contextRefresh.end();

      }

   }

}
AbstractApplicationContext中的refresh()是整个 IOC 的核心。
后续会对其中的 13 个主要方法做详细解析。
Spring源码 04 IOC XML方式的更多相关文章
- Spring源码 05 IOC 注解方式
参考源 https://www.bilibili.com/video/BV1tR4y1F75R?spm_id_from=333.337.search-card.all.click https://ww ...
- spring源码浅析——IOC
=========================================== 原文链接: spring源码浅析--IOC 转载请注明出处! ======================= ...
- Spring源码解析-ioc容器的设计
Spring源码解析-ioc容器的设计 1 IoC容器系列的设计:BeanFactory和ApplicatioContext 在Spring容器中,主要分为两个主要的容器系列,一个是实现BeanFac ...
- spring源码分析---IOC(1)
我们都知道spring有2个最重要的概念,IOC(控制反转)和AOP(依赖注入).今天我就分享一下spring源码的IOC. IOC的定义:直观的来说,就是由spring来负责控制对象的生命周期和对象 ...
- Spring源码 06 IOC refresh方法1
参考源 https://www.bilibili.com/video/BV1tR4y1F75R?spm_id_from=333.337.search-card.all.click https://ww ...
- Spring源码 03 IOC原理
参考源 https://www.bilibili.com/video/BV1tR4y1F75R?spm_id_from=333.337.search-card.all.click https://ww ...
- spring源码学习五 - xml格式配置,如何解析
spring在注入bean的时候,可以通过bean.xml来配置,在xml文件中配置bean的属性,然后spring在refresh的时候,会去解析xml配置文件,这篇笔记,主要来记录.xml配置文件 ...
- Spring源码 07 IOC refresh方法2
参考源 https://www.bilibili.com/video/BV1tR4y1F75R?spm_id_from=333.337.search-card.all.click https://ww ...
- 从零开始学spring源码之ioc预热:bean的拓展和beanProcessor注册
上篇聊完了bean的解析,说起来做的事情很简单,把xml文件里面配置的标签全部解析到spring容器里面,但是spring做的时候,花了那么大代价去做,后面看看到底值不值得呢. 接下来看看prepar ...
随机推荐
- 聊聊C#中的Mixin
写在前面 Mixin本意是指冰淇淋表面加的那些草莓酱,葡萄干等点缀物,它们负责给冰淇淋添加风味.在OOP里面也有Mixin这个概念,和它的本意相似,OOP里面的Mixin意在为类提供一些额外功能--在 ...
- 【NOIP2017 提高组正式赛】列队 题解
题目大意 有一个 \(n\times m\) 的方阵,每次有 \((x,y)\) 离开,离开后有两个命令 向左看齐.这时第一列保持不动,所有学生向左填补空缺.这条指令之后,空位在第 \(x\) 行第 ...
- LVGL库入门教程04-样式
LVGL样式 LVGL样式概述 创建样式 在 LVGL 中,样式都是以对象的方式存在,一个对象可以描述一种样式.每个控件都可以独立添加样式,创建的样式之间互不影响. 可以使用 lv_style_t 类 ...
- CSS SandBox
引言 本篇文章主要介绍的是关于CSS Sandbox的一些事情,为什么要介绍这个呢?在我们日常的开发中,样式问题其实一直是一个比较耗时的事情,一方面我们根据 UI 稿不断的去调整,另一方面随着项目越来 ...
- 5.RDD操作综合实例
一.词频统计 A. 分步骤实现 1.准备文件 (1)下载小说或长篇新闻稿 (2)上传到hdfs上 2.读文件创建RDD 3.分词 4. ·排除大小写lower(),map() ·标点符号re.spli ...
- 深入浅出理解SVM支持向量机算法
支持向量机是Vapnik等人于1995年首先提出的,它是基于VC维理论和结构风险最小化原则的学习机器.它在解决小样本.非线性和高维模式识别问题中表现出许多特有的优势,并在一定程度上克服了" ...
- arcgis中nodata设为0及其小技巧
一.arcgis中nodata设为0 两个栅格进行叠加,有时会有一部分没有数据,即用identify点击该区域,Value为NoDat a,而不是像其他非空区域一样有值. 此时注意nodata区域要赋 ...
- 基于POM---UI测试框架
为什么会出现这个半自动化UI测试框架 我进入公司的前一个月从事的手工测试,为了提高自己的测试效率在工作时间之外写了一个半自动化的UI测试(害怕手工测试做久了,忘记自己还学过软件开发), 为什么我把它叫 ...
- 数学工具类Math
概述 java.lang.Math 类包含用于执行基本数学运算的方法,如初等指数.对数.平方根和三角函数.类似这样的工具 类,其所有方法均为静态方法,并且不会创建对象,调用起来非常简单 基本运算的方法 ...
- java.super详解
package Demo.oop.APP.Demo03; //demo3包的启动器 //此启动器用于继承 public class application { public static void m ...